run LEXUS UX250H 2019 Owners Manual
[x] Cancel search | Manufacturer: LEXUS, Model Year: 2019, Model line: UX250H, Model: LEXUS UX250H 2019Pages: 476, PDF Size: 10.51 MB
Page 13 of 476
13Pictorial index
Windshield wipers ..................................................................................................P.184
Precautions against winter season ............................................................................ P.263
To prevent freezing (windshield wiper de-icer)
*.................................................. P.281
Precautions against car wash (r ain-sensing windshield wipers)
*................. P.323
Fuel filler door ..........................................................................................................P.190
Refueling method .............................................................................................................. P .190
Fuel type/fuel tank capacity ......... ..................................................................................P.417
Tires.......................................................................................................................... ..P.345
Tire size/inflation pressure ........................................................................................... P.422
Winter tires/tire chain .................................................................................................... P.26 3
Checking/rotation/tire pressure warning system.............................................. P.345
Coping with flat tires........................................................................................................ P .399
Hood ......................................................................................................................... P. 335
Opening ........................................................................................................................ .......P.335
Engine oil ..................................................................................................................... .......... P.418
Coping with overheat ...................................................................................................... P.410
Warning messages ..........................................................................................................P.395
Headlights ................................................................................................................. P.17 7
Parking lights/daytime running lights............................................................... P.177
Fog lights
*..................................................................................................................P.183
Cornering lights
*..................................................................................................... P.179
Turn signal lights ....................................................................................................... P.171
Tail lights/stop lights............................................................................................... P.177
Stop lights
License plate lights ................................................................................................. P.177
Back-up lights
Shifting the shift lever to R ...............................................................................................P.1 67
Light bulbs of the exterior lights for driving
(Replacing method: P.374, Watts: P.422)
D
E
F
G
H
I
J
K
L
M
N
O
P
Page 16 of 476
16Pictorial index
When the warning messages are displayed..........................................................P.395
Parking brake switch ............................................................................................. P.172
Applying/releasing ............................................................................................................ P.172
Precautions against winter season ................... ......................................................... P.264
Warning buzzer/message................................................................................ P.387, 395
Turn signal lever ....................................................................................................... P.171
Headlight switch...................................................................................................... P.177
Headlights/parking lights/tail lights/license plate lights/
daytime running lights ....................................................................................................... P. 177
Automatic High Beam ..................................................................................................... P.180
Fog lights
*1............................................................................................................................ P.1 83
Windshield wiper and washer switch ................................................................P.184
Rear window wiper and washer switch ........................................................... P.188
Usage.......................................................................................................................... ..P.184, 188
Adding washer fluid .......................................................................................................... P. 341
Headlight cleaners
*1......................................................................................................... P.184
Warning messages ..........................................................................................................P.395
Emergency flasher switch ...................................................................................P.378
Hood lock release lever ...................................................................................... P.335
Tilt and telescopic steering control switch
*1................................................... P.139
Adjustment ..................................................................................................................... ...... P.139
Driving position memory
*1............................................................................................. P.133
Tilt and telescopic steeri ng lock release lever
*1............................................ P.139
Adjustment ..................................................................................................................... ...... P.139
Air conditioning system ....................................................................................... P.276
Usage.......................................................................................................................... ........... P.276
Rear window defogger....................................................................................................P.277
Audio system
*2
*1
: If equipped
*2: Refer to “NAVIGATION AND MULTIMEDIA SYSTEM OWNER’S MANUAL”.
E
F
G
H
I
J
K
L
M
Page 49 of 476
491-2. Child safety
1
For safety and security
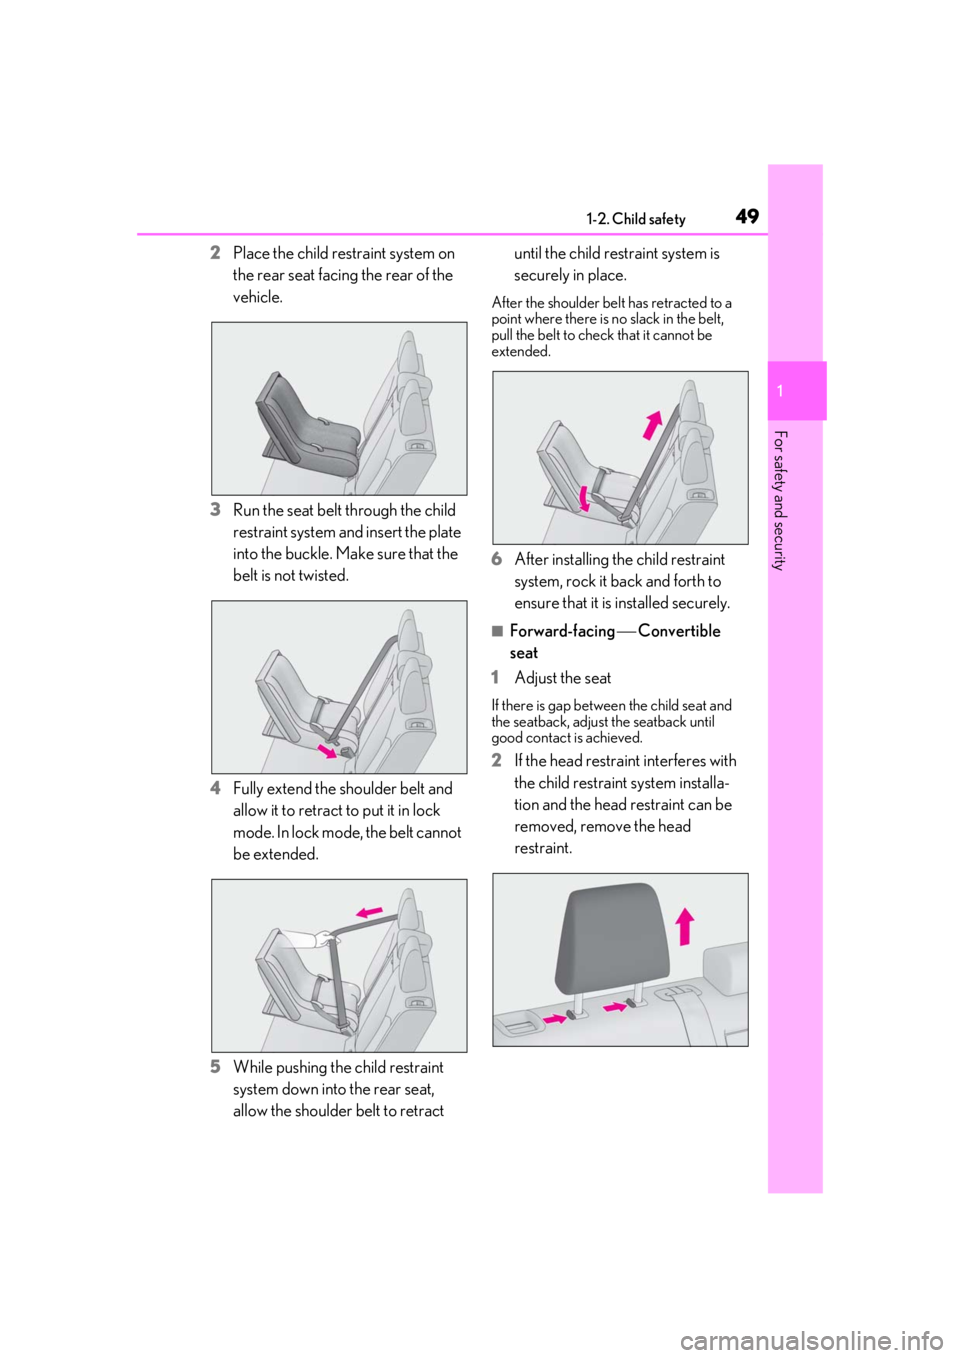
2Place the child restraint system on
the rear seat facing the rear of the
vehicle.
3 Run the seat belt through the child
restraint system and insert the plate
into the buckle. Make sure that the
belt is not twisted.
4 Fully extend the shoulder belt and
allow it to retract to put it in lock
mode. In lock mode, the belt cannot
be extended.
5 While pushing the child restraint
system down into the rear seat,
allow the shoulder belt to retract until the child restraint system is
securely in place.
After the shoulder belt has retracted to a
point where there is no slack in the belt,
pull the belt to check that it cannot be
extended.
6
After installing the child restraint
system, rock it back and forth to
ensure that it is installed securely.
■Forward-facing Convertible
seat
1 Adjust the seat
If there is gap between the child seat and
the seatback, adjust the seatback until
good contact is achieved.
2If the head restraint interferes with
the child restraint system installa-
tion and the head restraint can be
removed, remove the head
restraint.
Page 50 of 476
501-2. Child safety
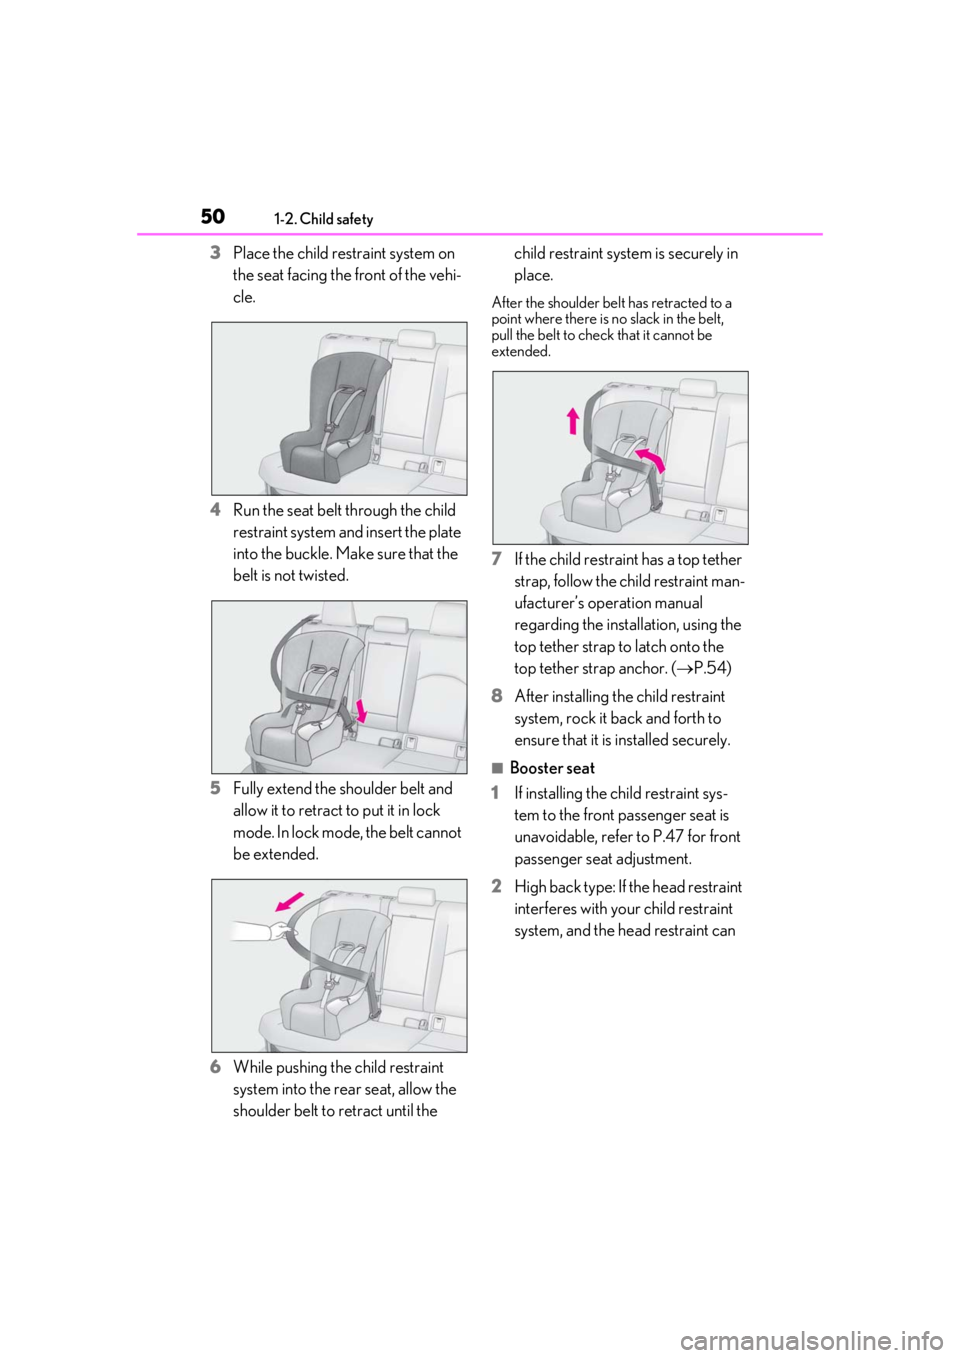
3Place the child restraint system on
the seat facing the front of the vehi-
cle.
4 Run the seat belt through the child
restraint system and insert the plate
into the buckle. Make sure that the
belt is not twisted.
5 Fully extend the shoulder belt and
allow it to retract to put it in lock
mode. In lock mode, the belt cannot
be extended.
6 While pushing the child restraint
system into the rear seat, allow the
shoulder belt to retract until the child restraint system is securely in
place.
After the shoulder belt has retracted to a
point where there is no slack in the belt,
pull the belt to check that it cannot be
extended.
7
If the child restraint has a top tether
strap, follow the child restraint man-
ufacturer’s operation manual
regarding the installation, using the
top tether strap to latch onto the
top tether strap anchor. ( P.54)
8 After installing the child restraint
system, rock it back and forth to
ensure that it is installed securely.
■Booster seat
1 If installing the child restraint sys-
tem to the front passenger seat is
unavoidable, refer to P.47 for front
passenger seat adjustment.
2 High back type: If the head restraint
interferes with your child restraint
system, and the head restraint can
Page 66 of 476
661-4. Hybrid system
*: AWD models only
■Running out of fuel
When the vehicle has run out of fuel and the
hybrid system cannot be started, refuel the
vehicle with at least enough gasoline to
make the low fuel level warning light
( P.390) go off. If th ere is only a small
amount of fuel, the hybrid system may not
be able to start. (The standard amount of
fuel is about 1.8 gal. [7.0 L, 1.5 Imp.gal.],
when the vehicle is on a level surface. This
value may vary when the vehicle is on a
slope. Add extra fuel when the vehicle is
inclined.)
■Electromagnetic waves
●High voltage parts and cables on hybrid
vehicles incorporate electromagnetic
shielding, and ther efore emit approxi-
mately the same amount of electromag-
netic waves as conventional gasoline
powered vehicles or home electronic
appliances.
●Your vehicle may cause sound interfer-
ence in some third party-produced radio
parts.
■Hybrid battery (traction battery)
The hybrid battery (traction battery) has a
limited service life. The lifespan of the
hybrid battery (traction battery) can
change in accordance with driving style and
driving conditions.
WARNING
■High voltage precautions
This vehicle has high voltage DC and AC
systems as well as a 12-volt system. DC
and AC high voltage is very dangerous
and can cause severe burns and electric
shock that may result in death or serious
injury.
●Never touch, disassemble, remove or
replace the high voltage parts, cables
or their connectors.
●The hybrid system will become hot
after starting as the system uses high
voltage. Be careful of both the high
voltage and the high temperature, and
always obey the warning labels
attached to the vehicle.
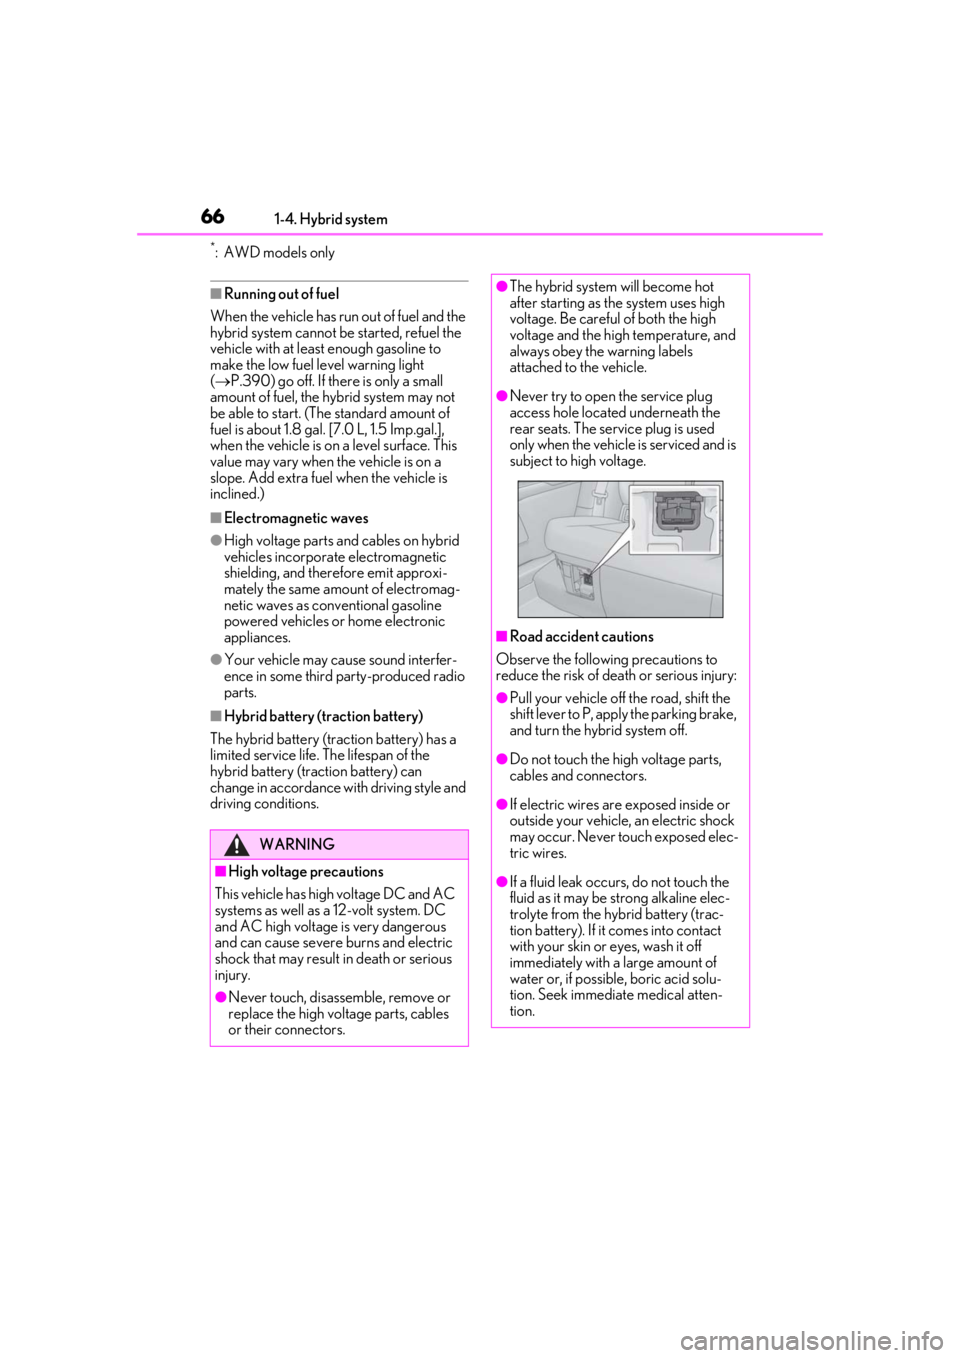
●Never try to open the service plug
access hole located underneath the
rear seats. The service plug is used
only when the vehicle is serviced and is
subject to high voltage.
■Road accident cautions
Observe the following precautions to
reduce the risk of death or serious injury:
●Pull your vehicle off the road, shift the
shift lever to P, apply the parking brake,
and turn the hybrid system off.
●Do not touch the high voltage parts,
cables and connectors.
●If electric wires are exposed inside or
outside your vehicle, an electric shock
may occur. Never touch exposed elec-
tric wires.
●If a fluid leak occurs, do not touch the
fluid as it may be st rong alkaline elec-
trolyte from the hybrid battery (trac-
tion battery). If it comes into contact
with your skin or eyes, wash it off
immediately with a large amount of
water or, if possible, boric acid solu-
tion. Seek immediate medical atten-
tion.
Page 155 of 476
1554-1. Before driving
4
Driving
WARNING
●Do not shift the shift lever to a driving
position while the vehicle is moving
backward.
Doing so can damage the hybrid trans-
mission and may result in a loss of vehi-
cle control.
●Shifting the shift lever to N while the
vehicle is moving will disengage the
hybrid system. Engine braking is not
available with the hybrid system disen-
gaged.
●Be careful not to shift the shift lever
with the accelerator pedal depressed.
Shifting the shift lever to any position
other than P or N may lead to unex-
pected rapid acceleration of the vehi-
cle that may cause an accident and
result in death or serious injury.
■If you hear a squealing or scraping
noise (brake pad wear limit indica-
tors)
Have the brake pads checked and
replaced by your Lexus dealer as soon as
possible. Rotor damage may result if the
pads are not replaced when needed.
It is dangerous to drive the vehicle when
the wear limits of the brake pads and/or
those of the brake discs are exceeded.
■When the vehicle is stopped
●Do not depress the accelerator pedal
unnecessarily.
If the shift lever is in any position other
than P or N, the vehicle may acceler-
ate suddenly and unexpectedly, caus-
ing an accident.
●In order to prevent accidents due to
the vehicle rolling away, always keep
depressing the brake pedal while
stopped with the “READY” indicator is
illuminated, and apply the parking
brake as necessary.
●If the vehicle is stopped on an incline,
in order to prevent accidents caused
by the vehicle rolling forward or back-
ward, always depress the brake pedal
and securely apply the parking brake
as needed.
●Avoid revving or racing the engine.
Running the engine at high speed
while the vehicle is stopped may cause
the exhaust system to overheat, which
could result in a fire if combustible
material is nearby.
■When the vehicle is parked
●Do not leave glasses, cigarette lighters,
spray cans, or soft drink cans in the
vehicle when it is in the sun.
Doing so may result in the following:
• Gas may leak from a cigarette lighter or spray can, and may lead to a fire.
• The temperature inside the vehicle may cause the plastic lenses and plas-
tic material of glasses to deform or
crack.
• Soft drink cans may fracture, causing the contents to spray over the interior
of the vehicle, and may also cause a
short circuit in the vehicle’s electrical
components.
●Do not leave cigarette lighters in the
vehicle. If a cigare tte lighter is in a
place such as the glove box or on the
floor, it may be lit accidentally when
luggage is loaded or the seat is
adjusted, causing a fire.
●Do not attach adhesive discs to the
windshield or windows. Do not place
containers such as air fresheners on
the instrument panel or dashboard.
Adhesive discs or containers may act
as lenses, causing a fire in the vehicle.
●Do not leave a door or window open if
the curved glass is coated with a met-
allized film such as a silver-colored
one. Reflected sunlight may cause the
glass to act as a lens, causing a fire.
Page 164 of 476
1644-2. Driving procedures
2Set the parking brake (P.172),
and shift the shift lever to P
( P.167).
3
Press the power switch.
4
Release the brake pedal and check
that “ACCESSORY” or “IGNI-
TION ON” is not shown on the
meter.
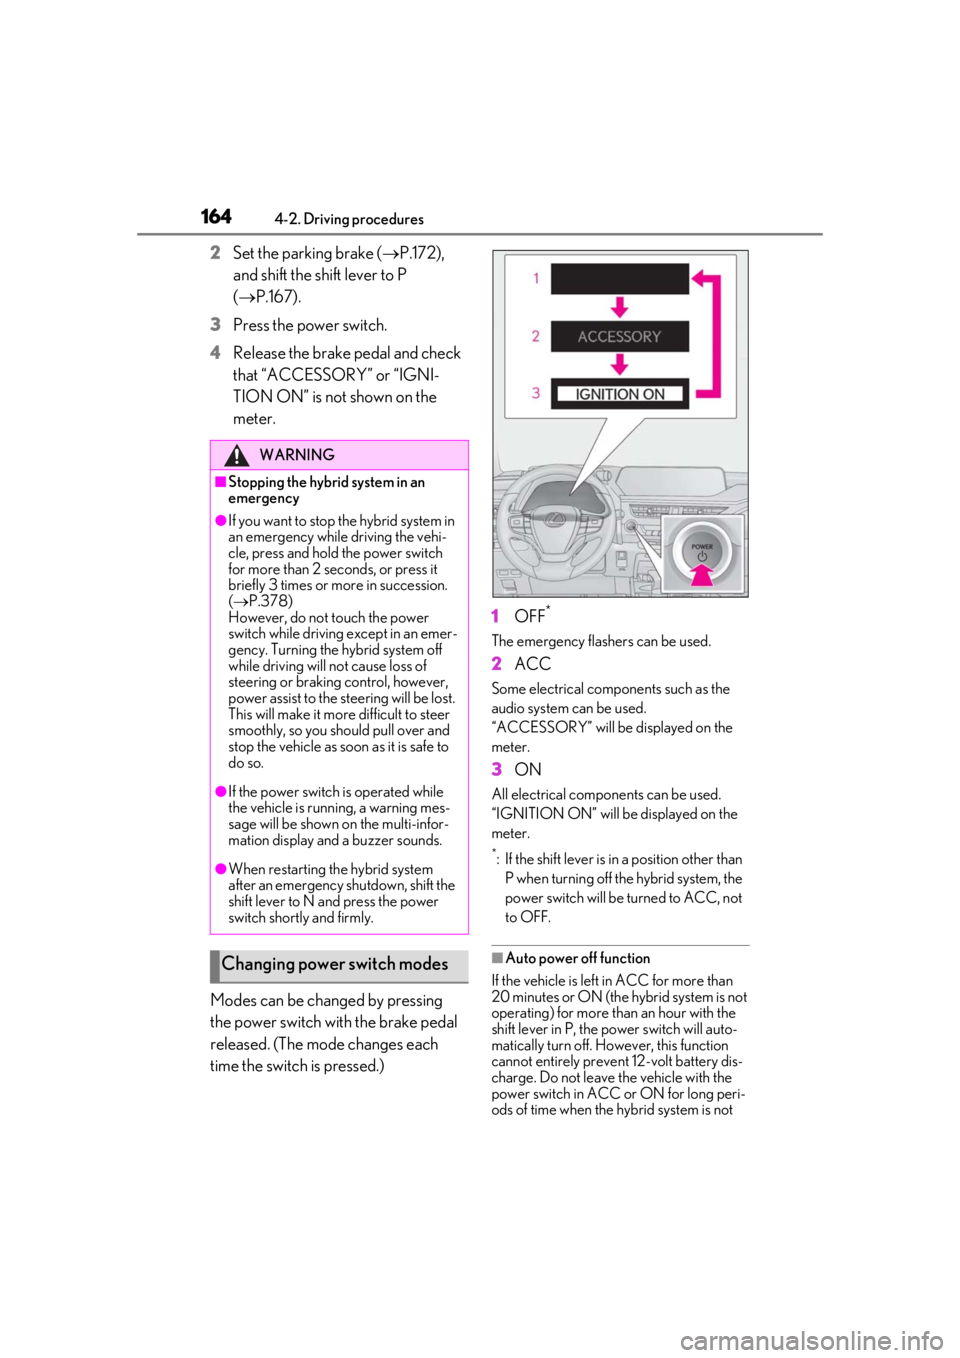
Modes can be changed by pressing
the power switch with the brake pedal
released. (The mode changes each
time the switch is pressed.) 1
OFF*
The emergency flashers can be used.
2ACC
Some electrical components such as the
audio system can be used.
“ACCESSORY” will be displayed on the
meter.
3ON
All electrical components can be used.
“IGNITION ON” will be displayed on the
meter.
*: If the shift lever is in a position other than
P when turning off the hybrid system, the
power switch will be turned to ACC, not
to OFF.
■Auto power off function
If the vehicle is left in ACC for more than
20 minutes or ON (the hybrid system is not
operating) for more than an hour with the
shift lever in P, the power switch will auto-
matically turn off. However, this function
cannot entirely prevent 12-volt battery dis-
charge. Do not leave the vehicle with the
power switch in ACC or ON for long peri-
ods of time when the hybrid system is not
WARNING
■Stopping the hybrid system in an
emergency
●If you want to stop the hybrid system in
an emergency while driving the vehi-
cle, press and hold the power switch
for more than 2 seconds, or press it
briefly 3 times or more in succession.
( P.378)
However, do not touch the power
switch while driving except in an emer-
gency. Turning the hybrid system off
while driving will not cause loss of
steering or braking control, however,
power assist to the steering will be lost.
This will make it more difficult to steer
smoothly, so you should pull over and
stop the vehicle as soon as it is safe to
do so.
●If the power switch is operated while
the vehicle is running, a warning mes-
sage will be shown on the multi-infor-
mation display and a buzzer sounds.
●When restarting the hybrid system
after an emergency shutdown, shift the
shift lever to N and press the power
switch shortly and firmly.
Changing power switch modes
Page 168 of 476
1684-2. Driving procedures
( P.255)
■Restraining sudden start (Drive-Start
Control)
P.153
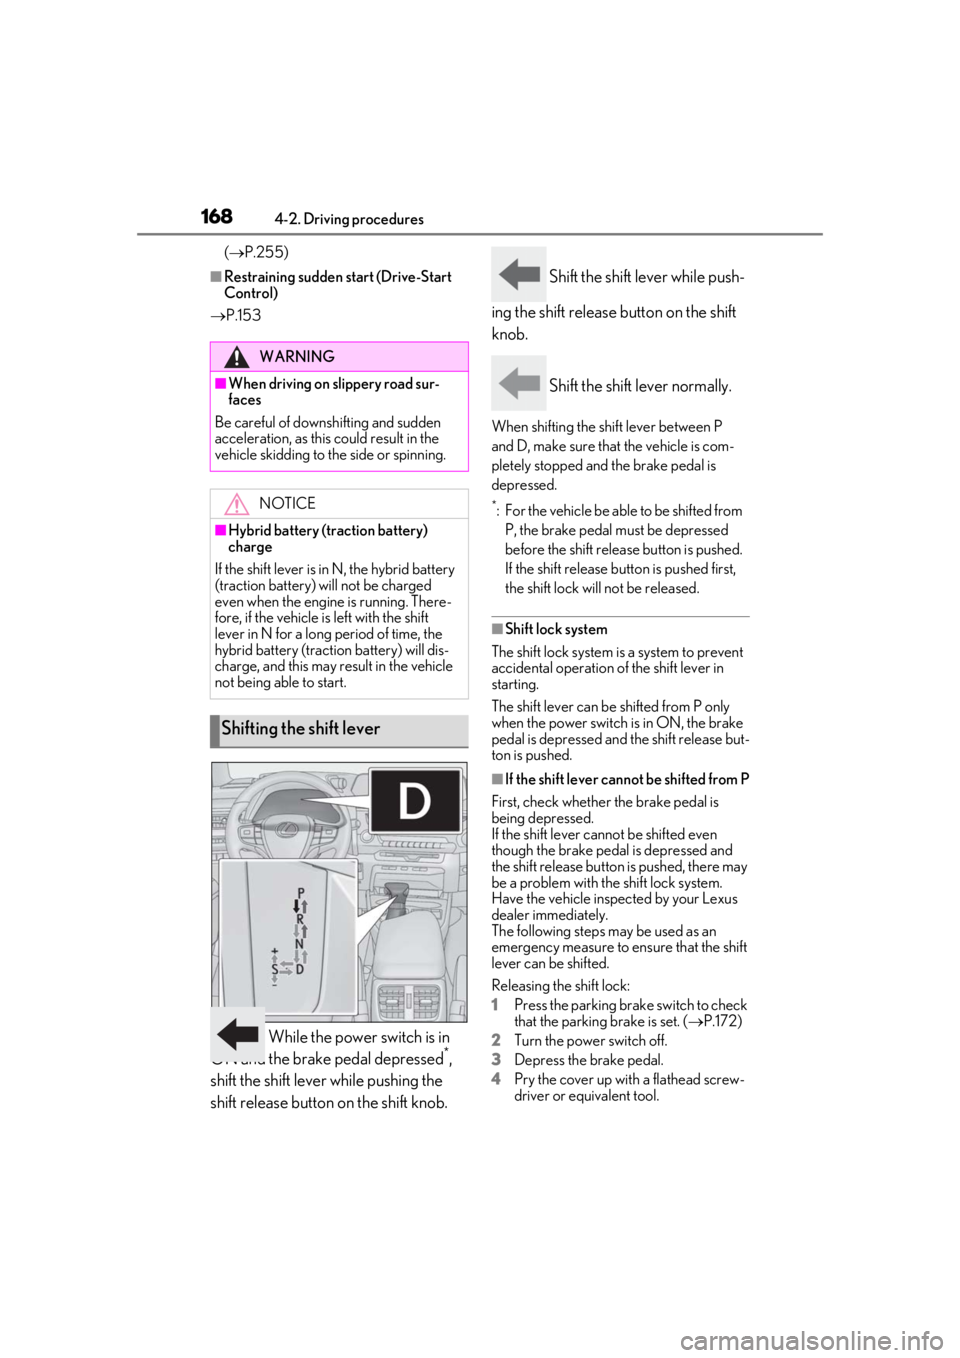
While the power switch is in
ON and the brake pedal depressed*,
shift the shift lever while pushing the
shift release button on the shift knob. Shift the shift lever while push-
ing the shift release button on the shift
knob.
Shift the shift lever normally.
When shifting the shift lever between P
and D, make sure that the vehicle is com-
pletely stopped and the brake pedal is
depressed.
*: For the vehicle be able to be shifted from P, the brake pedal must be depressed
before the shift releas e button is pushed.
If the shift release button is pushed first,
the shift lock will not be released.
■Shift lock system
The shift lock system is a system to prevent
accidental operation of the shift lever in
starting.
The shift lever can be shifted from P only
when the power switch is in ON, the brake
pedal is depressed and the shift release but-
ton is pushed.
■If the shift lever cannot be shifted from P
First, check whether the brake pedal is
being depressed.
If the shift lever cannot be shifted even
though the brake pedal is depressed and
the shift release button is pushed, there may
be a problem with th e shift lock system.
Have the vehicle inspected by your Lexus
dealer immediately.
The following steps may be used as an
emergency measure to ensure that the shift
lever can be shifted.
Releasing the shift lock:
1
Press the parking brake switch to check
that the parking brake is set. ( P.172)
2
Turn the power switch off.
3
Depress the brake pedal.
4
Pry the cover up with a flathead screw-
driver or equivalent tool.
WARNING
■When driving on slippery road sur-
faces
Be careful of downshifting and sudden
acceleration, as this could result in the
vehicle skidding to the side or spinning.
NOTICE
■Hybrid battery (traction battery)
charge
If the shift lever is in N, the hybrid battery
(traction battery) will not be charged
even when the engine is running. There-
fore, if the vehicle is left with the shift
lever in N for a long period of time, the
hybrid battery (traction battery) will dis-
charge, and this may re sult in the vehicle
not being able to start.
Shifting the shift lever
Page 177 of 476
1774-3. Operating the lights and wipers
4
Driving
4-3.Operating the lights and wipers
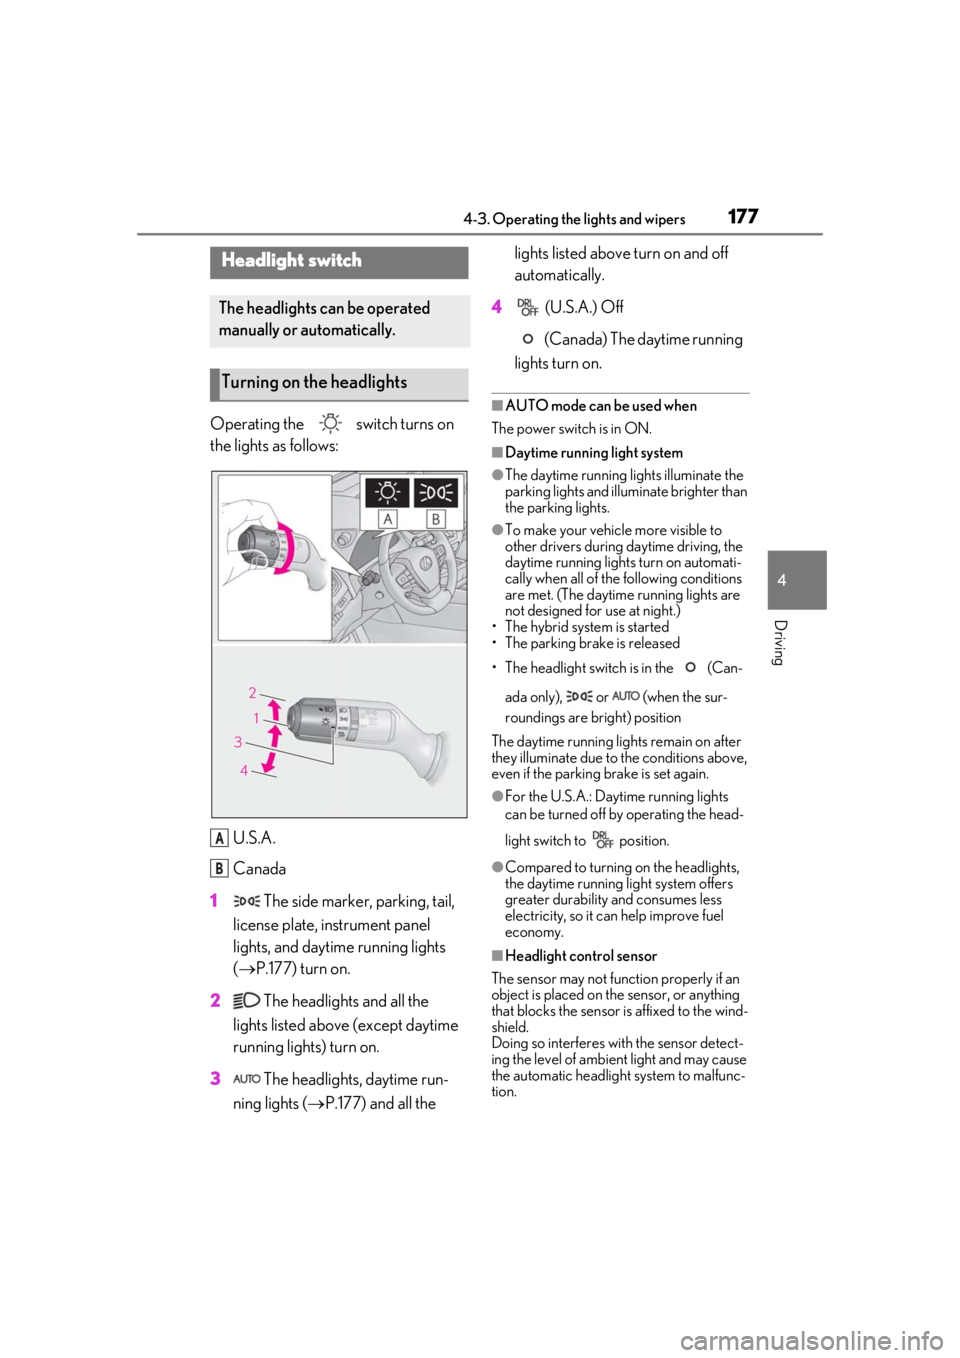
Operating the switch turns on
the lights as follows:U.S.A.
Canada
1 The side marker, parking, tail,
license plate, instrument panel
lights, and daytime running lights
( P.177) turn on.
2 The headlights and all the
lights listed above (except daytime
running lights) turn on.
3 The headlights, daytime run-
ning lights ( P.177) and all the lights listed above turn on and off
automatically.
4 (U.S.A.) Off
(Canada) The daytime running
lights turn on.
■AUTO mode can be used when
The power switch is in ON.
■Daytime running light system
●The daytime running lights illuminate the
parking lights and illuminate brighter than
the parking lights.
●To make your vehicle more visible to
other drivers during daytime driving, the
daytime running lights turn on automati-
cally when all of the following conditions
are met. (The daytime running lights are
not designed for use at night.)
• The hybrid system is started
• The parking brake is released
• The headlight switch is in the (Can-
ada only), or (when the sur-
roundings are bright) position
The daytime running lights remain on after
they illuminate due to the conditions above,
even if the parking brake is set again.
●For the U.S.A.: Daytime running lights
can be turned off by operating the head-
light switch to position.
●Compared to turning on the headlights,
the daytime running light system offers
greater durability and consumes less
electricity, so it can help improve fuel
economy.
■Headlight control sensor
The sensor may not function properly if an
object is placed on the sensor, or anything
that blocks the sensor is affixed to the wind-
shield.
Doing so interferes with the sensor detect-
ing the level of ambien t light and may cause
the automatic headlight system to malfunc-
tion.
Headlight switch
The headlights can be operated
manually or automatically.
Turning on the headlights
A
B
Page 207 of 476
2074-5. Using the driving support systems
4
Driving
WARNING
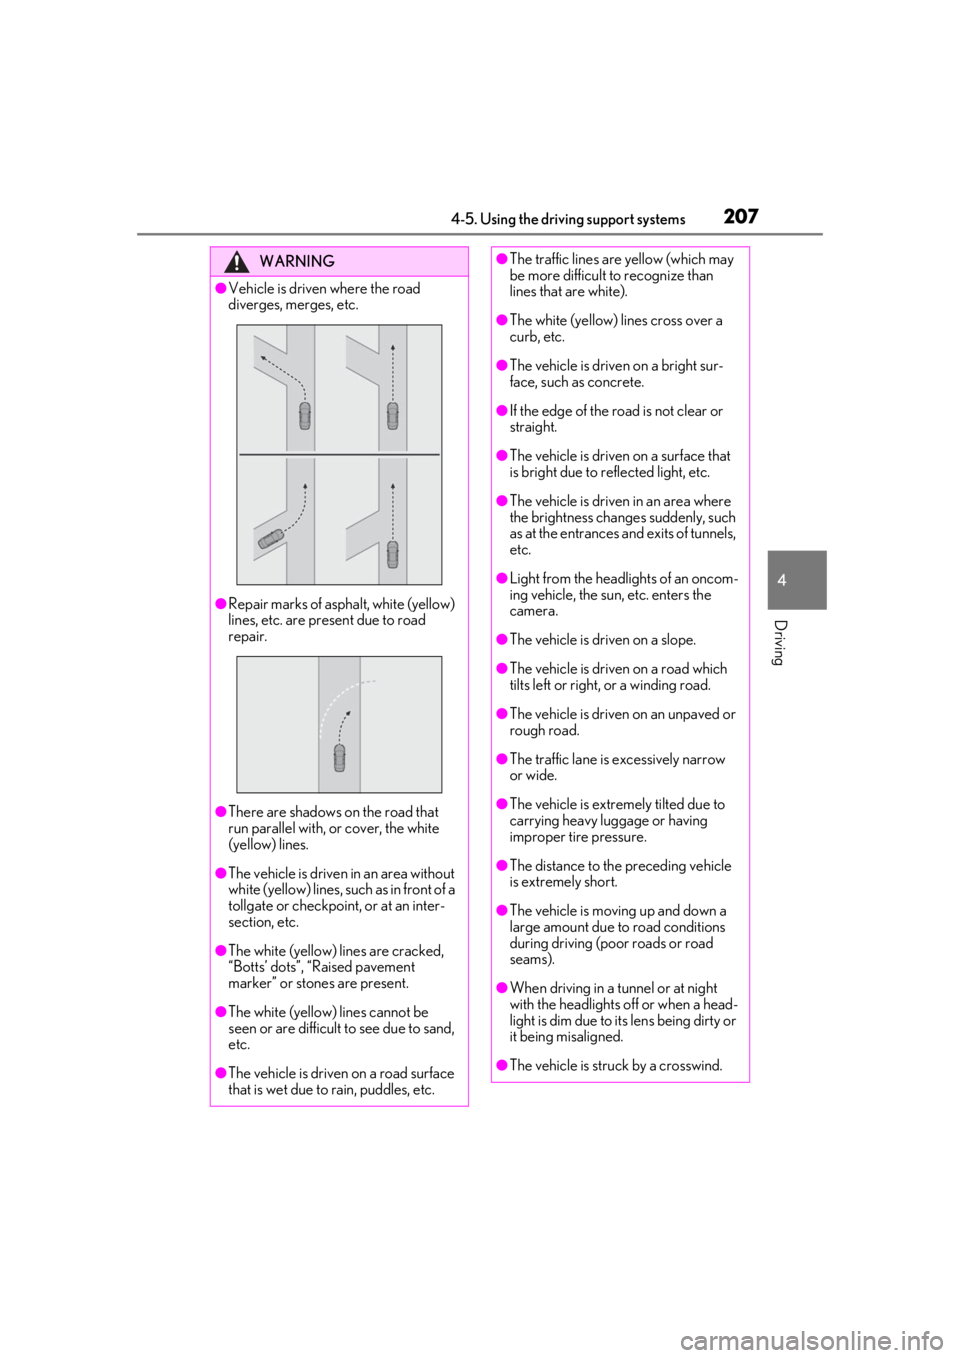
●Vehicle is driven where the road
diverges, merges, etc.
●Repair marks of asphalt, white (yellow)
lines, etc. are present due to road
repair.
●There are shadows on the road that
run parallel with, or cover, the white
(yellow) lines.
●The vehicle is driven in an area without
white (yellow) lines, su ch as in front of a
tollgate or checkpoint, or at an inter-
section, etc.
●The white (yellow) lines are cracked,
“Botts’ dots”, “Raised pavement
marker” or stones are present.
●The white (yellow) lines cannot be
seen or are difficult to see due to sand,
etc.
●The vehicle is driven on a road surface
that is wet due to rain, puddles, etc.
●The traffic lines are yellow (which may
be more difficult to recognize than
lines that are white).
●The white (yellow) lines cross over a
curb, etc.
●The vehicle is driven on a bright sur-
face, such as concrete.
●If the edge of the road is not clear or
straight.
●The vehicle is driven on a surface that
is bright due to reflected light, etc.
●The vehicle is driven in an area where
the brightness change s suddenly, such
as at the entrances and exits of tunnels,
etc.
●Light from the headlights of an oncom-
ing vehicle, the sun, etc. enters the
camera.
●The vehicle is driven on a slope.
●The vehicle is driven on a road which
tilts left or right, or a winding road.
●The vehicle is driven on an unpaved or
rough road.
●The traffic lane is excessively narrow
or wide.
●The vehicle is extremely tilted due to
carrying heavy luggage or having
improper tire pressure.
●The distance to the preceding vehicle
is extremely short.
●The vehicle is moving up and down a
large amount due to road conditions
during driving (poor roads or road
seams).
●When driving in a tunnel or at night
with the headlights off or when a head-
light is dim due to its lens being dirty or
it being misaligned.
●The vehicle is struck by a crosswind.