DRIVER CONTROLS LINCOLN AVIATOR 2003 Owners Manual
[x] Cancel search | Manufacturer: LINCOLN, Model Year: 2003, Model line: AVIATOR, Model: LINCOLN AVIATOR 2003Pages: 288, PDF Size: 3.32 MB
Page 1 of 288
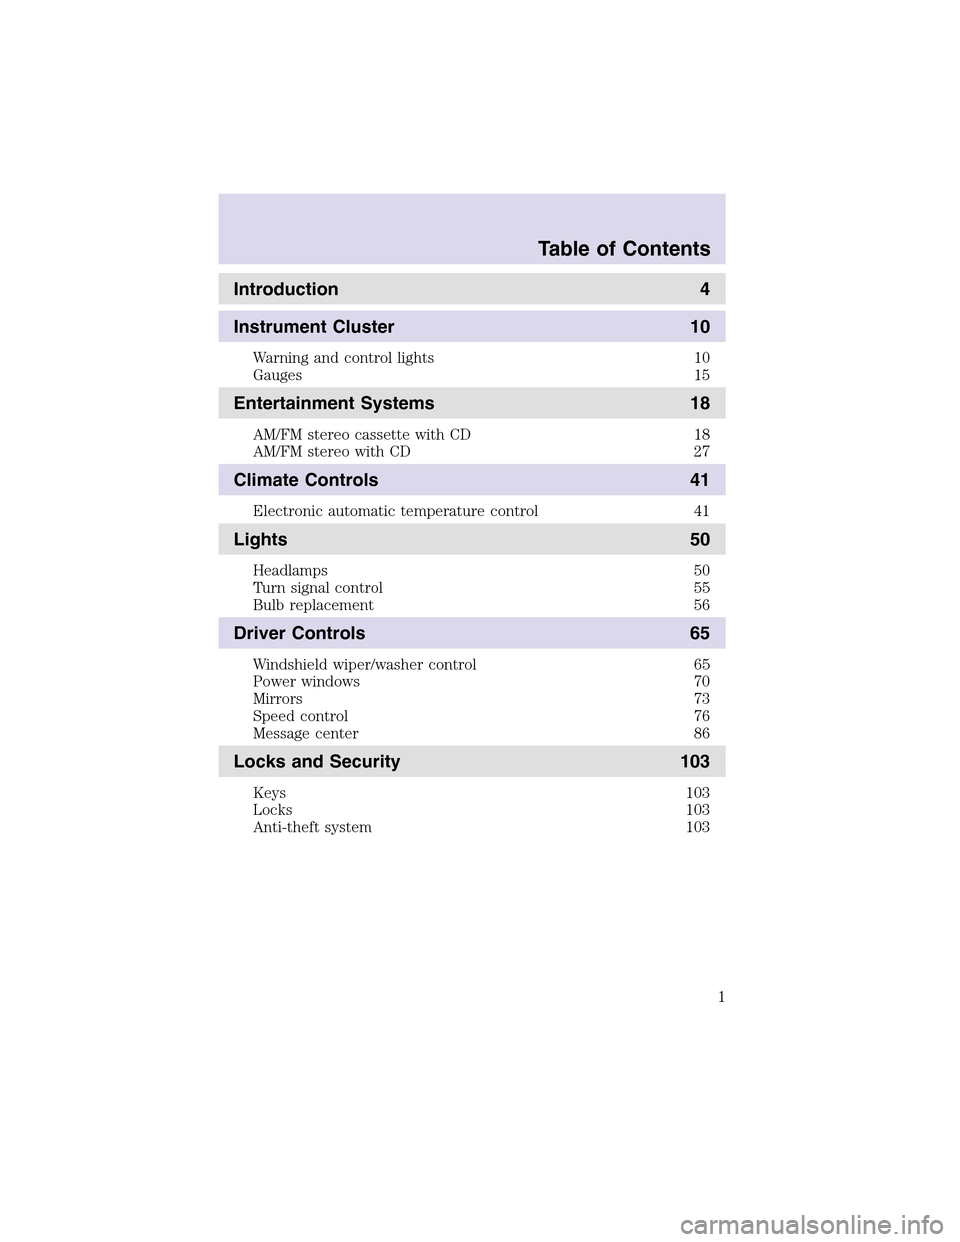
Introduction 4
Instrument Cluster 10
Warning and control lights 10
Gauges 15
Entertainment Systems 18
AM/FM stereo cassette with CD 18
AM/FM stereo with CD 27
Climate Controls 41
Electronic automatic temperature control 41
Lights 50
Headlamps 50
Turn signal control 55
Bulb replacement 56
Driver Controls 65
Windshield wiper/washer control 65
Power windows 70
Mirrors 73
Speed control 76
Message center 86
Locks and Security 103
Keys 103
Locks 103
Anti-theft system 103
Table of Contents
1
Page 6 of 288
for Emissions Defect and Emissions Performance Warranties. For a
detailed description of what is covered and what is not covered, refer to
theWarranty Guidethat is provided to you along with your Owner’s
Guide.
Data Recording
Computers in your vehicle are capable of recording detailed data
potentially including but not limited to information such as:
•the use of restraint systems including seat belts by the driver and
passengers,
•information about the performance of various systems and modules in
the vehicle, and
•information related to engine, throttle, steering, brake or other system
status.
Any of this information could potentially including information regarding
how the driver operates the vehicle potentially including but not limited
to information regarding vehicle speed, brake or accelerator application
or steering input. This information may be stored during regular
operation or in a crash or near crash event.
This stored information may be read out and used by:
•Ford Motor Company.
•service and repair facilities.
•law enforcement or government agencies.
•others who may assert a right or obtain your consent to know such
information.
Special instructions
For your added safety, your vehicle is fitted with sophisticated electronic
controls.
Please read the sectionAir bagin theSeating and safety
restraintschapter. Failure to follow the specific warnings and
instructions could result in personal injury.
Front seat mounted rear facing child or infant seats should
NEVERbe used in front of a passenger side air bag unless the
air bag can be and is turned OFF.
Introduction
6
Page 27 of 288
Soft mute
When the vehicle is in reverse, and an obstacle is detected by Rear Park
Assist, the radio volume is reduced to a level that allows the warning to
be heard. After the obstacle warning is gone, the radio will return to the
previously set volume level.
Setting the clock
Your vehicle is equipped with a separate instrument panel mounted
clock. Please refer toClockin theDriver controls chapterfor
instructions on setting the clock.
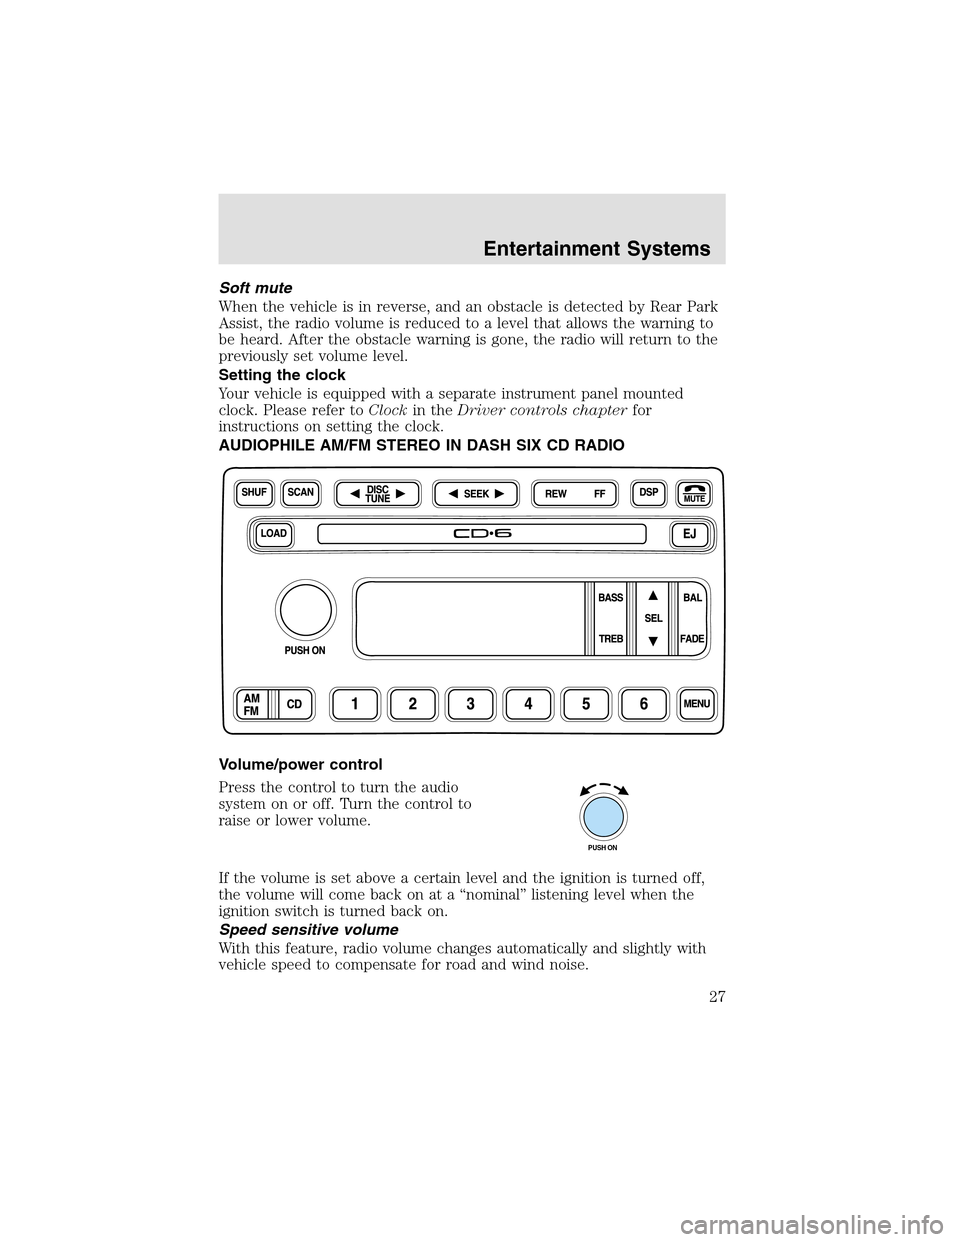
AUDIOPHILE AM/FM STEREO IN DASH SIX CD RADIO
Volume/power control
Press the control to turn the audio
system on or off. Turn the control to
raise or lower volume.
If the volume is set above a certain level and the ignition is turned off,
the volume will come back on at a “nominal” listening level when the
ignition switch is turned back on.
Speed sensitive volume
With this feature, radio volume changes automatically and slightly with
vehicle speed to compensate for road and wind noise.
PUSH ON
Entertainment Systems
27
Page 38 of 288
Soft mute
When the vehicle is in reverse, and an obstacle is detected by Rear Park
Assist, the radio volume is reduced to a level that allows the warning to
be heard. After the obstacle warning is gone, the radio will return to the
previously set volume level.
Setting the clock
Your vehicle is equipped with a separate instrument panel mounted
clock. Please refer toClockin theDriver controls chapterfor
instructions on setting the clock.
Digital signal processing
The digital signal processing (DSP) feature allows you to change the
signal mode to suit your listening tastes.
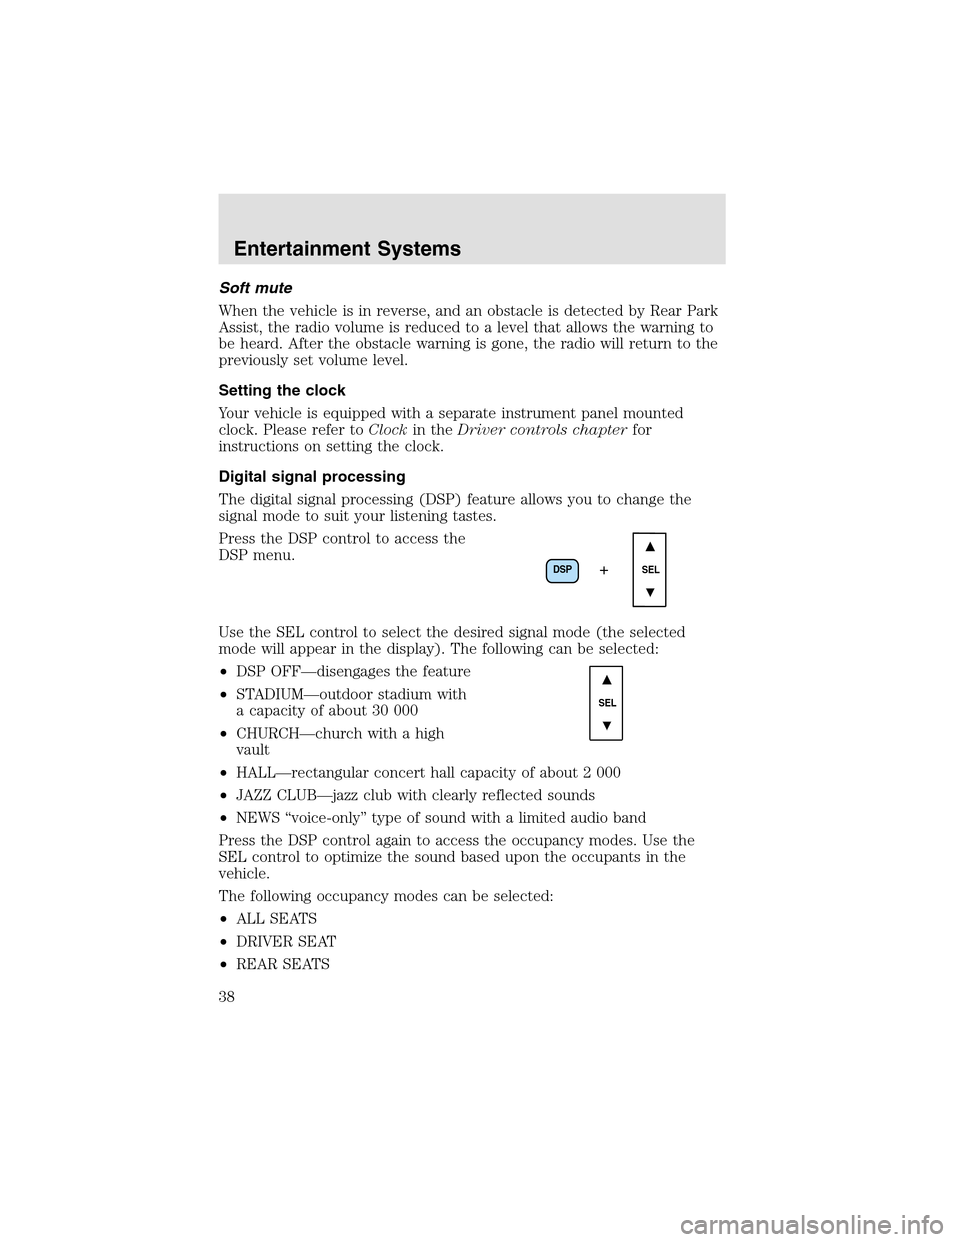
Press the DSP control to access the
DSP menu.
Use the SEL control to select the desired signal mode (the selected
mode will appear in the display). The following can be selected:
•DSP OFF—disengages the feature
•STADIUM—outdoor stadium with
a capacity of about 30 000
•CHURCH—church with a high
vault
•HALL—rectangular concert hall capacity of about 2 000
•JAZZ CLUB—jazz club with clearly reflected sounds
•NEWS “voice-only” type of sound with a limited audio band
Press the DSP control again to access the occupancy modes. Use the
SEL control to optimize the sound based upon the occupants in the
vehicle.
The following occupancy modes can be selected:
•ALL SEATS
•DRIVER SEAT
•REAR SEATS
DSP
SEL+
SEL
Entertainment Systems
38
Page 41 of 288
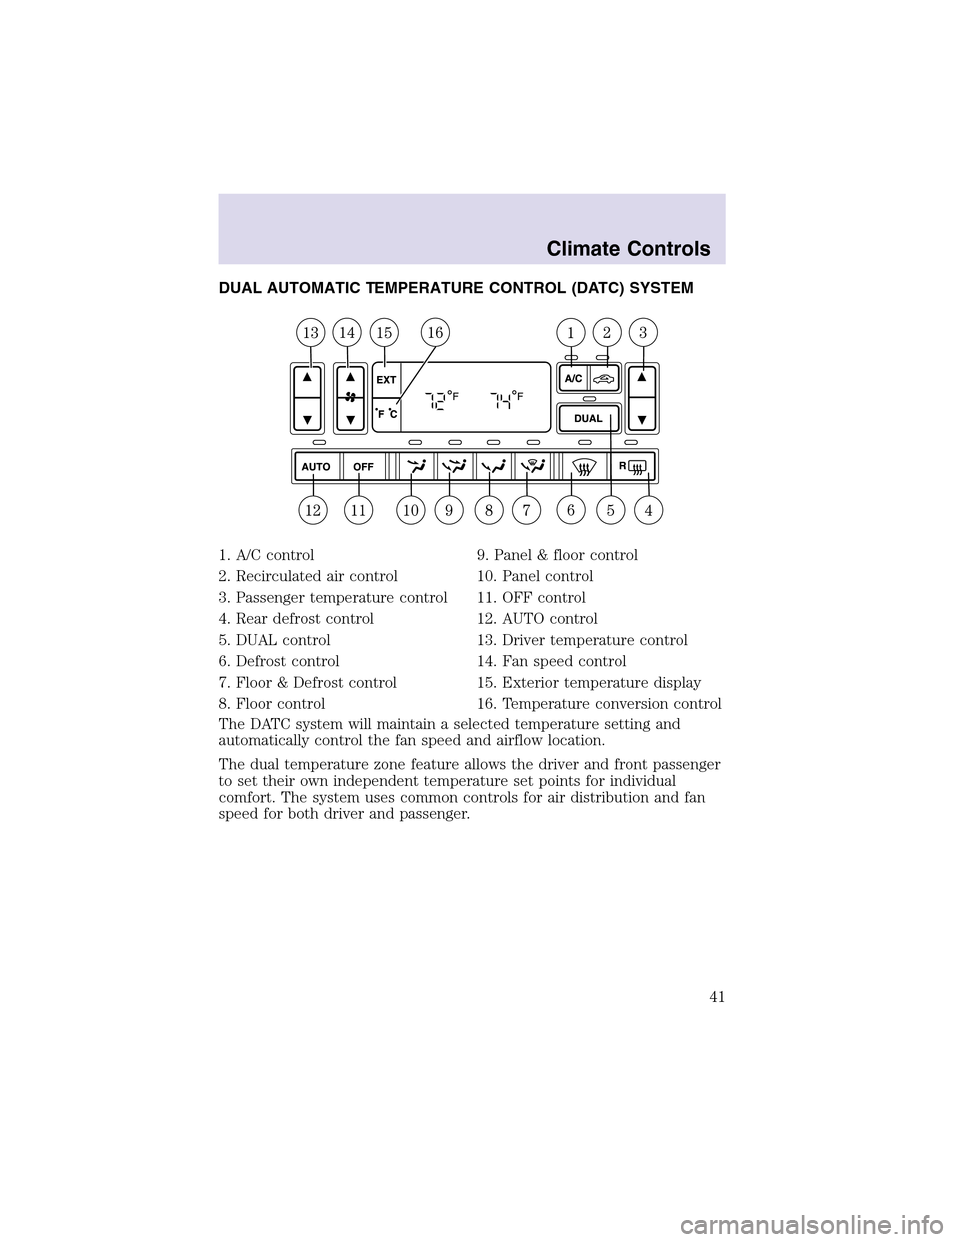
DUAL AUTOMATIC TEMPERATURE CONTROL (DATC) SYSTEM
1. A/C control
2. Recirculated air control
3. Passenger temperature control
4. Rear defrost control
5. DUAL control
6. Defrost control
7. Floor & Defrost control
8. Floor control9. Panel & floor control
10. Panel control
11. OFF control
12. AUTO control
13. Driver temperature control
14. Fan speed control
15. Exterior temperature display
16. Temperature conversion control
The DATC system will maintain a selected temperature setting and
automatically control the fan speed and airflow location.
The dual temperature zone feature allows the driver and front passenger
to set their own independent temperature set points for individual
comfort. The system uses common controls for air distribution and fan
speed for both driver and passenger.
Climate Controls
41
Page 42 of 288
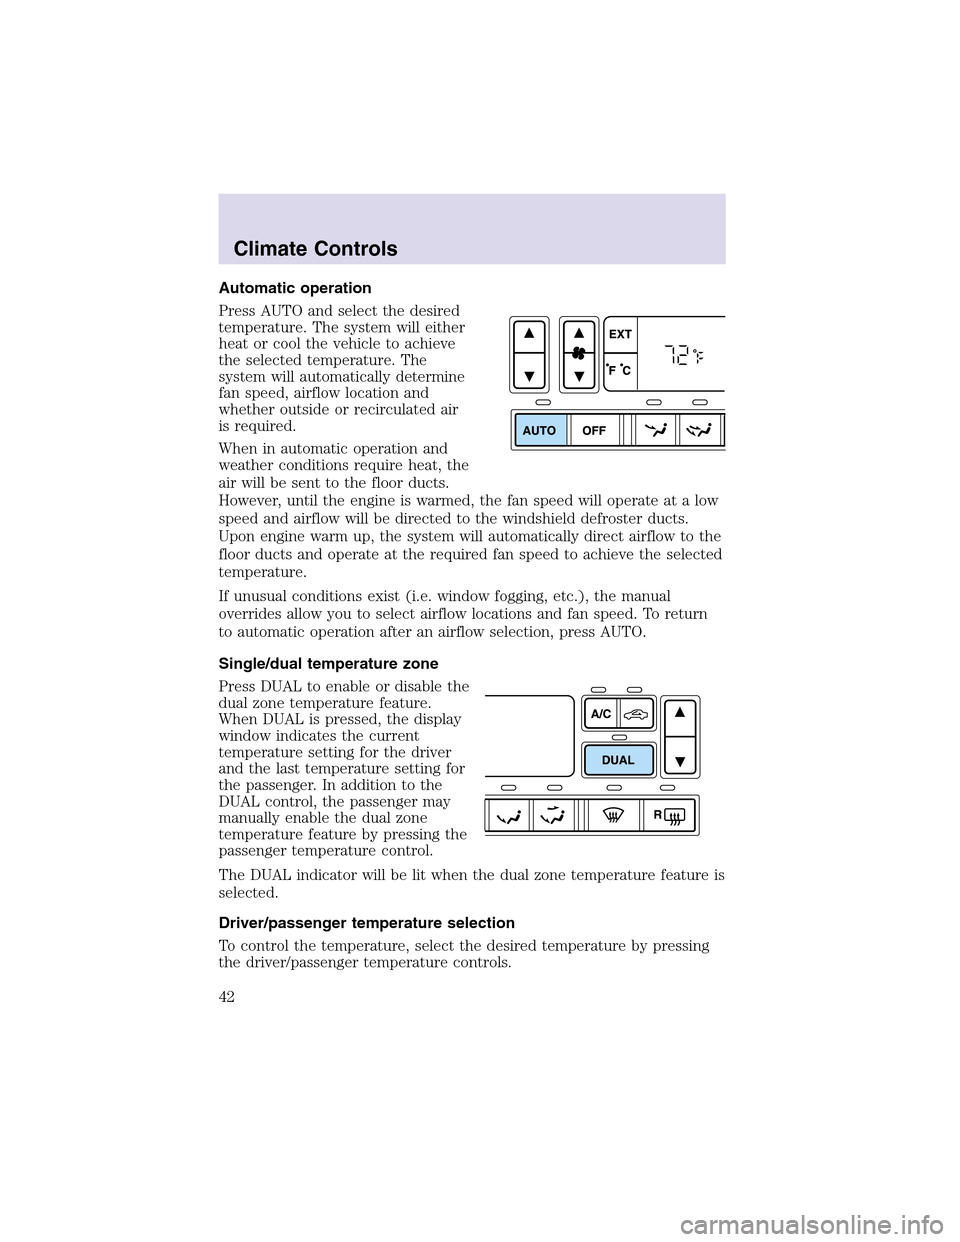
Automatic operation
Press AUTO and select the desired
temperature. The system will either
heat or cool the vehicle to achieve
the selected temperature. The
system will automatically determine
fan speed, airflow location and
whether outside or recirculated air
is required.
When in automatic operation and
weather conditions require heat, the
air will be sent to the floor ducts.
However, until the engine is warmed, the fan speed will operate at a low
speed and airflow will be directed to the windshield defroster ducts.
Upon engine warm up, the system will automatically direct airflow to the
floor ducts and operate at the required fan speed to achieve the selected
temperature.
If unusual conditions exist (i.e. window fogging, etc.), the manual
overrides allow you to select airflow locations and fan speed. To return
to automatic operation after an airflow selection, press AUTO.
Single/dual temperature zone
Press DUAL to enable or disable the
dual zone temperature feature.
When DUAL is pressed, the display
window indicates the current
temperature setting for the driver
and the last temperature setting for
the passenger. In addition to the
DUAL control, the passenger may
manually enable the dual zone
temperature feature by pressing the
passenger temperature control.
The DUAL indicator will be lit when the dual zone temperature feature is
selected.
Driver/passenger temperature selection
To control the temperature, select the desired temperature by pressing
the driver/passenger temperature controls.
Climate Controls
42
Page 65 of 288
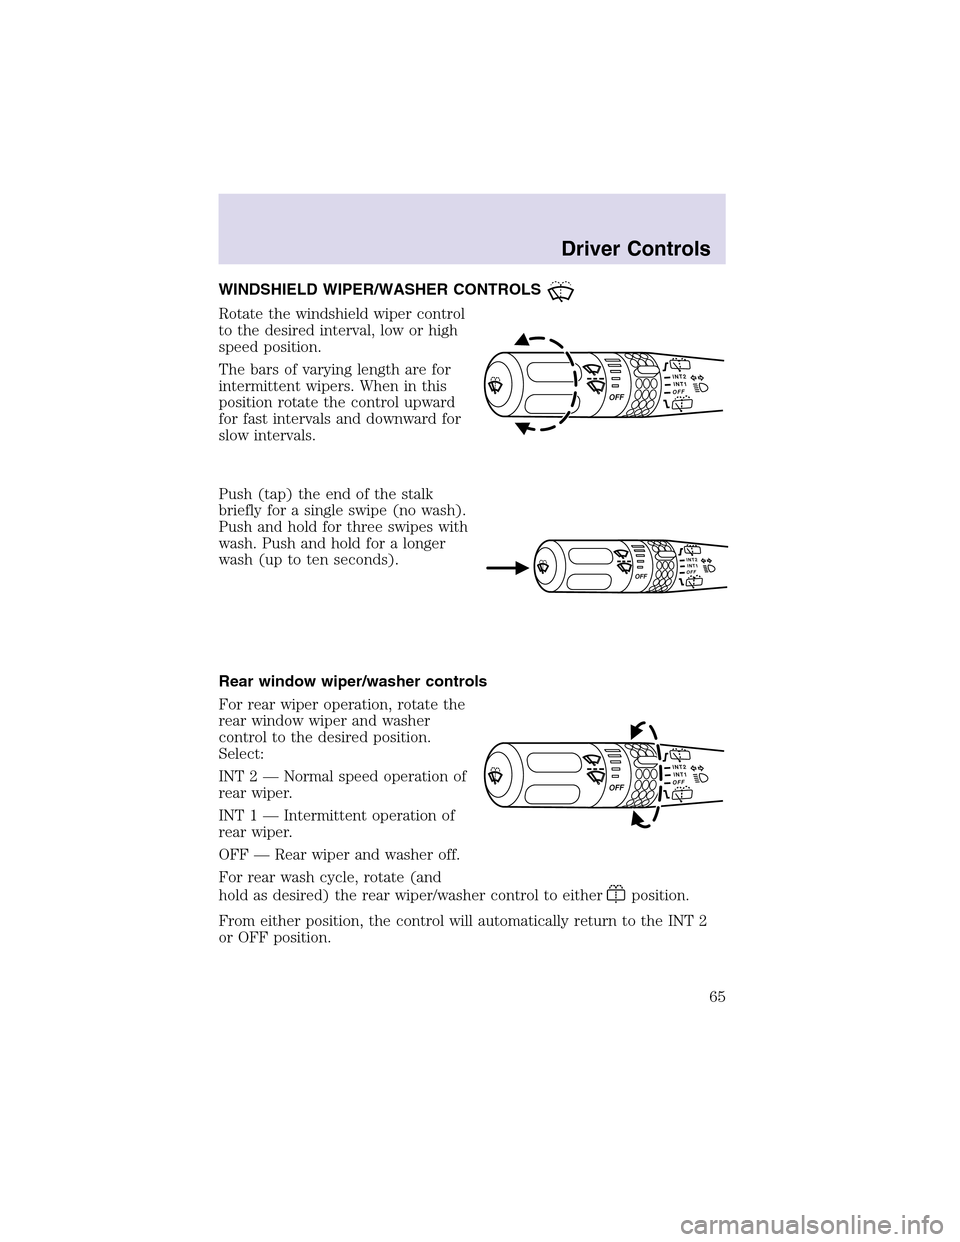
WINDSHIELD WIPER/WASHER CONTROLS
Rotate the windshield wiper control
to the desired interval, low or high
speed position.
The bars of varying length are for
intermittent wipers. When in this
position rotate the control upward
for fast intervals and downward for
slow intervals.
Push (tap) the end of the stalk
briefly for a single swipe (no wash).
Push and hold for three swipes with
wash. Push and hold for a longer
wash (upto ten seconds).
Rear window wiper/washer controls
For rear wiper operation, rotate the
rear window wiper and washer
control to the desired position.
Select:
INT 2 — Normal speed operation of
rear wiper.
INT 1 — Intermittent operation of
rear wiper.
OFF — Rear wiper and washer off.
For rear wash cycle, rotate (and
hold as desired) the rear wiper/washer control to either
position.
From either position, the control will automatically return to the INT 2
or OFF position.
Driver Controls
65
Page 66 of 288
Windshield wiper blades
Check the wiper blades for wear at least twice a year or when they seem
less effective. Substances such as tree sapand some hot wax treatments
used by commercial car washes reduce the effectiveness of wiper blades.
Checking the wiper blades
If the wiper blades do not wipe properly, clean both the windshield and
wiper blades using undiluted windshield wiper solution or a mild
detergent. Rinse thoroughly with clean water. To avoid damaging the
blades, do not use fuel, kerosene, paint thinner or other solvents.
Changing the wiper blades
It is recommended that wiper blades are renewed before winter.
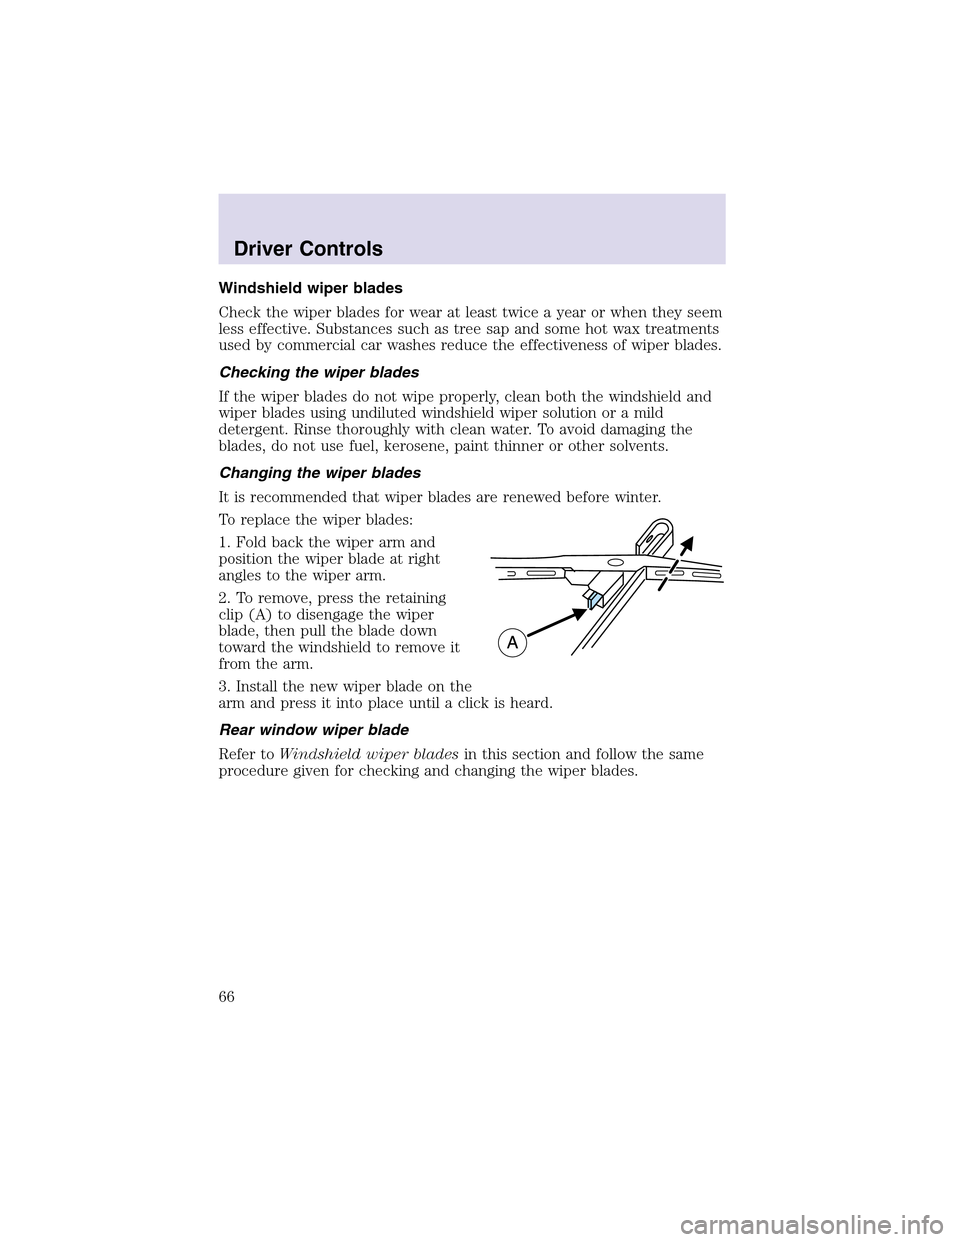
To replace the wiper blades:
1. Fold back the wiper arm and
position the wiper blade at right
angles to the wiper arm.
2. To remove, press the retaining
clip(A) to disengage the wiper
blade, then pull the blade down
toward the windshield to remove it
from the arm.
3. Install the new wiper blade on the
arm and press it into place until a click is heard.
Rear window wiper blade
Refer toWindshield wiper bladesin this section and follow the same
procedure given for checking and changing the wiper blades.
Driver Controls
66
Page 67 of 288
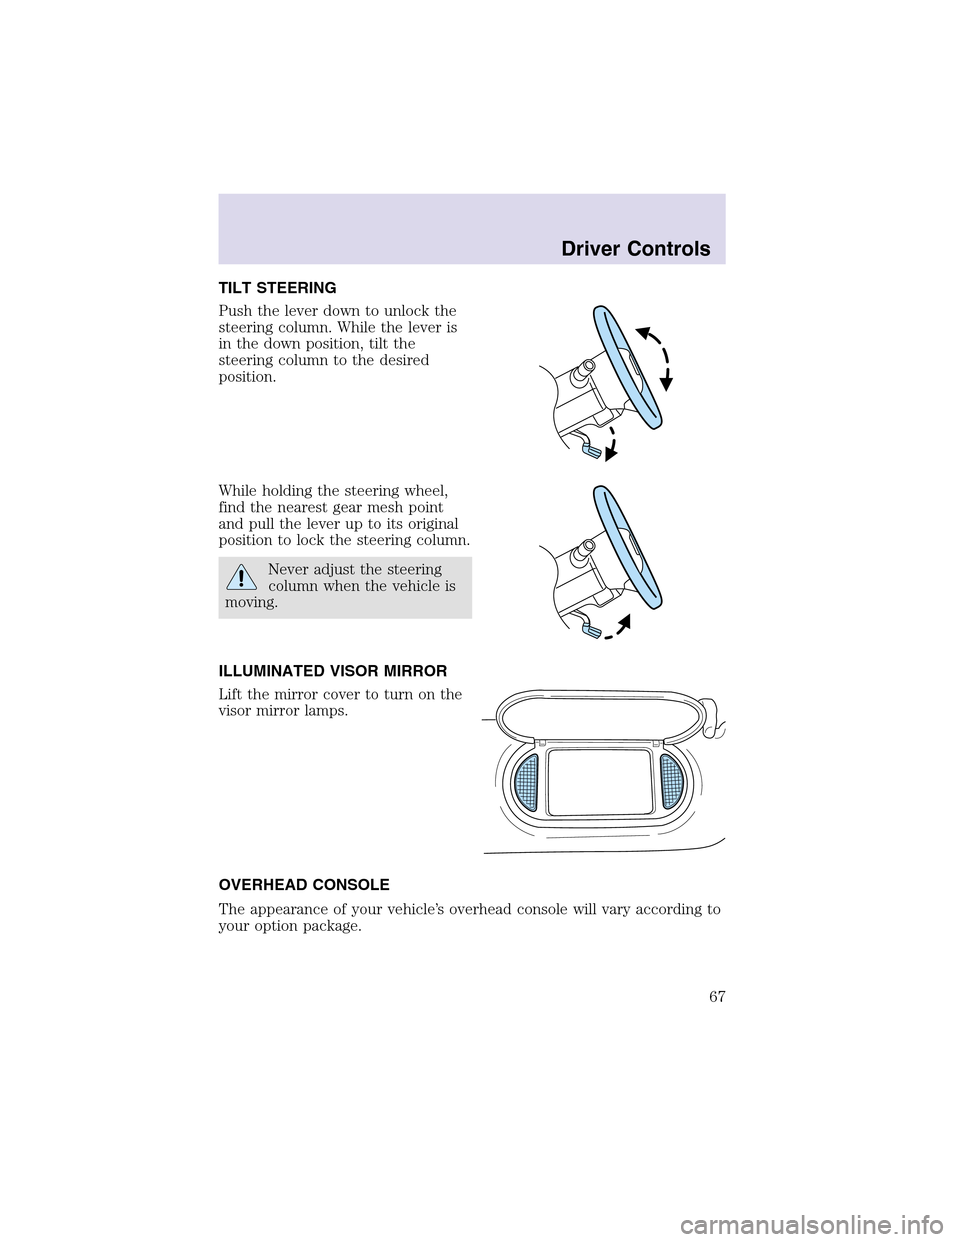
TILT STEERING
Push the lever down to unlock the
steering column. While the lever is
in the down position, tilt the
steering column to the desired
position.
While holding the steering wheel,
find the nearest gear mesh point
and pull the lever up to its original
position to lock the steering column.
Never adjust the steering
column when the vehicle is
moving.
ILLUMINATED VISOR MIRROR
Lift the mirror cover to turn on the
visor mirror lamps.
OVERHEAD CONSOLE
The appearance of your vehicle’s overhead console will vary according to
your option package.
Driver Controls
67
Page 68 of 288
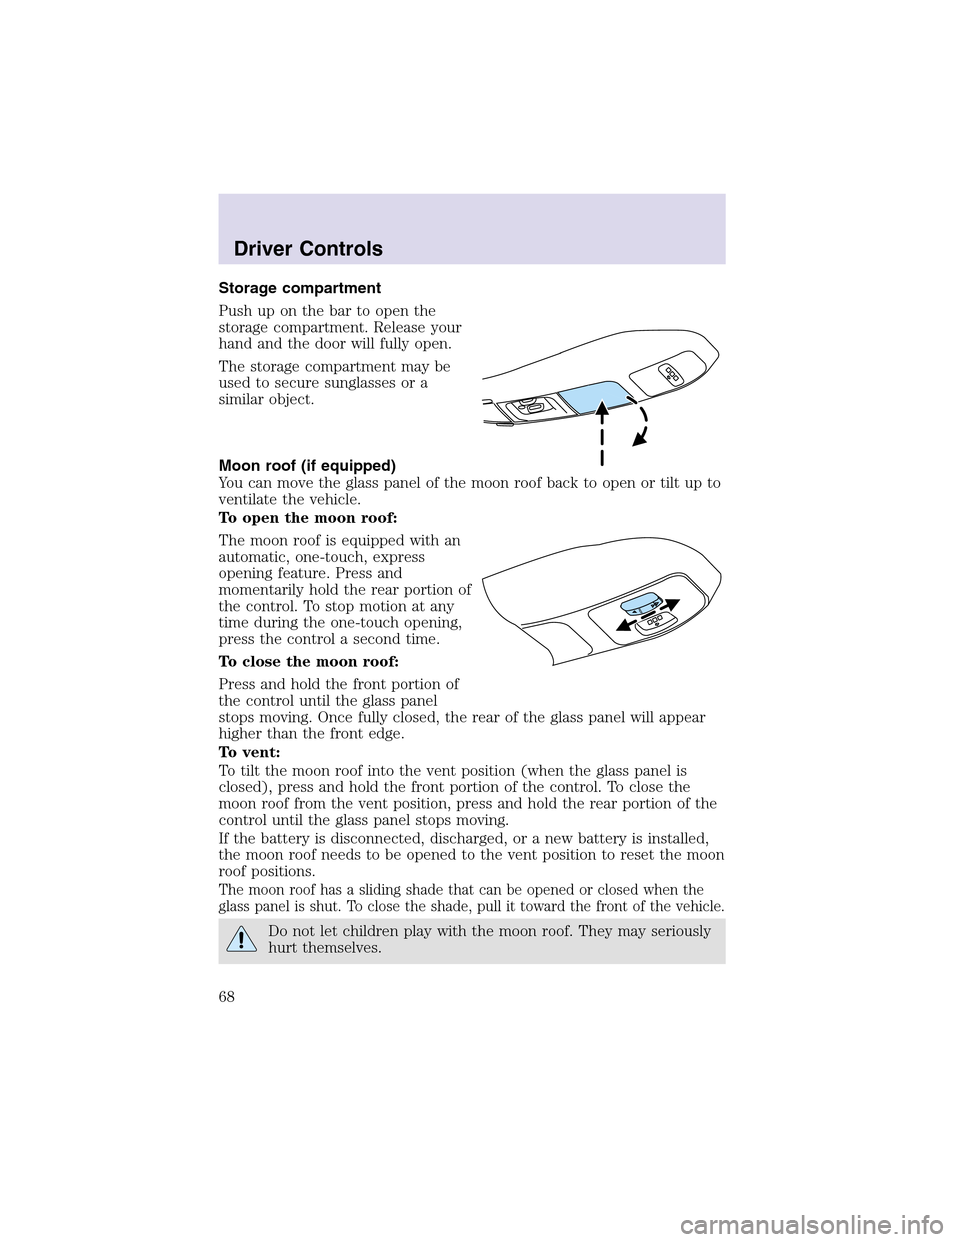
Storage compartment
Push upon the bar to open the
storage compartment. Release your
hand and the door will fully open.
The storage compartment may be
used to secure sunglasses or a
similar object.
Moon roof (if equipped)
You can move the glass panel of the moon roof back to open or tilt up to
ventilate the vehicle.
To open the moon roof:
The moon roof is equipped with an
automatic, one-touch, express
opening feature. Press and
momentarily hold the rear portion of
the control. To stopmotion at any
time during the one-touch opening,
press the control a second time.
To close the moon roof:
Press and hold the front portion of
the control until the glass panel
stops moving. Once fully closed, the rear of the glass panel will appear
higher than the front edge.
To vent:
To tilt the moon roof into the vent position (when the glass panel is
closed), press and hold the front portion of the control. To close the
moon roof from the vent position, press and hold the rear portion of the
control until the glass panel stops moving.
If the battery is disconnected, discharged, or a new battery is installed,
the moon roof needs to be opened to the vent position to reset the moon
roof positions.
The moon roof has a sliding shade that can be opened or closed when the
glass panel is shut. To close the shade, pull it toward the front of the vehicle.
Do not let children play with the moon roof. They may seriously
hurt themselves.
Driver Controls
68