start stop button LINCOLN AVIATOR 2020 User Guide
[x] Cancel search | Manufacturer: LINCOLN, Model Year: 2020, Model line: AVIATOR, Model: LINCOLN AVIATOR 2020Pages: 609, PDF Size: 5.4 MB
Page 212 of 609
•
You are not in 4H or 4L.
• You have not selected Manual shift
mode.
• Hill descent control is not active.
• You have not selected Tow haul, Excite,
Deep, or Slow Climb.
Note: When in Excite mode, Start/Stop can
be enabled by pressing the Auto-Start-Stop
button. The green Auto-Start-Stop
indicator light on the instrument
cluster will illuminate to indicate
when the automatic engine stop occurs. If the instrument cluster is
equipped with a grey
Auto-Start-Stop indicator light, it
illuminates when automatic engine stop is
not available due to one of the above noted
conditions not being met. Automatic Engine Restart
Any of the following conditions will result in
an automatic restart of the engine:
•
You have removed your foot from the
brake pedal.
• You press the accelerator pedal.
• You press the accelerator and the brake
pedal at the same time.
• The driver safety belt becomes
unfastened or the driver door is ajar.
• Your vehicle is moving.
• The interior compartment does not meet
customer comfort when air conditioning
or heat is on.
• Fogging of the windows could occur and
the air conditioning is on.
• The battery is not within optimal
operating conditions.
• You have exceeded the maximum engine
off time.
• When you press the Auto-Start-Stop
button with the engine automatically
stopped. •
The front defroster is turned to the Max
setting.
• When you shift into park (P), the engine
will restart.
Any of the following conditions may result in
an automatic restart of the engine:
• You have increased the blower fan speed
or changed the climate control
temperature.
• You have an electrical accessory turned
on or plugged in.
Note: You may notice that the climate seat
fan fluctuates during an automatic restart.
Disabling Auto-Start-Stop Press the button on the instrument
panel to access the
Auto-Start-Stop feature on the
touchscreen. Use the touchscreen to
deactivate the feature.
Deactivating the feature lasts only 1 key
cycle. Use the touchscreen to restore
Auto-Start-Stop function.
209
Aviator (CTV) Canada/United States of America, enUSA, Edition date: 201902, Third-Printing- Unique Driving Characteristics E146361 E287975
Page 229 of 609
Manual Park Release (MPR)
WARNING: When doing this
procedure, you need to take the
transmission out of park (P) which means
your vehicle can roll freely. To avoid
unwanted vehicle movement, always fully
apply the parking brake prior to doing this
procedure. Use wheels chocks if
appropriate. WARNING:
If the parking brake is
fully released, but the brake warning lamp
remains illuminated, the brakes may not
be working properly. Have your vehicle
checked as soon as possible. WARNING: Do not drive your vehicle
until you verify that the stoplamps are
working.
Use the manual park release to move your
transmission from the park (P) position in the
event of an electrical malfunction or
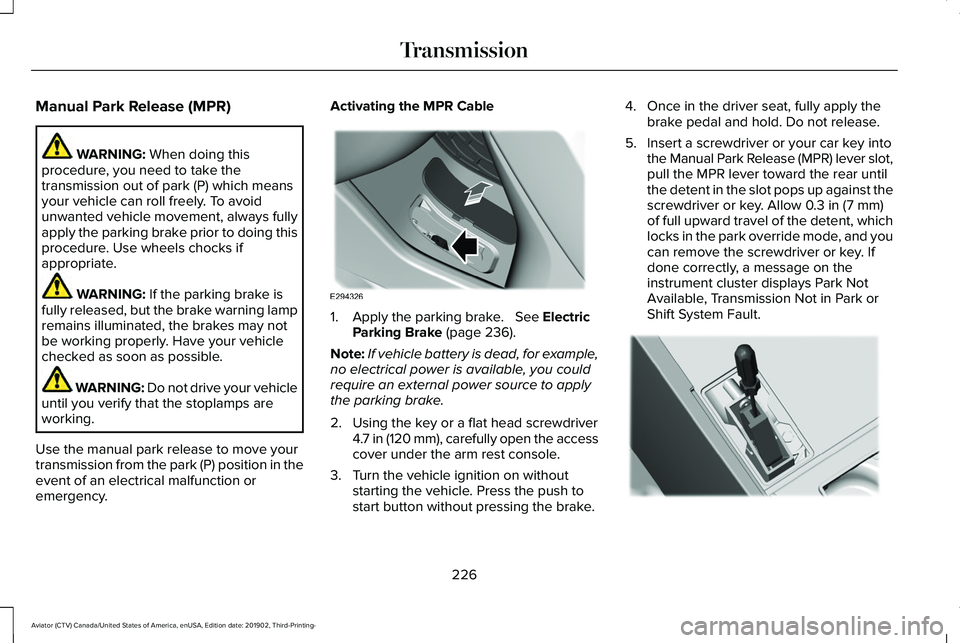
emergency. Activating the MPR Cable
1. Apply the parking brake.
See Electric
Parking Brake (page 236).
Note: If vehicle battery is dead, for example,
no electrical power is available, you could
require an external power source to apply
the parking brake.
2. Using the key or a flat head screwdriver 4.7 in (120 mm), carefully open the access
cover under the arm rest console.
3. Turn the vehicle ignition on without starting the vehicle. Press the push to
start button without pressing the brake. 4. Once in the driver seat, fully apply the
brake pedal and hold. Do not release.
5. Insert a screwdriver or your car key into the Manual Park Release (MPR) lever slot,
pull the MPR lever toward the rear until
the detent in the slot pops up against the
screwdriver or key. Allow
0.3 in (7 mm)
of full upward travel of the detent, which
locks in the park override mode, and you
can remove the screwdriver or key. If
done correctly, a message on the
instrument cluster displays Park Not
Available, Transmission Not in Park or
Shift System Fault. 226
Aviator (CTV) Canada/United States of America, enUSA, Edition date: 201902, Third-Printing- TransmissionE294326 E297270
Page 242 of 609
Switching the System On and Off
Vehicles with Manual Transmission
You can switch this feature on or off in the
information display. The system remembers
the last setting when you start your vehicle.
Vehicles with Automatic Transmission
You cannot turn the system on or off. When
you switch the ignition on, the system
automatically turns on.
AUTO HOLD
WARNING: The system does not
replace the parking brake. When you leave
your vehicle, always apply the parking
brake. WARNING: You must remain in your
vehicle when the system turns on. At all
times, you are responsible for controlling
your vehicle, supervising the system and
intervening, if required. Failure to take care
may result in the loss of control of your
vehicle, serious personal injury or death. WARNING:
The system turns off if
there is a malfunction or if you excessively
rev the engine.
The system is designed to apply the brakes
to hold your vehicle at a standstill after you
stop your vehicle and release the brake
pedal. This could be beneficial in certain
situations, for example when waiting on a hill
or in traffic.
Switching Auto Hold On and Off Press the button in the instrument
panel to access the Auto Hold
feature on the touchscreen.
Note: You can only switch the system on
after you close the driver door, fasten your
seatbelt and start the engine. Note:
The system remembers the last setting
when you start your vehicle.
Make sure you switch the system off before
towing with your vehicle or before using an
automatic car wash.
Using Auto Hold
1. Use the brakes to bring your vehicle to a complete stop. The auto hold active
indicator illuminates in the information
display.
2. Release the brake pedal. The system holds your vehicle at a standstill. The
auto hold active indicator remains
illuminated in the information display.
Note: The system only activates if you apply
enough brake pressure. If your vehicle is on
a steep slope, you need to press the brake
pedal harder before the system activates.
Note: Under certain conditions, the system
could apply the electric parking brake. The
brake system warning lamp illuminates. The
electric parking brake releases when you
press the accelerator pedal.
See Electric
Parking Brake (page 236).
239
Aviator (CTV) Canada/United States of America, enUSA, Edition date: 201902, Third-Printing- BrakesE287975
Page 317 of 609
Special Loading Instructions for
Owners of Pick-up Trucks and Utility-
type Vehicles
WARNING: When loading the
roof racks, we recommend you evenly
distribute the load, as well as maintain
a low center of gravity. Loaded
vehicles, with higher centers of gravity,
may handle differently than unloaded
vehicles. Take extra precautions, such
as slower speeds and increased
stopping distance, when driving a
heavily loaded vehicle.
AIR SUSPENSION
(IF EQUIPPED) WARNING:
If your vehicle has
self-leveling air suspension, you must
switch the system off before carrying out
any maintenance or repair. Failure to follow
this warning could result in serious
personal injury or death. The air suspension system automatically
adjusts to maintain a constant frame height,
allows for ease of vehicle loading, provides
improved vehicle ride, and increased driver
comfort.
You can adjust different ride settings through
the selectable drive modes.
See Selecting
a Drive Mode (page 306).
Note: The air suspension system may not
operate properly if you exceed the load limit.
See
Load Limit (page 310).
Note: When your vehicle is off, the air
compressor may run for a short time. This is
normal.
Switching the systems on or off
You can access the air suspension, liftgate
and easy entry features through the
information display menu settings.
See
General Information (page 130).
Using the Service Mode
When the service mode is active, the air
suspension does not make any adjustments
while your vehicle is stationary. Note:
Always switch the air suspension
service mode to on before servicing your
vehicle.
Using Cargo Loading
The air suspension cargo loading feature
lowers your vehicle for easier access when
the system detects the liftgate is opening.
When the liftgate is closed your vehicle
returns to its normal height after a short time.
Note: To preserve your vehicle battery, your
vehicle may only lower for cargo mode one
to two times per ignition cycle.
Using Easy Entry
The air suspension can lower your vehicle
to an easier access entry height when the
system detects the intelligent access key,
you press the unlock button, use the remote
start, or use Phone as a Key.
The leveling process stops when you open
a door or the target level is achieved.
Note: To stop the leveling process, press the
lock button on the intelligent access key.
314
Aviator (CTV) Canada/United States of America, enUSA, Edition date: 201902, Third-Printing- Load Carrying
Page 332 of 609
The fuel pump shutoff stops the flow of fuel
to the engine in the event of a moderate to
severe crash. Not every impact causes a
shutoff.
Should your vehicle shut off after a crash,
you may restart your vehicle.
If your vehicle has a key system:
1. Switch off the ignition.
2. Switch to start position.
3. Switch off the ignition.
4. Switch on the ignition to re-enable the
fuel pump.
5. If the vehicle does not start, repeat steps
1 through 4.
If your vehicle has a push button start
system:
1. Press START/STOP to switch off your
vehicle.
2. Press the brake pedal and
START/STOP
to switch on your vehicle.
3. Remove your foot from the brake pedal and press
START/STOP to switch off
your vehicle. 4. You can attempt to start the vehicle by
pressing the brake pedal and
START/STOP
, or press START/STOP
without pressing the brake pedal.
5. If the vehicle does not start, repeat steps
1 through 4.
JUMP STARTING THE VEHICLE WARNING:
Batteries normally
produce explosive gases which can cause
personal injury. Therefore, do not allow
flames, sparks or lighted substances to
come near the battery. When working near
the battery, always shield your face and
protect your eyes. Always provide correct
ventilation. WARNING:
Keep batteries out of
reach of children. Batteries contain sulfuric
acid. Avoid contact with skin, eyes or
clothing. Shield your eyes when working
near the battery to protect against possible
splashing of acid solution. In case of acid
contact with skin or eyes, flush immediately
with water for a minimum of 15 minutes and
get prompt medical attention. If acid is
swallowed, call a physician immediately. WARNING:
Use only adequately
sized cables with insulated clamps.
Preparing Your Vehicle
Do not attempt to push-start your automatic
transmission vehicle.
Note: Attempting to push-start a vehicle with
an automatic transmission may cause
transmission damage.
Note: Use only a 12-volt supply to start your
vehicle.
329
Aviator (CTV) Canada/United States of America, enUSA, Edition date: 201902, Third-Printing- Roadside Emergencies
Page 501 of 609
SETTINGS
Press the button to enter the
settings menu.
Once you select a tile, press the
button next to a menu item to view
an explanation of the feature or
setting.
Sound
Select this tile to adjust the sound settings.
Clock
Select this tile to adjust the clock settings.
Bluetooth
Select this tile to switch Bluetooth on and off
and adjust settings.
Phone
Select this tile to connect, disconnect, and
manage the connected device settings. Audio
Select this tile to adjust the audio settings.
Driver Assist (If Equipped)
Select this tile to adjust Driver Assist features
like Parking Aids, Lane Keeping system,
Pedestrian Detection, and Auto-Start-Stop.
Vehicle
Select this tile to adjust vehicle settings like
windows, alarm, lighting, backup starting
passcode, and MyKey settings.
Lincoln Way
Select this tile to adjust the Lincoln Way
settings.
General
Select this tile to adjust settings like
language, measurement units, or to reset the
system.
911 Assist
(If Equipped)
Select this tile to switch 911 Assist on and off. Automatic Updates
Select this tile to adjust automatic update
settings.
Mobile Apps
Select this tile to adjust permissions, enable,
disable, and update mobile apps.
Display
Select this tile to adjust display settings like
brightness and auto dim.
Charge Settings
(If Equipped)
Select this tile to adjust the electric vehicle
charge setting.
Voice Control
Select this tile to adjust voice control settings
like command confirmations and displayed
lists.
Navigation
(If Equipped)
Select this tile to adjust navigation settings
like map preferences and route guidance.
498
Aviator (CTV) Canada/United States of America, enUSA, Edition date: 201902, Third-Printing- SYNC™ 3E280315 E268570
Page 513 of 609
Apps
Possible Cause and Resolution
Symptom
The system cannot find any apps. –Incompatible device.
•You will need an Android device with OS 4.3 or higher or an iOS device wi\
th iOS 8.0
or higher. Pair and connect your Android device to find AppLink compatible apps.
Connect your iOS device to a USB port or pair and connect using Bluetoot\
h.
I have a compatible device and it is correctly
connected but the system still cannot find any
apps. –
AppLink compatible apps not installed on your device.
•Download and install the latest version of the app.
– AppLink compatible apps not running on your device.
•Start the apps to allow the system to find them and make sure you sign in to any apps
if required.
– Incorrect app settings.
•Check and adjust the app settings on your device and allow SYNC to access the app
if required.
I have a compatible device, it is correctly
connected and my apps are running but the
system still cannot find any apps. –
Apps failed to fully close.
•Restart the apps and try again.
• If you have an Android device with apps that have an exit or quit option\
, use this and
then restart the apps. Alternatively, use the force stop option in the settings menu on
your device.
• If you have an iOS device with iOS 7.0 or higher, tap the home button on your device
twice and then swipe the app upward to close it.
510
Aviator (CTV) Canada/United States of America, enUSA, Edition date: 201902, Third-Printing- SYNC™ 3