ABS LINCOLN AVIATOR 2020 Owners Manual
[x] Cancel search | Manufacturer: LINCOLN, Model Year: 2020, Model line: AVIATOR, Model: LINCOLN AVIATOR 2020Pages: 609, PDF Size: 5.4 MB
Page 128 of 609
Indicates engine coolant temperature. At
normal operating temperature, the level
indicator will be in the normal range. If the
engine coolant temperature exceeds the
normal range, stop your vehicle as soon as
safely possible, switch off the engine and let
the engine cool.
WARNING LAMPS AND
INDICATORS
The following warning lamps and indicators
alert you to a vehicle condition that may
become serious. Some lamps illuminate
when you start your vehicle to make sure
they work. If any lamps remain on after
starting your vehicle, refer to the respective
system warning lamp for further information.
Note:
Some warning indicators appear in
the information display and function the
same as a warning lamp, but do not display
when you start your vehicle. Adaptive Cruise Control (If Equipped) The speed control system indicator
light changes color to indicate
what mode the system is in.
See
How Does Adaptive Cruise Control With
Stop and Go Work
(page 269).
On (white light): Illuminates when you switch
on the adaptive cruise control system. Turns
off when the speed control system is turned
off.
Engaged (green light): Illuminates when you
engage the adaptive cruise control system.
Turns off when you disengage the speed
control system.
Adaptive Steering
(If Equipped) The adaptive steering system
indicator illuminates if the system
detects a fault during the
continuous diagnostic checks. Adaptive Steering Initialization (yellow,
flashing): The adaptive steering system
detects a difference between steering wheel
angle and the desired road wheel angle. The
steering wheel adjusts itself to correct this
difference. This adjustment is part of normal
system operation.
Adaptive Steering Off (yellow, solid): The
adaptive steering system is off. It is possible
that the steering wheel may not be straight
when you drive straight ahead. If this
message persists, see an authorized dealer.
Adaptive Steering Loss (red, solid): The
adaptive steering system integrity cannot be
verified. Do not drive the vehicle and contact
an authorized dealer immediately.
See
Steering (page 299).
Anti-Lock Braking System If it illuminates when you are
driving, this indicates a system
error. You continue to have the
normal braking (without ABS) unless the
brake system warning lamp also illuminates.
Have the system checked by an authorized
dealer.
125
Aviator (CTV) Canada/United States of America, enUSA, Edition date: 201902, Third-Printing- Instrument ClusterE144524 E223375
Page 174 of 609
HEAD RESTRAINTS
WARNING: Fully adjust the head
restraint before you sit in or operate your
vehicle. This will help minimize the risk of
neck injury in the event of a crash. Do not
adjust the head restraint when your vehicle
is moving. WARNING:
The head restraint is a
safety device. Whenever possible it should
be installed and properly adjusted when
the seat is occupied. Failure to adjust the
head restraint properly could reduce its
effectiveness during certain impacts.
Note: Adjust the seat backrest to an upright
driving position before adjusting the head
restraint. Adjust the head restraint so that
the top of it is level with the top of your head
and as far forward as possible. Make sure
that you remain comfortable. If you are
extremely tall, adjust the head restraint to
its highest position. Adjusting the Head Restraint
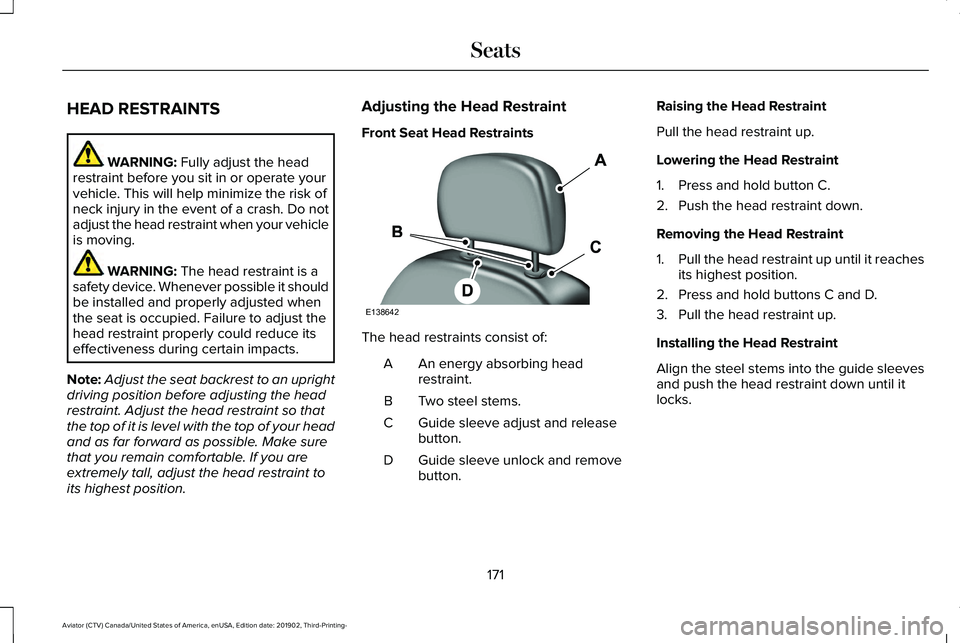
Front Seat Head Restraints
The head restraints consist of:
An energy absorbing head
restraint.
A
Two steel stems.
B
Guide sleeve adjust and release
button.
C
Guide sleeve unlock and remove
button.
D Raising the Head Restraint
Pull the head restraint up.
Lowering the Head Restraint
1. Press and hold button C.
2. Push the head restraint down.
Removing the Head Restraint
1.
Pull the head restraint up until it reaches
its highest position.
2. Press and hold buttons C and D.
3. Pull the head restraint up.
Installing the Head Restraint
Align the steel stems into the guide sleeves
and push the head restraint down until it
locks.
171
Aviator (CTV) Canada/United States of America, enUSA, Edition date: 201902, Third-Printing- SeatsE138642
Page 175 of 609
Second Row Center Seat Head Restraint
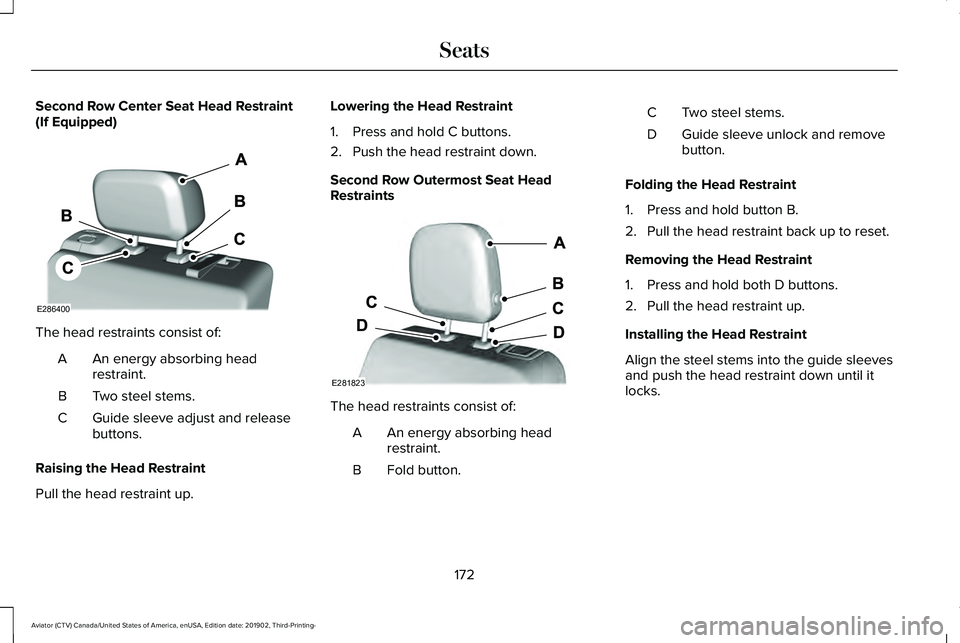
(If Equipped)
The head restraints consist of:
An energy absorbing head
restraint.
A
Two steel stems.
B
Guide sleeve adjust and release
buttons.
C
Raising the Head Restraint
Pull the head restraint up. Lowering the Head Restraint
1. Press and hold C buttons.
2. Push the head restraint down.
Second Row Outermost Seat Head
Restraints
The head restraints consist of:
An energy absorbing head
restraint.
A
Fold button.
B Two steel stems.
C
Guide sleeve unlock and remove
button.
D
Folding the Head Restraint
1. Press and hold button B.
2. Pull the head restraint back up to reset.
Removing the Head Restraint
1. Press and hold both D buttons.
2. Pull the head restraint up.
Installing the Head Restraint
Align the steel stems into the guide sleeves
and push the head restraint down until it
locks.
172
Aviator (CTV) Canada/United States of America, enUSA, Edition date: 201902, Third-Printing- SeatsE286400 E281823
Page 176 of 609
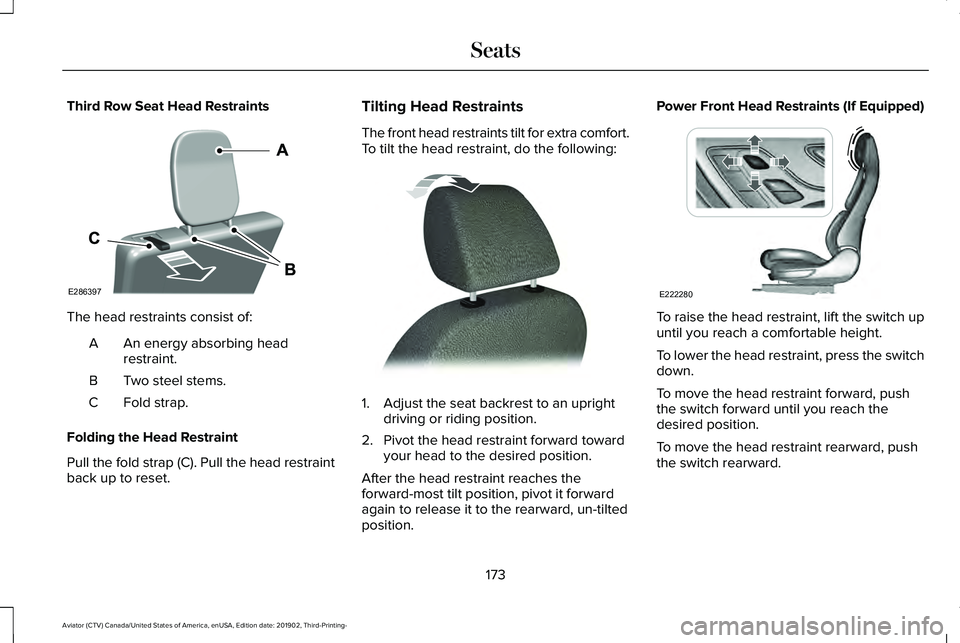
Third Row Seat Head Restraints
The head restraints consist of:
An energy absorbing head
restraint.
A
Two steel stems.
B
Fold strap.
C
Folding the Head Restraint
Pull the fold strap (C). Pull the head restraint
back up to reset. Tilting Head Restraints
The front head restraints tilt for extra comfort.
To tilt the head restraint, do the following:
1. Adjust the seat backrest to an upright
driving or riding position.
2. Pivot the head restraint forward toward your head to the desired position.
After the head restraint reaches the
forward-most tilt position, pivot it forward
again to release it to the rearward, un-tilted
position. Power Front Head Restraints (If Equipped)
To raise the head restraint, lift the switch up
until you reach a comfortable height.
To lower the head restraint, press the switch
down.
To move the head restraint forward, push
the switch forward until you reach the
desired position.
To move the head restraint rearward, push
the switch rearward.
173
Aviator (CTV) Canada/United States of America, enUSA, Edition date: 201902, Third-Printing- SeatsE286397 E144727 E222280
Page 214 of 609
SAFETY PRECAUTIONS
WARNING: Do not overfill the fuel
tank. The pressure in an overfilled tank
may cause leakage and lead to fuel spray
and fire. WARNING:
The fuel system may be
under pressure. If you hear a hissing sound
near the fuel filler inlet, do not refuel until
the sound stops. Otherwise, fuel may spray
out, which could cause serious personal
injury. WARNING:
Fuels can cause serious
injury or death if misused or mishandled. WARNING:
Fuel may contain
benzene, which is a cancer-causing agent. WARNING:
When refueling always
shut the engine off and never allow sparks
or open flames near the fuel tank filler
valve. Never smoke or use a cell phone
while refueling. Fuel vapor is extremely
hazardous under certain conditions. Avoid
inhaling excess fumes.
Follow these guidelines when refueling:
• Extinguish all smoking materials and any
open flames before refueling your
vehicle.
• Always switch the engine off before
refueling.
• Automotive fuels can be harmful or fatal
if swallowed. Fuel is highly toxic and if
swallowed can cause death or permanent
injury. If fuel is swallowed immediately
call a physician, even if no symptoms are
immediately apparent. The toxic effects
of fuel may not be apparent for hours. •
Avoid inhaling fuel vapors. Inhaling fuel
vapor can lead to eye and respiratory
tract irritation. In severe cases, excessive
or prolonged breathing of fuel vapor can
cause serious illness and permanent
injury.
• Avoid getting fuel in your eyes. If you
splash fuel in your eyes, immediately
remove contact lenses (if worn), flush with
water for 15 minutes and seek medical
attention. Failure to seek proper medical
attention could lead to permanent injury.
• Fuels can be harmful if absorbed through
the skin. If you splash fuel on your skin,
clothing or both, promptly remove
contaminated clothing and thoroughly
wash your skin with soap and water.
Repeated or prolonged skin contact
causes skin irritation.
• Be particularly careful if you are taking
Antabuse or other forms of Disulfiram for
the treatment of alcoholism. Breathing
fuel vapors could cause an adverse
reaction, serious personal injury or
sickness. Immediately call a physician if
you experience any adverse reactions.
211
Aviator (CTV) Canada/United States of America, enUSA, Edition date: 201902, Third-Printing- Fuel and Refueling
Page 222 of 609
EMISSION LAW
WARNING: Do not remove or alter
the original equipment floor covering or
insulation between it and the metal floor
of the vehicle. The floor covering and
insulation protect occupants of the vehicle
from the engine and exhaust system heat
and noise. On vehicles with no original
equipment floor covering insulation, do not
carry passengers in a manner that permits
prolonged skin contact with the metal floor.
Failure to follow these instructions may
result in fire or personal injury.
U.S. federal laws and certain state laws
prohibit removing or rendering inoperative
emission control system components. Similar
federal or provincial laws may apply in
Canada. We do not approve of any vehicle
modification without first determining
applicable laws. Tampering with emissions control
systems including related sensors
or the Diesel Exhaust Fluid system
can result in reduced engine power and the
illumination of the service engine soon light.
Tampering With a Noise Control
System
Federal laws prohibit the following acts:
• Removal or rendering inoperative by any
person other than for purposes of
maintenance.
• Repair or replacement of any device or
element of the design incorporated into
a new vehicle for the purpose of noise
control prior to its sale or delivery to the
ultimate purchaser or while it is in use.
• The use of the vehicle after any person
removes or renders inoperative any
device or element of the design. The U.S. Environmental Protection Agency
may presume to constitute tampering as
follows:
•
Removal of hood blanket, fender apron
absorbers, fender apron barriers,
underbody noise shields or acoustically
absorptive material.
• Tampering or rendering inoperative the
engine speed governor, to allow engine
speed to exceed manufacturer
specifications.
If the engine does not start, runs rough,
experiences a decrease in engine
performance, experiences excess fuel
consumption or produces excessive exhaust
smoke, check for the following:
• A plugged or disconnected air inlet
system hose.
• A plugged engine air filter element.
• Water in the fuel filter and water
separator.
• A clogged fuel filter.
• Contaminated fuel.
• Air in the fuel system, due to loose
connections.
219
Aviator (CTV) Canada/United States of America, enUSA, Edition date: 201902, Third-Printing- Engine Emission Control
Page 223 of 609
•
An open or pinched sensor hose.
• Incorrect engine oil level.
• Incorrect fuel for climatic conditions.
• Incorrect engine oil viscosity for climactic
conditions.
Note: Some vehicles have a lifetime fuel filter
that is integrated with the fuel tank. Regular
maintenance or replacement is not needed.
Note: If these checks do not help you correct
the concern, have your vehicle checked as
soon as possible.
Noise Emissions Warranty, Prohibited
Tampering Acts and Maintenance
On January 1, 1978, Federal regulation
became effective governing the noise
emission on trucks over 10,000 lb (4,536 kg)
Gross Vehicle Weight Rating (GVWR). The
preceding statements concerning prohibited
tampering acts and maintenance, and the
noise warranty found in the Warranty Guide,
are applicable to complete chassis cabs over
10,000 lb (4,536 kg)
GVWR. CATALYTIC CONVERTER WARNING:
Do not park, idle or drive
your vehicle on dry grass or other dry
ground cover. The emission system heats
up the engine compartment and exhaust
system, creating the risk of fire. WARNING:
The normal operating
temperature of the exhaust system is very
high. Never work around or attempt to
repair any part of the exhaust system until
it has cooled. Use special care when
working around the catalytic converter.
The catalytic converter heats up to a very
high temperature after only a short period
of engine operation and stays hot after the
engine is switched off. WARNING: Exhaust leaks may result
in entry of harmful and potentially lethal
fumes into the passenger compartment. If
you smell exhaust fumes inside your
vehicle, have your vehicle inspected
immediately. Do not drive if you smell
exhaust fumes. Your vehicle has various emission control
components and a catalytic converter that
enables it to comply with applicable exhaust
emission standards.
To make sure that the catalytic converter and
other emission control components continue
to work properly:
•
Do not crank the engine for more than
10 seconds at a time.
• Do not run the engine with a spark plug
lead disconnected.
• Do not push-start or tow-start your
vehicle. Use booster cables.
See Jump
Starting the Vehicle (page 329).
• Use only the specified fuel listed.
• Do not switch the ignition off when your
vehicle is moving.
• Avoid running out of fuel.
• Have the items listed in scheduled
maintenance information performed
according to the specified schedule.
Note: Resulting component damage may
not be covered by the vehicle Warranty.
220
Aviator (CTV) Canada/United States of America, enUSA, Edition date: 201902, Third-Printing- Engine Emission Control
Page 236 of 609
Descend a hill in the same gear you would
use to climb up the hill to avoid excessive
brake application and brake overheating. Do
not descend in neutral; instead, disengage
overdrive or manually shift to a lower gear.
When descending a steep hill, avoid sudden
hard braking as you could lose control. The
front wheels have to be turning in order to
steer the vehicle.
Your vehicle has anti-lock brakes, therefore
apply the brakes steadily. Do not “pump
” the
brakes.
Driving on Snow and Ice WARNING: If you are driving in
slippery conditions that require tire chains
or cables, then it is critical that you drive
cautiously. Keep speeds down, allow for
longer stopping distances and avoid
aggressive steering to reduce the chances
of a loss of vehicle control which can lead
to serious injury or death. If the rear end
of your vehicle slides while cornering, steer
in the direction of the slide until you regain
control of your vehicle. Note:
Excessive tire slippage can cause
driveline damage.
AWD vehicles have advantages over 2WD
vehicles in snow and ice but can skid like
any other vehicle.
Should you start to slide while driving on
snowy or icy roads, turn the steering wheel
in the direction of the slide until you regain
control.
Avoid sudden applications of power and
quick changes of direction on snow and ice.
Apply the accelerator slowly and steadily
when starting from a full stop.
Avoid sudden braking as well. Although an
AWD vehicle could accelerate better than a
two-wheel drive vehicle in snow and ice, it
will not stop any faster, because as in other
vehicles, braking occurs at all four wheels.
Do not become overconfident as to road
conditions. Make sure you allow sufficient distance
between you and other vehicles for stopping.
Drive slower than usual and consider using
one of the lower gears. In emergency
stopping situations, apply the brake steadily.
Since your vehicle is equipped with a four
wheel (ABS), do not “pump
” the brakes. See
Hints on Driving With Anti-Lock Brakes
(page
236).
Maintenance and Modifications
The suspension and steering systems on
your vehicle have been designed and tested
to provide predictable performance whether
loaded or empty and durable load carrying
capability. For this reason, we strongly
recommend that you do not make
modifications such as adding or removing
parts (such as lowering kits or stabilizer bars)
or by using replacement parts not equivalent
to the original factory equipment.
233
Aviator (CTV) Canada/United States of America, enUSA, Edition date: 201902, Third-Printing- All-Wheel Drive
(If Equipped)
Page 247 of 609
Reverse Braking Assist – Frequently
Asked Questions
Note:
If the frequently asked questions and
answers that are shown in the following
chart do not assist you in returning the
system to available, contact an authorized
dealer to have the system checked for
proper operation.
Why is the system off ?
Make sure you switch the system on.
See Switching Reverse Braking Assist
On and Off (page 242).
Why is the system unavailable? Make sure that the liftgate and all doors
are closed.
Why is the system unavailable? Make sure the cross traffic alert system
is on. See Cross Traffic Alert (page 293).
Why is the system unavailable? Make sure the rear parking aid system
is on. See Rear Parking Aid (page 250). Why is the system unavailable?
Make sure traction control is on.
See
Using Traction Control (page 245).
Why is the system unavailable? The vehicle has sustained a rear end
impact. Contact an authorized dealer to
have the sensors checked for proper
coverage and operation.
Why is the system unavailable? An ABS, traction control or stability
control event may have occurred. The
system resumes operation when the
event is complete.
Why is the system unavailable? Make sure the rear view camera and
360 degree camera are not dirty or
obstructed. If it is dirty, clean the
camera.
See Rear View Camera (page
261). See 360 Degree Camera (page
264). If the message still appears after
cleaning the camera, wait a short time
and the message should clear. If the
message does not clear, contact an
authorized dealer. Why is the system unavailable?
Make sure the sensors are not blocked
or faulted. See Cross Traffic Alert (page
293). See Rear Parking Aid (page 250).
Why is the system unavailable? You recently had your vehicle serviced,
or the battery disconnected. Drive your
vehicle a short distance to resume
system operation.
Why does the system turn off when I
connect a trailer? The system does not function when you
connect a trailer. Operation resumes
when you disconnect the trailer.
244
Aviator (CTV) Canada/United States of America, enUSA, Edition date: 201902, Third-Printing- Reverse Braking Assist
(If Equipped)
Page 253 of 609
PRINCIPLE OF OPERATION
WARNING: To help avoid personal
injury, always use caution when in reverse
(R) and when using the sensing system. WARNING:
The system may not
detect objects with surfaces that absorb
reflection. Always drive with due care and
attention. Failure to take care may result
in a crash. WARNING:
Traffic control systems,
inclement weather, air brakes, external
motors and fans may affect the correct
operation of the sensing system. This may
cause reduced performance or false alerts. WARNING:
The system may not
detect small or moving objects, particularly
those close to the ground.
Note: If your vehicle has MyKey™, the sensing
system cannot be switched off when a
MyKey™ is present.
See Principle of
Operation (page 73). Note:
Keep the sensors on the bumper or
fascia free from snow, ice and large
accumulations of dirt. If the sensors are
covered, the system’ s accuracy can be
affected. Do not clean the sensors with sharp
objects.
Note: If your vehicle sustains damage to the
bumper or fascia, leaving it misaligned or
bent, the sensing zone may be altered
causing inaccurate measurement of
obstacles or false alerts.
Note: Certain add-on devices installed
around the bumper or fascia may create
false alerts. For example, large trailer
hitches, bike or surfboard racks, license plate
brackets, bumper covers or any other device
that may block the normal detection zone
of the system. Remove the add-on device to
prevent false alerts.
Note: When you connect a trailer to your
vehicle, the rear parking aid may detect the
trailer and therefore provide an alert. Disable
the rear parking aid when you connect a
trailer to prevent the alert. The sensing system warns the driver of
obstacles within a certain range of your
vehicle. The system turns on automatically
whenever you switch the ignition on.
You can switch the system off through the
touchscreen, information display or from the
pop-up message that appears once you shift
the transmission into reverse (R). If your
vehicle has a parking aid button, you can
switch the system off by pressing the button.
If a fault is present in the system, a warning
message appears in the information display.
See
Information Messages (page 134).
REAR PARKING AID WARNING:
The system may not
detect objects with surfaces that absorb
reflection. Always drive with due care and
attention. Failure to take care may result
in a crash. WARNING:
The system may not
detect small or moving objects, particularly
those close to the ground.
250
Aviator (CTV) Canada/United States of America, enUSA, Edition date: 201902, Third-Printing- Parking Aids