Card LINCOLN AVIATOR 2020 Owners Manual
[x] Cancel search | Manufacturer: LINCOLN, Model Year: 2020, Model line: AVIATOR, Model: LINCOLN AVIATOR 2020Pages: 609, PDF Size: 5.4 MB
Page 10 of 609
Changing the Front Wiper Blades -
Vehicles Without: Heated Wiper Blades
......................................................................375
Changing the Front Wiper Blades - Vehicles With: Heated Wiper Blades
......................................................................
376
Changing the Rear Wiper Blades ............
377
Changing a Bulb ..........................................
377
Vehicle Care
General Information ....................................
378
Cleaning Products .......................................
378
Cleaning the Exterior ..................................
379
Waxing ...........................................................
380
Cleaning the Engine ....................................
381
Cleaning the Windows and Wiper Blades .......................................................................
381
Cleaning the Interior ...................................
382
Cleaning the Instrument Panel and Instrument Cluster Lens ........................
382
Cleaning Leather Seats .............................
383
Repairing Minor Paint Damage ................
384
Cleaning the Wheels ..................................
384
Vehicle Storage ...........................................
384Wheels and Tires
General Information
....................................
387
Tire Care ........................................................
389
Using Summer Tires ....................................
401
Using Snow Chains ....................................
402
Tire Pressure Monitoring System ...........
405
Changing a Road Wheel .............................
411
Technical Specifications .............................
419
Capacities and Specifications
Engine Specifications ..................................
421
Motorcraft Parts ...........................................
422
Vehicle Identification Number .................
424
Vehicle Certification Label ........................
424
Transmission Code Designation .............
425
Capacities and Specifications ..................
426
Bulb Specification Chart ............................
437
Vehicle Identification
Installing the Vehicle Identification Card ......................................................................
438 Connected Vehicle
Connected Vehicle Requirements
..........
439
Connected Vehicle Limitations ................
439
Connecting the Vehicle to a Mobile Network .....................................................
439
Connecting the Vehicle to a Wi-Fi Network ......................................................................
439
Connected Vehicle – Troubleshooting ......................................................................
440
Vehicle Wi-Fi Hotspot
Creating a Vehicle Wi-Fi Hotspot ............
443
Changing the Vehicle Wi-Fi Hotspot Name or Password ..............................................
443
Audio System
General Information ....................................
445
Audio Unit .....................................................
446
Digital Radio .................................................
448
Satellite Radio ...............................................
451
USB Port ........................................................
454
SYNC™ 3
General Information ...................................
456
7
Aviator (CTV) Canada/United States of America, enUSA, Edition date: 201902, Third-Printing- Table of Contents
Page 90 of 609
You can operate the keypad with the
factory-set five-digit entry code. The code
is on the owner's wallet card in the glove box
and is available from an authorized dealer.
You can also program up to five of your own
five-digit personal entry codes.
Programming a Personal Entry Code
1. Enter the factory-set five-digit code.
2. Press 1·2 on the keypad within five
seconds.
3. Enter your personal five-digit code. You must enter each number within five
seconds of each other.
4. Press 1·2 on the keypad to save personal
code 1.
The doors lock then unlock to confirm that
programming was successful.
To program additional personal entry codes,
repeat steps 1 through 3, then for step 4:
• Press
3·4 to save personal code 2.
• Press
5·6 to save personal code 3.
• Press
7·8 to save personal code 4.
• Press
9·0 to save personal code 5. Hints:
•
Do not set a code that uses five of the
same number.
• Do not use five numbers in sequential
order.
• The factory-set code works even if you
have set your own personal code.
Erasing a Personal Code
1. Enter the factory-set five-digit code.
2. Press and release
1·2 on the keypad
within five seconds.
3. Press and hold
1·2 for two seconds. You
must do this within five seconds of
completing step 2.
All personal codes erase and only the
factory-set five-digit code works.
Anti-Scan Feature
The keypad goes into an anti-scan mode if
you enter the wrong code seven times. This
mode turns off the keypad for one minute
and the keypad lamp flashes. The anti-scan feature turns off after any of
the following occur:
•
One minute of keypad inactivity.
• You press the unlock button on the
remote control.
• You switch your vehicle on.
• You unlock the vehicle using intelligent
access.
Locking and Unlocking the Doors
Locking All Doors
Press and hold 7·8 and 9·0 on the keypad
simultaneously with the driver door closed.
You do not need to enter a code first.
Unlocking All Doors
Enter the factory-set code or your personal
code, then press
3·4 on the keypad within
five seconds.
Unlocking Only the Driver Door
Enter the factory-set or your personal
five-digit code. You must press each number
within five seconds of each other. The
interior lamps illuminate.
87
Aviator (CTV) Canada/United States of America, enUSA, Edition date: 201902, Third-Printing- Doors and Locks
Page 201 of 609
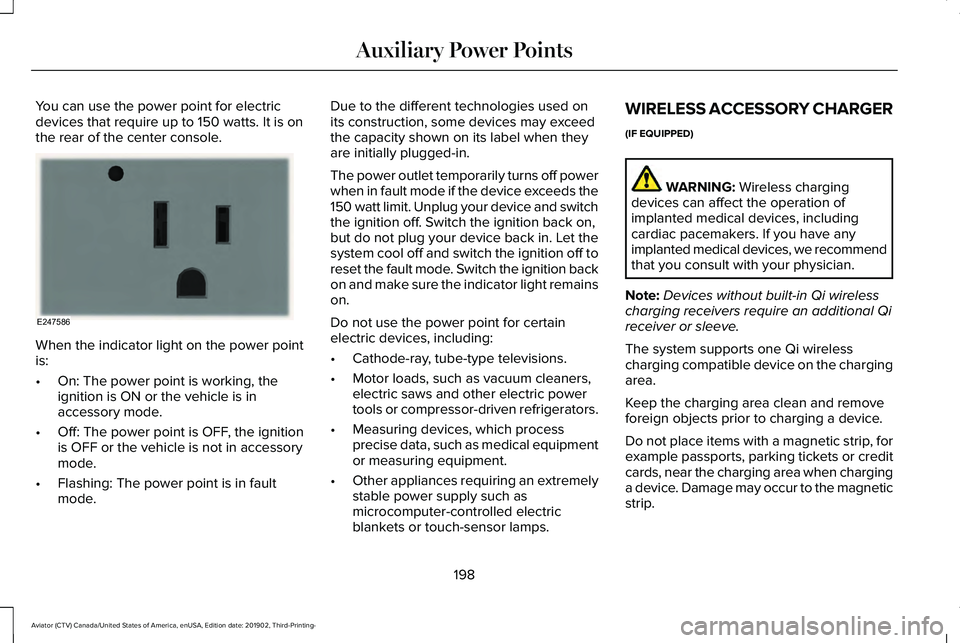
You can use the power point for electric
devices that require up to 150 watts. It is on
the rear of the center console.
When the indicator light on the power point
is:
•
On: The power point is working, the
ignition is ON or the vehicle is in
accessory mode.
• Off: The power point is OFF, the ignition
is OFF or the vehicle is not in accessory
mode.
• Flashing: The power point is in fault
mode. Due to the different technologies used on
its construction, some devices may exceed
the capacity shown on its label when they
are initially plugged-in.
The power outlet temporarily turns off power
when in fault mode if the device exceeds the
150 watt limit. Unplug your device and switch
the ignition off. Switch the ignition back on,
but do not plug your device back in. Let the
system cool off and switch the ignition off to
reset the fault mode. Switch the ignition back
on and make sure the indicator light remains
on.
Do not use the power point for certain
electric devices, including:
•
Cathode-ray, tube-type televisions.
• Motor loads, such as vacuum cleaners,
electric saws and other electric power
tools or compressor-driven refrigerators.
• Measuring devices, which process
precise data, such as medical equipment
or measuring equipment.
• Other appliances requiring an extremely
stable power supply such as
microcomputer-controlled electric
blankets or touch-sensor lamps. WIRELESS ACCESSORY CHARGER
(IF EQUIPPED)
WARNING: Wireless charging
devices can affect the operation of
implanted medical devices, including
cardiac pacemakers. If you have any
implanted medical devices, we recommend
that you consult with your physician.
Note: Devices without built-in Qi wireless
charging receivers require an additional Qi
receiver or sleeve.
The system supports one Qi wireless
charging compatible device on the charging
area.
Keep the charging area clean and remove
foreign objects prior to charging a device.
Do not place items with a magnetic strip, for
example passports, parking tickets or credit
cards, near the charging area when charging
a device. Damage may occur to the magnetic
strip.
198
Aviator (CTV) Canada/United States of America, enUSA, Edition date: 201902, Third-Printing- Auxiliary Power PointsE247586
Page 315 of 609
operation at Gross Vehicle Weight
Rating, not at Gross Combined Weight
Rating.) Separate functional brakes
should be used for safe control of towed
vehicles and for trailers where the Gross
Combined Weight of the towing vehicle
plus the trailer exceed the Gross Vehicle
Weight Rating of the towing vehicle.
The gross combined weight must never
exceed the Gross Combined Weight
Rating.
Note:
For trailer towing information
refer to the RV and Trailer Towing Guide
available at an authorized dealer. WARNING: Do not exceed the
GVWR or the GAWR specified on the
certification label. WARNING:
Do not use
replacement tires with lower load
carrying capacities than the original
tires because they may lower your
vehicle's GVWR and GAWR limitations.
Replacement tires with a higher limit
than the original tires do not increase
the GVWR and GAWR limitations. WARNING:
Exceeding any
vehicle weight rating can adversely
affect the performance and handling
of your vehicle, cause vehicle damage
and can result in the loss of control of
your vehicle, serious personal injury
or death.
Steps for determining the correct load
limit:
1. Locate the statement "The combined
weight of occupants and cargo
should never exceed XXX kg or XXX
lb." on your vehicle ’s placard. 2.
Determine the combined weight of
the driver and passengers that will
be riding in your vehicle.
3. Subtract the combined weight of the
driver and passengers from XXX kg
or XXX lb.
4. The resulting figure equals the available amount of cargo and
luggage load capacity. For example,
if the “XXX” amount equals 1,400 lb.
and there will be five 150 lb.
passengers in your vehicle, the
amount of available cargo and
luggage load capacity is 650 lb.
(1400-750 (5 x 150) = 650 lb.)
5. Determine the combined weight of
luggage and cargo being loaded on
the vehicle. That weight may not
safely exceed the available cargo
and luggage load capacity calculated
in Step 4.
312
Aviator (CTV) Canada/United States of America, enUSA, Edition date: 201902, Third-Printing- Load Carrying
Page 331 of 609
If you need to arrange roadside assistance
for yourself, Lincoln Motor Company
reimburses a reasonable amount for towing
to the nearest Lincoln dealership within
100 mi (160 km). To obtain reimbursement
information, United States clients, call
1-800-521-4140. Clients need to submit their
original receipts.
Vehicles Sold in Canada: Getting
Roadside Assistance
To fully assist you should you have a vehicle
concern, Lincoln Motor Company offers a
complimentary roadside assistance program.
This program is eligible within Canada or the
continental United States.
The service is available 24 hours a day,
seven days a week.
This program is separate from the New
Vehicle Limited Warranty, beginning from
the original warranty start date and lasts the
life of the vehicle for the original owner.
Subsequent owners receive coverage that
is concurrent with the 6 years or
70,000 mi
(110,000 km) (whichever occurs first)
powertrain warranty coverage period. Note:
Canadian roadside coverage and
benefits may differ from the U.S. coverage.
For complete program coverage details,
review your warranty guide, contact your
dealer, call us in Canada at 1-800-387-9333,
or visit our website at
www.lincolncanada.com.
If you purchased your vehicle in Canada and
require roadside assistance, please call
1-800-387-9333 or contact Roadside
Assistance using the Lincoln Way mobile
app.
Note: For quick reference, complete the
roadside assistance identification card found
in the glove compartment of your vehicle
and place it in your wallet.
HAZARD FLASHERS
Note: The hazard flashers operate when the
ignition is in any position, or if the key is not
in the ignition. If used when the vehicle is not
running, the battery loses charge. As a result,
there may be insufficient power to restart
your vehicle. The flasher control is on the
instrument panel. Use your hazard
flashers when your vehicle is
creating a safety hazard for other motorists.
• Press the flasher control and all front and
rear direction indicators flash.
• Press the button again to switch them off.
FUEL SHUTOFF WARNING:
If your vehicle has been
involved in a crash, have the fuel system
checked. Failure to follow this instruction
could result in fire, personal injury or death.
Note: When you try to restart your vehicle
after a fuel shutoff, the vehicle makes sure
that various systems are safe to restart.
Once the vehicle determines the systems
are safe, then the vehicle allows you to
restart.
Note: In the event that your vehicle does not
restart after your third attempt, contact a
qualified technician.
328
Aviator (CTV) Canada/United States of America, enUSA, Edition date: 201902, Third-Printing- Roadside Emergencies
Page 342 of 609
E-mail
Fax
Phone
Customer Relationship Center
[email protected]
N/A
+1-800-841-3673
Puerto Rico and U.S. Virgin Islands
[email protected]
N/A
N/A
Sub-Saharan Africa
[email protected] [email protected]
N/A
+82-02-1600-6003
South Korea
If you buy your vehicle in North America and
then relocate to any of the above locations,
register your vehicle identification number
(VIN) and new address with Ford Global
Trade Services by emailing,
[email protected].
If you are in another foreign country, contact
the nearest authorized dealer. In the event
your inquiry is unresolved, communicate your
concern with the dealership ’s Sales Manager,
Service Manager or Customer Relations
Manager. If you require additional assistance
or clarification, please contact the respective
Customer Relationship Center as previously
listed.
Customers in the U.S. should call
1-800-392-3673. ORDERING ADDITIONAL OWNER'S
LITERATURE
To order the publications in this portfolio,
contact Helm, Incorporated at:
HELM, INCORPORATED
47911 Halyard Drive
Plymouth, Michigan 48170
Attention: Customer Service
Or to order a free publication catalog, call
toll free: 1-800-782-4356
Monday-Friday 8:00 a.m. - 6:00 p.m. EST
Helm, Incorporated can also be reached by
their website:
www.helminc.com(Items in this catalog may be purchased by
credit card, check or money order.)
Obtaining a French Owner’
s Manual
French Owner’ s Manual can be obtained
from your authorized dealer or by contacting
Helm, Incorporated using the contact
information listed previously in this section.
339
Aviator (CTV) Canada/United States of America, enUSA, Edition date: 201902, Third-Printing- Customer Assistance
Page 408 of 609
TIRE PRESSURE MONITORING
SYSTEM
WARNING: The tire pressure
monitoring system is not a substitute for
manually checking tire pressures. You
should periodically check tire pressures
using a pressure gauge. Failure to correctly
maintain tire pressures could increase the
risk of tire failure, loss of control, vehicle
rollover and personal injury.
Note: You should only use tire sealants in
roadside emergencies as they may cause
damage to the tire pressure monitoring
system sensor.
Note: If the tire pressure monitoring system
sensor becomes damaged, it may not
function. Each tire, including the spare (if
provided), should be checked
monthly when cold and inflated to
the inflation pressure recommended by the
vehicle manufacturer on the vehicle placard
or tire inflation pressure label. (If your vehicle
has tires of a different size than the size
indicated on the vehicle placard or tire
inflation pressure label, you should
determine the proper tire inflation pressure
for those tires).
As an added safety feature, your vehicle has
been equipped with a Tire Pressure
Monitoring System (TPMS) that illuminates a
low tire pressure telltale when one or more
of your tires is significantly under-inflated.
Accordingly, when the low tire pressure
telltale illuminates, you should stop and
check your tires as soon as possible, and
inflate them to the proper pressure. Driving
on a significantly under-inflated tire causes
the tire to overheat and can lead to tire
failure. Under-inflation also reduces fuel
efficiency and tire tread life, and may affect
the vehicle ’s handling and stopping ability. Please note that the TPMS is not a substitute
for proper tire maintenance, and it is the
driver’
s responsibility to maintain correct tire
pressure, even if under-inflation has not
reached the level to trigger illumination of
the TPMS low tire pressure telltale.
Your vehicle has also been equipped with a
TPMS malfunction indicator to indicate when
the system is not operating properly. The
TPMS malfunction indicator is combined with
the low tire pressure telltale. When the
system detects a malfunction, the telltale will
flash for approximately one minute and then
remain continuously illuminated. This
sequence will continue upon subsequent
vehicle start-ups as long as the malfunction
exists.
When the malfunction indicator is illuminated,
the system may not be able to detect or
signal low tire pressure as intended. TPMS
malfunctions may occur for a variety of
reasons, including the installation of
replacement or alternate tires or wheels on
the vehicle that prevent the TPMS from
405
Aviator (CTV) Canada/United States of America, enUSA, Edition date: 201902, Third-Printing- Wheels and Tires
Page 441 of 609
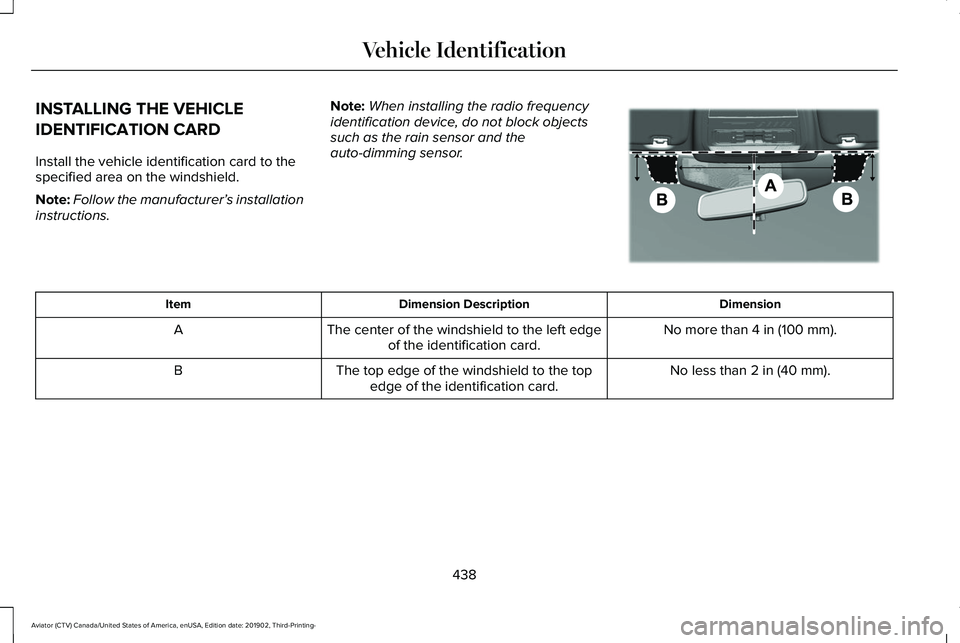
INSTALLING THE VEHICLE
IDENTIFICATION CARD
Install the vehicle identification card to the
specified area on the windshield.
Note:
Follow the manufacturer’ s installation
instructions. Note:
When installing the radio frequency
identification device, do not block objects
such as the rain sensor and the
auto-dimming sensor. Dimension
Dimension Description
Item
No more than 4 in (100 mm).
The center of the windshield to the left edge
of the identification card.
A
No less than
2 in (40 mm).
The top edge of the windshield to the top
edge of the identification card.
B
438
Aviator (CTV) Canada/United States of America, enUSA, Edition date: 201902, Third-Printing- Vehicle Identification E309790
Page 510 of 609
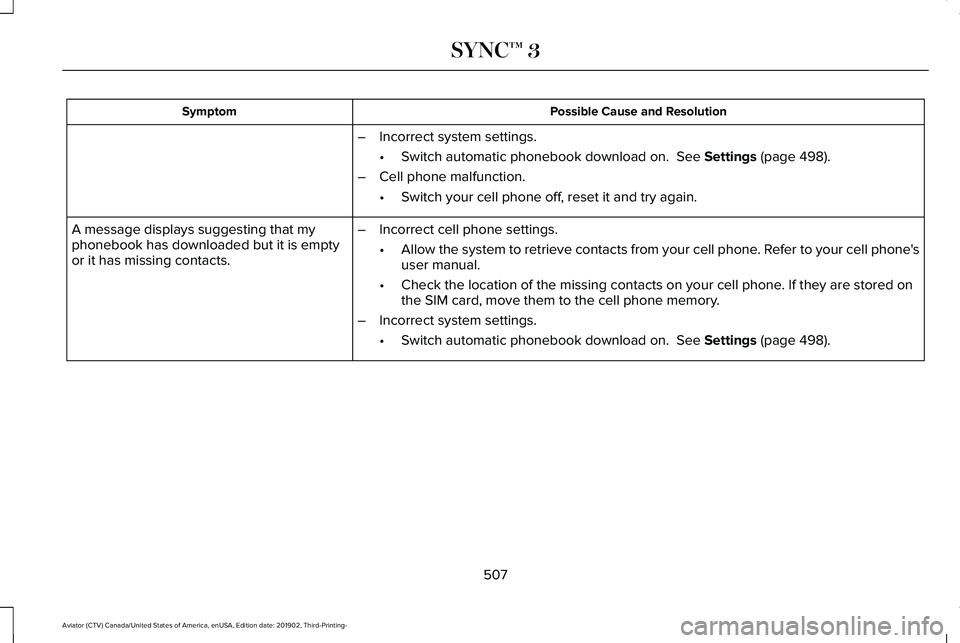
Possible Cause and Resolution
Symptom
–Incorrect system settings.
•Switch automatic phonebook download on. See Settings (page 498).
– Cell phone malfunction.
•Switch your cell phone off, reset it and try again.
– Incorrect cell phone settings.
•Allow the system to retrieve contacts from your cell phone. Refer to your cell phone's
user manual.
• Check the location of the missing contacts on your cell phone. If they are stored on
the SIM card, move them to the cell phone memory.
– Incorrect system settings.
•Switch automatic phonebook download on.
See Settings (page 498).
A message displays suggesting that my
phonebook has downloaded but it is empty
or it has missing contacts.
507
Aviator (CTV) Canada/United States of America, enUSA, Edition date: 201902, Third-Printing- SYNC™ 3
Page 602 of 609
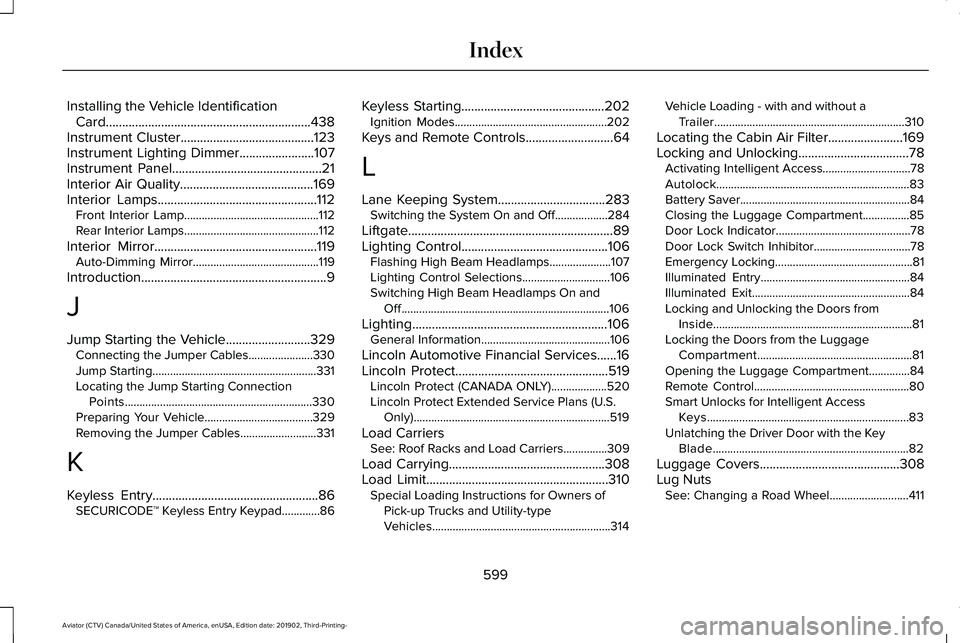
Installing the Vehicle Identification
Card...............................................................438
Instrument Cluster.........................................123
Instrument Lighting Dimmer.......................107
Instrument Panel..............................................21
Interior Air Quality.........................................169
Interior Lamps.................................................112 Front Interior Lamp..............................................112
Rear Interior Lamps..............................................112
Interior Mirror..................................................119 Auto-Dimming Mirror...........................................119
Introduction.........................................................9
J
Jump Starting the Vehicle
..........................329
Connecting the Jumper Cables......................330
Jump Starting........................................................331
Locating the Jump Starting Connection
Points................................................................330
Preparing Your Vehicle.....................................329
Removing the Jumper Cables..........................331
K
Keyless Entry...................................................86 SECURICODE™ Keyless Entry Keypad.............86 Keyless Starting
............................................202
Ignition Modes....................................................202
Keys and Remote Controls...........................64
L
Lane Keeping System.................................283 Switching the System On and Off..................284
Liftgate...............................................................89
Lighting Control.............................................106 Flashing High Beam Headlamps.....................107
Lighting Control Selections..............................106
Switching High Beam Headlamps On and
Off.......................................................................106
Lighting............................................................106 General Information............................................106
Lincoln Automotive Financial Services......16
Lincoln Protect...............................................519 Lincoln Protect (CANADA ONLY)...................520
Lincoln Protect Extended Service Plans (U.S.
Only)...................................................................519
Load Carriers See: Roof Racks and Load Carriers...............309
Load Carrying................................................308
Load Limit
........................................................310
Special Loading Instructions for Owners of
Pick-up Trucks and Utility-type
Vehicles.............................................................314 Vehicle Loading - with and without a
Trailer.................................................................310
Locating the Cabin Air Filter.......................169
Locking and Unlocking..................................78 Activating Intelligent Access..............................
78
Autolock..................................................................83
Battery Saver..........................................................84
Closing the Luggage Compartment................85
Door Lock Indicator..............................................78
Door Lock Switch Inhibitor.................................78
Emergency Locking...............................................81
Illuminated Entry...................................................84
Illuminated Exit......................................................84
Locking and Unlocking the Doors from Inside....................................................................81
Locking the Doors from the Luggage Compartment.....................................................81
Opening the Luggage Compartment..............84
Remote Control.....................................................80
Smart Unlocks for Intelligent Access Keys.....................................................................83
Unlatching the Driver Door with the Key Blade...................................................................82
Luggage Covers...........................................308
Lug Nuts See: Changing a Road Wheel...........................411
599
Aviator (CTV) Canada/United States of America, enUSA, Edition date: 201902, Third-Printing- Index