Code door LINCOLN AVIATOR 2020 Owners Manual
[x] Cancel search | Manufacturer: LINCOLN, Model Year: 2020, Model line: AVIATOR, Model: LINCOLN AVIATOR 2020Pages: 609, PDF Size: 5.4 MB
Page 89 of 609

EMERGENCY DOOR RELEASE If you are inside your vehicle and unable to
use the electronic door system, you can
open the driver door using the emergency
door release switch in the map pocket.
SOFT CLOSING DOOR
Gently close the door until it fully latches.
The system automatically closes the door,
making sure it is fully secure.
Note:
The system does not work if the
vehicle battery charge is low.
Note: The system is limited to 25 cycles
between each ignition cycle. This is to
prevent the vehicle battery from losing
charge.
Note: You can override soft close by fully
closing the door manually.
KEYLESS ENTRY
SECURICODE™ Keyless Entry Keypad
The keypad is near the driver window. It
illuminates when touched. Note:
If you enter your entry code too fast
on the keypad, the unlock function may not
work. Enter your entry code again more
slowly. You can use the keypad to do the following:
•
Lock or unlock the doors.
• Program and erase user codes.
• Arm and disarm the anti-theft alarm.
86
Aviator (CTV) Canada/United States of America, enUSA, Edition date: 201902, Third-Printing- Doors and Locks E295773 E138637
Page 90 of 609
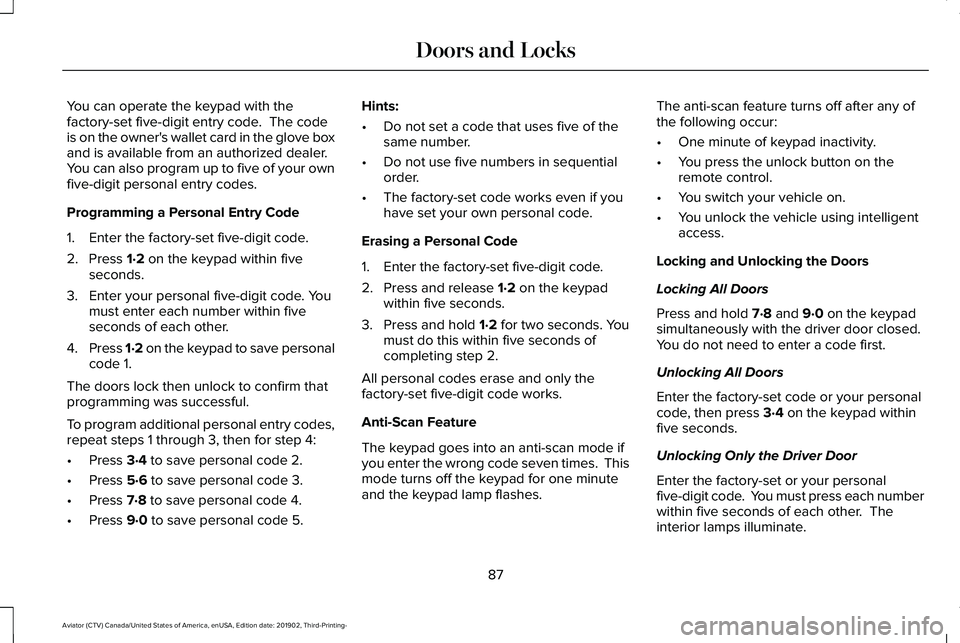
You can operate the keypad with the
factory-set five-digit entry code. The code
is on the owner's wallet card in the glove box
and is available from an authorized dealer.
You can also program up to five of your own
five-digit personal entry codes.
Programming a Personal Entry Code
1. Enter the factory-set five-digit code.
2. Press 1·2 on the keypad within five
seconds.
3. Enter your personal five-digit code. You must enter each number within five
seconds of each other.
4. Press 1·2 on the keypad to save personal
code 1.
The doors lock then unlock to confirm that
programming was successful.
To program additional personal entry codes,
repeat steps 1 through 3, then for step 4:
• Press
3·4 to save personal code 2.
• Press
5·6 to save personal code 3.
• Press
7·8 to save personal code 4.
• Press
9·0 to save personal code 5. Hints:
•
Do not set a code that uses five of the
same number.
• Do not use five numbers in sequential
order.
• The factory-set code works even if you
have set your own personal code.
Erasing a Personal Code
1. Enter the factory-set five-digit code.
2. Press and release
1·2 on the keypad
within five seconds.
3. Press and hold
1·2 for two seconds. You
must do this within five seconds of
completing step 2.
All personal codes erase and only the
factory-set five-digit code works.
Anti-Scan Feature
The keypad goes into an anti-scan mode if
you enter the wrong code seven times. This
mode turns off the keypad for one minute
and the keypad lamp flashes. The anti-scan feature turns off after any of
the following occur:
•
One minute of keypad inactivity.
• You press the unlock button on the
remote control.
• You switch your vehicle on.
• You unlock the vehicle using intelligent
access.
Locking and Unlocking the Doors
Locking All Doors
Press and hold 7·8 and 9·0 on the keypad
simultaneously with the driver door closed.
You do not need to enter a code first.
Unlocking All Doors
Enter the factory-set code or your personal
code, then press
3·4 on the keypad within
five seconds.
Unlocking Only the Driver Door
Enter the factory-set or your personal
five-digit code. You must press each number
within five seconds of each other. The
interior lamps illuminate.
87
Aviator (CTV) Canada/United States of America, enUSA, Edition date: 201902, Third-Printing- Doors and Locks
Page 97 of 609
PASSIVE ANTI-THEFT SYSTEM
Note:
The system is not compatible with
non-Ford aftermarket remote start systems.
Use of these systems may result in vehicle
starting problems and a loss of security
protection.
Note: Metallic objects, electronic devices or
a second coded key on the same key chain
may cause vehicle starting problems if they
are too close to the key when starting the
engine. Prevent these objects from touching
the coded key while starting the engine.
Switch the ignition off, move all objects on
the key chain away from the coded key and
restart the engine if a problem occurs.
Note: Do not leave a duplicate coded key
in the vehicle. Always take your keys and
lock all doors when leaving the vehicle. SecuriLock®
The system is an engine immobilization
system. It is designed to help prevent the
engine from being started unless a coded
key programmed to your vehicle is used.
Using the wrong key may prevent the engine
from starting. A message may appear in the
information display.
If you are unable to start the engine with a
correctly coded key, a malfunction has
happened and a message may appear in the
information display.
Automatic Arming
The vehicle arms immediately after you
switch the ignition off.
Automatic Disarming
Switching the ignition on with a coded key
disarms the vehicle.
Replacement Keys
Note:
Your vehicle comes equipped with two
intelligent access keys. The intelligent access key functions as a
programmed key that operates the driver
door lock and activates the intelligent access
with push button start system, as well as a
remote control.
If your programmed transmitters are lost or
stolen and you do not have an extra coded
key, you will need to have your vehicle
towed to an authorized dealer. You need to
erase the key codes from your vehicle and
program new coded keys.
Store an extra programmed key away from
the vehicle in a safe place to help prevent
any inconveniences. See your authorized
dealer to purchase additional spare or
replacement keys.
Programming a Spare Intelligent Access
Key
See your authorized dealer to have
additional keys programmed to your vehicle.
94
Aviator (CTV) Canada/United States of America, enUSA, Edition date: 201902, Third-Printing- Security
Page 145 of 609
Action
Message
Indicates that the rear seat interior door release switches and power wi\
ndows are switched off,preventing rear seat occupants from opening the doors or windows.
Child Lock ON
Indicates that the rear seat interior door release switches and power wi\
ndows are switched on.
Child Lock OFF
The factory keypad code displays in the information display after the system resets t\
he keypad.See Passive Anti-Theft System (page 94).
Factory Keypad Code {X X X X X}
Driver Alert Action
Message
Stop and rest as soon as it is safe to do so.
Driver Alert Warning Rest Now
Take a rest soon.
Driver Alert Warning Rest Suggested
Fuel Action
Message
An early reminder of a low fuel condition.
Fuel Level Low
The fuel fill inlet valve may not be properly closed.
Check Fuel Fill Inlet
142
Aviator (CTV) Canada/United States of America, enUSA, Edition date: 201902, Third-Printing- Information Displays
Page 194 of 609

UNIVERSAL GARAGE DOOR
OPENER
HomeLink Wireless Control System
WARNING: Do not use the system
with any garage door opener that does not
have the safety stop and reverse feature
as required by U.S. Federal Safety
Standards (this includes any garage door
opener manufactured before April 1, 1982).
A garage door opener which cannot detect
an object, signaling the door to stop and
reverse, does not meet current federal
safety standards. Using a garage door
opener without these features increases
the risk of serious injury or death.
Note: Make sure that the garage door and
security device are free from obstruction
when you are programming. Do not program
the system with the vehicle in the garage.
Note: Make sure you keep the original
remote control transmitter for use in other
vehicles as well as for future system
programming. Note:
We recommend that upon the sale or
lease termination of your vehicle, you erase
the programmed function buttons for security
reasons. See
Erasing the Function Button
Codes.
Note: You can program a maximum of three
devices. To change or replace any of the
three devices after it has been initially
programmed, you must first erase the current
settings. See
Erasing the Function Button
Codes. The universal garage door opener replaces
the common hand-held garage door opener
with a three-button transmitter that is
integrated into the driver’
s sun visor.The system includes two primary features, a
garage door opener and a platform for
remote activation of devices within the home.
As well as being programmed for garage
doors, the system transmitter can be
programmed to operate entry gate operators,
security systems, entry door locks and home
or office lighting.
Additional system information can be found
online at www.homelink.com,
www.youtube.com/HomeLinkGentex or by
calling the toll-free help line on
1-800-355-3515.
In-Vehicle Programming
This process is to program your hand-held
transmitter and your in-vehicle HomeLink
button.
Note:
The programming steps below assume
you will be programming HomeLink that was
not previously programmed.
Note: Put a new battery in the hand-held
transmitter. This will ensure quicker training
and accurate transmission of the
radio-frequency signal.
191
Aviator (CTV) Canada/United States of America, enUSA, Edition date: 201902, Third-Printing- Garage Door OpenerE142657
Page 196 of 609
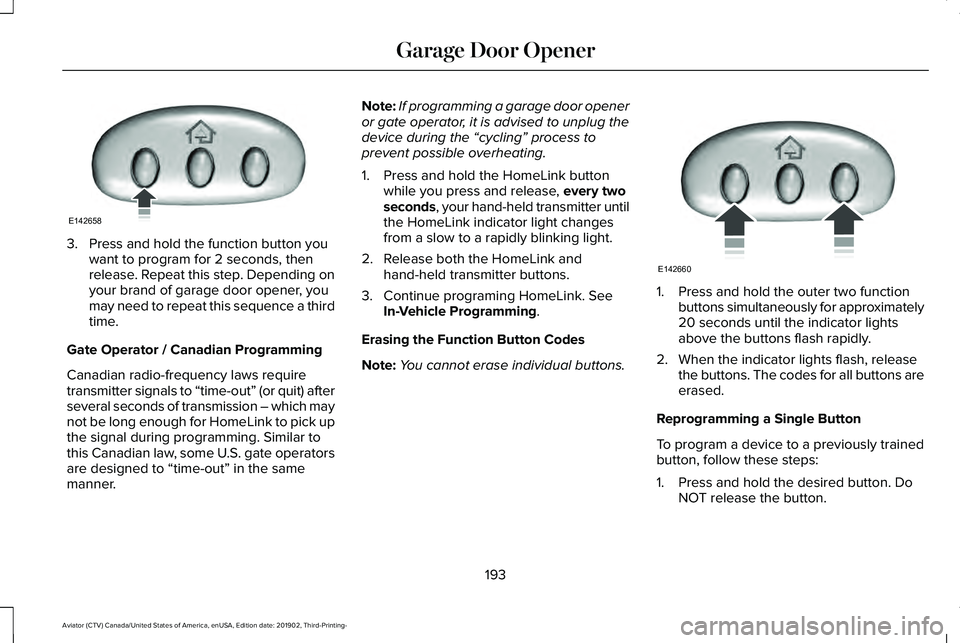
3. Press and hold the function button you
want to program for 2 seconds, then
release. Repeat this step. Depending on
your brand of garage door opener, you
may need to repeat this sequence a third
time.
Gate Operator / Canadian Programming
Canadian radio-frequency laws require
transmitter signals to “time-out” (or quit) after
several seconds of transmission – which may
not be long enough for HomeLink to pick up
the signal during programming. Similar to
this Canadian law, some U.S. gate operators
are designed to “time-out” in the same
manner. Note:
If programming a garage door opener
or gate operator, it is advised to unplug the
device during the “cycling” process to
prevent possible overheating.
1. Press and hold the HomeLink button while you press and release, every two
seconds, your hand-held transmitter until
the HomeLink indicator light changes
from a slow to a rapidly blinking light.
2. Release both the HomeLink and hand-held transmitter buttons.
3. Continue programing HomeLink. See In-Vehicle Programming
.
Erasing the Function Button Codes
Note: You cannot erase individual buttons. 1. Press and hold the outer two function
buttons simultaneously for approximately
20 seconds until the indicator lights
above the buttons flash rapidly.
2. When the indicator lights flash, release the buttons. The codes for all buttons are
erased.
Reprogramming a Single Button
To program a device to a previously trained
button, follow these steps:
1. Press and hold the desired button. Do NOT release the button.
193
Aviator (CTV) Canada/United States of America, enUSA, Edition date: 201902, Third-Printing- Garage Door OpenerE142658 E142660
Page 197 of 609
2.
The indicator light will begin to flash after
20 seconds. Without releasing the
button, follow Step 1 in the Programming
section.
For questions or comments, contact
HomeLink at www.homelink.com,
www.youtube.com/HomeLinkGentex or
1-800-355-3515.
Programming to a Genie Intellicode 2
Garage Door Opener
Note: The Genie Intellicode 2 transmitter
must already be programmed to operate
with the garage door opener.
Note: To program HomeLink to the
transmitter you must first put the transmitter
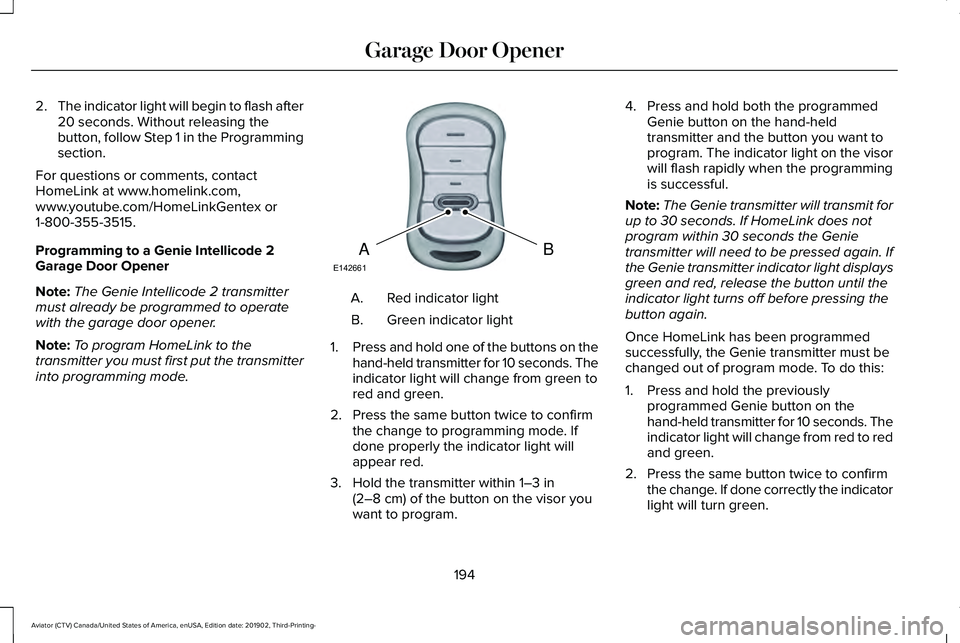
into programming mode. Red indicator light
A.
Green indicator light
B.
1. Press and hold one of the buttons on the
hand-held transmitter for 10 seconds. The
indicator light will change from green to
red and green.
2. Press the same button twice to confirm the change to programming mode. If
done properly the indicator light will
appear red.
3. Hold the transmitter within 1–3 in
(2–8 cm) of the button on the visor you
want to program. 4. Press and hold both the programmed
Genie button on the hand-held
transmitter and the button you want to
program. The indicator light on the visor
will flash rapidly when the programming
is successful.
Note: The Genie transmitter will transmit for
up to 30 seconds. If HomeLink does not
program within 30 seconds the Genie
transmitter will need to be pressed again. If
the Genie transmitter indicator light displays
green and red, release the button until the
indicator light turns off before pressing the
button again.
Once HomeLink has been programmed
successfully, the Genie transmitter must be
changed out of program mode. To do this:
1. Press and hold the previously programmed Genie button on the
hand-held transmitter for 10 seconds. The
indicator light will change from red to red
and green.
2. Press the same button twice to confirm the change. If done correctly the indicator
light will turn green.
194
Aviator (CTV) Canada/United States of America, enUSA, Edition date: 201902, Third-Printing- Garage Door OpenerBAE142661
Page 198 of 609
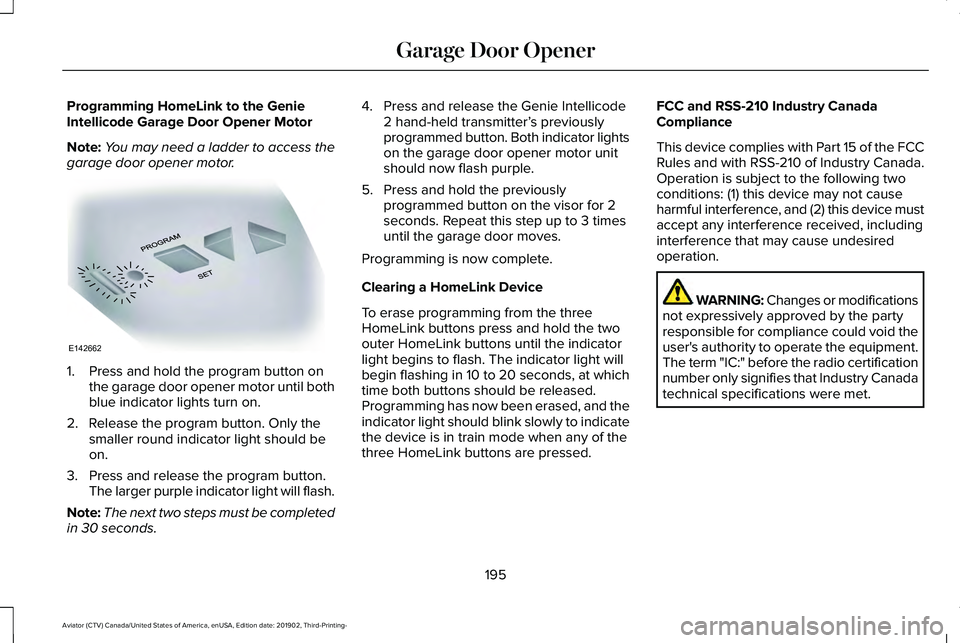
Programming HomeLink to the Genie
Intellicode Garage Door Opener Motor
Note:
You may need a ladder to access the
garage door opener motor. 1. Press and hold the program button on
the garage door opener motor until both
blue indicator lights turn on.
2. Release the program button. Only the smaller round indicator light should be
on.
3. Press and release the program button. The larger purple indicator light will flash.
Note: The next two steps must be completed
in 30 seconds. 4. Press and release the Genie Intellicode
2 hand-held transmitter’ s previously
programmed button. Both indicator lights
on the garage door opener motor unit
should now flash purple.
5. Press and hold the previously programmed button on the visor for 2
seconds. Repeat this step up to 3 times
until the garage door moves.
Programming is now complete.
Clearing a HomeLink Device
To erase programming from the three
HomeLink buttons press and hold the two
outer HomeLink buttons until the indicator
light begins to flash. The indicator light will
begin flashing in 10 to 20 seconds, at which
time both buttons should be released.
Programming has now been erased, and the
indicator light should blink slowly to indicate
the device is in train mode when any of the
three HomeLink buttons are pressed. FCC and RSS-210 Industry Canada
Compliance
This device complies with Part 15 of the FCC
Rules and with RSS-210 of Industry Canada.
Operation is subject to the following two
conditions: (1) this device may not cause
harmful interference, and (2) this device must
accept any interference received, including
interference that may cause undesired
operation.
WARNING: Changes or modifications
not expressively approved by the party
responsible for compliance could void the
user's authority to operate the equipment.
The term "IC:" before the radio certification
number only signifies that Industry Canada
technical specifications were met.
195
Aviator (CTV) Canada/United States of America, enUSA, Edition date: 201902, Third-Printing- Garage Door OpenerE142662
Page 387 of 609
REPAIRING MINOR PAINT
DAMAGE
Authorized dealers have touch-up paint to
match your vehicle
’s color. Your vehicle
color code is printed on a sticker on the front,
left-hand side door jamb. Take your color
code to your authorized dealer to make sure
you get the correct color.
Before repairing minor paint damage, use a
cleaner such as Motorcraft Bug and Tar
Remover to remove particles such as bird
droppings, tree sap, insect deposits, tar
spots, road salt and industrial fallout.
Read the instructions before using cleaning
products.
CLEANING THE WHEELS
1. Regularly clean them with a wheel cleaner. We recommend that you use
Ford approved wheel cleaner if available.
2. Remove dirt and brake dust with a sponge. 3. Remove tar and grease with a bug and
tar remover. We recommend that you use
Ford approved bug and tar remover if
available.
4. Thoroughly rinse the wheels with water after cleaning.
If you intend on parking your vehicle for an
extended period after cleaning the wheels
with a wheel cleaner, drive your vehicle for
a few minutes before doing so. This reduces
the risk of corrosion of the brake discs, brake
pads and linings.
Do not clean the wheels when they are hot.
Note: Some car washes could damage
wheel rims and covers.
Note: Using non-recommended cleaners,
harsh cleaning products, chrome wheel
cleaners or abrasive materials could
damage wheel rims and covers. VEHICLE STORAGE
If you plan on storing your vehicle for 30
days or more, read the following
maintenance recommendations to make sure
your vehicle stays in good operating
condition.
We engineer and test all motor vehicles and
their components for reliable, regular driving.
Under various conditions, long-term storage
may lead to degraded engine performance
or failure unless you use specific precautions
to preserve engine components.
General
•
Store all vehicles in a dry, ventilated
place.
• Protect from sunlight, if possible.
• If vehicles are stored outside, they
require regular maintenance to protect
against rust and damage.
384
Aviator (CTV) Canada/United States of America, enUSA, Edition date: 201902, Third-Printing- Vehicle Care
Page 393 of 609
The traction grades, from highest to
lowest are AA, A, B, and C. The grades
represent the tire
’s ability to stop on wet
pavement as measured under controlled
conditions on specified government test
surfaces of asphalt and concrete. A tire
marked C may have poor traction
performance.
Temperature A B C WARNING: The temperature
grade for this tire is established for a
tire that is properly inflated and not
overloaded. Excessive speed,
underinflation, or excessive loading,
either separately or in combination,
can cause heat buildup and possible
tire failure.
The temperature grades are A (the
highest), B and C, representing the tire ’s
resistance to the generation of heat and
its ability to dissipate heat when tested
under controlled conditions on a
specified indoor laboratory test wheel.
Sustained high temperature can cause the material of the tire to degenerate
and reduce tire life, and excessive
temperature can lead to sudden tire
failure. The grade C corresponds to a
level of performance which all
passenger car tires must meet under the
Federal Motor Vehicle Safety Standard
No. 139. Grades B and A represent
higher levels of performance on the
laboratory test wheel than the minimum
required by law.
Glossary of Tire Terminology
*
Tire label: A label showing the original
equipment tire sizes, recommended
inflation pressure and the maximum
weight the vehicle can carry.
*
Tire Identification Number (TIN): A
number on the sidewall of each tire
providing information about the tire
brand and manufacturing plant, tire size
and date of manufacture. Also referred
to as DOT code.
*
Inflation pressure: A measure of the
amount of air in a tire. *
Standard load: A class of P-metric or
Metric tires designed to carry a
maximum load at set pressure. For
example: For P-metric tires
35 psi
(2.4 bar) and for Metric tires 36 psi
(2.5 bar). Increasing the inflation
pressure beyond this pressure will not
increase the tire ’s load carrying
capability.
*
Extra load: A class of P-metric or Metric
tires designed to carry a heavier
maximum load at
42 psi (2.9 bar).
Increasing the inflation pressure beyond
this pressure will not increase the tire ’s
load carrying capability.
*
kPa: Kilopascal, a metric unit of air
pressure.
*PSI: Pounds per square inch, a standard
unit of air pressure.
*
Cold tire pressure: The tire pressure
when the vehicle has been stationary
and out of direct sunlight for an hour or
more and prior to the vehicle being
driven for
1 mi (1.6 km).
390
Aviator (CTV) Canada/United States of America, enUSA, Edition date: 201902, Third-Printing- Wheels and Tires