drive mode LINCOLN AVIATOR 2020 Owners Manual
[x] Cancel search | Manufacturer: LINCOLN, Model Year: 2020, Model line: AVIATOR, Model: LINCOLN AVIATOR 2020Pages: 609, PDF Size: 5.4 MB
Page 4 of 609
Introduction
About This Manual
...........................................9
Symbols Glossary ............................................
9
Data Recording ...............................................
12
Perchlorate .......................................................
16
Lincoln Automotive Financial Services ........................................................................\
..
16
Replacement Parts Recommendation ........................................................................\
..
17
Special Notices ................................................
17
Mobile Communications Equipment .........
18
Export Unique Options ..................................
19
Environment
Protecting the Environment ........................
20
At a Glance
Instrument Panel .............................................
21
Child Safety
General Information ......................................
24
Installing Child Restraints ............................
26
Booster Seats ..................................................
37Child Restraint Positioning
..........................
39
Child Safety Locks ..........................................
41
Seatbelts
Principle of Operation ..................................
43
Fastening the Seatbelts ...............................
44
Seatbelt Height Adjustment .......................
46
Seatbelt Warning Lamp and Indicator Chime ...........................................................
46
Seatbelt Reminder .........................................
47
Child Restraint and Seatbelt Maintenance ........................................................................\
.
49
Seatbelt Extensions ......................................
50
Personal Safety System ™
Personal Safety System ™..............................
51
Supplementary Restraints System
Principle of Operation ..................................
52
Driver and Passenger Airbags ...................
53
Front Passenger Sensing System .............
55
Side Airbags ....................................................
57Driver and Passenger Knee Airbags
........
58
Safety Canopy™ ..............................................
58
Crash Sensors and Airbag Indicator ........
60
Airbag Disposal ...............................................
61
911 Assist
What Is 911 Assist ...........................................
62
Emergency Call Requirements ..................
62
Emergency Call Limitations ........................
63
Keys and Remote Controls
General Information on Radio Frequencies ........................................................................\
.
64
Remote Control ..............................................
64
Replacing a Lost Key or Remote Control ........................................................................\
69
Phone as a Key
What Is Phone As a Key ...............................
70
Phone as a Key Limitations .........................
70
Programming Your Phone ..........................
70
Using the Valet Mode ...................................
70
Using the Backup Start Passcode ..............
71
1
Aviator (CTV) Canada/United States of America, enUSA, Edition date: 201902, Third-Printing- Table of Contents
Page 8 of 609
Hill Descent Control Indicator ..................249
Parking Aids
Principle of Operation ................................
250
Rear Parking Aid .........................................
250
Front Parking Aid ........................................
252
Side Sensing System .................................
254
Active Park Assist .......................................
256
Rear View Camera .......................................
261
360 Degree Camera ..................................
264
Cruise Control
What Is Cruise Control ...............................
267
Switching Cruise Control On and Off ......
267
Setting the Cruise Control Speed ...........
267
Canceling the Set Speed ..........................
268
Resuming the Set Speed ..........................
268
Cruise Control Indicators ..........................
268
Adaptive Cruise Control
How Does Adaptive Cruise Control With Stop and Go Work ..................................
269What Is Intelligent Adaptive Cruise Control
......................................................................
269
Adaptive Cruise Control Precautions - Vehicles With: Adaptive Cruise Control
With Lane Centering ..............................
269
Adaptive Cruise Control Precautions - Vehicles With: Adaptive Cruise Control
With Stop and Go ...................................
269
Adaptive Cruise Control Limitations - Vehicles With: Adaptive Cruise Control
With Lane Centering ..............................
270
Adaptive Cruise Control Limitations - Vehicles With: Adaptive Cruise Control
With Stop and Go .....................................
271
Switching Adaptive Cruise Control On and Off ...............................................................
273
Setting the Adaptive Cruise Control Speed ......................................................................
274
Setting the Adaptive Cruise Control Gap ......................................................................
275
Canceling the Set Speed ..........................
276
Resuming the Set Speed ..........................
276
Overriding the Set Speed .........................
276
Adaptive Cruise Control Indicators - Vehicles With: Adaptive Cruise Control
With Lane Centering ..............................
276Adaptive Cruise Control Indicators -
Vehicles With: Adaptive Cruise Control
With Stop and Go ....................................
277
Adaptive Cruise Control Indicators - Vehicles With: Intelligent Adaptive
Cruise Control ..........................................
277
Switching From Adaptive Cruise Control to Cruise Control .....................................
277
Switching Intelligent Mode On and Off ......................................................................
278
Adjusting the Set Speed Tolerance ........
278
Adaptive Cruise Control – Troubleshooting ......................................................................
279
Driving Aids
Driver Alert ....................................................
282
Lane Keeping System ................................
283
Blind Spot Information System ................
289
Cross Traffic Alert ........................................
293
Speed Sign Recognition ...........................
298
Steering .........................................................
299
Pre-Collision Assist .....................................
300
Drive Mode Control
What Is Drive Mode Control .....................
306
5
Aviator (CTV) Canada/United States of America, enUSA, Edition date: 201902, Third-Printing- Table of Contents
Page 9 of 609
Selecting a Drive Mode
.............................306
Drive Modes .................................................
306
Load Carrying
Rear Under Floor Storage .........................
308
Luggage Covers ..........................................
308
Roof Racks and Load Carriers .................
309
Load Limit .......................................................
310
Air Suspension ..............................................
314
Towing
Towing a Trailer .............................................
316
Trailer Sway Control .....................................
317
Recommended Towing Weights ...............
317
Essential Towing Checks ...........................
319
Towing the Vehicle on Four Wheels .......
321
Driving Hints
Reduced Engine Performance .................
323
Economical Driving .....................................
323
Cold Weather Precautions ........................
324
Breaking-In ....................................................
324
Driving Through Water ..............................
324Floor Mats
.....................................................
325
Roadside Emergencies
Roadside Assistance ..................................
327
Hazard Flashers ...........................................
328
Fuel Shutoff ..................................................
328
Jump Starting the Vehicle .........................
329
Post-Crash Alert System .............................
331
Transporting the Vehicle ...........................
332
Customer Assistance
Getting the Services You Need ...............
333
In California (U.S. Only) ..............................
334
The Better Business Bureau (BBB) Auto Line Program (U.S. Only) .......................
335
Utilizing the Mediation/Arbitration Program (Canada Only) ..........................................
336
Getting Assistance Outside the U.S. and Canada .......................................................
337
Ordering Additional Owner's Literature ......................................................................
339
Reporting Safety Defects (U.S. Only) ......
340
Reporting Safety Defects (Canada Only) ......................................................................
340 Fuses
Fuse Specification Chart
...........................
342
Changing a Fuse .........................................
355
Maintenance
General Information ....................................
358
Opening and Closing the Hood ..............
358
Under Hood Overview ..............................
360
Engine Oil Dipstick ......................................
361
Engine Oil Check .........................................
361
Oil Change Indicator Reset ......................
362
Changing the Engine Air Filter ................
363
Engine Coolant Check ...............................
364
Automatic Transmission Fluid Check ......
369
Brake Fluid Check ......................................
369
Power Steering Fluid Check .....................
370
Changing the 12V Battery ..........................
371
Adjusting the Headlamps ..........................
373
Washer Fluid Check ....................................
375
Fuel Filter .......................................................
375
Checking the Wiper Blades ......................
375
6
Aviator (CTV) Canada/United States of America, enUSA, Edition date: 201902, Third-Printing- Table of Contents
Page 46 of 609
PRINCIPLE OF OPERATION
WARNING: Always drive and ride
with your seatback upright and the lap belt
snug and low across the hips. WARNING:
Children must always be
properly restrained. WARNING: Do not allow a passenger
to hold a child on their lap when your
vehicle is moving. Failure to follow this
instruction could result in personal injury
or death in the event of a sudden stop or
crash. WARNING:
All occupants of your
vehicle, including the driver, should always
properly wear their seatbelts, even when
an airbag supplemental restraint system is
provided. Failure to properly wear your
seatbelt could seriously increase the risk
of injury or death. WARNING: It is extremely dangerous
to ride in a cargo area, inside or outside of
a vehicle. In a crash, people riding in these
areas are more likely to be seriously
injured or killed. Do not allow people to
ride in any area of your vehicle that is not
equipped with seats and seatbelts. Make
sure everyone in your vehicle is in a seat
and properly using a seatbelt. Failure to
follow this warning could result in serious
personal injury or death. WARNING:
In a rollover crash, an
unbelted person is significantly more likely
to die than a person wearing a seatbelt. WARNING:
Each seating position in
your vehicle has a specific seatbelt
assembly made up of one buckle and one
tongue designed to be used as a pair. Use
the shoulder belt on the outside shoulder
only. Never wear the shoulder belt under
the arm. Never use a single seatbelt for
more than one person. WARNING:
Even with advanced
restraints systems, properly restrain
children 12 and under in a rear seating
position. Failure to follow this could
seriously increase the risk of injury or
death. WARNING:
Seatbelts and seats may
be hot in a vehicle that is in the sunshine.
The hot seatbelts or seats may burn a small
child. Check seat covers and buckles
before you place a child anywhere near
them.
All seating positions in your vehicle have lap
and shoulder seatbelts. All occupants of the
vehicle should always properly wear their
seatbelts, even when an airbag supplemental
restraint system is provided.
The seatbelt system consists of:
• Lap and shoulder seatbelts.
• Shoulder seatbelt with automatic locking
mode, (except driver seatbelt).
• Height adjuster at the front outermost
seating positions.
43
Aviator (CTV) Canada/United States of America, enUSA, Edition date: 201902, Third-Printing- Seatbelts
Page 48 of 609
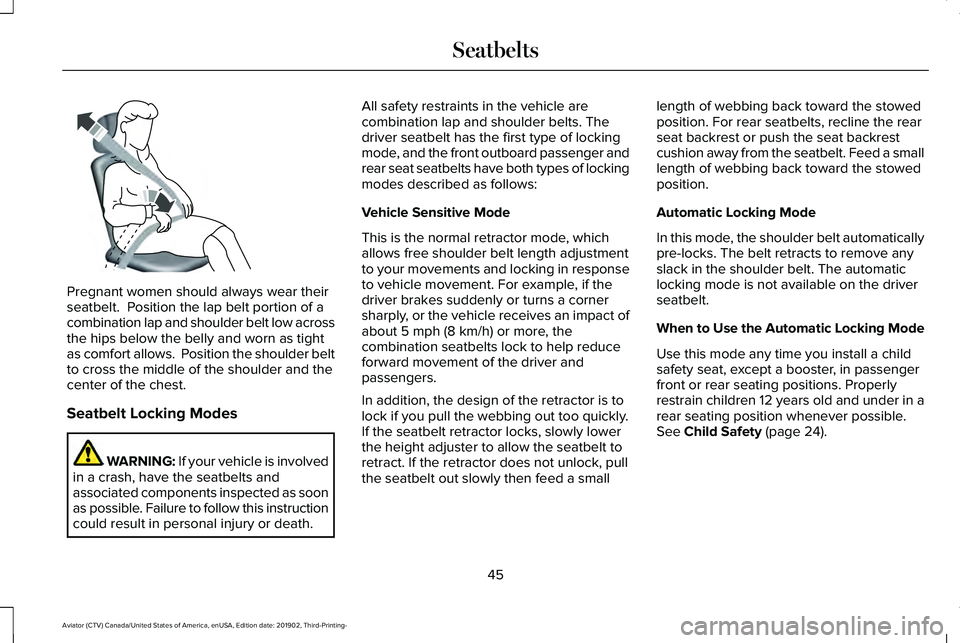
Pregnant women should always wear their
seatbelt. Position the lap belt portion of a
combination lap and shoulder belt low across
the hips below the belly and worn as tight
as comfort allows. Position the shoulder belt
to cross the middle of the shoulder and the
center of the chest.
Seatbelt Locking Modes
WARNING: If your vehicle is involved
in a crash, have the seatbelts and
associated components inspected as soon
as possible. Failure to follow this instruction
could result in personal injury or death. All safety restraints in the vehicle are
combination lap and shoulder belts. The
driver seatbelt has the first type of locking
mode, and the front outboard passenger and
rear seat seatbelts have both types of locking
modes described as follows:
Vehicle Sensitive Mode
This is the normal retractor mode, which
allows free shoulder belt length adjustment
to your movements and locking in response
to vehicle movement. For example, if the
driver brakes suddenly or turns a corner
sharply, or the vehicle receives an impact of
about 5 mph (8 km/h) or more, the
combination seatbelts lock to help reduce
forward movement of the driver and
passengers.
In addition, the design of the retractor is to
lock if you pull the webbing out too quickly.
If the seatbelt retractor locks, slowly lower
the height adjuster to allow the seatbelt to
retract. If the retractor does not unlock, pull
the seatbelt out slowly then feed a small length of webbing back toward the stowed
position. For rear seatbelts, recline the rear
seat backrest or push the seat backrest
cushion away from the seatbelt. Feed a small
length of webbing back toward the stowed
position.
Automatic Locking Mode
In this mode, the shoulder belt automatically
pre-locks. The belt retracts to remove any
slack in the shoulder belt. The automatic
locking mode is not available on the driver
seatbelt.
When to Use the Automatic Locking Mode
Use this mode any time you install a child
safety seat, except a booster, in passenger
front or rear seating positions. Properly
restrain children 12 years old and under in a
rear seating position whenever possible.
See
Child Safety (page 24).
45
Aviator (CTV) Canada/United States of America, enUSA, Edition date: 201902, Third-Printing- SeatbeltsE142590
Page 49 of 609
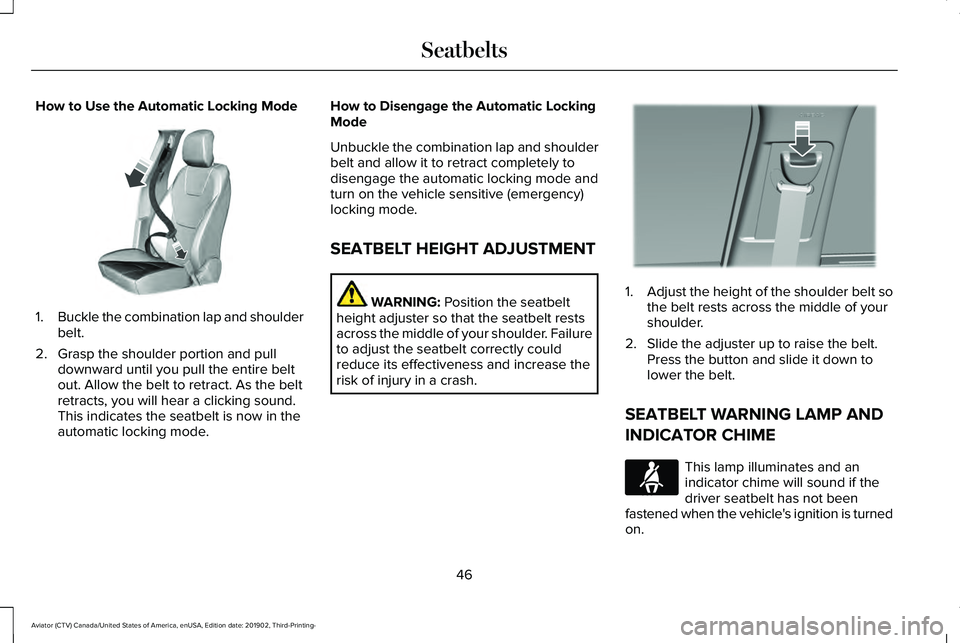
How to Use the Automatic Locking Mode
1.
Buckle the combination lap and shoulder
belt.
2. Grasp the shoulder portion and pull downward until you pull the entire belt
out. Allow the belt to retract. As the belt
retracts, you will hear a clicking sound.
This indicates the seatbelt is now in the
automatic locking mode. How to Disengage the Automatic Locking
Mode
Unbuckle the combination lap and shoulder
belt and allow it to retract completely to
disengage the automatic locking mode and
turn on the vehicle sensitive (emergency)
locking mode.
SEATBELT HEIGHT ADJUSTMENT
WARNING: Position the seatbelt
height adjuster so that the seatbelt rests
across the middle of your shoulder. Failure
to adjust the seatbelt correctly could
reduce its effectiveness and increase the
risk of injury in a crash. 1.
Adjust the height of the shoulder belt so
the belt rests across the middle of your
shoulder.
2. Slide the adjuster up to raise the belt. Press the button and slide it down to
lower the belt.
SEATBELT WARNING LAMP AND
INDICATOR CHIME This lamp illuminates and an
indicator chime will sound if the
driver seatbelt has not been
fastened when the vehicle's ignition is turned
on.
46
Aviator (CTV) Canada/United States of America, enUSA, Edition date: 201902, Third-Printing- SeatbeltsE142591 E201573 E71880
Page 52 of 609
Note:
The driver and front passenger
warnings switch on and off independently.
When you perform this procedure for one
seating position, do not buckle the other
position as this terminates the process.
Read Steps 1 - 4 before starting the
procedure.
Make sure that:
• You set the parking brake.
• The transmission is in park (P).
• The ignition is off.
• You close all vehicle doors.
• You unbuckle the driver and front
passenger seatbelts.
1. Switch the ignition on. Do not start the engine.
2. Wait until the seatbelt warning lamp turns
off (about one minute). After Step 2, wait
an additional five seconds before
proceeding with Step 3. Once you start
Step 3, you must complete the procedure
within 60 seconds. 3.
For the seating position you are switching
off, buckle then unbuckle the seatbelt
three times at a moderate speed, ending
in the unbuckled state. After Step 3, the
seatbelt warning lamp turns on.
4. When the seatbelt warning lamp is on, buckle then unbuckle the seatbelt. After
Step 4, the seatbelt warning lamp flashes
for confirmation.
• This switches the feature off if it is
currently on.
• This switches the feature on if it is
currently off.
CHILD RESTRAINT AND SEATBELT
MAINTENANCE
Inspect the vehicle seatbelts and child safety
seat systems periodically to make sure they
work properly and are not damaged. Inspect
the vehicle and child restraint seatbelts to
make sure there are no nicks, tears or cuts.
Replace if necessary. All vehicle seatbelt
assemblies, including retractors, buckles,
front seatbelt buckle assemblies, buckle
support assemblies (slide bar-if equipped), shoulder belt height adjusters (if equipped),
shoulder belt guide on seat backrest (if
equipped), child safety seat LATCH and
tether anchors, and attaching hardware,
should be inspected after a crash. Read the
child restraint manufacturer's instructions for
additional inspection and maintenance
information specific to the child restraint.
We recommend that all seatbelt assemblies
in use in vehicles involved in a crash be
replaced. However, if the crash was minor
and an authorized dealer finds that the belts
do not show damage and continue to
operate properly, they do not need to be
replaced. Seatbelt assemblies not in use
during a crash should also be inspected and
replaced if either damage or improper
operation is noted.
Properly care for seatbelts. See Vehicle
Care (page 378).
49
Aviator (CTV) Canada/United States of America, enUSA, Edition date: 201902, Third-Printing- Seatbelts
Page 73 of 609
WHAT IS PHONE AS A KEY
Phone as a key allows you to use your phone
in place of a remote control.
You can use your phone for the following
functions:
•
Remote locking and unlocking.
• Passive entry and exit.
• Passive start.
• Remote start.
• Memory function recall.
PHONE AS A KEY LIMITATIONS
Limitations can vary based on the make and
model of your phone, phone location and
physical obstructions.
The following items could cause your phone
as a key to stop working:
• The approximate phone as a key range
is 131 ft (40 m).
• Your Bluetooth connection is not
enabled, is disrupted, or out of range. •
Your phone as a key is not active or
enabled on at least one phone.
• Your vehicle battery has depleted.
• Your phone battery has depleted.
• Your phone frequencies have jammed.
• Your phone is too close to metal objects
or other electronic devices.
PROGRAMMING YOUR PHONE
Refer to the Lincoln Way app for instructions
on registering your vehicle and programming
your phone as a key.
USING THE VALET MODE
1. Press Settings on the touchscreen.
2. Press Valet Mode.
Note: Have your backup start passcode
completely setup before using valet mode. Note:
Once the system detects a valid phone
as a key, the temporary passcode displays
in both the touchscreen and mobile app. If
the system does not detect a valid phone as
a key, it prompts you to enter your backup
start passcode. Once validated, the
temporary passcode displays on the
touchscreen.
3. Enter the first five digits of the passcode
on the keyless entry keypad to lock or
unlock your vehicle.
4. Enter the eight-digit passcode on the touchscreen to start and drive your
vehicle.
To disable valet mode, press Exit Valet Mode
on the touchscreen. Once the system detects
an authorized phone as a key, it disables. If
the system does not detect a valid phone as
a key, it prompts you to enter your backup
start passcode. Once validated, valet mode
disables.
70
Aviator (CTV) Canada/United States of America, enUSA, Edition date: 201902, Third-Printing- Phone as a Key
(If Equipped)
Page 75 of 609
How does a valet drive my car if I only use
my phone as a key?
Have the valet use the temporary valet
passcode that you created when using
valet mode. See Using the Valet Mode
(page 70).
How do I delete a phone as a key
programmed to my vehicle? If the phone as a key belongs to your
account, you can delete it from your
phone. If not, reset phone as a key from
the touchscreen display menu.
I uninstalled my Lincoln Way app and
reinstalled it. Why am I not able to get a
new phone as a key? Remove the phone as a key that was
previously associated with your phone
or reset phone as a key from your
vehicle, and then request a new phone
as a key. Why can I not remotely start the vehicle
with my phone as a key?
Using the Lincoln Way app, verify your
phone as a key to be active and enabled
via Bluetooth connection on at least one
phone. If Bluetooth has connected but
phone as a key is not active, activate
your phone as a key where prompted
from the Lincoln Way app.
See Using
the Backup Start Passcode (page 71).
72
Aviator (CTV) Canada/United States of America, enUSA, Edition date: 201902, Third-Printing- Phone as a Key
(If Equipped)
Page 76 of 609
PRINCIPLE OF OPERATION
MyKey allows you to program keys with
restricted driving modes to promote good
driving habits. You can program the
restrictions to all keys except one. Any keys
that you did not program are administrator
keys or admin keys.
You can use admin keys to:
•
Create a MyKey with certain vehicle
restrictions.
• Program certain MyKey settings.
• Clear all MyKey restrictions.
After you program a MyKey, you can view
the following information through the
information display:
• The total number of admin keys and
MyKeys for your vehicle.
• The total distance a MyKey driver
traveled with your vehicle.
Note: Every MyKey receives the same
restrictions and settings. You cannot
program them individually. Note:
For vehicles equipped with a
push-button start switch: When both a MyKey
and an admin key are present when you
start your vehicle, the system recognizes the
admin key only.
Standard Settings
Not every vehicle includes the features listed
below. If your vehicle has this equipment,
then you cannot change the following
settings when using a MyKey:
• Seatbelt reminder or Belt-Minder™. MyKey
mutes the audio system until drivers, and
in some instances, passengers, fasten
their seatbelts. Note: If your vehicle
includes an AM/FM radio or a very basic
audio system, then the radio may not
mute.
• Earlier low-fuel warning. The low-fuel
warning activates earlier for MyKey
drivers, giving them more time to refuel. •
Certain driver alerts, stability systems or
parking aids turn on automatically when
you use the MyKey system. For example,
Blind Spot Information System (BLIS),
cross traffic alert, lane departure warning
or forward collision warning. Note: MyKey
drivers may be able to turn the lane
departure warning feature off, but this
feature turns back on automatically with
every new key cycle.
• Restricted touchscreen operation in some
markets. For example, MyKey may
prevent manual navigation destination
input while the vehicle is in any gear
other than park (P) or when the vehicle
reaches a certain rate of speed.
• Satellite radio adult content restrictions,
if this feature is available in your market.
Optional Settings
You can configure certain vehicle feature
settings when you first create a MyKey. You
can also change the settings afterward with
an admin key.
73
Aviator (CTV) Canada/United States of America, enUSA, Edition date: 201902, Third-Printing- MyKey™