technical specifications LINCOLN AVIATOR 2020 Owners Manual
[x] Cancel search | Manufacturer: LINCOLN, Model Year: 2020, Model line: AVIATOR, Model: LINCOLN AVIATOR 2020Pages: 609, PDF Size: 5.4 MB
Page 10 of 609
Changing the Front Wiper Blades -
Vehicles Without: Heated Wiper Blades
......................................................................375
Changing the Front Wiper Blades - Vehicles With: Heated Wiper Blades
......................................................................
376
Changing the Rear Wiper Blades ............
377
Changing a Bulb ..........................................
377
Vehicle Care
General Information ....................................
378
Cleaning Products .......................................
378
Cleaning the Exterior ..................................
379
Waxing ...........................................................
380
Cleaning the Engine ....................................
381
Cleaning the Windows and Wiper Blades .......................................................................
381
Cleaning the Interior ...................................
382
Cleaning the Instrument Panel and Instrument Cluster Lens ........................
382
Cleaning Leather Seats .............................
383
Repairing Minor Paint Damage ................
384
Cleaning the Wheels ..................................
384
Vehicle Storage ...........................................
384Wheels and Tires
General Information
....................................
387
Tire Care ........................................................
389
Using Summer Tires ....................................
401
Using Snow Chains ....................................
402
Tire Pressure Monitoring System ...........
405
Changing a Road Wheel .............................
411
Technical Specifications .............................
419
Capacities and Specifications
Engine Specifications ..................................
421
Motorcraft Parts ...........................................
422
Vehicle Identification Number .................
424
Vehicle Certification Label ........................
424
Transmission Code Designation .............
425
Capacities and Specifications ..................
426
Bulb Specification Chart ............................
437
Vehicle Identification
Installing the Vehicle Identification Card ......................................................................
438 Connected Vehicle
Connected Vehicle Requirements
..........
439
Connected Vehicle Limitations ................
439
Connecting the Vehicle to a Mobile Network .....................................................
439
Connecting the Vehicle to a Wi-Fi Network ......................................................................
439
Connected Vehicle – Troubleshooting ......................................................................
440
Vehicle Wi-Fi Hotspot
Creating a Vehicle Wi-Fi Hotspot ............
443
Changing the Vehicle Wi-Fi Hotspot Name or Password ..............................................
443
Audio System
General Information ....................................
445
Audio Unit .....................................................
446
Digital Radio .................................................
448
Satellite Radio ...............................................
451
USB Port ........................................................
454
SYNC™ 3
General Information ...................................
456
7
Aviator (CTV) Canada/United States of America, enUSA, Edition date: 201902, Third-Printing- Table of Contents
Page 67 of 609
GENERAL INFORMATION ON
RADIO FREQUENCIES
This device complies with Part 15 of the FCC
Rules and with Industry Canada
license-exempt RSS standard(s). Operation
is subject to the following two conditions: (1)
This device may not cause harmful
interference, and (2) This device must accept
any interference received, including
interference that may cause undesired
operation.
WARNING: Changes or modifications
not expressively approved by the party
responsible for compliance could void the
user's authority to operate the equipment.
The term "IC:" before the radio certification
number only signifies that Industry Canada
technical specifications were met.
The typical operating range for your
transmitter is approximately 33 ft (10 m).
Vehicles with the remote start feature will
have a greater range. One of the following could cause a decrease
in operating range:
•
Weather conditions.
• Nearby radio towers.
• Structures around the vehicle.
• Other vehicles parked next to your
vehicle.
The radio frequency used by your remote
control can also be used by other radio
transmitters, for example amateur radios,
medical equipment, wireless headphones,
wireless remote controls, cell phones, battery
chargers and alarm systems. If the
frequencies are jammed, you will not be able
to use your remote control. You can lock and
unlock the doors with the key.
Note: Make sure to lock your vehicle before
leaving it unattended.
Note: If you are in range, the remote control
will operate if you press any button
unintentionally.
Note: The remote control contains sensitive
electrical components. Exposure to moisture
or impact may cause permanent damage. Intelligent Access
(If Equipped)
The system uses a radio frequency signal to
communicate with your vehicle and authorize
your vehicle to unlock when one of the
following conditions are met:
• You activate the front exterior door
handle switch.
• You press the luggage compartment
button.
• You press a button on the transmitter.
If excessive radio frequency interference is
present in the area or if the transmitter
battery is low, you may need to mechanically
unlock your door. You can use the
mechanical key blade in your intelligent
access key to open the driver door in this
situation.
See Remote Control (page 64).
REMOTE CONTROL
Intelligent Access Key
Note: You may not be able to shift out of
park (P) unless the intelligent access key is
inside your vehicle.
64
Aviator (CTV) Canada/United States of America, enUSA, Edition date: 201902, Third-Printing- Keys and Remote Controls
Page 198 of 609
Programming HomeLink to the Genie
Intellicode Garage Door Opener Motor
Note:
You may need a ladder to access the
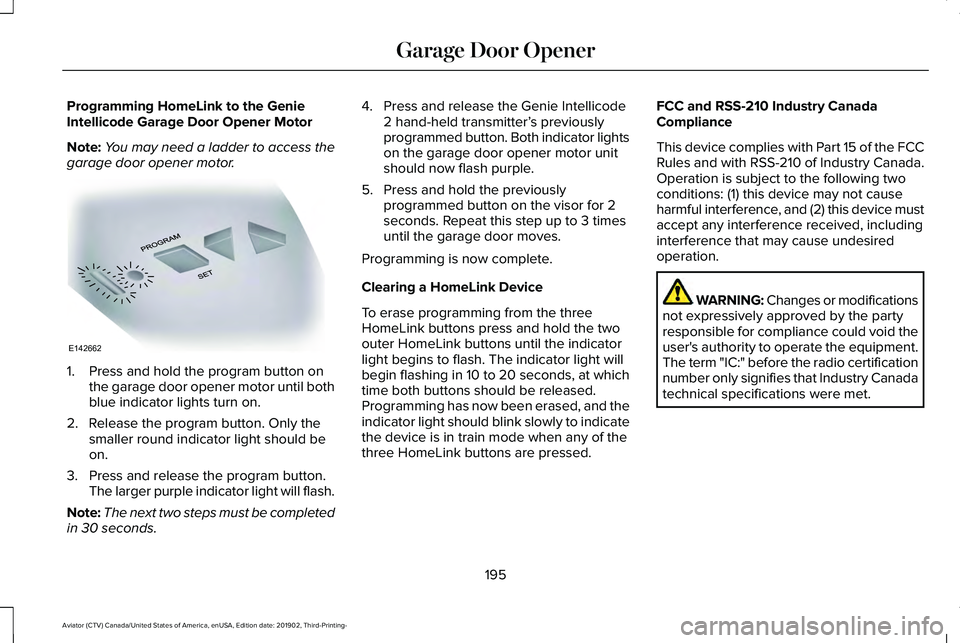
garage door opener motor. 1. Press and hold the program button on
the garage door opener motor until both
blue indicator lights turn on.
2. Release the program button. Only the smaller round indicator light should be
on.
3. Press and release the program button. The larger purple indicator light will flash.
Note: The next two steps must be completed
in 30 seconds. 4. Press and release the Genie Intellicode
2 hand-held transmitter’ s previously
programmed button. Both indicator lights
on the garage door opener motor unit
should now flash purple.
5. Press and hold the previously programmed button on the visor for 2
seconds. Repeat this step up to 3 times
until the garage door moves.
Programming is now complete.
Clearing a HomeLink Device
To erase programming from the three
HomeLink buttons press and hold the two
outer HomeLink buttons until the indicator
light begins to flash. The indicator light will
begin flashing in 10 to 20 seconds, at which
time both buttons should be released.
Programming has now been erased, and the
indicator light should blink slowly to indicate
the device is in train mode when any of the
three HomeLink buttons are pressed. FCC and RSS-210 Industry Canada
Compliance
This device complies with Part 15 of the FCC
Rules and with RSS-210 of Industry Canada.
Operation is subject to the following two
conditions: (1) this device may not cause
harmful interference, and (2) this device must
accept any interference received, including
interference that may cause undesired
operation.
WARNING: Changes or modifications
not expressively approved by the party
responsible for compliance could void the
user's authority to operate the equipment.
The term "IC:" before the radio certification
number only signifies that Industry Canada
technical specifications were met.
195
Aviator (CTV) Canada/United States of America, enUSA, Edition date: 201902, Third-Printing- Garage Door OpenerE142662
Page 199 of 609

This equipment complies with FCC radiation
exposure limits set forth for an uncontrolled
environment. End Users must follow the
specific operating instructions for satisfying
RF exposure compliance. This transmitter
must be at least 8 in (20 cm) from the user
and must not be co-located or operating in
conjunction with any other antenna or
transmitter.
The term “IC:” before the
certification/registration number only signifies
that Industry Canada technical specifications
were met.
196
Aviator (CTV) Canada/United States of America, enUSA, Edition date: 201902, Third-Printing- Garage Door Opener
Page 409 of 609
functioning properly. Always check the TPMS
malfunction telltale after replacing one or
more tires or wheels on your vehicle to
ensure that the replacement or alternate tires
and wheels allow the TPMS to continue to
function properly.
This device complies with Part 15 of the FCC
Rules and with License exempt RSS
Standards of Industry Canada. Operation is
subject to the following two conditions:
1. This device may not cause harmful
interference, and
2. This device must accept any interference
received, including interference that may
cause undesired operation. WARNING: Changes or modifications
not expressively approved by the party
responsible for compliance could void the
user's authority to operate the equipment.
The term "IC:" before the radio certification
number only signifies that Industry Canada
technical specifications were met. Changing Tires With a Tire Pressure
Monitoring System
Note:
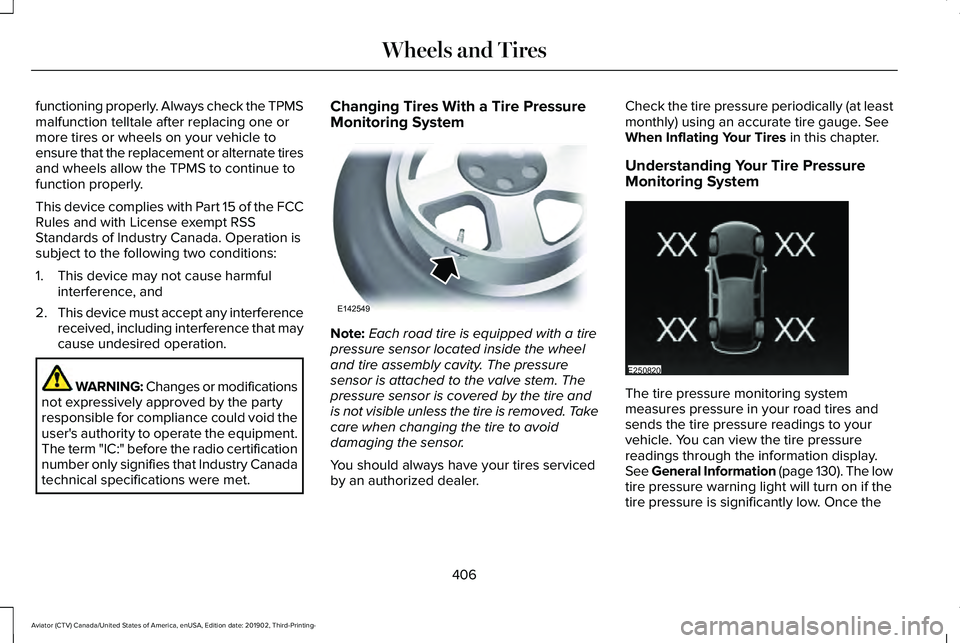
Each road tire is equipped with a tire
pressure sensor located inside the wheel
and tire assembly cavity. The pressure
sensor is attached to the valve stem. The
pressure sensor is covered by the tire and
is not visible unless the tire is removed. Take
care when changing the tire to avoid
damaging the sensor.
You should always have your tires serviced
by an authorized dealer. Check the tire pressure periodically (at least
monthly) using an accurate tire gauge. See
When Inflating Your Tires in this chapter.
Understanding Your Tire Pressure
Monitoring System The tire pressure monitoring system
measures pressure in your road tires and
sends the tire pressure readings to your
vehicle. You can view the tire pressure
readings through the information display.
See
General Information (page 130). The low
tire pressure warning light will turn on if the
tire pressure is significantly low. Once the
406
Aviator (CTV) Canada/United States of America, enUSA, Edition date: 201902, Third-Printing- Wheels and TiresE142549 E250820
Page 420 of 609
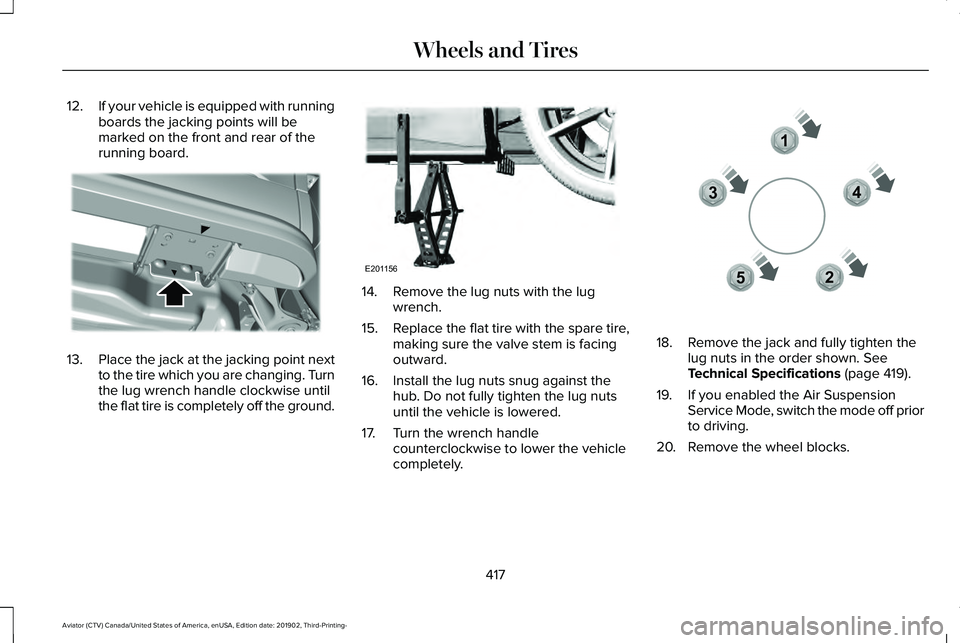
12.
If your vehicle is equipped with running
boards the jacking points will be
marked on the front and rear of the
running board. 13.
Place the jack at the jacking point next
to the tire which you are changing. Turn
the lug wrench handle clockwise until
the flat tire is completely off the ground. 14. Remove the lug nuts with the lug
wrench.
15. Replace the flat tire with the spare tire,
making sure the valve stem is facing
outward.
16. Install the lug nuts snug against the hub. Do not fully tighten the lug nuts
until the vehicle is lowered.
17. Turn the wrench handle counterclockwise to lower the vehicle
completely. 18. Remove the jack and fully tighten the
lug nuts in the order shown. See
Technical Specifications (page 419).
19. If you enabled the Air Suspension Service Mode, switch the mode off prior
to driving.
20. Remove the wheel blocks.
417
Aviator (CTV) Canada/United States of America, enUSA, Edition date: 201902, Third-Printing- Wheels and TiresE310613 E201156 12
3
4
5E306781
Page 422 of 609
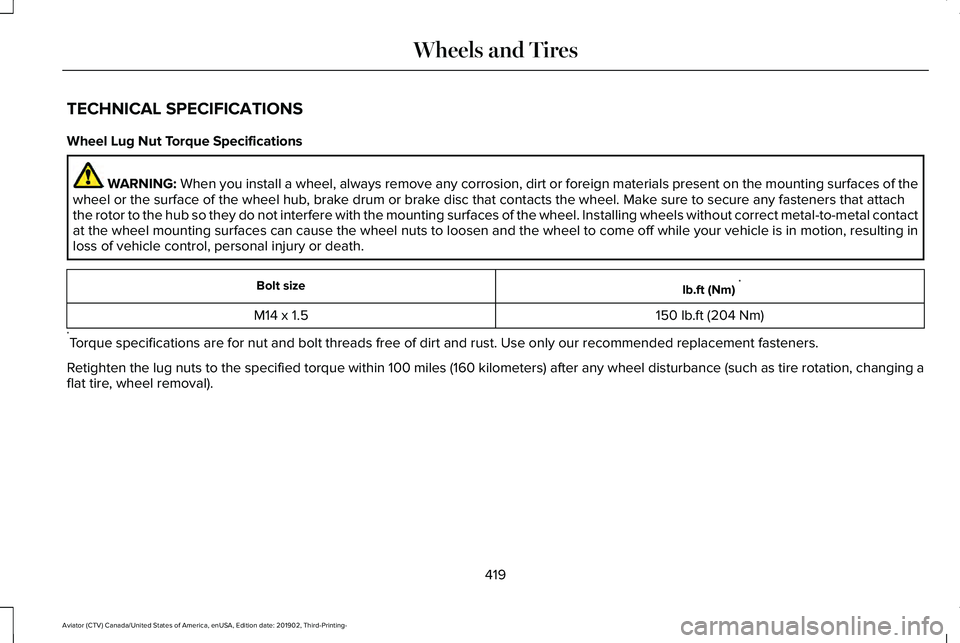
TECHNICAL SPECIFICATIONS
Wheel Lug Nut Torque Specifications
WARNING: When you install a wheel, always remove any corrosion, dirt or foreign m\
aterials present on the mounting surfaces of the
wheel or the surface of the wheel hub, brake drum or brake disc that contacts the wheel. Make sure to secure any fasteners that attach
the rotor to the hub so they do not interfere with the mounting surfaces\
of the wheel. Installing wheels without correct metal-to-metal contact
at the wheel mounting surfaces can cause the wheel nuts to loosen and th\
e wheel to come off while your vehicle is in motion, resulting in
loss of vehicle control, personal injury or death. lb.ft (Nm)
*
Bolt size
150 lb.ft (204 Nm)
M14 x 1.5
* Torque specifications are for nut and bolt threads free of dirt and rust.\
Use only our recommended replacement fasteners.
Retighten the lug nuts to the specified torque within 100 miles (160 kil\
ometers) after any wheel disturbance (such as tire rotation, changing \
a
flat tire, wheel removal).
419
Aviator (CTV) Canada/United States of America, enUSA, Edition date: 201902, Third-Printing- Wheels and Tires
Page 590 of 609
Gracenote uses a unique identifier to track
queries for statistical purposes. The purpose
of a randomly assigned numeric identifier is
to allow Gracenote to count queries without
knowing anything about who you are. For
more information, see the web page at
www.gracenote.com for the Gracenote
Privacy Policy.
THE GRACENOTE SOFTWARE, EACH ITEM
OF GRACENOTE DATA AND THE
GRACENOTE CONTENT ARE LICENSED TO
YOU "AS IS". NEITHER GRACENOTE MAKES
ANY REPRESENTATIONS OR WARRANTIES,
EXPRESS OR IMPLIED, REGARDING THE
ACCURACY OF ANY GRACENOTE DATA
FROM THE GRACENOTE SERVERS OR
GRACENOTE CONTENT. GRACENOTE
COLLECTIVELY AND SEPARATELY RESERVE
THE RIGHT TO DELETE DATA AND/OR
CONTENT FROM THE COMPANIES'
RESPECTIVE SERVERS OR, IN THE CASE OF
GRACENOTE, CHANGE DATA CATEGORIES
FOR ANY CAUSE THAT GRACENOTE
DEEMS SUFFICIENT. NO WARRANTY IS
MADE THAT EITHER GRACENOTE
CONTENT OR THE GRACENOTE SOFTWARE
OR GRACENOTE SERVERS ARE
ERROR-FREE OR THAT THE FUNCTIONING
OF THE GRACENOTE SOFTWARE OR
GRACENOTE SERVERS WILL BE
UNINTERRUPTED. GRACENOTE IS NOT
OBLIGATED TO PROVIDE YOU WITH ANY
ENHANCED OR ADDITIONAL DATA TYPES
THAT GRACENOTE MAY CHOOSE TO
PROVIDE IN THE FUTURE AND IS FREE TO
DISCONTINUE ITS ONLINE SERVICES AT
ANY TIME. GRACENOTE DISCLAIM ALL
WARRANTIES EXPRESS OR IMPLIED,
INCLUDING, BUT NOT LIMITED TO, IMPLIED
WARRANTIES OF MERCHANTABILITY,
FITNESS FOR A PARTICULAR PURPOSE,
TITLE, AND NON-INFRINGEMENT. NEITHER
GRACENOTE WARRANTS THE RESULTS
THAT WILL BE OBTAINED BY YOUR USE
OF THE GRACENOTE SOFTWARE OR ANY
GRACENOTE SERVER. IN NO CASE WILL
GRACENOTE BE LIABLE FOR ANY
CONSEQUENTIAL OR INCIDENTAL
DAMAGES OR FOR ANY LOST PROFITS OR
LOST REVENUES FOR ANY REASON
WHATSOEVER. © Gracenote 2007.
Radio Frequency Statement
FCC ID: ACJ-SYNCG3-L
IC: 216B-SYNCG3-L
This device complies with Part 15 of the FCC
Rules and with RSS-210 of Industry Canada.
Operation is subject to the following two
conditions:
(1) This device may not cause harmful
interference, and
(2)
this device must accept any interference
received, including interference that may
cause undesired operation. WARNING: Changes or modifications
not expressively approved by the party
responsible for compliance could void the
user's authority to operate the equipment.
The term "IC:" before the radio certification
number only signifies that Industry Canada
technical specifications were met.
The antenna used for this transmitter must
not be co-located or operating in conjunction
with any other antenna or transmitter.
587
Aviator (CTV) Canada/United States of America, enUSA, Edition date: 201902, Third-Printing- Appendices
Page 593 of 609
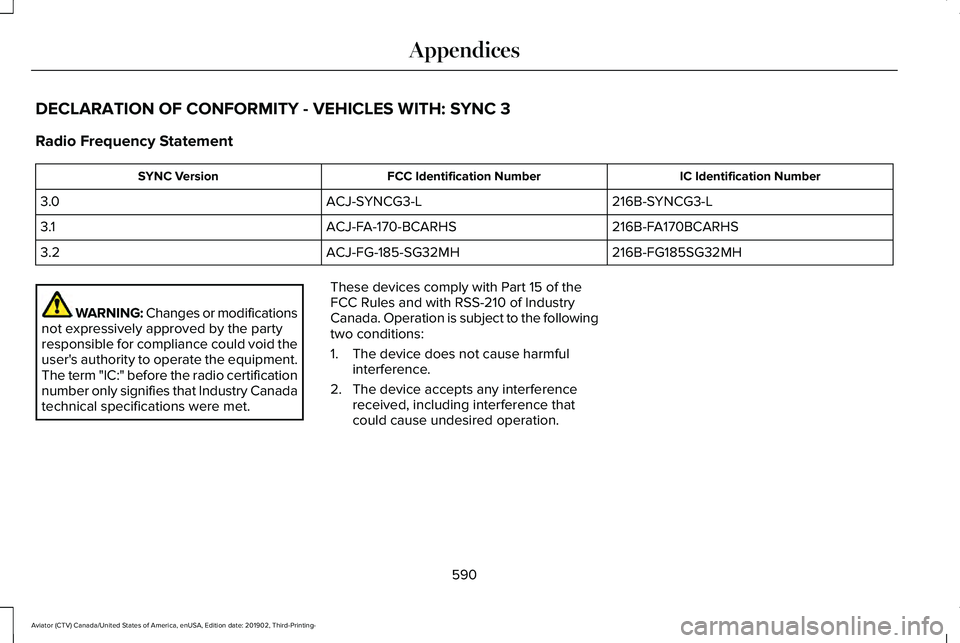
DECLARATION OF CONFORMITY - VEHICLES WITH: SYNC 3
Radio Frequency Statement
IC Identification Number
FCC Identification Number
SYNC Version
216B-SYNCG3-L
ACJ-SYNCG3-L
3.0
216B-FA170BCARHS
ACJ-FA-170-BCARHS
3.1
216B-FG185SG32MH
ACJ-FG-185-SG32MH
3.2 WARNING: Changes or modifications
not expressively approved by the party
responsible for compliance could void the
user's authority to operate the equipment.
The term "IC:" before the radio certification
number only signifies that Industry Canada
technical specifications were met. These devices comply with Part 15 of the
FCC Rules and with RSS-210 of Industry
Canada. Operation is subject to the following
two conditions:
1. The device does not cause harmful
interference.
2. The device accepts any interference received, including interference that
could cause undesired operation.
590
Aviator (CTV) Canada/United States of America, enUSA, Edition date: 201902, Third-Printing- Appendices
Page 607 of 609
Stopping the Engine When Your Vehicle is
Moving..............................................................206
Stopping the Engine When Your Vehicle is Stationary.........................................................205
Vehicles using Phone as a Key.......................204
Starting and Stopping the Engine...........202 General Information...........................................202
Steering..........................................................299 Adaptive Steering..............................................300
Electric Power Steering....................................299
Steering Wheel................................................97
Storage Compartments...............................201
Sunroof See: Moonroof.....................................................120
Sun Visors
.......................................................120
Illuminated Vanity Mirror...................................120
Supplementary Restraints System.............52 Principle of Operation.........................................52
Switching Adaptive Cruise Control On and Off..................................................................273
Automatic Cancellation or Deactivation.......273
Switching Adaptive Cruise Control Off.........273
Switching Adaptive Cruise Control On.........273
Switching Automatic High Beam Control On and Off
.....................................................114
Activating the Automatic High Beam
Control................................................................114 Switching Cruise Control On and
Off..................................................................267
Switching Cruise Control Off...........................267
Switching Cruise Control On...........................267
Switching From Adaptive Cruise Control to Cruise Control
........................................277
Switching Hill Descent Control On and Off..................................................................248
Switching Intelligent Mode On and Off..................................................................278
Changing the Set Speed with Intelligent Adaptive Cruise Control...............................278
Switching Rear Occupant Alert System On and Off
..........................................................190
Switching Reverse Braking Assist On and Off..................................................................242
Symbols Glossary..............................................9
SYNC™ 3
..........................................................456
General Information...........................................456
SYNC™ 3 Troubleshooting.........................500 Additional Information and Assistance..........516
Apps.......................................................................510
Navigation............................................................509
Personal Profiles..................................................514
Phone....................................................................506
Resetting the System.........................................516
USB and Bluetooth Audio................................502
Voice Recognition..............................................500 Wi-Fi Connectivity...............................................512
T
Technical Specifications See: Capacities and Specifications................421
The Better Business Bureau (BBB) Auto Line Program (U.S. Only)..........................335
Tire Care.........................................................389 Glossary of Tire Terminology..........................
390
Information About Uniform Tire Quality Grading.............................................................389
Information Contained on the Tire Sidewall.............................................................391
Temperature A B C............................................390
Traction AA A B C...............................................389
Treadwear............................................................389
Tire Pressure Monitoring System............405 Changing Tires With a Tire Pressure
Monitoring System........................................
406
Understanding Your Tire Pressure Monitoring System .............................................................406
Tires See: Wheels and Tires......................................387
Towing a Trailer
..............................................316
Load Placement...................................................316
Towing the Vehicle on Four Wheels........321 Emergency Towing.............................................321
604
Aviator (CTV) Canada/United States of America, enUSA, Edition date: 201902, Third-Printing- Index