suspension LINCOLN AVIATOR 2023 User Guide
[x] Cancel search | Manufacturer: LINCOLN, Model Year: 2023, Model line: AVIATOR, Model: LINCOLN AVIATOR 2023Pages: 681, PDF Size: 9.33 MB
Page 347 of 681
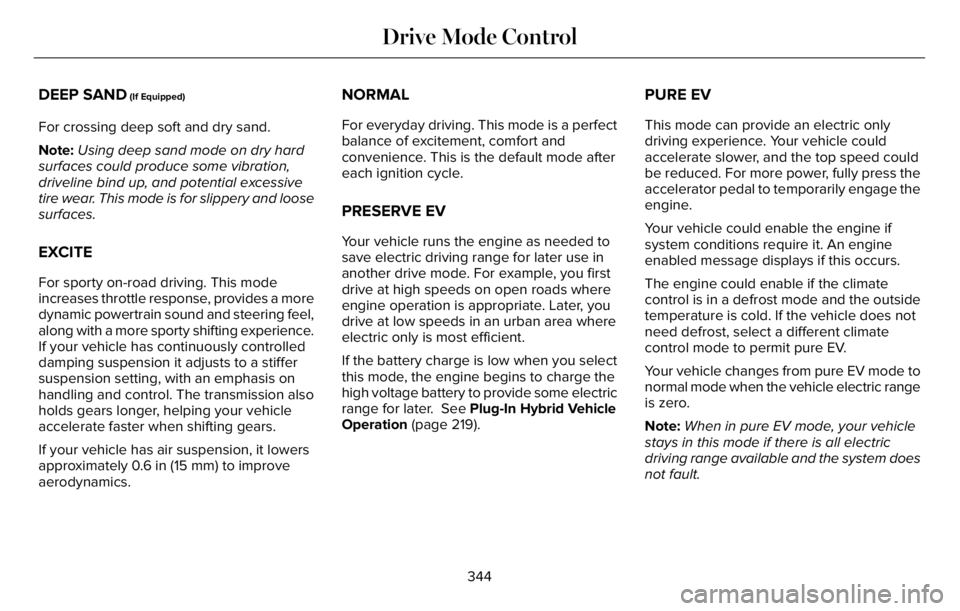
DEEP SAND (If Equipped)
For crossing deep soft and dry sand.
Note:Using deep sand mode on dry hard
surfaces could produce some vibration,
driveline bind up, and potential excessive
tire wear. This mode is for slippery and loose
surfaces.
EXCITE
For sporty on-road driving. This mode
increases throttle response, provides a more
dynamic powertrain sound and steering feel,
along with a more sporty shifting experience.
If your vehicle has continuously controlled
damping suspension it adjusts to a stiffer
suspension setting, with an emphasis on
handling and control. The transmission also
holds gears longer, helping your vehicle
accelerate faster when shifting gears.
If your vehicle has air suspension, it lowers
approximately 0.6 in (15 mm) to improve
aerodynamics.
NORMAL
For everyday driving. This mode is a perfect
balance of excitement, comfort and
convenience. This is the default mode after
each ignition cycle.
PRESERVE EV
Your vehicle runs the engine as needed to
save electric driving range for later use in
another drive mode. For example, you first
drive at high speeds on open roads where
engine operation is appropriate. Later, you
drive at low speeds in an urban area where
electric only is most efficient.
If the battery charge is low when you select
this mode, the engine begins to charge the
high voltage battery to provide some electric
range for later. See Plug-In Hybrid Vehicle
Operation (page 219).
PURE EV
This mode can provide an electric only
driving experience. Your vehicle could
accelerate slower, and the top speed could
be reduced. For more power, fully press the
accelerator pedal to temporarily engage the
engine.
Your vehicle could enable the engine if
system conditions require it. An engine
enabled message displays if this occurs.
The engine could enable if the climate
control is in a defrost mode and the outside
temperature is cold. If the vehicle does not
need defrost, select a different climate
control mode to permit pure EV.
Your vehicle changes from pure EV mode to
normal mode when the vehicle electric range
is zero.
Note:When in pure EV mode, your vehicle
stays in this mode if there is all electric
driving range available and the system does
not fault.
344
Drive Mode Control
Page 355 of 681
Special Loading Instructions for
Owners of Pick-up Trucks and Utility-
type Vehicles
WARNING: When loading the
roof racks, we recommend you evenly
distribute the load, as well as maintain
a low center of gravity. Loaded
vehicles, with higher centers of gravity,
may handle differently than unloaded
vehicles. Take extra precautions, such
as slower speeds and increased
stopping distance, when driving a
heavily loaded vehicle.
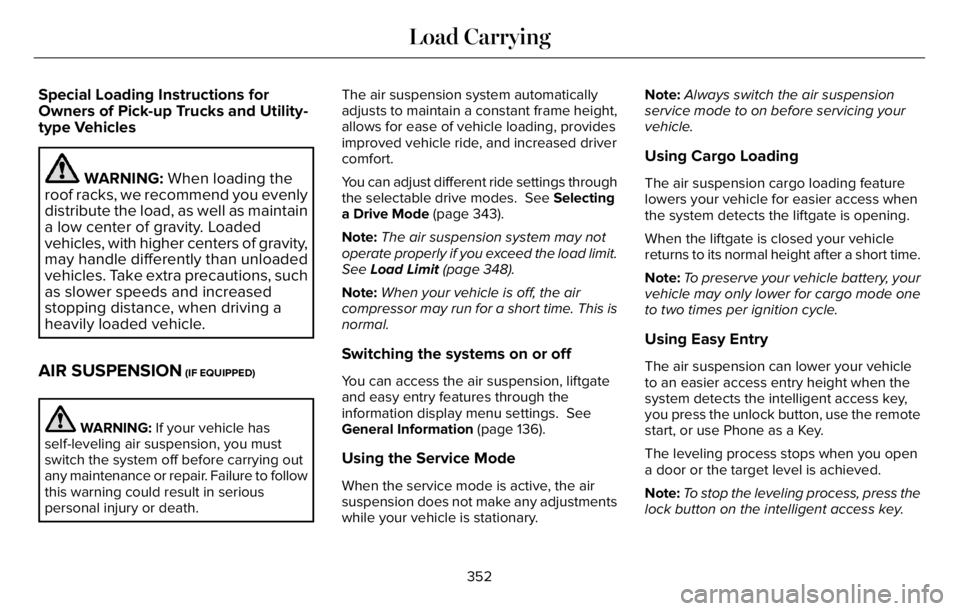
AIR SUSPENSION (IF EQUIPPED)
WARNING: If your vehicle has
self-leveling air suspension, you must
switch the system off before carrying out
any maintenance or repair. Failure to follow
this warning could result in serious
personal injury or death.The air suspension system automatically
adjusts to maintain a constant frame height,
allows for ease of vehicle loading, provides
improved vehicle ride, and increased driver
comfort.
You can adjust different ride settings through
the selectable drive modes. See Selecting
a Drive Mode (page 343).
Note:The air suspension system may not
operate properly if you exceed the load limit.
See Load Limit (page 348).
Note:When your vehicle is off, the air
compressor may run for a short time. This is
normal.
Switching the systems on or off
You can access the air suspension, liftgate
and easy entry features through the
information display menu settings. See
General Information (page 136).
Using the Service Mode
When the service mode is active, the air
suspension does not make any adjustments
while your vehicle is stationary.Note:Always switch the air suspension
service mode to on before servicing your
vehicle.
Using Cargo Loading
The air suspension cargo loading feature
lowers your vehicle for easier access when
the system detects the liftgate is opening.
When the liftgate is closed your vehicle
returns to its normal height after a short time.
Note:To preserve your vehicle battery, your
vehicle may only lower for cargo mode one
to two times per ignition cycle.
Using Easy Entry
The air suspension can lower your vehicle
to an easier access entry height when the
system detects the intelligent access key,
you press the unlock button, use the remote
start, or use Phone as a Key.
The leveling process stops when you open
a door or the target level is achieved.
Note:To stop the leveling process, press the
lock button on the intelligent access key.
352
Load Carrying
Page 357 of 681
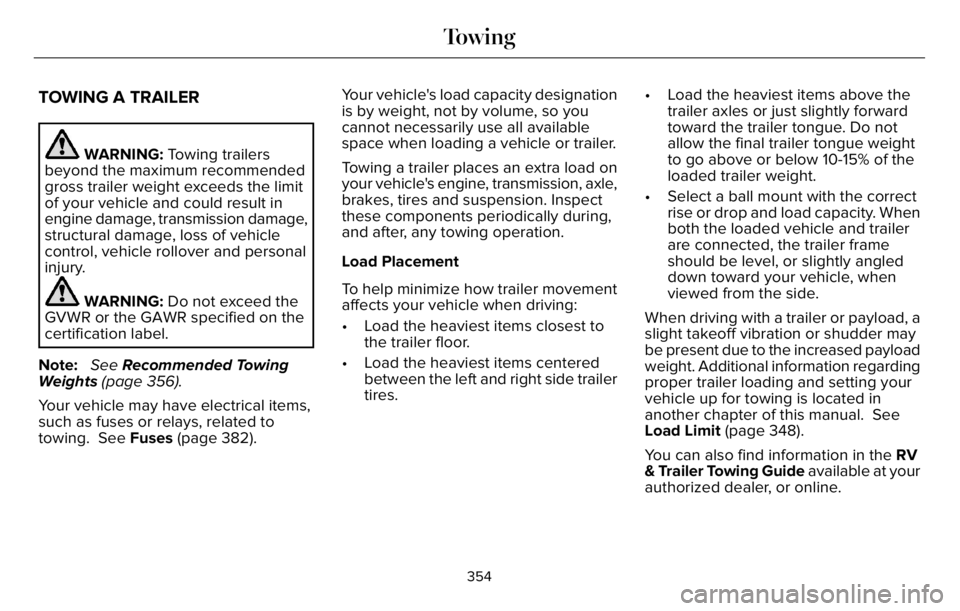
TOWING A TRAILER
WARNING: Towing trailers
beyond the maximum recommended
gross trailer weight exceeds the limit
of your vehicle and could result in
engine damage, transmission damage,
structural damage, loss of vehicle
control, vehicle rollover and personal
injury.
WARNING: Do not exceed the
GVWR or the GAWR specified on the
certification label.
Note: See Recommended Towing
Weights (page 356).
Your vehicle may have electrical items,
such as fuses or relays, related to
towing. See Fuses (page 382).Your vehicle's load capacity designation
is by weight, not by volume, so you
cannot necessarily use all available
space when loading a vehicle or trailer.
Towing a trailer places an extra load on
your vehicle's engine, transmission, axle,
brakes, tires and suspension. Inspect
these components periodically during,
and after, any towing operation.
Load Placement
To help minimize how trailer movement
affects your vehicle when driving:
• Load the heaviest items closest to
the trailer floor.
• Load the heaviest items centered
between the left and right side trailer
tires.• Load the heaviest items above the
trailer axles or just slightly forward
toward the trailer tongue. Do not
allow the final trailer tongue weight
to go above or below 10-15% of the
loaded trailer weight.
• Select a ball mount with the correct
rise or drop and load capacity. When
both the loaded vehicle and trailer
are connected, the trailer frame
should be level, or slightly angled
down toward your vehicle, when
viewed from the side.
When driving with a trailer or payload, a
slight takeoff vibration or shudder may
be present due to the increased payload
weight. Additional information regarding
proper trailer loading and setting your
vehicle up for towing is located in
another chapter of this manual. See
Load Limit (page 348).
You can also find information in the RV
& Trailer Towing Guide available at your
authorized dealer, or online.
354
Towing
Page 390 of 681
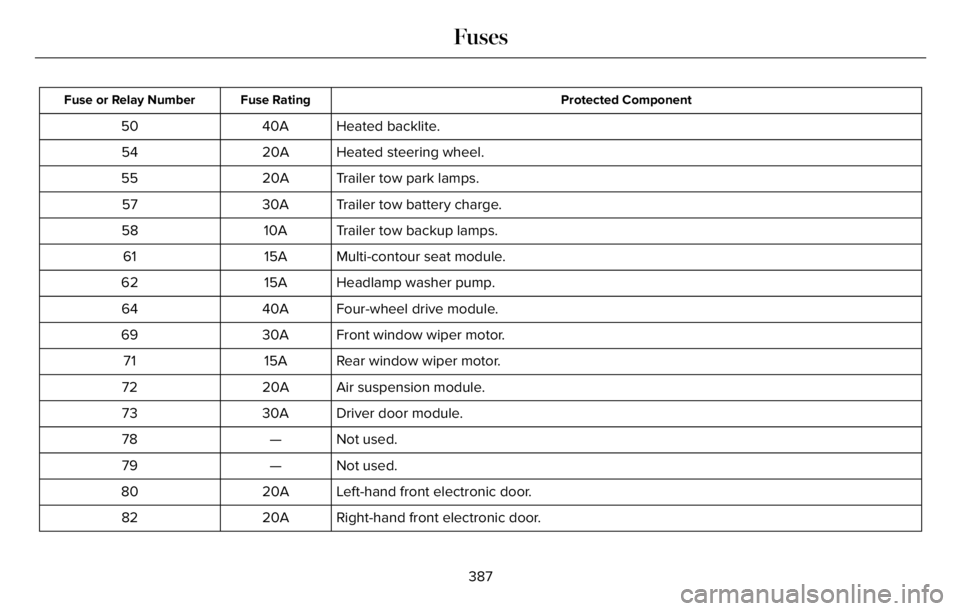
Protected Component Fuse Rating Fuse or Relay Number
Heated backlite. 40A 50
Heated steering wheel. 20A 54
Trailer tow park lamps. 20A 55
Trailer tow battery charge. 30A 57
Trailer tow backup lamps. 10A 58
Multi-contour seat module. 15A 61
Headlamp washer pump. 15A 62
Four-wheel drive module. 40A 64
Front window wiper motor. 30A 69
Rear window wiper motor. 15A 71
Air suspension module. 20A 72
Driver door module. 30A 73
Not used. — 78
Not used. — 79
Left-hand front electronic door. 20A 80
Right-hand front electronic door. 20A 82
387
Fuses
Page 392 of 681
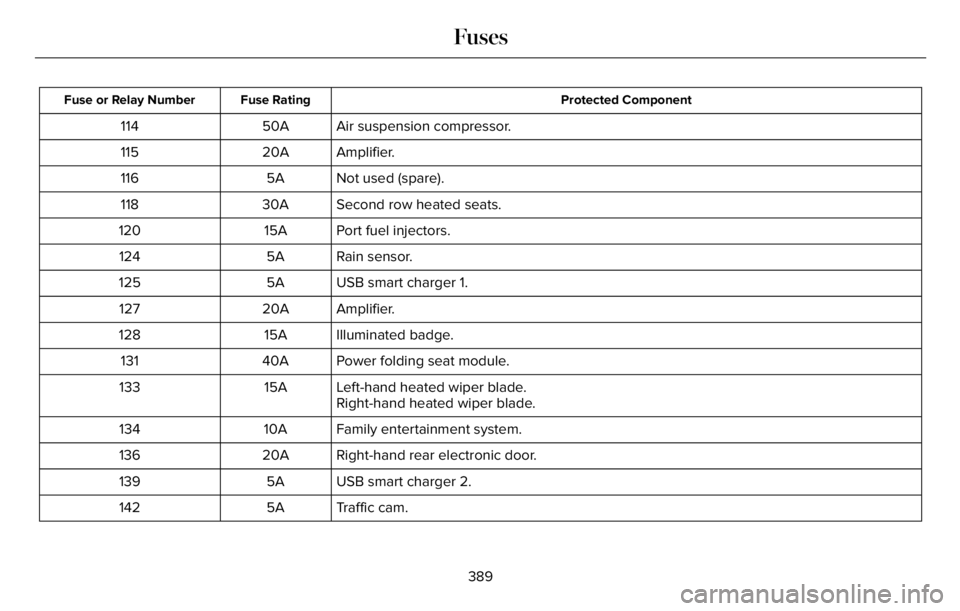
Protected Component Fuse Rating Fuse or Relay Number
Air suspension compressor. 50A 114
Amplifier. 20A 115
Not used (spare). 5A 116
Second row heated seats. 30A 118
Port fuel injectors. 15A 120
Rain sensor. 5A 124
USB smart charger 1. 5A 125
Amplifier. 20A 127
Illuminated badge. 15A 128
Power folding seat module. 40A 131
Left-hand heated wiper blade. 15A 133
Right-hand heated wiper blade.
Family entertainment system. 10A 134
Right-hand rear electronic door. 20A 136
USB smart charger 2. 5A 139
Traffic cam. 5A 142
389
Fuses
Page 397 of 681
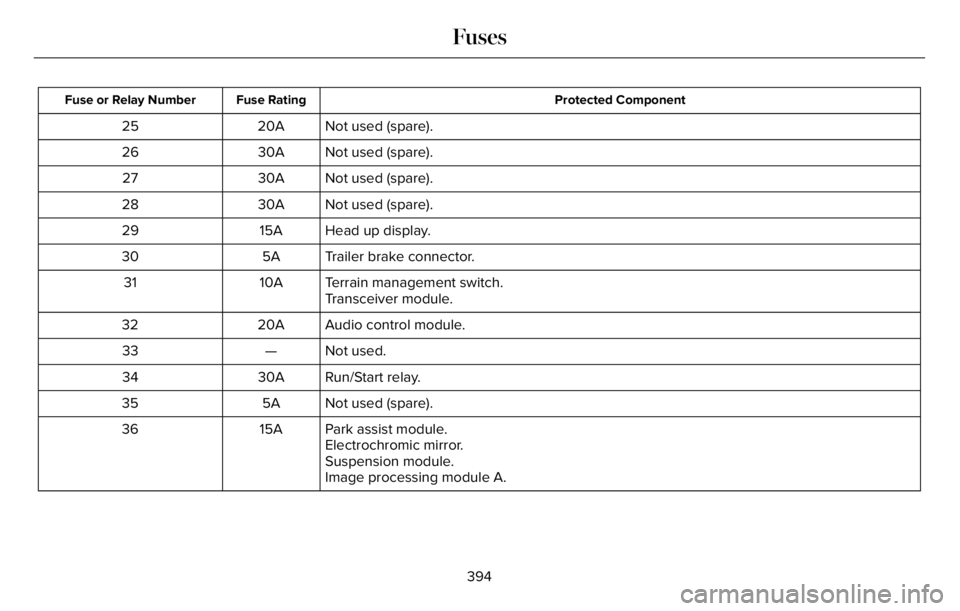
Protected Component Fuse Rating Fuse or Relay Number
Not used (spare). 20A 25
Not used (spare). 30A 26
Not used (spare). 30A 27
Not used (spare). 30A 28
Head up display. 15A 29
Trailer brake connector. 5A 30
Terrain management switch. 10A 31
Transceiver module.
Audio control module. 20A 32
Not used. — 33
Run/Start relay. 30A 34
Not used (spare). 5A 35
Park assist module. 15A 36
Electrochromic mirror.
Suspension module.
Image processing module A.
394
Fuses
Page 446 of 681
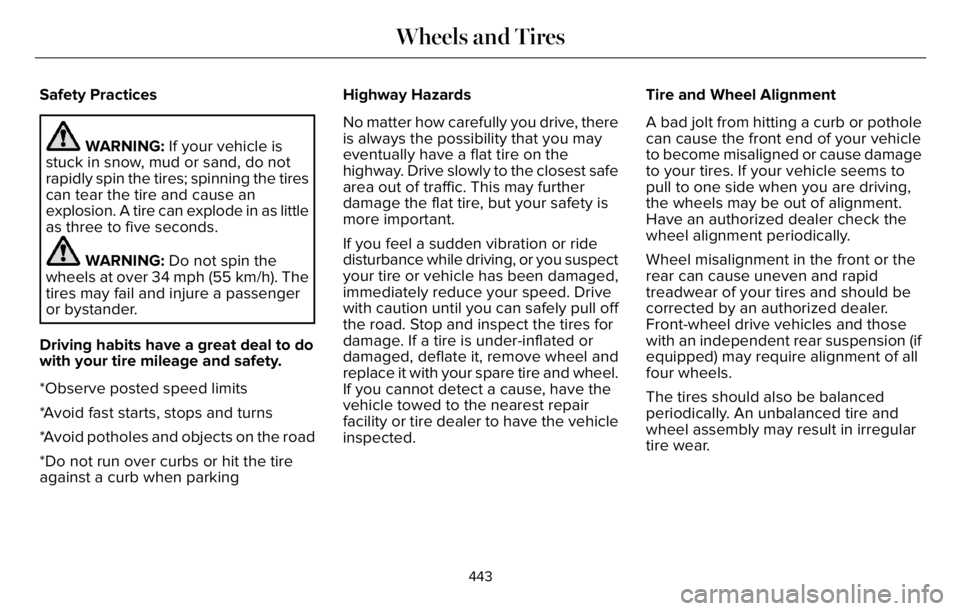
Safety Practices
WARNING: If your vehicle is
stuck in snow, mud or sand, do not
rapidly spin the tires; spinning the tires
can tear the tire and cause an
explosion. A tire can explode in as little
as three to five seconds.
WARNING: Do not spin the
wheels at over 34 mph (55 km/h). The
tires may fail and injure a passenger
or bystander.
Driving habits have a great deal to do
with your tire mileage and safety.
*Observe posted speed limits
*Avoid fast starts, stops and turns
*Avoid potholes and objects on the road
*Do not run over curbs or hit the tire
against a curb when parkingHighway Hazards
No matter how carefully you drive, there
is always the possibility that you may
eventually have a flat tire on the
highway. Drive slowly to the closest safe
area out of traffic. This may further
damage the flat tire, but your safety is
more important.
If you feel a sudden vibration or ride
disturbance while driving, or you suspect
your tire or vehicle has been damaged,
immediately reduce your speed. Drive
with caution until you can safely pull off
the road. Stop and inspect the tires for
damage. If a tire is under-inflated or
damaged, deflate it, remove wheel and
replace it with your spare tire and wheel.
If you cannot detect a cause, have the
vehicle towed to the nearest repair
facility or tire dealer to have the vehicle
inspected.Tire and Wheel Alignment
A bad jolt from hitting a curb or pothole
can cause the front end of your vehicle
to become misaligned or cause damage
to your tires. If your vehicle seems to
pull to one side when you are driving,
the wheels may be out of alignment.
Have an authorized dealer check the
wheel alignment periodically.
Wheel misalignment in the front or the
rear can cause uneven and rapid
treadwear of your tires and should be
corrected by an authorized dealer.
Front-wheel drive vehicles and those
with an independent rear suspension (if
equipped) may require alignment of all
four wheels.
The tires should also be balanced
periodically. An unbalanced tire and
wheel assembly may result in irregular
tire wear.
443
Wheels and Tires
Page 448 of 681
conditions. Like any tire, summer tire
performance is affected by tire wear and
environmental conditions. If you must drive
in those conditions, we recommend using
Mud and Snow (M+S, M/S), All-season or
Snow tires.
Always store your summer tires indoors at
temperatures above 19°F (-7°C). The rubber
compounds used in these tires lose flexibility
and may develop surface cracks in the tread
area at temperatures below 19°F (-7°C). If the
tires have been subjected to 19°F (-7°C) or
less, warm them in a heated space to at least
41°F (5°C) for at least 24 hours before
installing them on a vehicle, or moving the
vehicle with the tires installed, or checking
tire inflation. Do not place tires near heaters
or heating devices used to warm the room
where the tires are stored. Do not apply heat
or blow heated air directly on the tires.
Always inspect the tires after storage periods
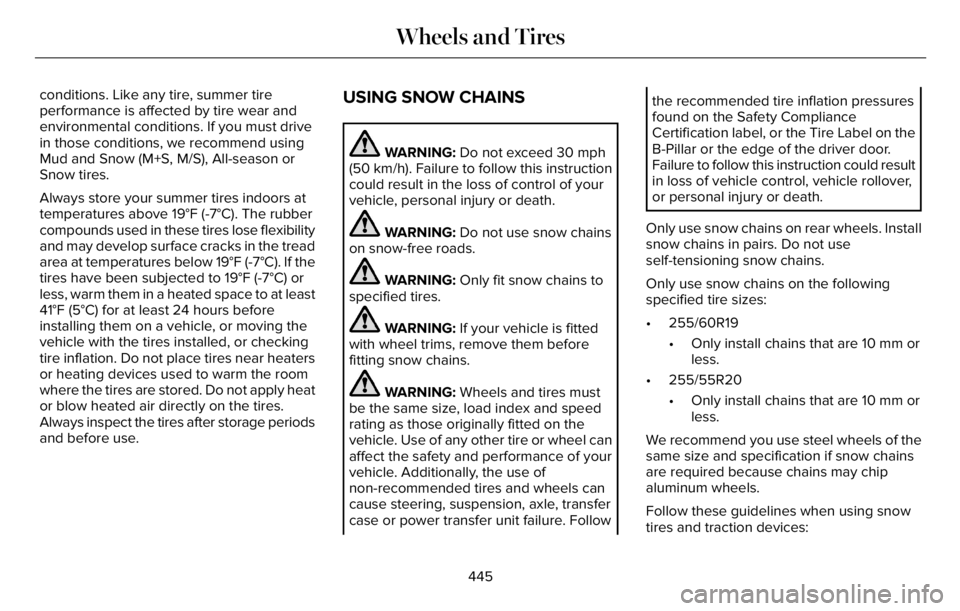
and before use.USING SNOW CHAINS
WARNING: Do not exceed 30 mph
(50 km/h). Failure to follow this instruction
could result in the loss of control of your
vehicle, personal injury or death.
WARNING: Do not use snow chains
on snow-free roads.
WARNING: Only fit snow chains to
specified tires.
WARNING: If your vehicle is fitted
with wheel trims, remove them before
fitting snow chains.
WARNING: Wheels and tires must
be the same size, load index and speed
rating as those originally fitted on the
vehicle. Use of any other tire or wheel can
affect the safety and performance of your
vehicle. Additionally, the use of
non-recommended tires and wheels can
cause steering, suspension, axle, transfer
case or power transfer unit failure. Follow
the recommended tire inflation pressures
found on the Safety Compliance
Certification label, or the Tire Label on the
B-Pillar or the edge of the driver door.
Failure to follow this instruction could result
in loss of vehicle control, vehicle rollover,
or personal injury or death.
Only use snow chains on rear wheels. Install
snow chains in pairs. Do not use
self-tensioning snow chains.
Only use snow chains on the following
specified tire sizes:
• 255/60R19
• Only install chains that are 10 mm or
less.
• 255/55R20
• Only install chains that are 10 mm or
less.
We recommend you use steel wheels of the
same size and specification if snow chains
are required because chains may chip
aluminum wheels.
Follow these guidelines when using snow
tires and traction devices:
445
Wheels and Tires
Page 449 of 681
• If possible, avoid fully loading your
vehicle.
• Purchase snow chains from a
manufacturer that clearly labels body to
tire dimension restrictions.
• When driving with snow chains do not
exceed 30 mph (50 km/h) or the
maximum speed recommended by the
chain manufacturer, whichever is less.• Drive cautiously. If you hear the snow
chains rub or bang against the vehicle,
stop and tighten them. If this does not
work, remove the snow chains to prevent
vehicle damage.
• Remove the snow chains when they are
no longer needed. Do not use snow
chains on dry roads.• If a temporary spare wheel is mounted
on your vehicle, do not use snow chains
on the axle with the temporary spare
wheel.
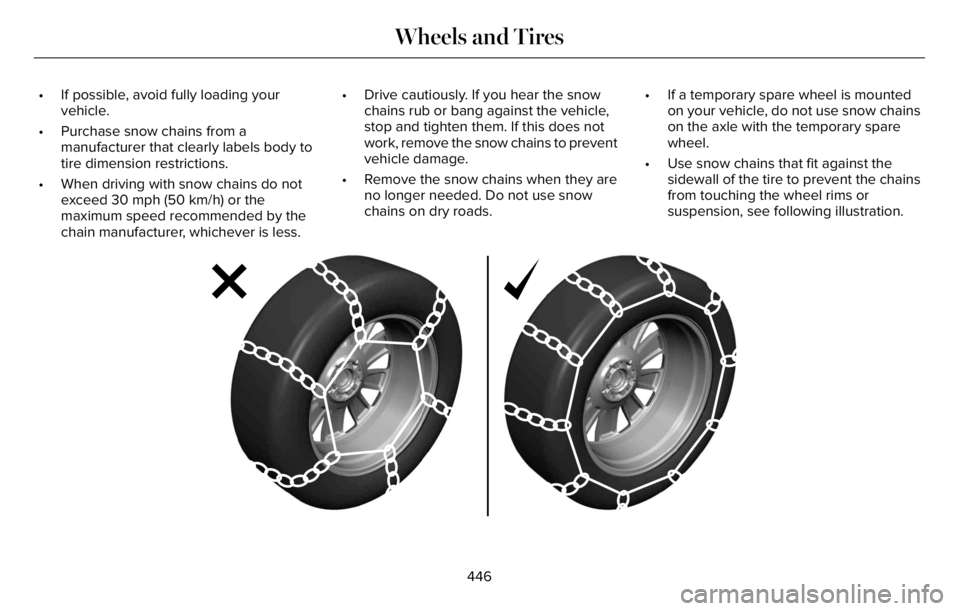
• Use snow chains that fit against the
sidewall of the tire to prevent the chains
from touching the wheel rims or
suspension, see following illustration.
E292547E2925472547
446
Wheels and Tires
Page 457 of 681
Note:No maintenance or additional
lubrication of your jack is required over the
service life of your vehicle.
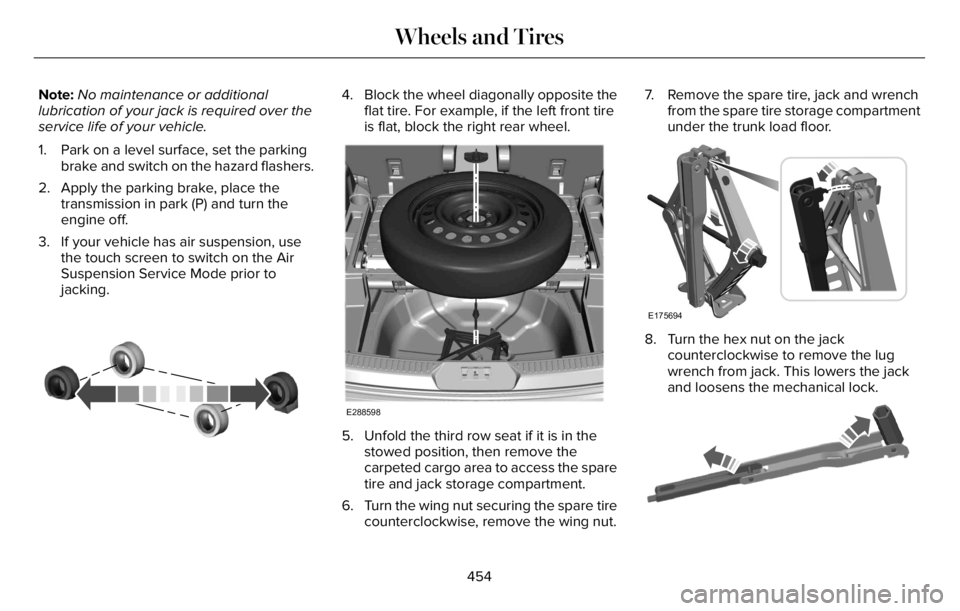
1. Park on a level surface, set the parking
brake and switch on the hazard flashers.
2. Apply the parking brake, place the
transmission in park (P) and turn the
engine off.
3. If your vehicle has air suspension, use
the touch screen to switch on the Air
Suspension Service Mode prior to
jacking.
E142551
4. Block the wheel diagonally opposite the
flat tire. For example, if the left front tire
is flat, block the right rear wheel.
E288598
5. Unfold the third row seat if it is in the
stowed position, then remove the
carpeted cargo area to access the spare
tire and jack storage compartment.
6. Turn the wing nut securing the spare tire
counterclockwise, remove the wing nut.7. Remove the spare tire, jack and wrench
from the spare tire storage compartment
under the trunk load floor.
E175694
8. Turn the hex nut on the jack
counterclockwise to remove the lug
wrench from jack. This lowers the jack
and loosens the mechanical lock.
E181744E181744
454
Wheels and Tires