clock reset LINCOLN AVIATOR 2023 Owners Manual
[x] Cancel search | Manufacturer: LINCOLN, Model Year: 2023, Model line: AVIATOR, Model: LINCOLN AVIATOR 2023Pages: 681, PDF Size: 9.33 MB
Page 90 of 681

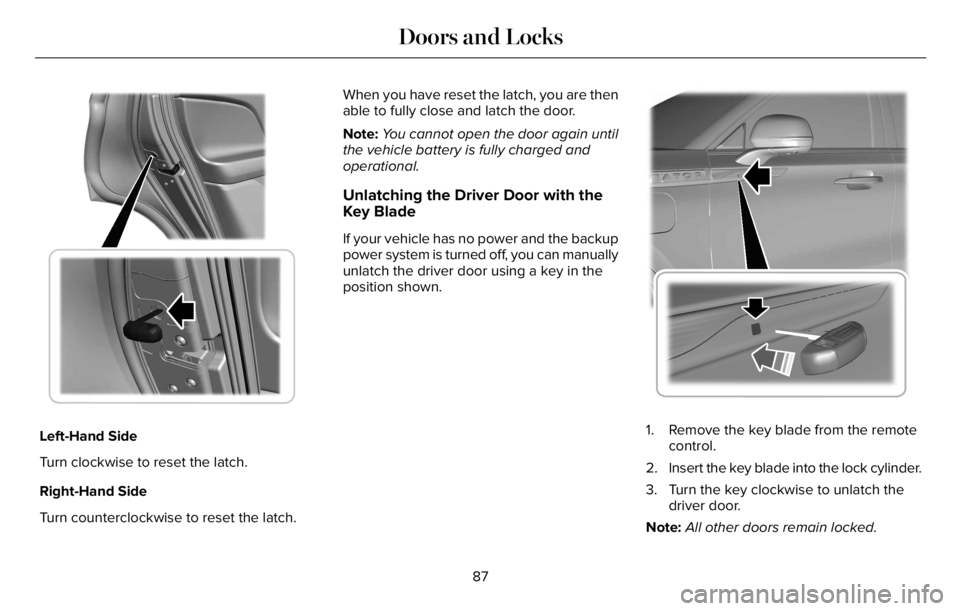
E316247E316247316247316247
Left-Hand Side
Turn clockwise to reset the latch.
Right-Hand Side
Turn counterclockwise to reset the latch.When you have reset the latch, you are then
able to fully close and latch the door.
Note:You cannot open the door again until
the vehicle battery is fully charged and
operational.
Unlatching the Driver Door with the
Key Blade
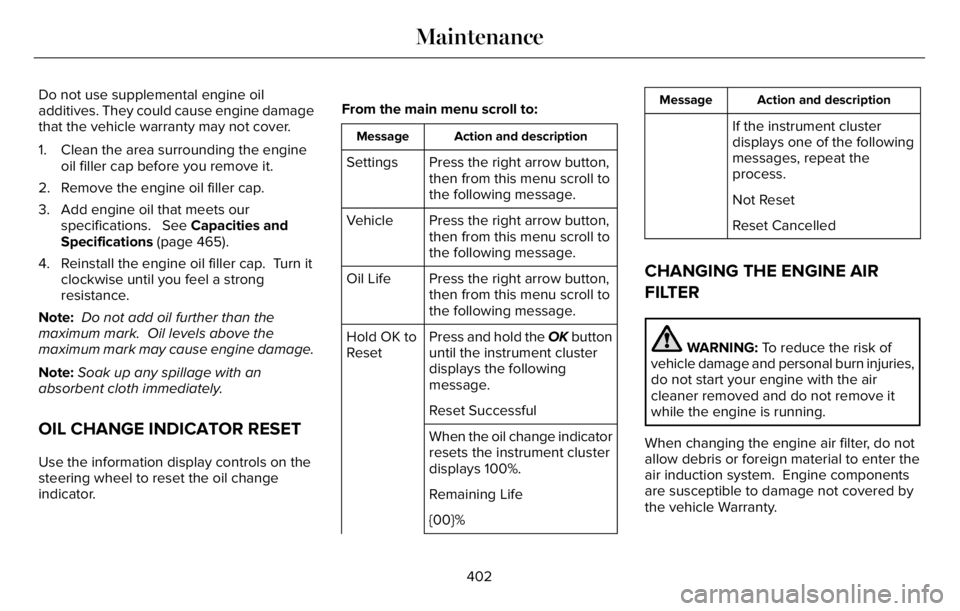
If your vehicle has no power and the backup
power system is turned off, you can manually
unlatch the driver door using a key in the
position shown.
E295771
1. Remove the key blade from the remote
control.
2. Insert the key blade into the lock cylinder.
3. Turn the key clockwise to unlatch the
driver door.
Note:All other doors remain locked.
87
Doors and Locks
Page 405 of 681

Do not use supplemental engine oil
additives. They could cause engine damage
that the vehicle warranty may not cover.
1. Clean the area surrounding the engine
oil filler cap before you remove it.
2. Remove the engine oil filler cap.
3. Add engine oil that meets our
specifications. See Capacities and
Specifications (page 465).
4. Reinstall the engine oil filler cap. Turn it
clockwise until you feel a strong
resistance.
Note: Do not add oil further than the
maximum mark. Oil levels above the
maximum mark may cause engine damage.
Note:Soak up any spillage with an
absorbent cloth immediately.
OIL CHANGE INDICATOR RESET
Use the information display controls on the
steering wheel to reset the oil change
indicator.From the main menu scroll to:
Action and description Message
Press the right arrow button,
then from this menu scroll to
the following message. Settings
Press the right arrow button,
then from this menu scroll to
the following message. Vehicle
Press the right arrow button,
then from this menu scroll to
the following message. Oil Life
Press and hold the OK button
until the instrument cluster
displays the following
message. Hold OK to
Reset
Reset Successful
When the oil change indicator
resets the instrument cluster
displays 100%.
Remaining Life
{00}%
Action and description Message
If the instrument cluster
displays one of the following
messages, repeat the
process.
Not Reset
Reset Cancelled
CHANGING THE ENGINE AIR
FILTER
WARNING: To reduce the risk of
vehicle damage and personal burn injuries,
do not start your engine with the air
cleaner removed and do not remove it
while the engine is running.
When changing the engine air filter, do not
allow debris or foreign material to enter the
air induction system. Engine components
are susceptible to damage not covered by
the vehicle Warranty.
402
Maintenance
Page 415 of 681

After battery replacement, or in some cases
after charging the battery with an external
charger, the battery management system
requires eight hours of vehicle sleep time to
relearn the battery state of charge. During
this time, your vehicle must remain fully
locked with the ignition switched off.
Note:Prior to relearning the battery state of
charge, the battery management system
may temporarily disable some electrical
systems.
Electrical Accessory Installation
To make sure the battery management
system works correctly, do not connect an
electrical device ground connection directly
to the battery negative post. This can cause
inaccurate measurements of the battery
condition and potential incorrect system
operation.
Note:If you add electrical accessories or
components to the vehicle, it may adversely
affect battery performance and durability.
This may also affect the performance of
other electrical systems in the vehicle.Remove and Reinstall the Battery
Install a battery approved for use by our
specifications. See Capacities and
Specifications (page 460).
To disconnect or remove the battery, do the
following:
1. Apply the parking brake and switch the
ignition off.
2. Switch all electrical equipment off, for
example lights and radio.
3. Wait a minimum of two minutes before
disconnecting the battery.
Note:The engine management system has
a power hold function and remains powered
for a period of time after you switch the
ignition off. This is to allow the system to
store diagnostic and adaptive tables.
Disconnecting the battery without waiting
can cause damage not covered by the
vehicle warranty.
4. Disconnect the negative battery cable
terminal.
5. Disconnect the positive battery cable
terminal.6. Remove the battery securing clamp.
7. Remove the battery.
8. To install, reverse the removal procedure.
Note:Before reconnecting the battery, make
sure the ignition remains switched off.
Note:Make sure to fully tighten the battery
cables.
If you disconnect or replace the vehicle
battery, you must reset the following
features:
• Window bounce-back. See Power
Windows (page 121).
• Clock Settings.
• Pre-set radio stations.
Battery Disposal
E107998
Make sure that you dispose of old
batteries in an environmentally
friendly way. Seek advice from
your local authority about recycling old
batteries.
412
Maintenance
Page 419 of 681

6. Remove the battery securing clamp.
7. Remove the battery.
8. To install, reverse the removal procedure.
Note:Before reconnecting the battery, make
sure the ignition remains switched off.
Note:Make sure to fully tighten the battery
cables.
If you disconnect or replace the vehicle
battery, you must reset the following
features:
• Window bounce-back. See Power
Windows (page 121).
• Clock Settings.
• Pre-set radio stations.
Battery Disposal
E107998
Make sure that you dispose of old
batteries in an environmentally
friendly way. Seek advice from
your local authority about recycling old
batteries.
ADJUSTING THE HEADLAMPS
Vertical Aim Adjustment
If your vehicle has been involved in a crash,
have the aim of the headlamp beam checked
by an authorized dealer.
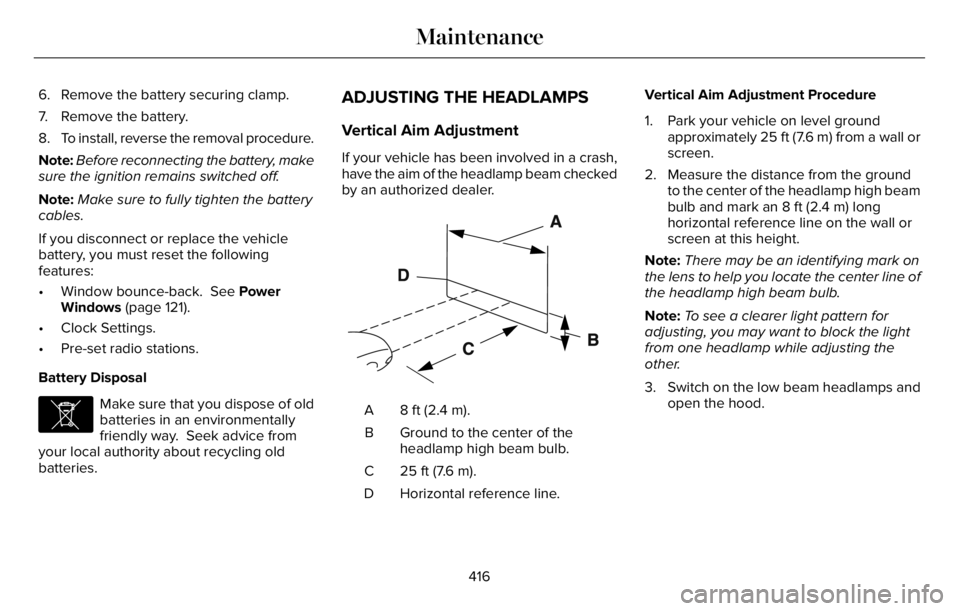
E142592
8 ft (2.4 m). A
Ground to the center of the
headlamp high beam bulb. B
25 ft (7.6 m). C
Horizontal reference line. DVertical Aim Adjustment Procedure
1. Park your vehicle on level ground
approximately 25 ft (7.6 m) from a wall or
screen.
2. Measure the distance from the ground
to the center of the headlamp high beam
bulb and mark an 8 ft (2.4 m) long
horizontal reference line on the wall or
screen at this height.
Note:There may be an identifying mark on
the lens to help you locate the center line of
the headlamp high beam bulb.
Note:To see a clearer light pattern for
adjusting, you may want to block the light
from one headlamp while adjusting the
other.
3. Switch on the low beam headlamps and
open the hood.
416
Maintenance