remove seats LINCOLN AVIATOR 2023 Owners Manual
[x] Cancel search | Manufacturer: LINCOLN, Model Year: 2023, Model line: AVIATOR, Model: LINCOLN AVIATOR 2023Pages: 681, PDF Size: 9.33 MB
Page 35 of 681
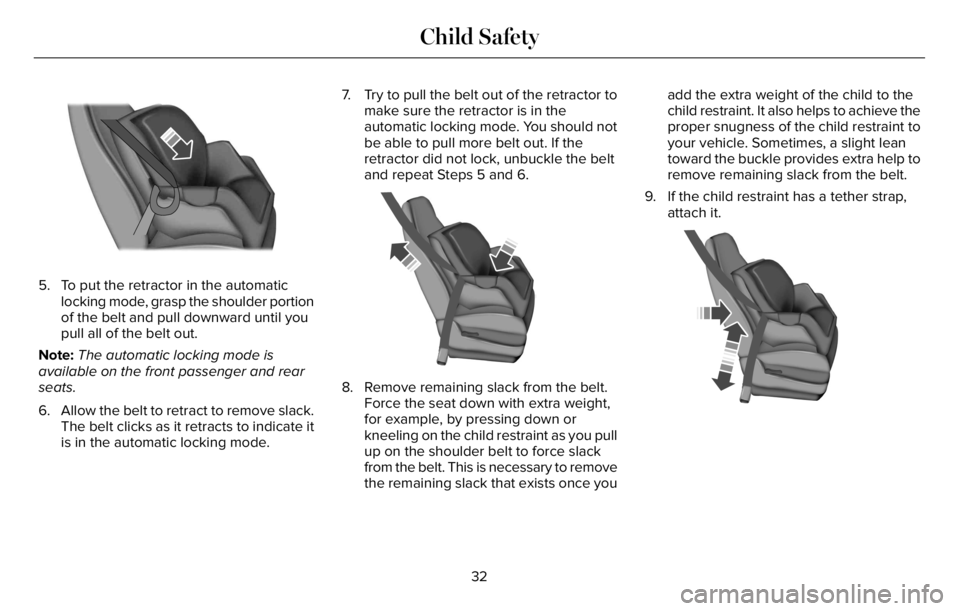
5. To put the retractor in the automatic
locking mode, grasp the shoulder portion
of the belt and pull downward until you
pull all of the belt out.
Note:The automatic locking mode is
available on the front passenger and rear
seats.
6. Allow the belt to retract to remove slack.
The belt clicks as it retracts to indicate it
is in the automatic locking mode.7. Try to pull the belt out of the retractor to
make sure the retractor is in the
automatic locking mode. You should not
be able to pull more belt out. If the
retractor did not lock, unbuckle the belt
and repeat Steps 5 and 6.
E142533
8. Remove remaining slack from the belt.
Force the seat down with extra weight,
for example, by pressing down or
kneeling on the child restraint as you pull
up on the shoulder belt to force slack
from the belt. This is necessary to remove
the remaining slack that exists once youadd the extra weight of the child to the
child restraint. It also helps to achieve the
proper snugness of the child restraint to
your vehicle. Sometimes, a slight lean
toward the buckle provides extra help to
remove remaining slack from the belt.
9. If the child restraint has a tether strap,
attach it.E142534
32
Child Safety
Page 43 of 681
BOOSTER SEATS
WARNING: Do not put the shoulder
section of the seatbelt or allow the child to
put the shoulder section of the seatbelt
under their arm or behind their back.
Failure to follow this instruction could
reduce the effectiveness of the seatbelt
and increase the risk of injury or death in
a crash.
Use a belt-positioning booster seat for
children who have outgrown or no longer
properly fit in a child safety restraint
(generally children who are less than 57 in
(1.45 m) tall, are greater than age 4 and less
than age 12, and between 40 lb (18 kg) and
80 lb (36 kg) and upward to 100 lb (45 kg) if
recommended by your child restraint
manufacturer). Many state and provincial
laws require that children use approved
booster seats until they reach age eight, a
height of 57 in (1.45 m) tall, or 80 lb (36 kg).
Booster seats should be used until you can
answer YES to ALL of these questions when
seated without a booster seat:
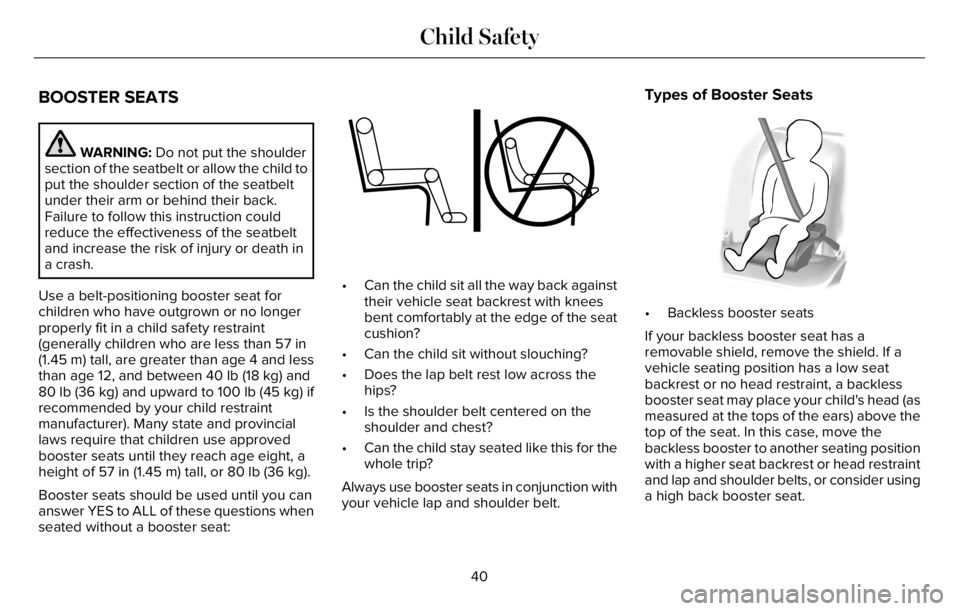
• Can the child sit all the way back against
their vehicle seat backrest with knees
bent comfortably at the edge of the seat
cushion?
• Can the child sit without slouching?
• Does the lap belt rest low across the
hips?
• Is the shoulder belt centered on the
shoulder and chest?
• Can the child stay seated like this for the
whole trip?
Always use booster seats in conjunction with
your vehicle lap and shoulder belt.
Types of Booster Seats
E68924
• Backless booster seats
If your backless booster seat has a
removable shield, remove the shield. If a
vehicle seating position has a low seat
backrest or no head restraint, a backless
booster seat may place your child's head (as
measured at the tops of the ears) above the
top of the seat. In this case, move the
backless booster to another seating position
with a higher seat backrest or head restraint
and lap and shoulder belts, or consider using
a high back booster seat.
40
Child Safety
Page 47 of 681
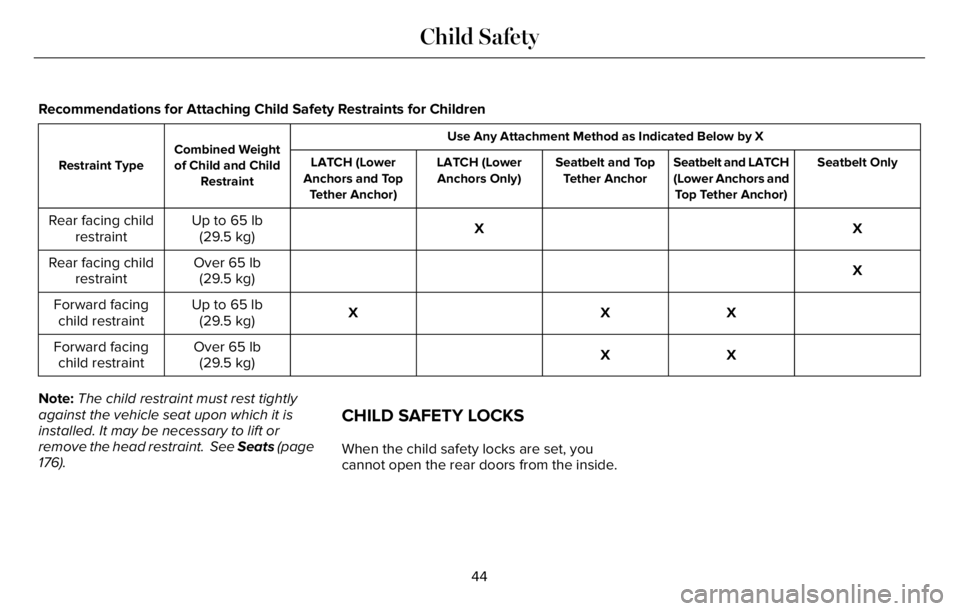
Recommendations for Attaching Child Safety Restraints for Children
Use Any Attachment Method as Indicated Below by X
Combined Weight
of Child and Child
Restraint Restraint TypeSeatbelt Only Seatbelt and LATCH
(Lower Anchors and
Top Tether Anchor) Seatbelt and Top
Tether Anchor LATCH (Lower
Anchors Only) LATCH (Lower
Anchors and Top
Tether Anchor)
X X Up to 65 lb
(29.5 kg) Rear facing child
restraint
X Over 65 lb
(29.5 kg) Rear facing child
restraint
X X X Up to 65 lb
(29.5 kg) Forward facing
child restraint
X X Over 65 lb
(29.5 kg) Forward facing
child restraint
Note:The child restraint must rest tightly
against the vehicle seat upon which it is
installed. It may be necessary to lift or
remove the head restraint. See Seats (page
176).
CHILD SAFETY LOCKS
When the child safety locks are set, you
cannot open the rear doors from the inside.
44
Child Safety
Page 97 of 681
POWER LIFTGATE
WARNING: It is extremely dangerous
to ride in a cargo area, inside or outside of
a vehicle. In a crash, people riding in these
areas are more likely to be seriously
injured or killed. Do not allow people to
ride in any area of your vehicle that is not
equipped with seats and seatbelts. Make
sure everyone in your vehicle is in a seat
and properly using a seatbelt. Failure to
follow this warning could result in serious
personal injury or death.
WARNING: Make sure that you fully
close the liftgate to prevent exhaust fumes
from entering your vehicle. If you are
unable to fully close the liftgate, open the
air vents or the windows to allow fresh air
to enter your vehicle. Failure to follow this
instruction could result in personal injury
or death.
WARNING: Keep keys out of reach
of children. Do not allow children to
operate or play near an open or moving
power liftgate. You should supervise the
operation of the power liftgate at all times.
Note: Make sure that you close the liftgate
before operating or moving your vehicle,
especially in an enclosure, like a garage or
a parking structure. This could damage the
liftgate and its components.
Note: Do not hang anything, for example a
bike rack, from the glass or liftgate. This
could damage the liftgate and its
components.
Note:Make sure that you fully close the
liftgate to prevent cargo from falling out
The liftgate only operates with the
transmission in park (P).
If there is a problem with the open or close
request, a tone sounds for one of the
following reasons:• The ignition is on and the transmission
is not in park (P).
• The battery voltage is below the
minimum operating voltage.
• The liftgate is not fully closed and your
vehicle speed is at or above 3 mph
(5 km/h).
If the liftgate starts to close after it has fully
opened, this indicates there could be
excessive weight on the liftgate or a possible
strut failure. A repetitive tone sounds and
the liftgate closes under control. If the liftgate
continues to close after opening, have the
system checked by an authorized dealer.
Remove any excessive weight from the
liftgate.
Opening and Closing the Liftgate
WARNING: Make sure all persons
are clear of the power liftgate area before
using the power liftgate control.
94
Liftgate
Page 163 of 681
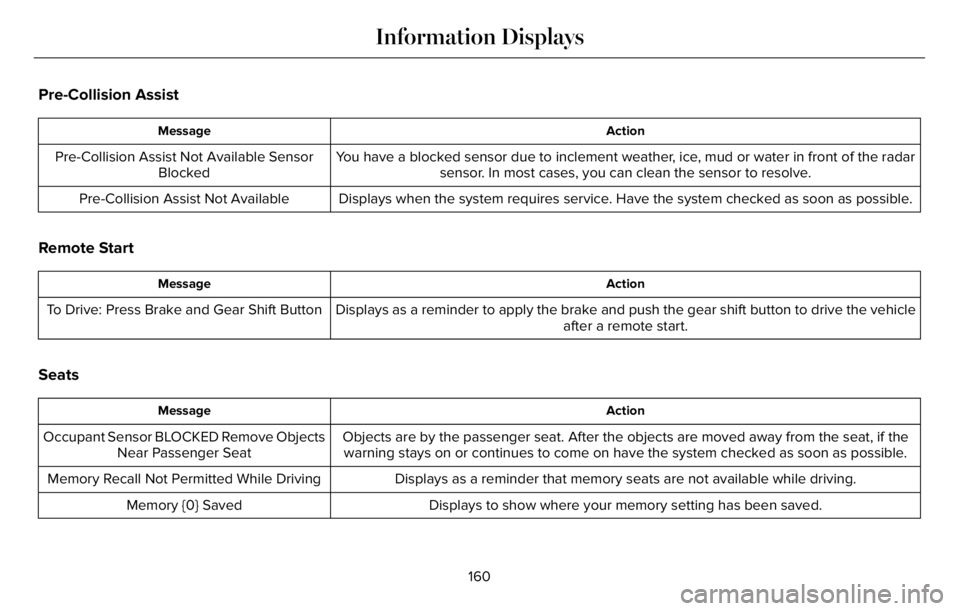
Pre-Collision Assist
Action Message
You have a blocked sensor due to inclement weather, ice, mud or water in front of the radar
sensor. In most cases, you can clean the sensor to resolve. Pre-Collision Assist Not Available Sensor
Blocked
Displays when the system requires service. Have the system checked as soon as possible. Pre-Collision Assist Not Available
Remote Start
Action Message
Displays as a reminder to apply the brake and push the gear shift button to drive the vehicle
after a remote start. To Drive: Press Brake and Gear Shift Button
Seats
Action Message
Objects are by the passenger seat. After the objects are moved away from the seat, if the
warning stays on or continues to come on have the system checked as soon as possible. Occupant Sensor BLOCKED Remove Objects
Near Passenger Seat
Displays as a reminder that memory seats are not available while driving. Memory Recall Not Permitted While Driving
Displays to show where your memory setting has been saved. Memory {0} Saved
160
Information Displays
Page 171 of 681
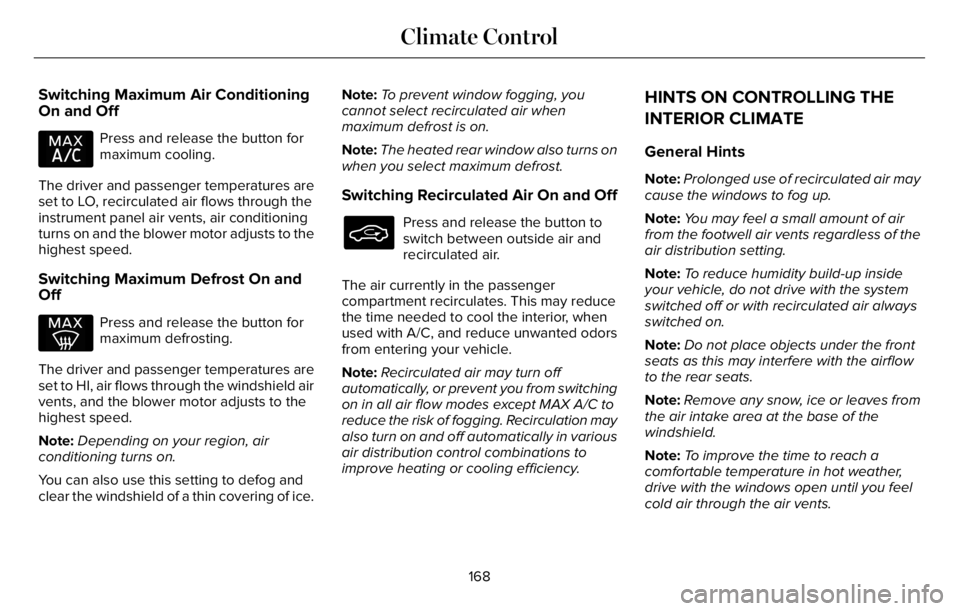
Switching Maximum Air Conditioning
On and Off
Press and release the button for
maximum cooling.
The driver and passenger temperatures are
set to LO, recirculated air flows through the
instrument panel air vents, air conditioning
turns on and the blower motor adjusts to the
highest speed.
Switching Maximum Defrost On and
Off
Press and release the button for
maximum defrosting.
The driver and passenger temperatures are
set to HI, air flows through the windshield air
vents, and the blower motor adjusts to the
highest speed.
Note:Depending on your region, air
conditioning turns on.
You can also use this setting to defog and
clear the windshield of a thin covering of ice.Note:To prevent window fogging, you
cannot select recirculated air when
maximum defrost is on.
Note:The heated rear window also turns on
when you select maximum defrost.
Switching Recirculated Air On and Off
Press and release the button to
switch between outside air and
recirculated air.
The air currently in the passenger
compartment recirculates. This may reduce
the time needed to cool the interior, when
used with A/C, and reduce unwanted odors
from entering your vehicle.
Note:Recirculated air may turn off
automatically, or prevent you from switching
on in all air flow modes except MAX A/C to
reduce the risk of fogging. Recirculation may
also turn on and off automatically in various
air distribution control combinations to
improve heating or cooling efficiency.
HINTS ON CONTROLLING THE
INTERIOR CLIMATE
General Hints
Note:Prolonged use of recirculated air may
cause the windows to fog up.
Note:You may feel a small amount of air
from the footwell air vents regardless of the
air distribution setting.
Note:To reduce humidity build-up inside
your vehicle, do not drive with the system
switched off or with recirculated air always
switched on.
Note:Do not place objects under the front
seats as this may interfere with the airflow
to the rear seats.
Note:Remove any snow, ice or leaves from
the air intake area at the base of the
windshield.
Note:To improve the time to reach a
comfortable temperature in hot weather,
drive with the windows open until you feel
cold air through the air vents.
168
Climate Control
Page 180 of 681
HEAD RESTRAINTS
WARNING: Fully adjust the head
restraint before you sit in or operate your
vehicle. This will help minimize the risk of
neck injury in the event of a crash. Do not
adjust the head restraint when your vehicle
is moving.
WARNING: The head restraint is a
safety device. Whenever possible it should
be installed and properly adjusted when
the seat is occupied. Failure to adjust the
head restraint properly could reduce its
effectiveness during certain impacts.
Note:Adjust the seat backrest to an upright
driving position before adjusting the head
restraint. Adjust the head restraint so that
the top of it is level with the top of your head
and as far forward as possible. Make sure
that you remain comfortable. If you are
extremely tall, adjust the head restraint to
its highest position.
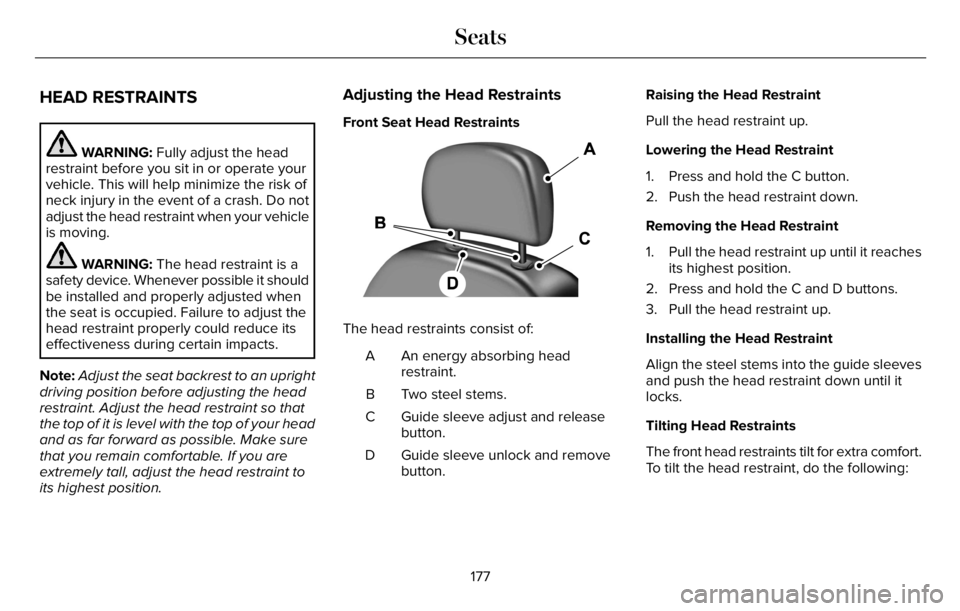
Adjusting the Head Restraints
Front Seat Head Restraints
The head restraints consist of:
An energy absorbing head
restraint. A
Two steel stems. B
Guide sleeve adjust and release
button. C
Guide sleeve unlock and remove
button. DRaising the Head Restraint
Pull the head restraint up.
Lowering the Head Restraint
1. Press and hold the C button.
2. Push the head restraint down.
Removing the Head Restraint
1. Pull the head restraint up until it reaches
its highest position.
2. Press and hold the C and D buttons.
3. Pull the head restraint up.
Installing the Head Restraint
Align the steel stems into the guide sleeves
and push the head restraint down until it
locks.
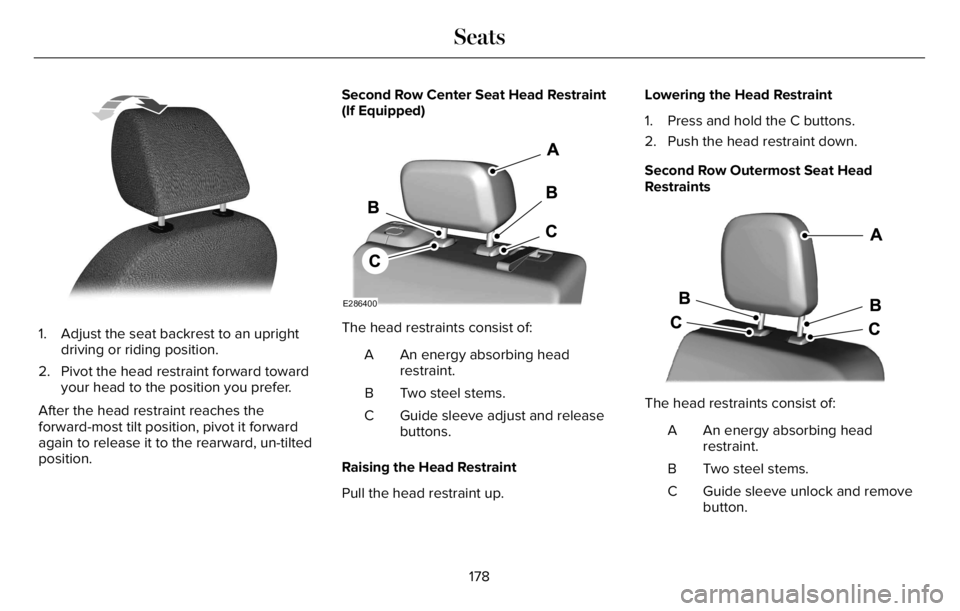
Tilting Head Restraints
The front head restraints tilt for extra comfort.
To tilt the head restraint, do the following:
177
Seats
Page 181 of 681
E144727
1. Adjust the seat backrest to an upright
driving or riding position.
2. Pivot the head restraint forward toward
your head to the position you prefer.
After the head restraint reaches the
forward-most tilt position, pivot it forward
again to release it to the rearward, un-tilted
position.Second Row Center Seat Head Restraint
(If Equipped)
E286400
The head restraints consist of:
An energy absorbing head
restraint. A
Two steel stems. B
Guide sleeve adjust and release
buttons. C
Raising the Head Restraint
Pull the head restraint up.Lowering the Head Restraint
1. Press and hold the C buttons.
2. Push the head restraint down.
Second Row Outermost Seat Head
Restraints
E3333322253E333332222253222222222222253222253225332253232533225333225353
The head restraints consist of:
An energy absorbing head
restraint. A
Two steel stems. B
Guide sleeve unlock and remove
button. C
178
Seats
Page 197 of 681
SWITCHING REAR OCCUPANT
ALERT SYSTEM ON AND OFF
1. Press Settings on the touchscreen.
2. Press Vehicle.
3. Switch Rear Occupant Alert on or off.
Note:The default setting is on.
Note:Performing a master reset causes the
system to switch on again.
Semiannual Reminder (If Equipped)
When you switch the system off, a message
appears every six months as a reminder that
the system is off. You can switch the system
back on or leave it off.
REAR OCCUPANT ALERT SYSTEM
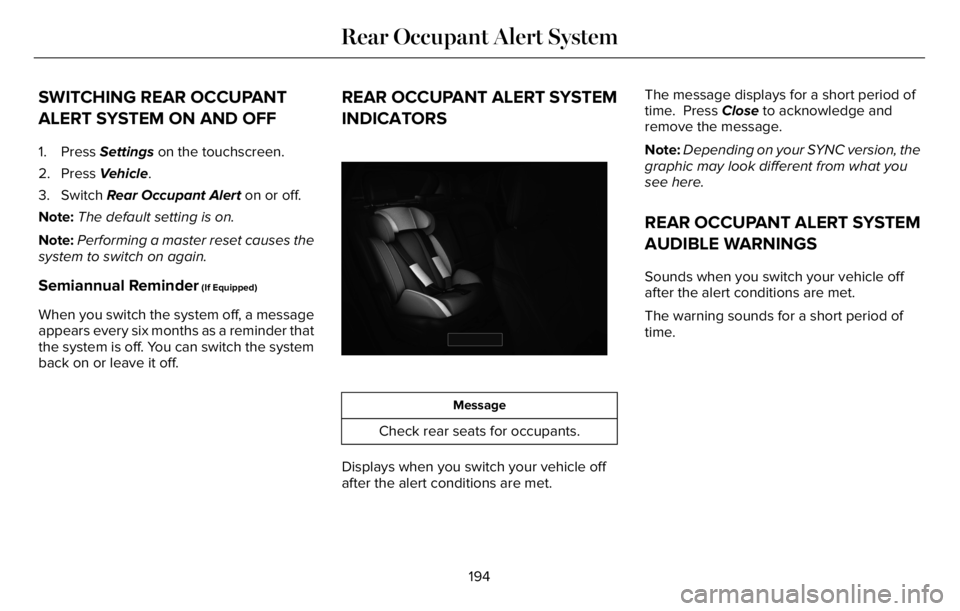
INDICATORS
E350472E350472
Message
Check rear seats for occupants.
Displays when you switch your vehicle off
after the alert conditions are met.The message displays for a short period of
time. Press Close to acknowledge and
remove the message.
Note:Depending on your SYNC version, the
graphic may look different from what you
see here.
REAR OCCUPANT ALERT SYSTEM
AUDIBLE WARNINGS
Sounds when you switch your vehicle off
after the alert conditions are met.
The warning sounds for a short period of
time.
194
Rear Occupant Alert System
Page 414 of 681
For longer, trouble-free operation, keep the
top of the battery clean and dry and the
battery cables tightly fastened to the battery
terminals. If any corrosion is present on the
battery or terminals, remove the cables from
the terminals and clean with a wire brush.
You can neutralize the acid with a solution
of baking soda and water.
We recommend that you disconnect the
negative battery cable terminal from the
battery if you plan to store your vehicle for
an extended period.
Note:If you only disconnect the negative
battery cable terminal, make sure it is
isolated or placed away from the battery
terminal to avoid unintended connection or
arcing.
If you replace the battery make sure it
matches the electrical requirements of your
vehicle.If you disconnect or replace the battery and
your vehicle has an automatic transmission,
it must relearn its adaptive strategy. Because
of this, the transmission may shift firmly when
first driven. This is normal operation while
the transmission fully updates its operation
to optimum shift feel.
Battery Sensor Reset
When you install a new battery, reset the
battery sensor by doing the following:
1. Switch the ignition on, and leave the
engine off.
Note:Complete Steps 2 and 3 within 10
seconds.
2. Flash the high beam headlamps five
times, ending with the high beams off.
3. Press and release the brake pedal three
times.
The battery warning lamp flashes three times
to confirm that the reset is successful.
Battery Management System (If Equipped)
The system monitors battery conditions and
takes actions to extend battery life. If
excessive battery drain is detected, the
system temporarily disables some electrical
systems to protect the battery.
Systems included are:
• Heated rear window.
• Heated seats.
• Climate control.
• Heated steering wheel.
• Audio unit.
• Navigation system.
A message may appear in the information
display to alert you that battery protection
actions are active. This message is only for
notification that an action is taking place, and
not intended to indicate an electrical problem
or that the battery requires replacement.
411
Maintenance