air filter LINCOLN BLACKWOOD 2002 Owners Manual
[x] Cancel search | Manufacturer: LINCOLN, Model Year: 2002, Model line: BLACKWOOD, Model: LINCOLN BLACKWOOD 2002Pages: 248, PDF Size: 2.33 MB
Page 5 of 248
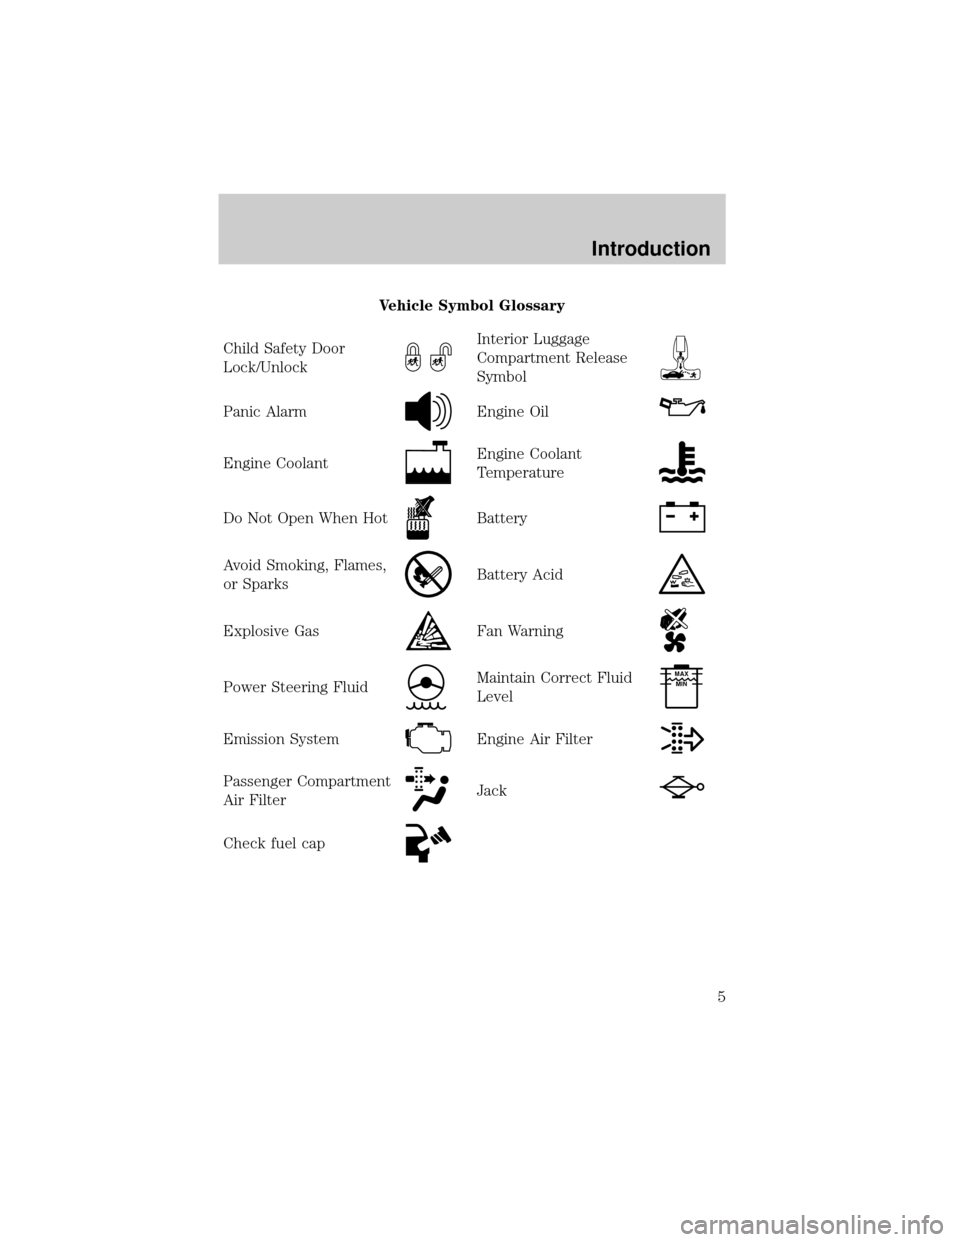
Vehicle Symbol Glossary
Child Safety Door
Lock/Unlock
Interior Luggage
Compartment Release
Symbol
Panic AlarmEngine Oil
Engine CoolantEngine Coolant
Temperature
Do Not Open When HotBattery
Avoid Smoking, Flames,
or SparksBattery Acid
Explosive GasFan Warning
Power Steering FluidMaintain Correct Fluid
LevelMAX
MIN
Emission SystemEngine Air Filter
Passenger Compartment
Air FilterJack
Check fuel cap
Introduction
5
Page 93 of 248
CLIMATE CONTROL SEATS
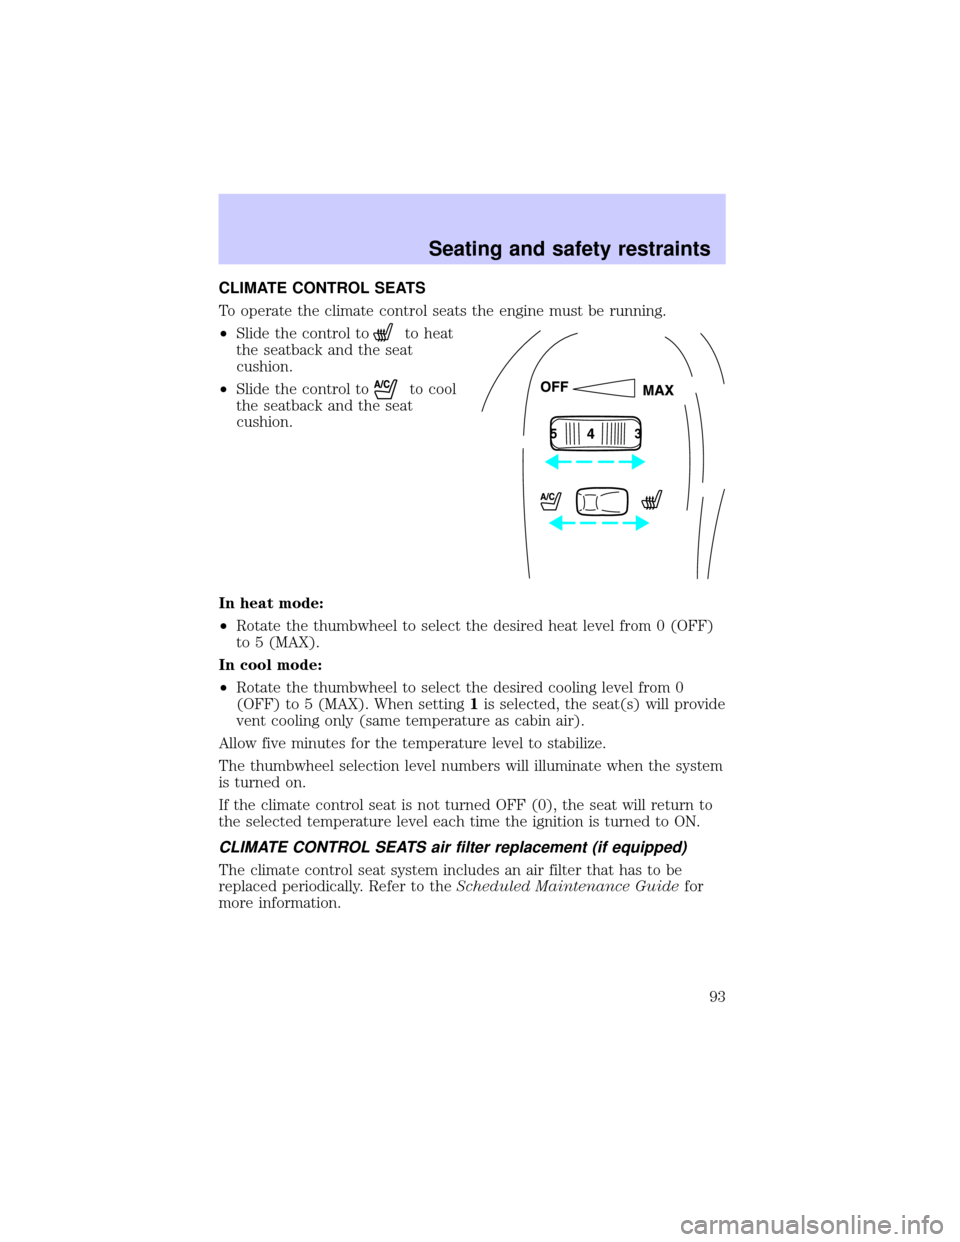
To operate the climate control seats the engine must be running.
²Slide the control to
to heat
the seatback and the seat
cushion.
²Slide the control to
to cool
the seatback and the seat
cushion.
In heat mode:
²Rotate the thumbwheel to select the desired heat level from 0 (OFF)
to 5 (MAX).
In cool mode:
²Rotate the thumbwheel to select the desired cooling level from 0
(OFF) to 5 (MAX). When setting1is selected, the seat(s) will provide
vent cooling only (same temperature as cabin air).
Allow five minutes for the temperature level to stabilize.
The thumbwheel selection level numbers will illuminate when the system
is turned on.
If the climate control seat is not turned OFF (0), the seat will return to
the selected temperature level each time the ignition is turned to ON.
CLIMATE CONTROL SEATS air filter replacement (if equipped)
The climate control seat system includes an air filter that has to be
replaced periodically. Refer to theScheduled Maintenance Guidefor
more information.
53
Seating and safety restraints
93
Page 94 of 248
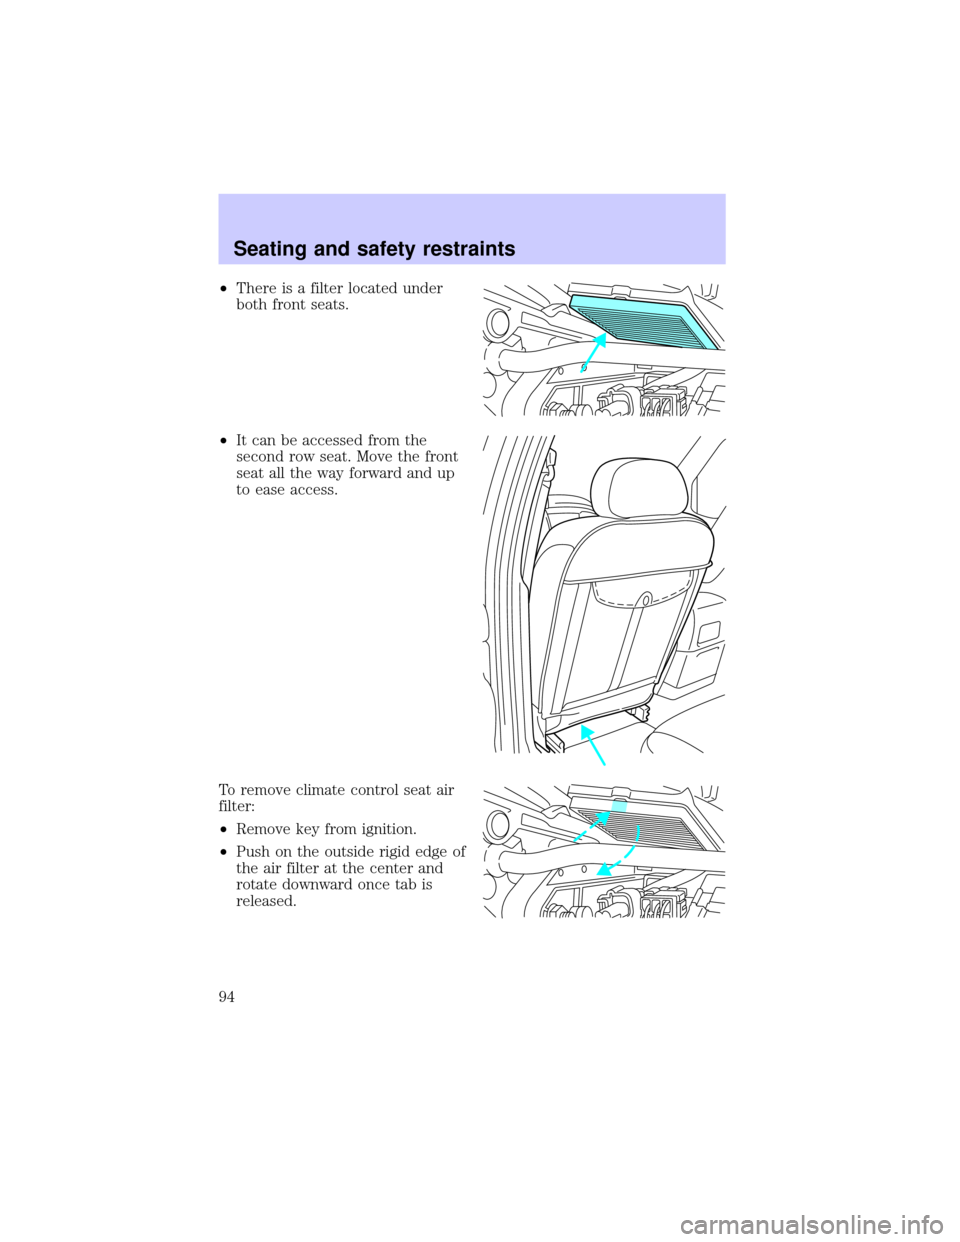
²There is a filter located under
both front seats.
²It can be accessed from the
second row seat. Move the front
seat all the way forward and up
to ease access.
To remove climate control seat air
filter:
²Remove key from ignition.
²Push on the outside rigid edge of
the air filter at the center and
rotate downward once tab is
released.
����
����
Seating and safety restraints
94
Page 95 of 248
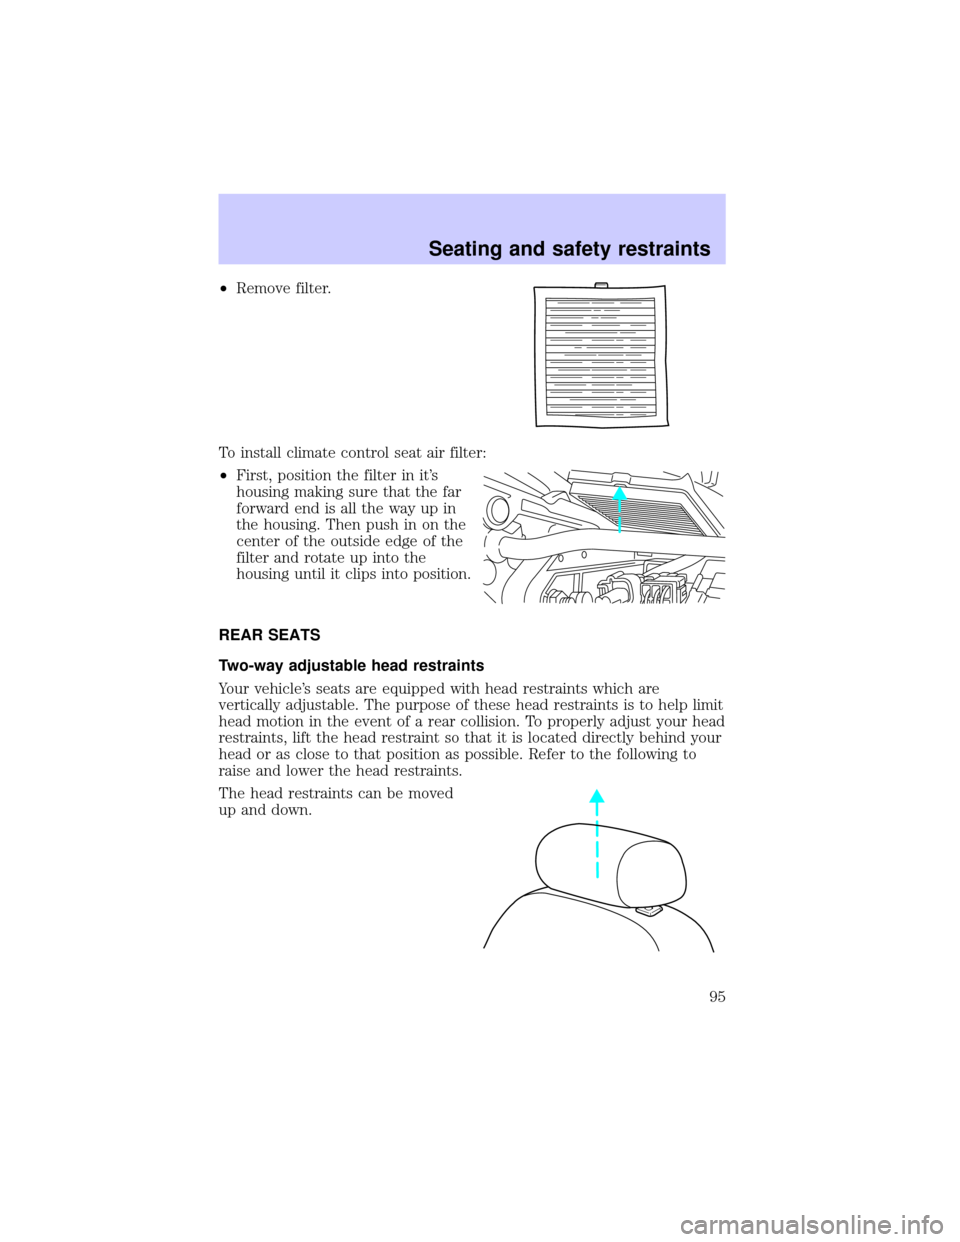
²Remove filter.
To install climate control seat air filter:
²First, position the filter in it's
housing making sure that the far
forward end is all the way up in
the housing. Then push in on the
center of the outside edge of the
filter and rotate up into the
housing until it clips into position.
REAR SEATS
Two-way adjustable head restraints
Your vehicle's seats are equipped with head restraints which are
vertically adjustable. The purpose of these head restraints is to help limit
head motion in the event of a rear collision. To properly adjust your head
restraints, lift the head restraint so that it is located directly behind your
head or as close to that position as possible. Refer to the following to
raise and lower the head restraints.
The head restraints can be moved
up and down.
Seating and safety restraints
95
Page 170 of 248
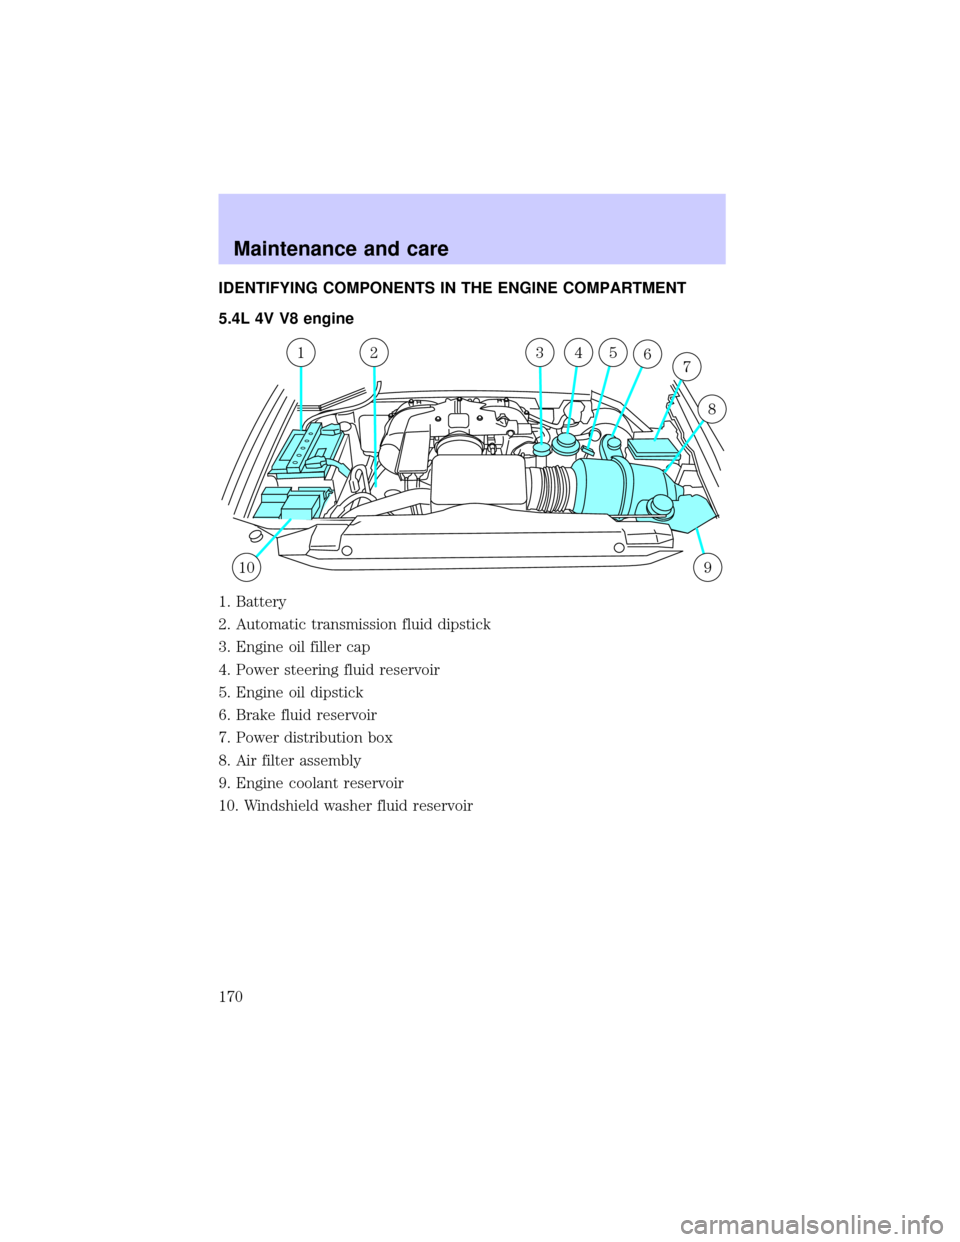
IDENTIFYING COMPONENTS IN THE ENGINE COMPARTMENT
5.4L 4V V8 engine
1. Battery
2. Automatic transmission fluid dipstick
3. Engine oil filler cap
4. Power steering fluid reservoir
5. Engine oil dipstick
6. Brake fluid reservoir
7. Power distribution box
8. Air filter assembly
9. Engine coolant reservoir
10. Windshield washer fluid reservoir
109
123456
8
7
Maintenance and care
170
Page 187 of 248
4. Allow the engine to idle for at least one minute.
5. Turn the A/C on and allow the engine to idle for at least one minute.
6. Drive the vehicle to complete the relearning process.
²The vehicle may need to be driven 16 km (10 miles) or more to
relearn the idle and fuel trim strategy.
²If you do not allow the engine to relearn its idle trim, the idle
quality of your vehicle may be adversely affected until the idle
trim is eventually relearned.
If the battery has been disconnected or a new battery has been installed,
the clock and the preset radio stations must be reset once the battery is
reconnected.
²Always dispose of automotive
batteries in a responsible manner.
Follow your local authorized
standards for disposal. Call your
local authorized recycling center
to find out more about recycling
automotive batteries.
AIR FILTER MAINTENANCE
Refer to the scheduled maintenance guide for the appropriate intervals
for changing the air filter element.
When changing the air filter element, use only the Motorcraft air filter
element listed. Refer toMotorcraft Part Numbers.
Do not start your engine with the air cleaner removed and do
not remove it while the engine is running.
LEAD
RETURN
RECYCLE
Maintenance and care
187
Page 188 of 248
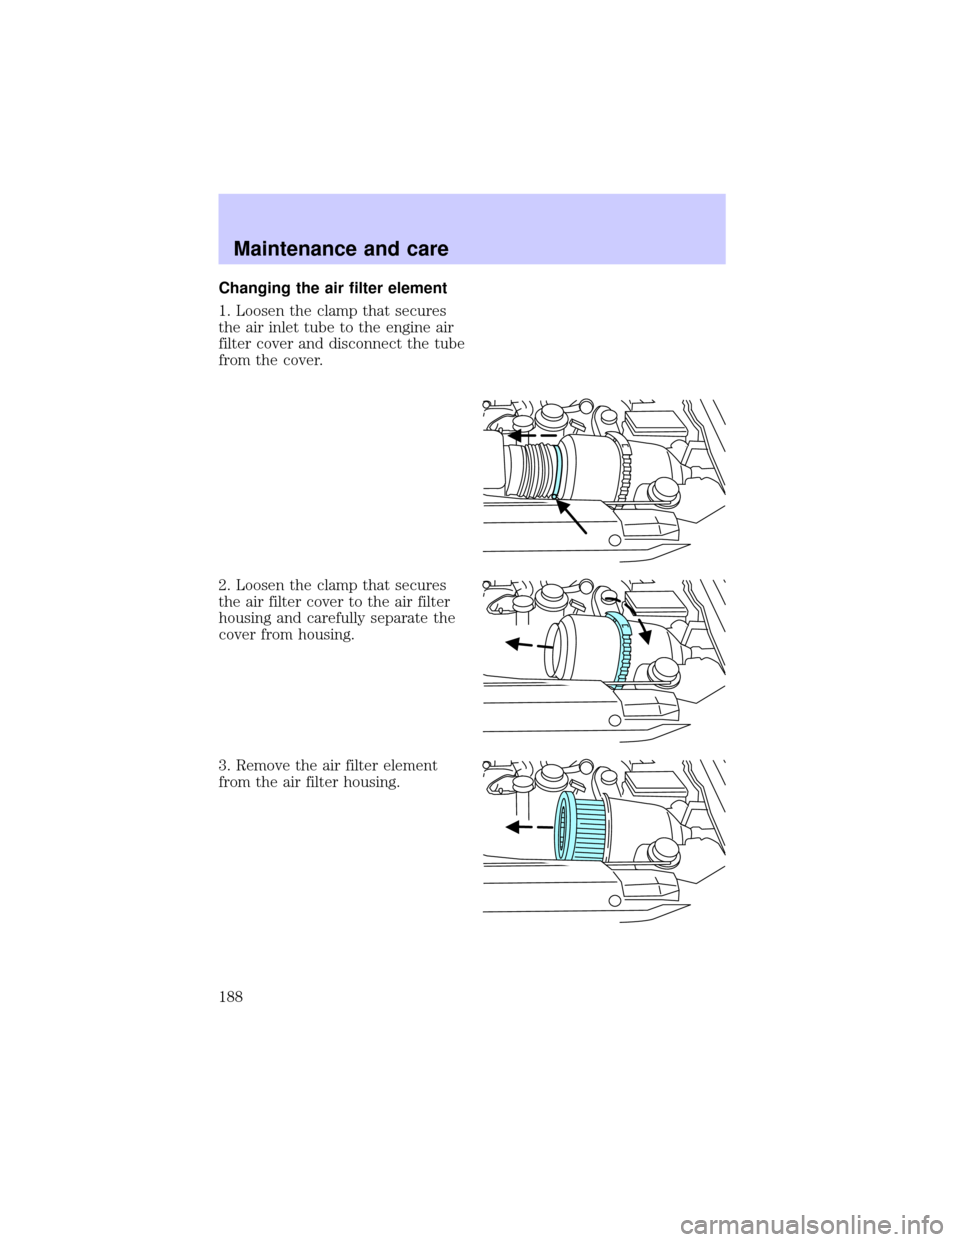
Changing the air filter element
1. Loosen the clamp that secures
the air inlet tube to the engine air
filter cover and disconnect the tube
from the cover.
2. Loosen the clamp that secures
the air filter cover to the air filter
housing and carefully separate the
cover from housing.
3. Remove the air filter element
from the air filter housing.
Maintenance and care
188
Page 189 of 248
4. Install a new air filter element. Be careful not to crimp the filter
element edges between the air filter housing and cover. This could cause
filter damage and allow unmetered air to enter the engine if not properly
seated.
5. Replace the air filter cover and secure the clamp.
6. Replace the air inlet tube and secure the clamp.
WINDSHIELD WIPER BLADES
Check the wiper blades at least twice a year or when they seem less
effective. Substances such as tree sap and some hot wax treatments used
by commercial car washes reduce the effectiveness of wiper blades.
Checking the wiper blades
If the wiper blades do not wipe properly, clean both the windshield and
wiper blades using undiluted windshield wiper solution or a mild
detergent. Rinse thoroughly with clean water. To avoid damaging the
blades, do not use fuel, kerosene, paint thinner or other solvents.
Changing the wiper blades
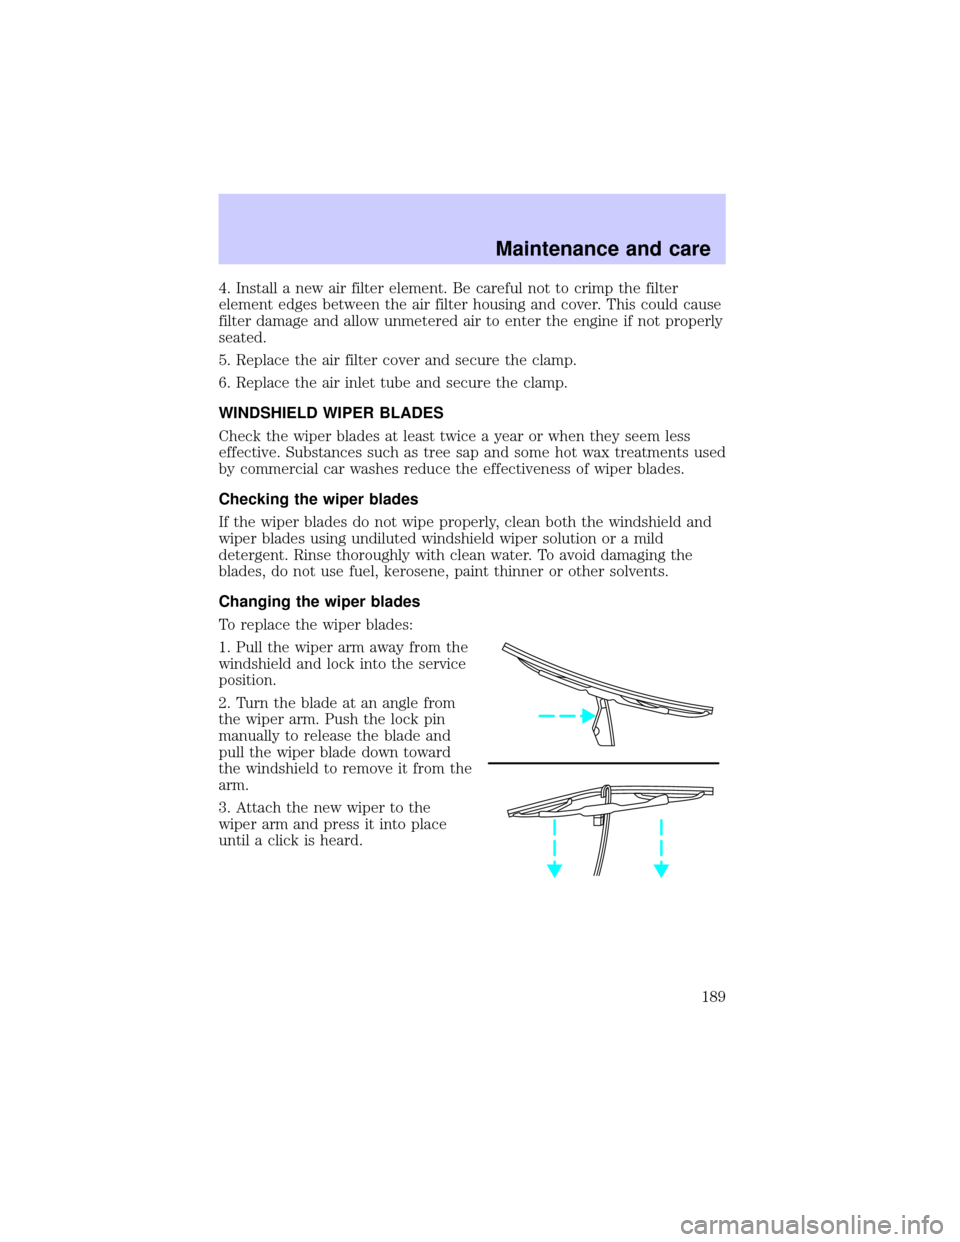
To replace the wiper blades:
1. Pull the wiper arm away from the
windshield and lock into the service
position.
2. Turn the blade at an angle from
the wiper arm. Push the lock pin
manually to release the blade and
pull the wiper blade down toward
the windshield to remove it from the
arm.
3. Attach the new wiper to the
wiper arm and press it into place
until a click is heard.
Maintenance and care
189
Page 218 of 248
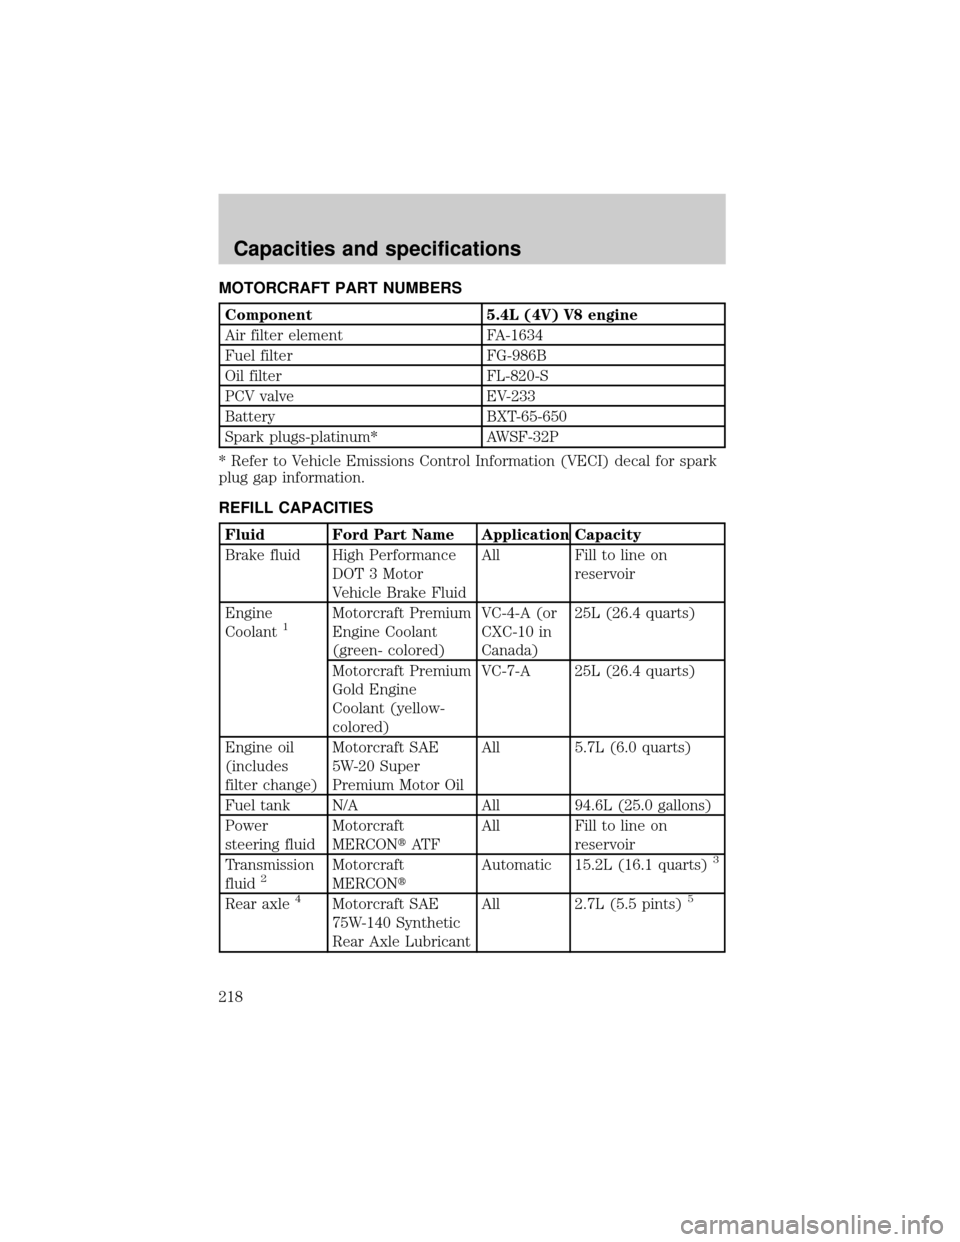
MOTORCRAFT PART NUMBERS
Component 5.4L (4V) V8 engine
Air filter element FA-1634
Fuel filter FG-986B
Oil filter FL-820-S
PCV valve EV-233
Battery BXT-65-650
Spark plugs-platinum* AWSF-32P
* Refer to Vehicle Emissions Control Information (VECI) decal for spark
plug gap information.
REFILL CAPACITIES
Fluid Ford Part Name Application Capacity
Brake fluid High Performance
DOT 3 Motor
Vehicle Brake FluidAll Fill to line on
reservoir
Engine
Coolant
1Motorcraft Premium
Engine Coolant
(green- colored)VC-4-A (or
CXC-10 in
Canada)25L (26.4 quarts)
Motorcraft Premium
Gold Engine
Coolant (yellow-
colored)VC-7-A 25L (26.4 quarts)
Engine oil
(includes
filter change)Motorcraft SAE
5W-20 Super
Premium Motor OilAll 5.7L (6.0 quarts)
Fuel tank N/A All 94.6L (25.0 gallons)
Power
steering fluidMotorcraft
MERCONtAT FAll Fill to line on
reservoir
Transmission
fluid
2Motorcraft
MERCONtAutomatic 15.2L (16.1 quarts)3
Rear axle4Motorcraft SAE
75W-140 Synthetic
Rear Axle LubricantAll 2.7L (5.5 pints)5
Capacities and specifications
218
Page 238 of 248

A
Accessory delay ..........................70
Air bag supplemental restraint
system ................................111±112
and child safety seats ............114
description ..............................112
disposal ....................................116
driver air bag ..........................114
indicator light .....................9, 116
operation .................................114
passenger air bag ...................114
Air cleaner filter .......187±188, 218
Air conditioning ..........................41
rear seat controls .....................47
Air suspension ...........................132
description ..............................132
warning light .............................12
Ambulance packages ....................3
Antifreeze
(see Engine coolant) ................175
Anti-lock brake system
(see Brakes) ......................129±130
Anti-theft system
warning light .............................10
Audio system (see Radio) .........23
Automatic transmission
driving an automatic
overdrive .................................137
fluid, adding ............................183
fluid, checking ........................183
fluid, refill capacities ..............218
fluid, specification ..................222
Auxiliary power point .................19
Axle
lubricant
specifications ..................220, 222refill capacities ........................218
B
Battery .......................................185
acid, treating emergencies .....185
charging system
warning light .............................11
jumping a disabled battery ....162
maintenance-free ....................185
replacement, specifications ...218
servicing ..................................185
voltage gauge ............................15
Belt minder ...............................107
Brakes ........................................129
anti-lock ...........................129±130
anti-lock brake system
(ABS) warning light .........10, 129
brake warning light ..................10
fluid, checking and adding ....174
fluid, refill capacities ..............218
fluid, specifications .........220, 222
lubricant specifications ..220, 222
parking ....................................130
pedals (see Power adjustable
foot pedals) ...............................18
shift interlock ..........................135
Break-in period .............................3
C
Capacities for refilling fluids ....218
CD changer .................................37
Certification Label ....................224
Child safety restraints ..............117
child safety belts ....................117
Child safety seats ......................118
attaching with tether straps ..122
in front seat ............................119
Index
238