clock LINCOLN CONTINENTAL 2001 Owners Manual
[x] Cancel search | Manufacturer: LINCOLN, Model Year: 2001, Model line: CONTINENTAL, Model: LINCOLN CONTINENTAL 2001Pages: 224, PDF Size: 1.82 MB
Page 7 of 224
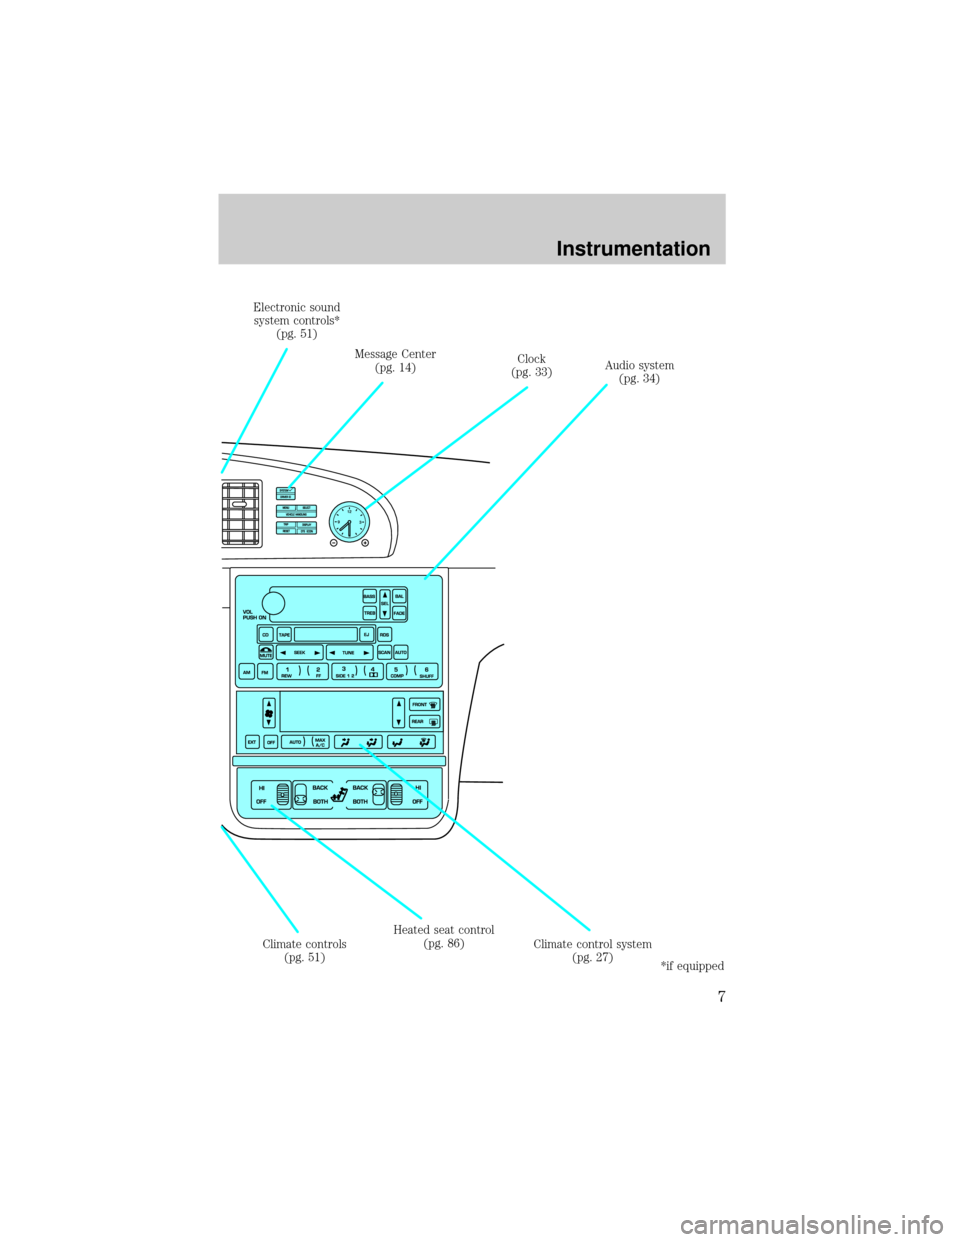
Electronic sound
system controls*
(pg. 51)
Message Center
(pg. 14)Clock
(pg. 33)Audio system
(pg. 34)
Climate control system
(pg. 27) Heated seat control
(pg. 86)
Climate controls
(pg. 51)
*if equipped
Instrumentation
7
Page 33 of 224
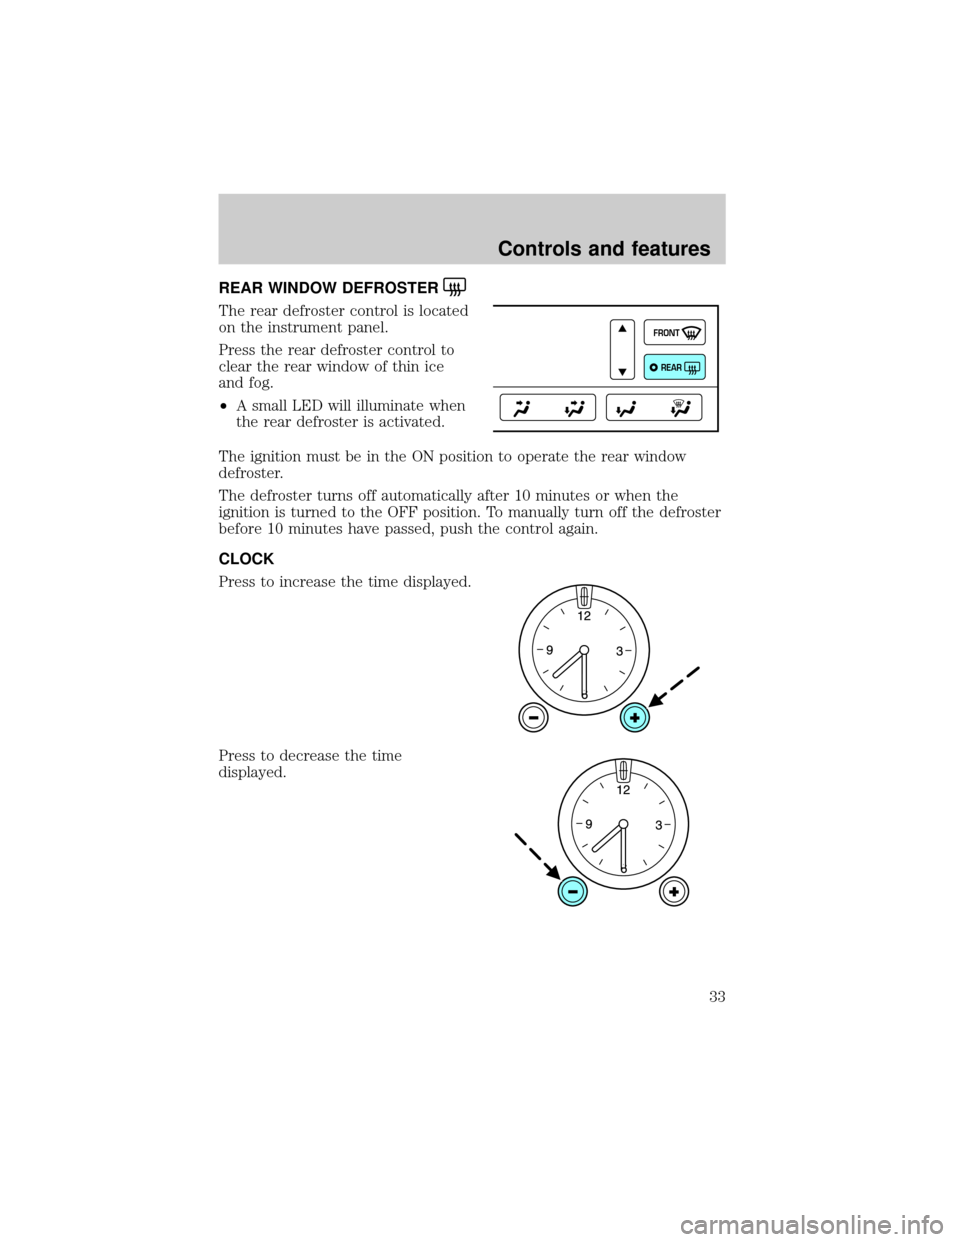
REAR WINDOW DEFROSTER
The rear defroster control is located
on the instrument panel.
Press the rear defroster control to
clear the rear window of thin ice
and fog.
²A small LED will illuminate when
the rear defroster is activated.
The ignition must be in the ON position to operate the rear window
defroster.
The defroster turns off automatically after 10 minutes or when the
ignition is turned to the OFF position. To manually turn off the defroster
before 10 minutes have passed, push the control again.
CLOCK
Press to increase the time displayed.
Press to decrease the time
displayed.
FRONT
REAR
Controls and features
33
Page 42 of 224
Dolbytnoise reduction is manufactured under license from Dolbyt
Laboratories Licensing Corporation. ªDolbytº and the double-D symbol
are trademarks of DolbytLaboratories Licensing Corporation.
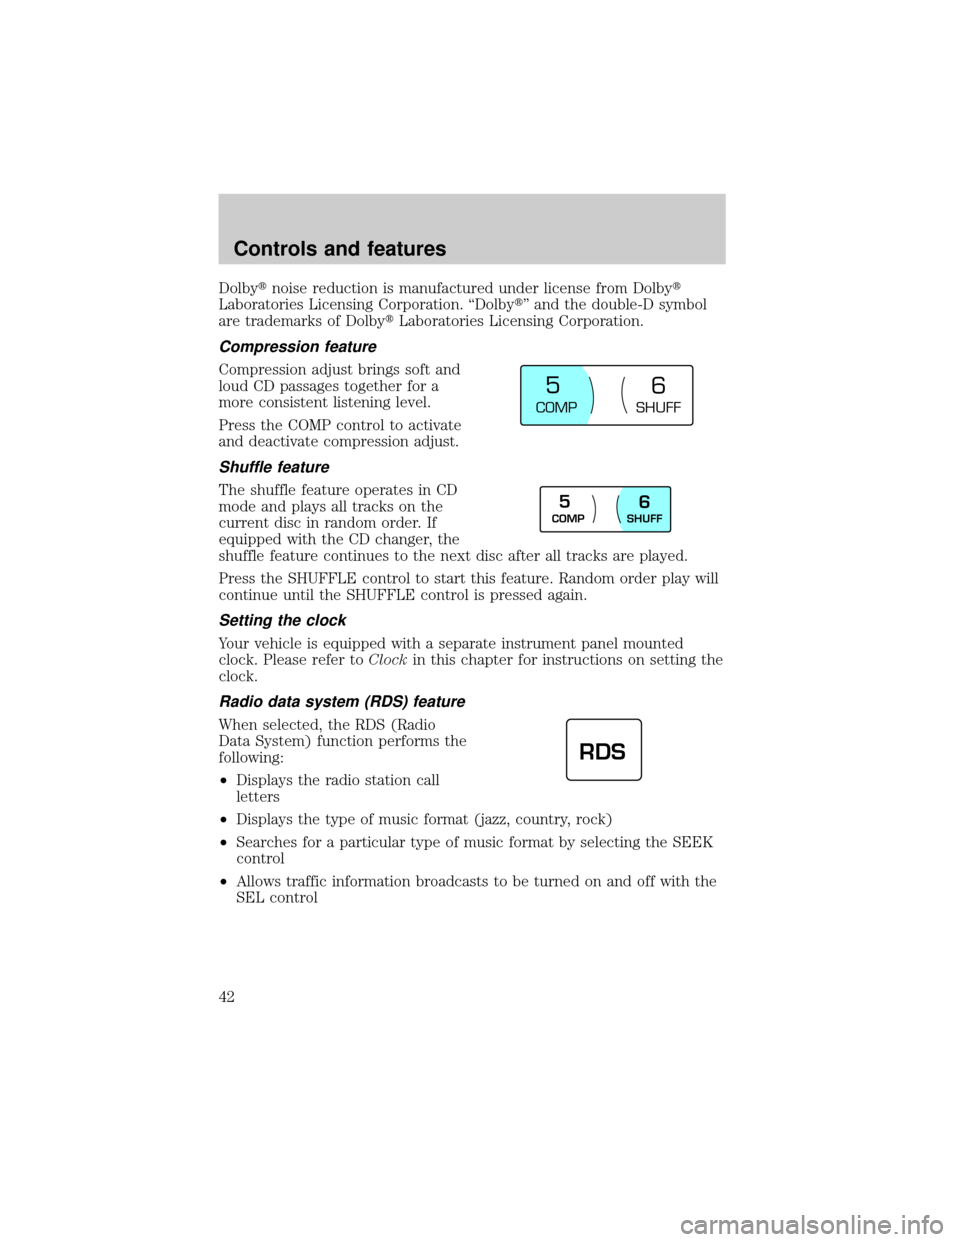
Compression feature
Compression adjust brings soft and
loud CD passages together for a
more consistent listening level.
Press the COMP control to activate
and deactivate compression adjust.
Shuffle feature
The shuffle feature operates in CD
mode and plays all tracks on the
current disc in random order. If
equipped with the CD changer, the
shuffle feature continues to the next disc after all tracks are played.
Press the SHUFFLE control to start this feature. Random order play will
continue until the SHUFFLE control is pressed again.
Setting the clock
Your vehicle is equipped with a separate instrument panel mounted
clock. Please refer toClockin this chapter for instructions on setting the
clock.
Radio data system (RDS) feature
When selected, the RDS (Radio
Data System) function performs the
following:
²Displays the radio station call
letters
²Displays the type of music format (jazz, country, rock)
²Searches for a particular type of music format by selecting the SEEK
control
²Allows traffic information broadcasts to be turned on and off with the
SEL control
COMP
SHUFF
5
6
COMP
SHUFF5
6
RDS
Controls and features
42
Page 137 of 224
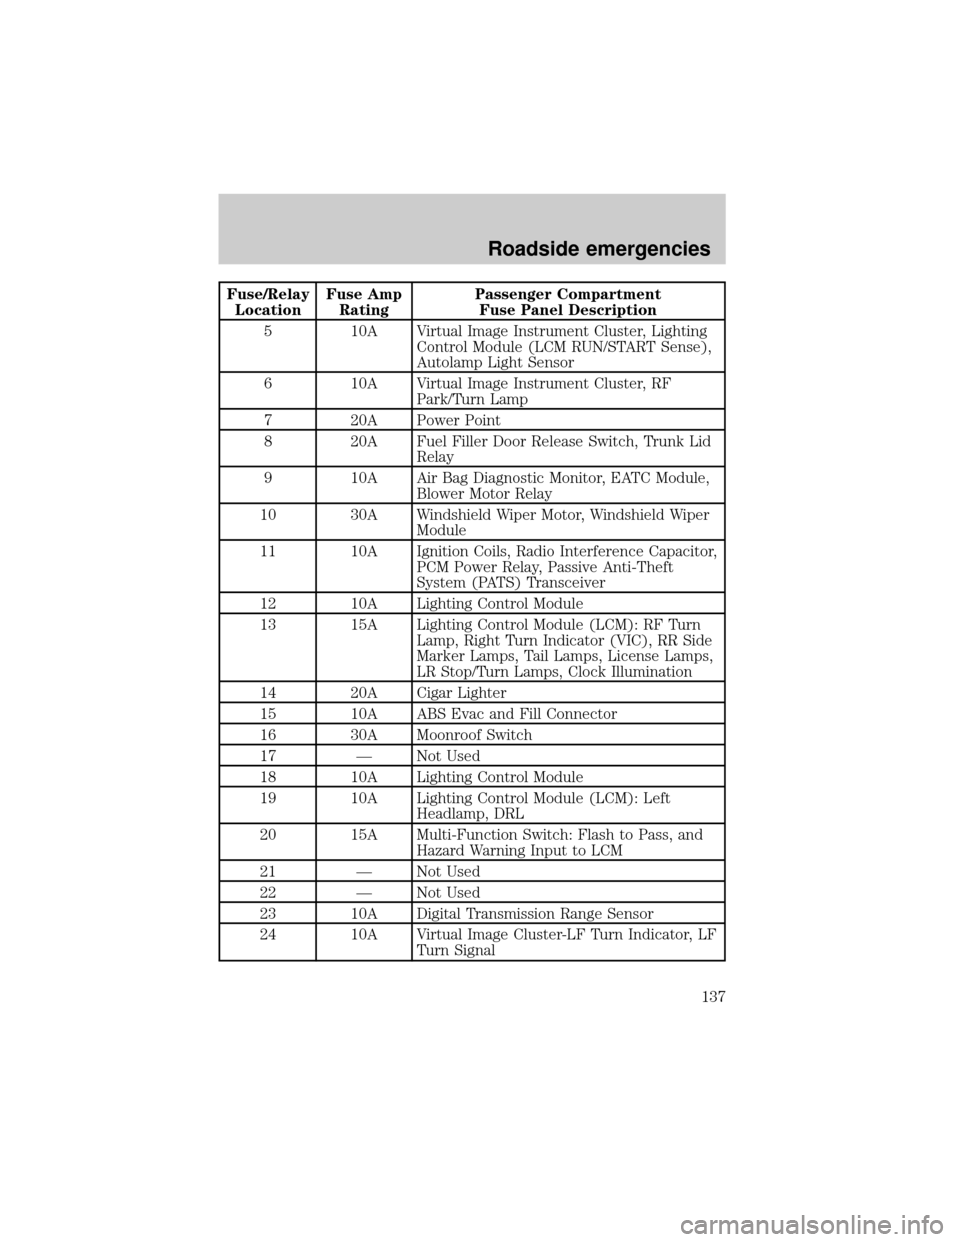
Fuse/Relay
LocationFuse Amp
RatingPassenger Compartment
Fuse Panel Description
5 10A Virtual Image Instrument Cluster, Lighting
Control Module (LCM RUN/START Sense),
Autolamp Light Sensor
6 10A Virtual Image Instrument Cluster, RF
Park/Turn Lamp
7 20A Power Point
8 20A Fuel Filler Door Release Switch, Trunk Lid
Relay
9 10A Air Bag Diagnostic Monitor, EATC Module,
Blower Motor Relay
10 30A Windshield Wiper Motor, Windshield Wiper
Module
11 10A Ignition Coils, Radio Interference Capacitor,
PCM Power Relay, Passive Anti-Theft
System (PATS) Transceiver
12 10A Lighting Control Module
13 15A Lighting Control Module (LCM): RF Turn
Lamp, Right Turn Indicator (VIC), RR Side
Marker Lamps, Tail Lamps, License Lamps,
LR Stop/Turn Lamps, Clock Illumination
14 20A Cigar Lighter
15 10A ABS Evac and Fill Connector
16 30A Moonroof Switch
17 Ð Not Used
18 10A Lighting Control Module
19 10A Lighting Control Module (LCM): Left
Headlamp, DRL
20 15A Multi-Function Switch: Flash to Pass, and
Hazard Warning Input to LCM
21 Ð Not Used
22 Ð Not Used
23 10A Digital Transmission Range Sensor
24 10A Virtual Image Cluster-LF Turn Indicator, LF
Turn Signal
Roadside emergencies
137
Page 138 of 224
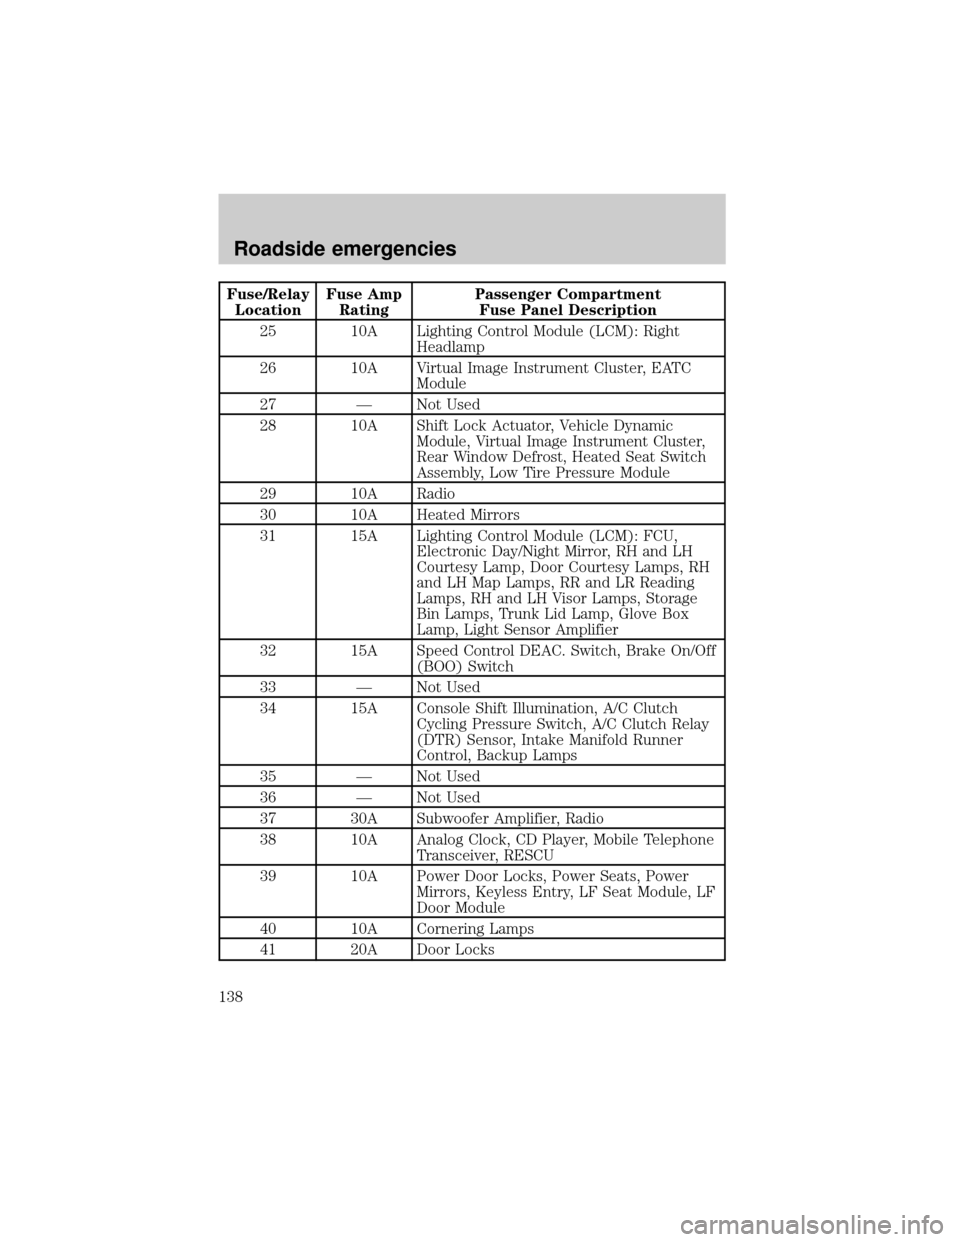
Fuse/Relay
LocationFuse Amp
RatingPassenger Compartment
Fuse Panel Description
25 10A Lighting Control Module (LCM): Right
Headlamp
26 10A Virtual Image Instrument Cluster, EATC
Module
27 Ð Not Used
28 10A Shift Lock Actuator, Vehicle Dynamic
Module, Virtual Image Instrument Cluster,
Rear Window Defrost, Heated Seat Switch
Assembly, Low Tire Pressure Module
29 10A Radio
30 10A Heated Mirrors
31 15A Lighting Control Module (LCM): FCU,
Electronic Day/Night Mirror, RH and LH
Courtesy Lamp, Door Courtesy Lamps, RH
and LH Map Lamps, RR and LR Reading
Lamps, RH and LH Visor Lamps, Storage
Bin Lamps, Trunk Lid Lamp, Glove Box
Lamp, Light Sensor Amplifier
32 15A Speed Control DEAC. Switch, Brake On/Off
(BOO) Switch
33 Ð Not Used
34 15A Console Shift Illumination, A/C Clutch
Cycling Pressure Switch, A/C Clutch Relay
(DTR) Sensor, Intake Manifold Runner
Control, Backup Lamps
35 Ð Not Used
36 Ð Not Used
37 30A Subwoofer Amplifier, Radio
38 10A Analog Clock, CD Player, Mobile Telephone
Transceiver, RESCU
39 10A Power Door Locks, Power Seats, Power
Mirrors, Keyless Entry, LF Seat Module, LF
Door Module
40 10A Cornering Lamps
41 20A Door Locks
Roadside emergencies
138
Page 142 of 224
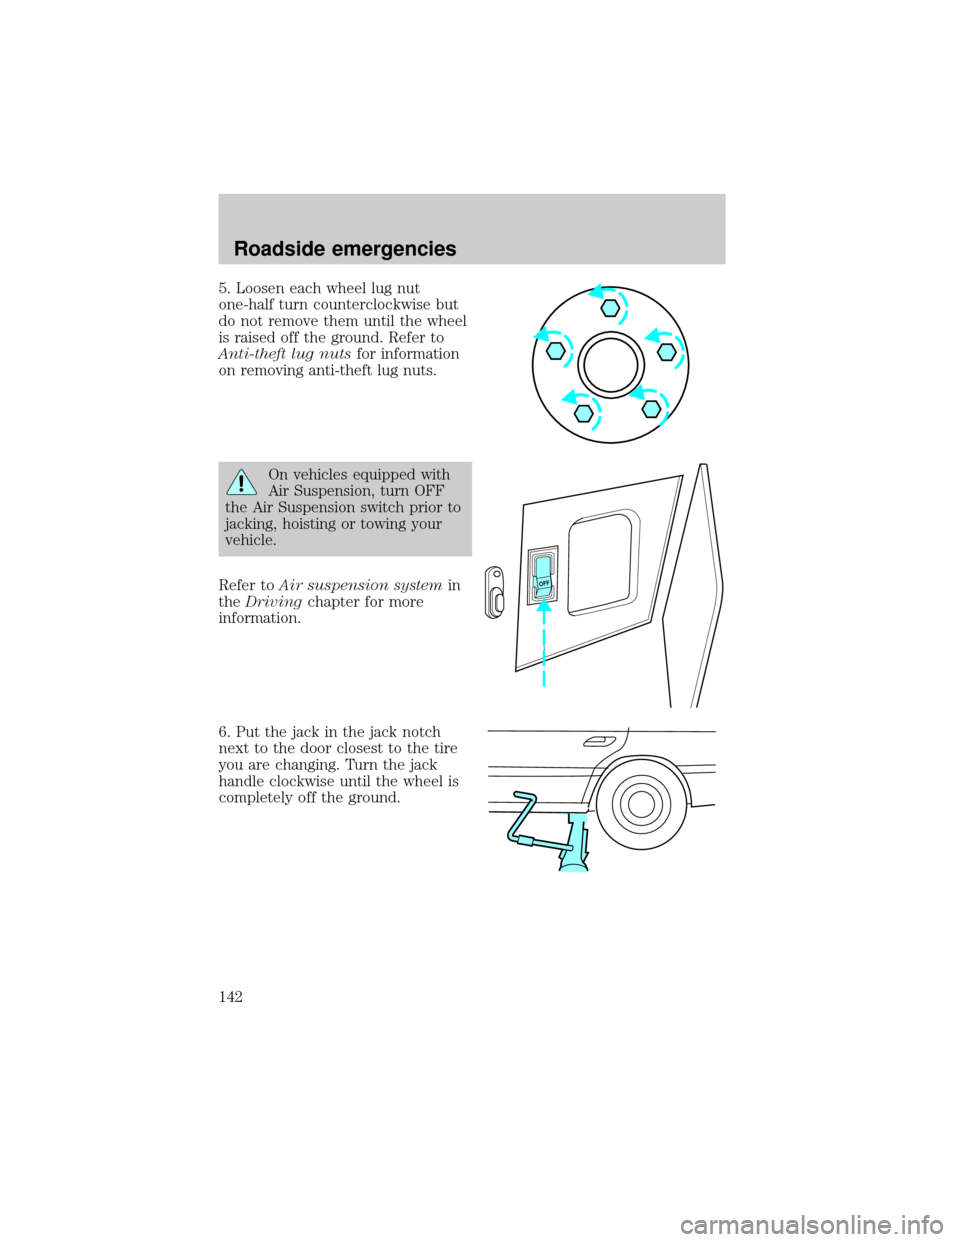
5. Loosen each wheel lug nut
one-half turn counterclockwise but
do not remove them until the wheel
is raised off the ground. Refer to
Anti-theft lug nutsfor information
on removing anti-theft lug nuts.
On vehicles equipped with
Air Suspension, turn OFF
the Air Suspension switch prior to
jacking, hoisting or towing your
vehicle.
Refer toAir suspension systemin
theDrivingchapter for more
information.
6. Put the jack in the jack notch
next to the door closest to the tire
you are changing. Turn the jack
handle clockwise until the wheel is
completely off the ground.
OFF
Roadside emergencies
142
Page 143 of 224
To lessen the risk of personal injury, do not put any part of your
body under the vehicle while changing a tire. Do not start the
engine when your vehicle is on the jack. The jack is only meant for
changing the tire.
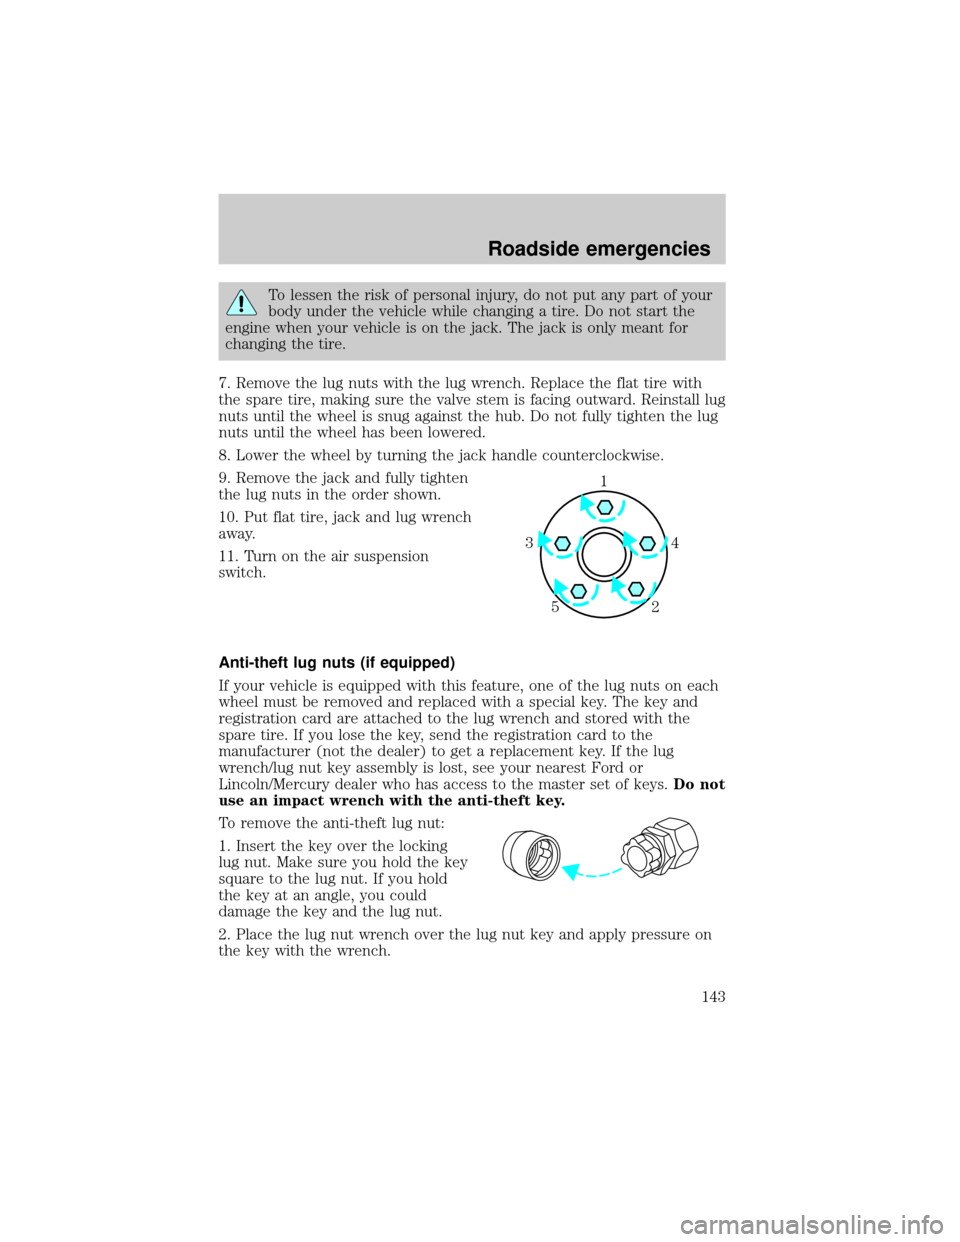
7. Remove the lug nuts with the lug wrench. Replace the flat tire with
the spare tire, making sure the valve stem is facing outward. Reinstall lug
nuts until the wheel is snug against the hub. Do not fully tighten the lug
nuts until the wheel has been lowered.
8. Lower the wheel by turning the jack handle counterclockwise.
9. Remove the jack and fully tighten
the lug nuts in the order shown.
10. Put flat tire, jack and lug wrench
away.
11. Turn on the air suspension
switch.
Anti-theft lug nuts (if equipped)
If your vehicle is equipped with this feature, one of the lug nuts on each
wheel must be removed and replaced with a special key. The key and
registration card are attached to the lug wrench and stored with the
spare tire. If you lose the key, send the registration card to the
manufacturer (not the dealer) to get a replacement key. If the lug
wrench/lug nut key assembly is lost, see your nearest Ford or
Lincoln/Mercury dealer who has access to the master set of keys.Do not
use an impact wrench with the anti-theft key.
To remove the anti-theft lug nut:
1. Insert the key over the locking
lug nut. Make sure you hold the key
square to the lug nut. If you hold
the key at an angle, you could
damage the key and the lug nut.
2. Place the lug nut wrench over the lug nut key and apply pressure on
the key with the wrench.
1
4 3
2 5
Roadside emergencies
143
Page 144 of 224
3. Turn the wrench in a counterclockwise direction to remove the lug
nut.
To install the anti-theft lug nut:
1. Insert the key over the locking lug nut.
2. Place the lug nut wrench over the lug nut key and apply pressure on
the key with the wrench.
3. Install the lug nut.
JUMP STARTING YOUR VEHICLE
The gases around the battery can explode if exposed to flames,
sparks, or lit cigarettes. An explosion could result in injury or
vehicle damage.
Do not push start your vehicle. You could damage the catalytic
converter.
Batteries contain sulfuric acid which can burn skin, eyes, and
clothing, if contacted.
Do not attempt to push start your vehicle. Automatic
transmissions do not have push-start capability.
Preparing your vehicle
When the battery is disconnected or a new battery is installed, the
transmission must relearn its adaptive strategy. As a result of this, the
transmission may shift firmly. This operation is considered normal and
will not effect function or durability of the transmission. Over time, the
adaptive learning process will fully update transmission operation to its
optimum shift feel.
1.Use only a 12±volt supply to start your vehicle.
2. Do not disconnect the battery of the disabled vehicle as this could
damage the vehicle's electrical system.
3. Park the booster vehicle close to the hood of the disabled vehicle
making sure the two vehiclesdo nottouch. Set the parking brake on
both vehicles and stay clear of the engine cooling fan and other moving
parts.
Roadside emergencies
144
Page 154 of 224
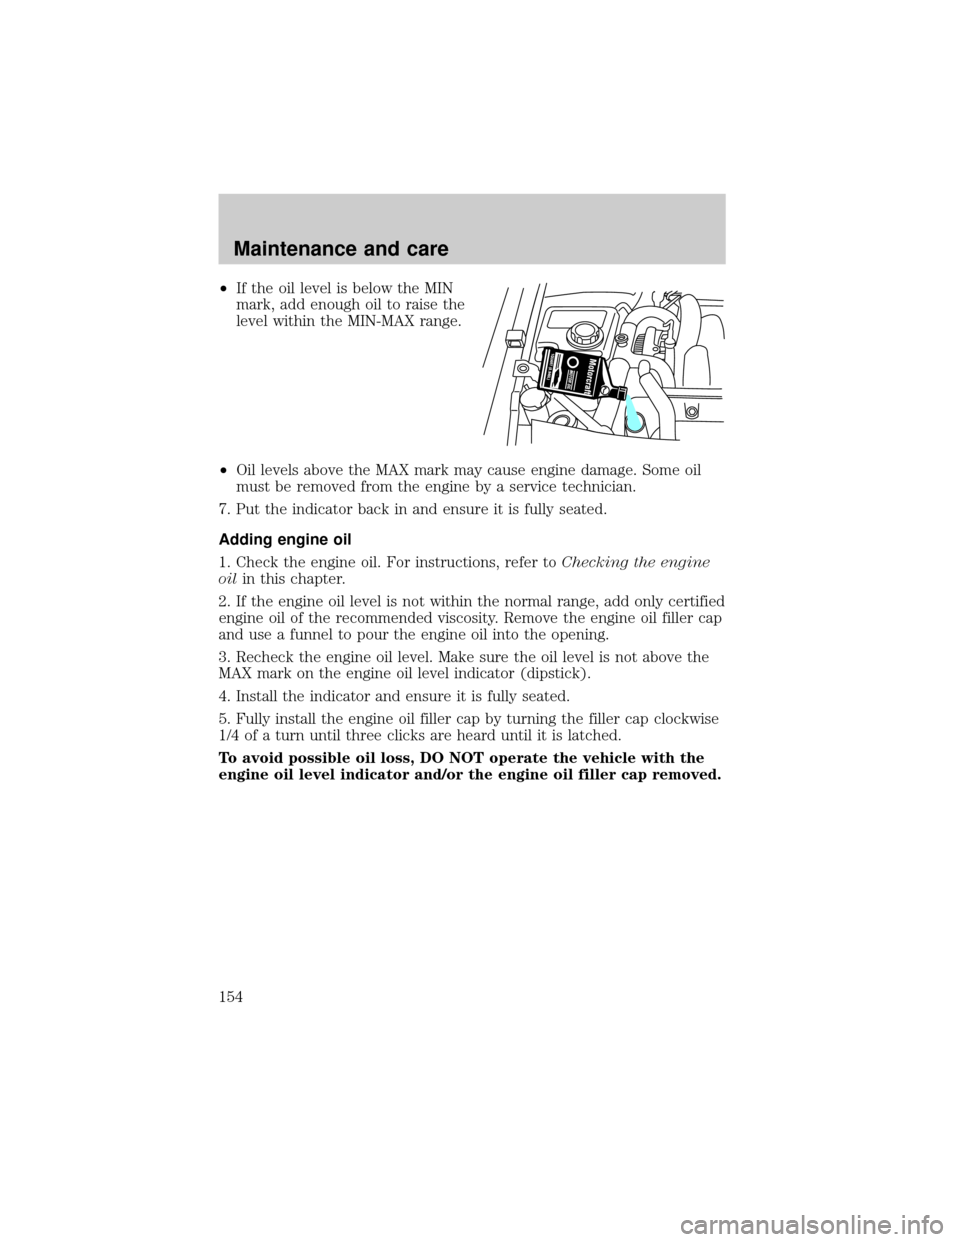
²If the oil level is below the MIN
mark, add enough oil to raise the
level within the MIN-MAX range.
²Oil levels above the MAX mark may cause engine damage. Some oil
must be removed from the engine by a service technician.
7. Put the indicator back in and ensure it is fully seated.
Adding engine oil
1. Check the engine oil. For instructions, refer toChecking the engine
oilin this chapter.
2. If the engine oil level is not within the normal range, add only certified
engine oil of the recommended viscosity. Remove the engine oil filler cap
and use a funnel to pour the engine oil into the opening.
3. Recheck the engine oil level. Make sure the oil level is not above the
MAX mark on the engine oil level indicator (dipstick).
4. Install the indicator and ensure it is fully seated.
5. Fully install the engine oil filler cap by turning the filler cap clockwise
1/4 of a turn until three clicks are heard until it is latched.
To avoid possible oil loss, DO NOT operate the vehicle with the
engine oil level indicator and/or the engine oil filler cap removed.
Maintenance and care
154
Page 160 of 224
²Engine coolant concentrations above 60% or below 40% will
decrease the freeze protection characteristics of the engine
coolant and may cause engine damage.
Plain water may be added in an emergency, but youmustreplace it with
a 50/50 mixture of engine coolant and distilled water as soon as possible.
Check the coolant level in the reservoir before you drive your vehicle the
next few times (with the engine cool). If necessary, add a50/50
mixtureof engine coolant and distilled water to the engine coolant
reservoir until the coolant level is at the ªcold fill levelº or within the
ªcold fill rangeº as listed on the reservoir (depending upon application).
Have your dealer check the engine cooling system for leaks if you have
to add more than 1.0 liter (1.0 quart) of engine coolant per month.
To avoid scalding hot steam or coolant from being released from
the engine cooling system, never remove the reservoir cap while
the engine is running or hot. Failure to follow this warning may result
in damage to the engine's cooling system and possible severe personal
injury.
If you must remove the coolant cap, follow these steps to avoid personal
injury:
1. Before you remove the cap, turn the engine off and let it cool.
2. When the engine is cool, wrap a thick cloth around the cap. Slowly
turn cap counterclockwise until pressure begins to release.
3. Step back while the pressure releases.
4. When you are sure that all the pressure has been released, use the
cloth to turn it counterclockwise and remove the cap.
Recycled engine coolant
Ford Motor Company recommends the use of a recycled engine coolant
produced by Ford-approved processes.
Not all coolant recycling processes produce coolant which meets Ford
specification WSS-M97B51±A1. Use of a recycled engine coolant which
does not meet the Ford G05 specification may harm engine and cooling
system components.
Maintenance and care
160