air suspension LINCOLN CONTINENTAL 2002 Owners Manual
[x] Cancel search | Manufacturer: LINCOLN, Model Year: 2002, Model line: CONTINENTAL, Model: LINCOLN CONTINENTAL 2002Pages: 240, PDF Size: 1.79 MB
Page 82 of 240
CHECK RIDE CONTROL.Displayed when the air suspension system is
not operating properly. If this message is displayed while driving, pull off
the road as soon as safely possible. The message may also be displayed if
the vehicle is loaded beyond the recommended maximum payload. This
is a normal condition if the vehicle is overloaded. To correct this
condition:
1. Remove or redistribute the payload per the recommended maximum
requirements.
2. Turn the ignition switch from ON to OFF to ON again.
If the message reappears:
1. Turn the air suspension switch (located in the trunk) OFF.
2. Contact your dealer for service as soon as safely possible.
For more information, refer toAir suspensionin theDrivingchapter.
TRUNK AJAR.Displayed when the trunk is not completely closed.
CHECK STEERING ASSIST.Displayed when the steering system is
not operating properly. If this message is displayed while driving, pull off
the road as soon as safely possible. If this warning stays on, contact your
dealer for service as soon as possible.
LOW WASHER FLUID.Indicates the washer fluid reservoir is less than
one quarter full. Check the washer fluid level. Refer toChecking and
adding washer fluidin theMaintenance and specificationschapter.
AIR LEVELING DISABLED.Displayed when the air suspension switch
is in the OFF position.
TAIL LAMP OUT.Displayed when the tail lamps are activated and at
least one is burned out. Check the lamps as soon as possible and have
the burned out lamp replaced.
CHECK FRT TURN LAMPS.Displayed when the turn signals are
activated and at least one is burned out. Check the lamps as soon as
safely possible and have the burned out lamp replaced.
TURN ON HEADLAMPS.Displayed when the headlamps are activated
by the autolamp sensor.
E/M (if equipped)
Press this control to switch the
odometer and display readouts from
metric (kilometers) to English
(miles) units.
E/M
Driver Controls
82
Page 142 of 240

Wheel-speed sensors allow excess front wheel spin to be detected by the
Traction Controlyportion of the ABS computer. Any excessive wheel
spin is controlled by automatically applying and releasing the front
brakes in conjunction with engine torque reductions. Engine torque
reduction is realized via the fully electronic spark and fuel injection
systems. This process is very sensitive to driving conditions and very fast
acting. The front wheels ªsearchº for optimum traction several times a
second and adjustments are made accordingly.
The Traction Controlysystem will allow your vehicle to make better use
of available traction on slippery surfaces. The system is a driver aid
which makes your vehicle easier to handle primarily on snow and ice
covered roads.
During Traction Controlyoperation, TRACTION CONTROL ACTIVE is
displayed on the message center. You may hear an electric motor type of
sound coming from the engine compartment and the engine will not
ªrev-upº when you push further on the accelerator. This is normal
system behavior.
If you should become stuck in snow or on a very slippery road surface,
try switching the Traction Controlysystem off. This may allow excess
wheel spin to ªdigº the vehicle out or enable a successful ªrockingº
maneuver. Refer toMessage centerin theInstrumentationchapter.
If the Traction Controlysystem is cycled excessively, the brake portion
of the system will shut down to prevent the front brakes from
overheating. A limited Traction Controlyfunction using only engine
torque reduction will still control wheels from over-spinning. When the
front brakes have cooled down, the system will again function normally.
Anti-lock braking is not affected by this condition and will function
normally during the cool down period.
If a system fault is detected, CHECK TRACTION CONTROL is displayed
on the message center and your vehicle should be serviced.
AIR SUSPENSION SYSTEM
The air suspension system is designed to improve ride, handling and
general vehicle performance during:
²certain road conditions
²steering maneuvers
²braking
²accelerations
Driving
142
Page 143 of 240
This system keeps the rear of your vehicle at a constant level by
automatically adding air or releasing air from the springs.
If you exceed the load limit, the rear air suspension may not operate and
the system warning CHECK RIDE CONTROL may appear on the message
center.
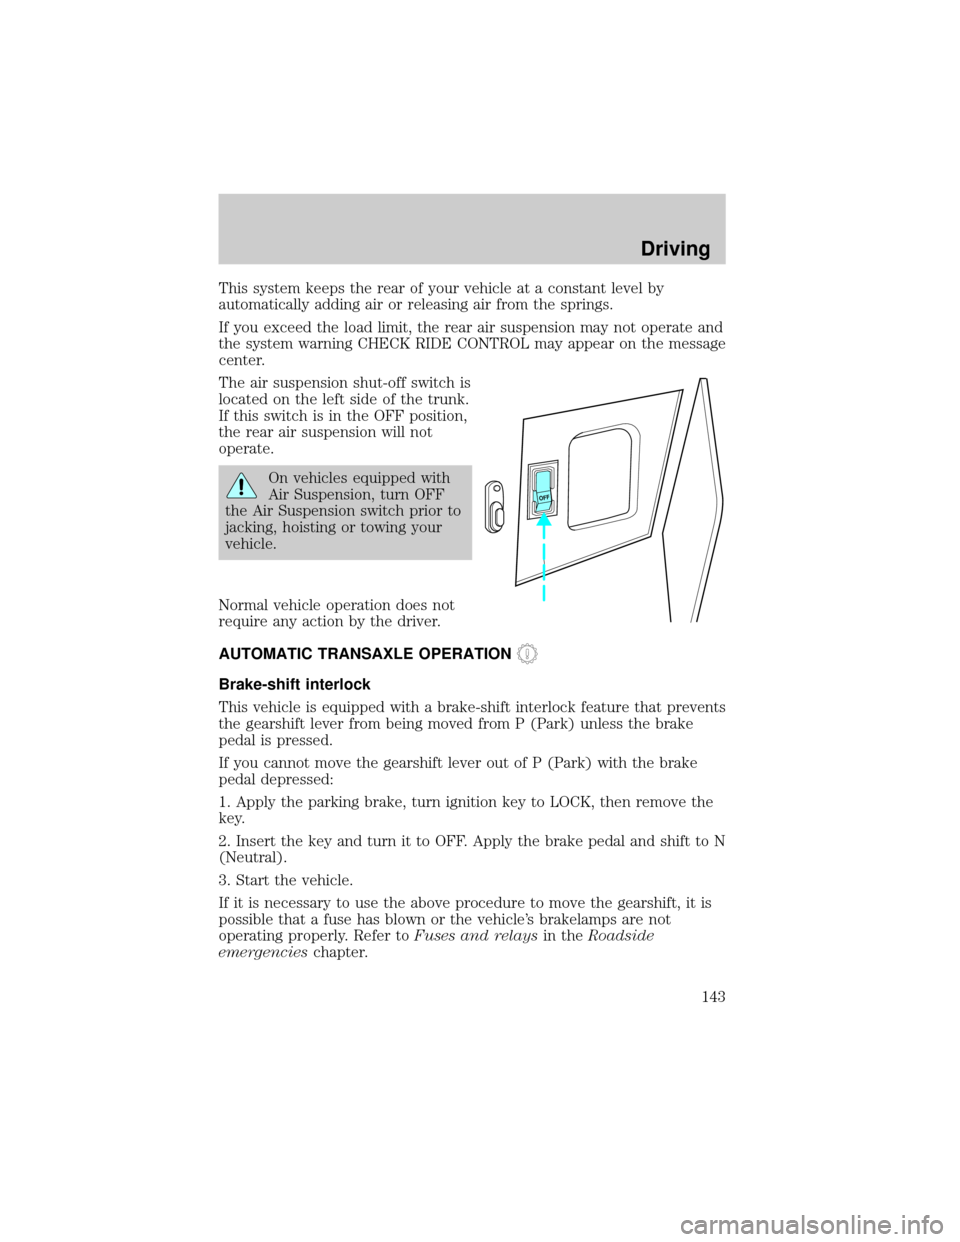
The air suspension shut-off switch is
located on the left side of the trunk.
If this switch is in the OFF position,
the rear air suspension will not
operate.
On vehicles equipped with
Air Suspension, turn OFF
the Air Suspension switch prior to
jacking, hoisting or towing your
vehicle.
Normal vehicle operation does not
require any action by the driver.
AUTOMATIC TRANSAXLE OPERATION
Brake-shift interlock
This vehicle is equipped with a brake-shift interlock feature that prevents
the gearshift lever from being moved from P (Park) unless the brake
pedal is pressed.
If you cannot move the gearshift lever out of P (Park) with the brake
pedal depressed:
1. Apply the parking brake, turn ignition key to LOCK, then remove the
key.
2. Insert the key and turn it to OFF. Apply the brake pedal and shift to N
(Neutral).
3. Start the vehicle.
If it is necessary to use the above procedure to move the gearshift, it is
possible that a fuse has blown or the vehicle's brakelamps are not
operating properly. Refer toFuses and relaysin theRoadside
emergencieschapter.
OFF
Driving
143
Page 162 of 240
Power distribution box
The power distribution box is located in the engine compartment. The
power distribution box contains high-current fuses that protect your
vehicle's main electrical systems from overloads.
Always disconnect the battery before servicing high current
fuses.
Always replace the cover to the power distribution box before
reconnecting the battery or refilling fluid reservoirs
If the battery has been disconnected and reconnected, refer to the
Batterysection of theMaintenance and specificationschapter.
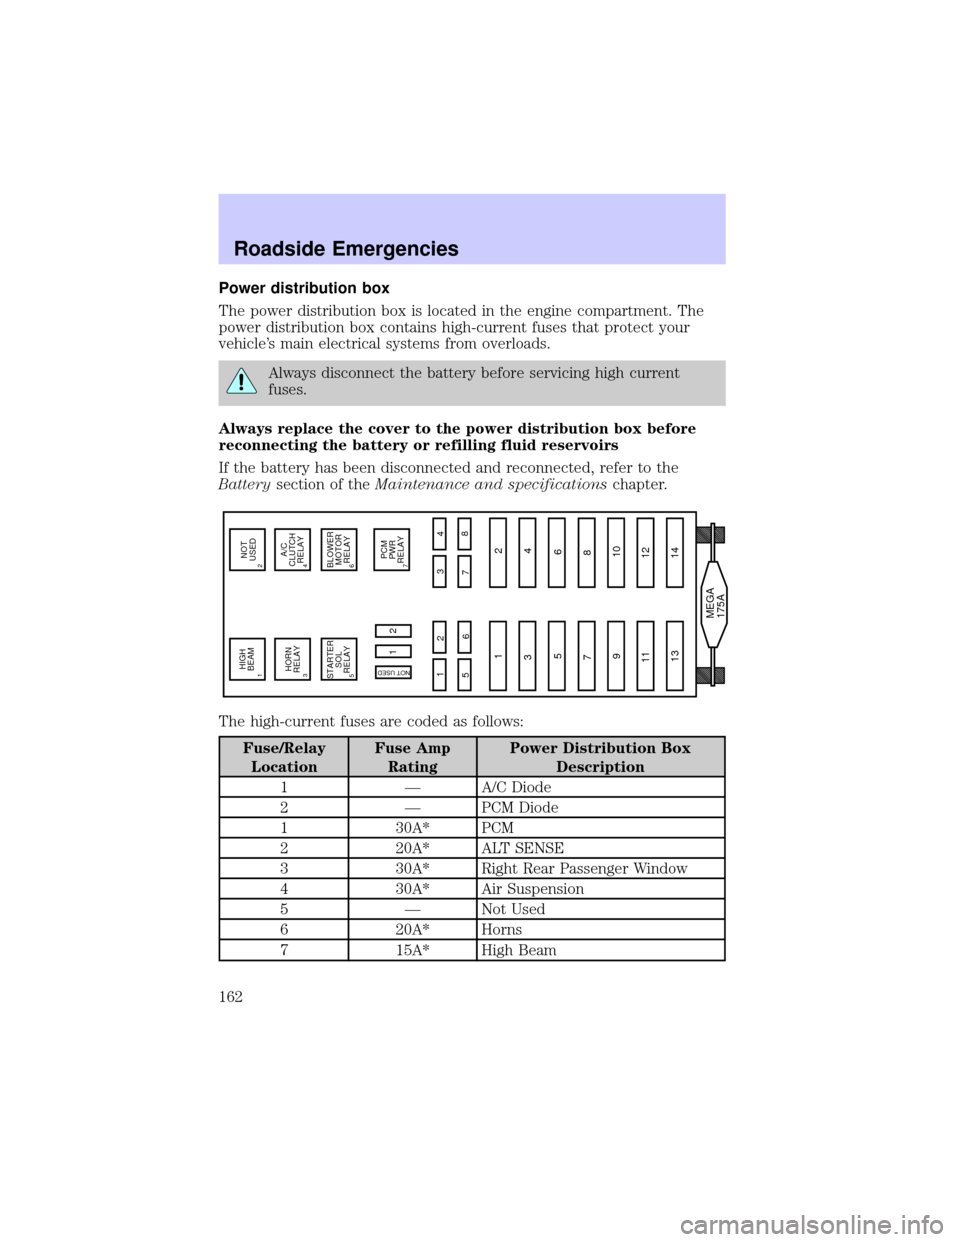
The high-current fuses are coded as follows:
Fuse/Relay
LocationFuse Amp
RatingPower Distribution Box
Description
1 Ð A/C Diode
2 Ð PCM Diode
1 30A* PCM
2 20A* ALT SENSE
3 30A* Right Rear Passenger Window
4 30A* Air Suspension
5 Ð Not Used
6 20A* Horns
7 15A* High Beam
MEGA
175A
PCM
PWR
RELAY
12 3 4
8
7
6 5
12
4 3
5
7
9
1110
12
14 136
8NOT USED
7BLOWER
MOTOR
RELAY6A/C
CLUTCH
RELAY4NOT
USED2
HORN
RELAY3HIGH
BEAM1STARTER
SOL
RELAY5
12
Roadside Emergencies
162
Page 165 of 240
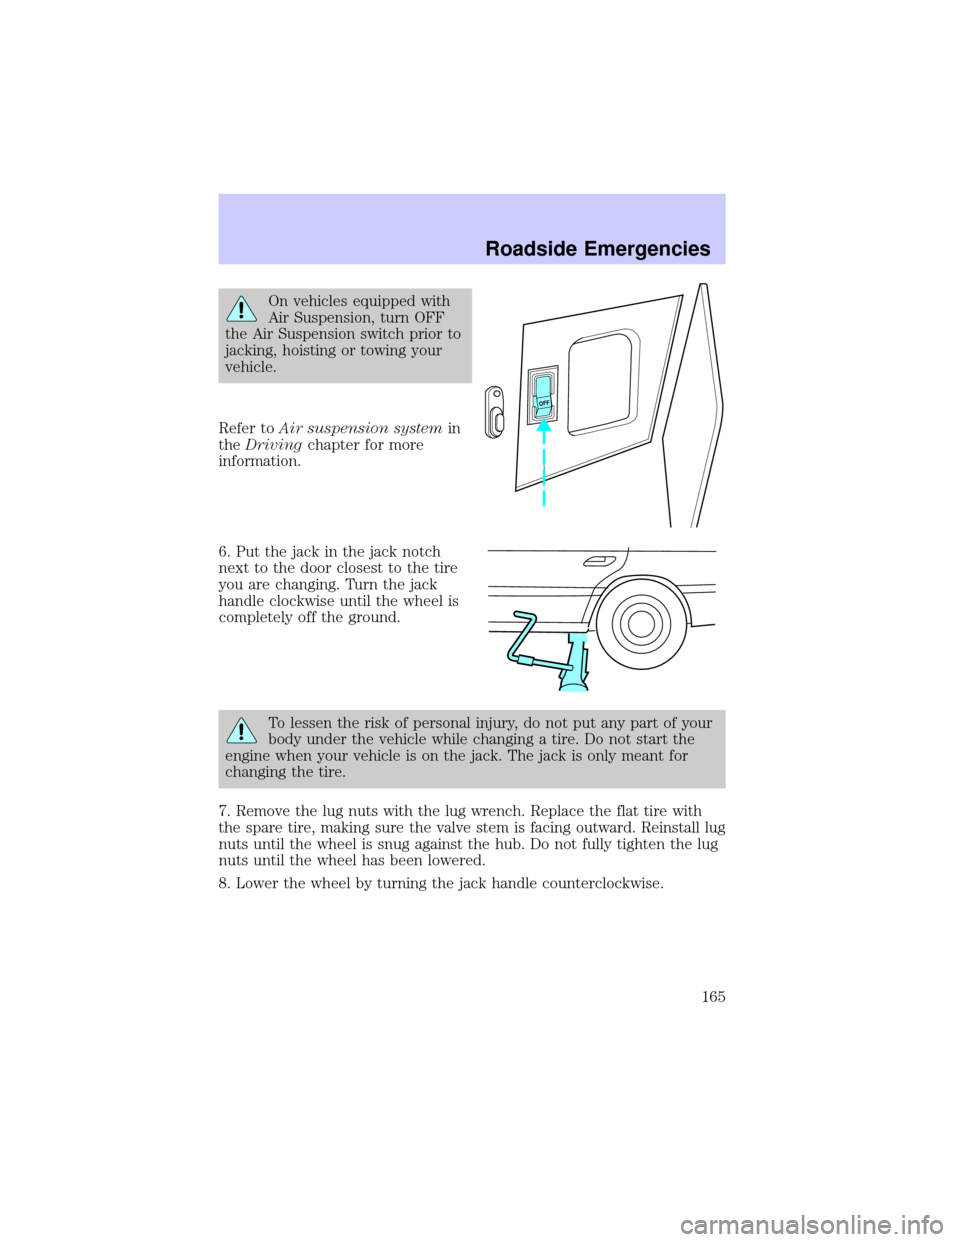
On vehicles equipped with
Air Suspension, turn OFF
the Air Suspension switch prior to
jacking, hoisting or towing your
vehicle.
Refer toAir suspension systemin
theDrivingchapter for more
information.
6. Put the jack in the jack notch
next to the door closest to the tire
you are changing. Turn the jack
handle clockwise until the wheel is
completely off the ground.
To lessen the risk of personal injury, do not put any part of your
body under the vehicle while changing a tire. Do not start the
engine when your vehicle is on the jack. The jack is only meant for
changing the tire.
7. Remove the lug nuts with the lug wrench. Replace the flat tire with
the spare tire, making sure the valve stem is facing outward. Reinstall lug
nuts until the wheel is snug against the hub. Do not fully tighten the lug
nuts until the wheel has been lowered.
8. Lower the wheel by turning the jack handle counterclockwise.
OFF
Roadside Emergencies
165
Page 166 of 240
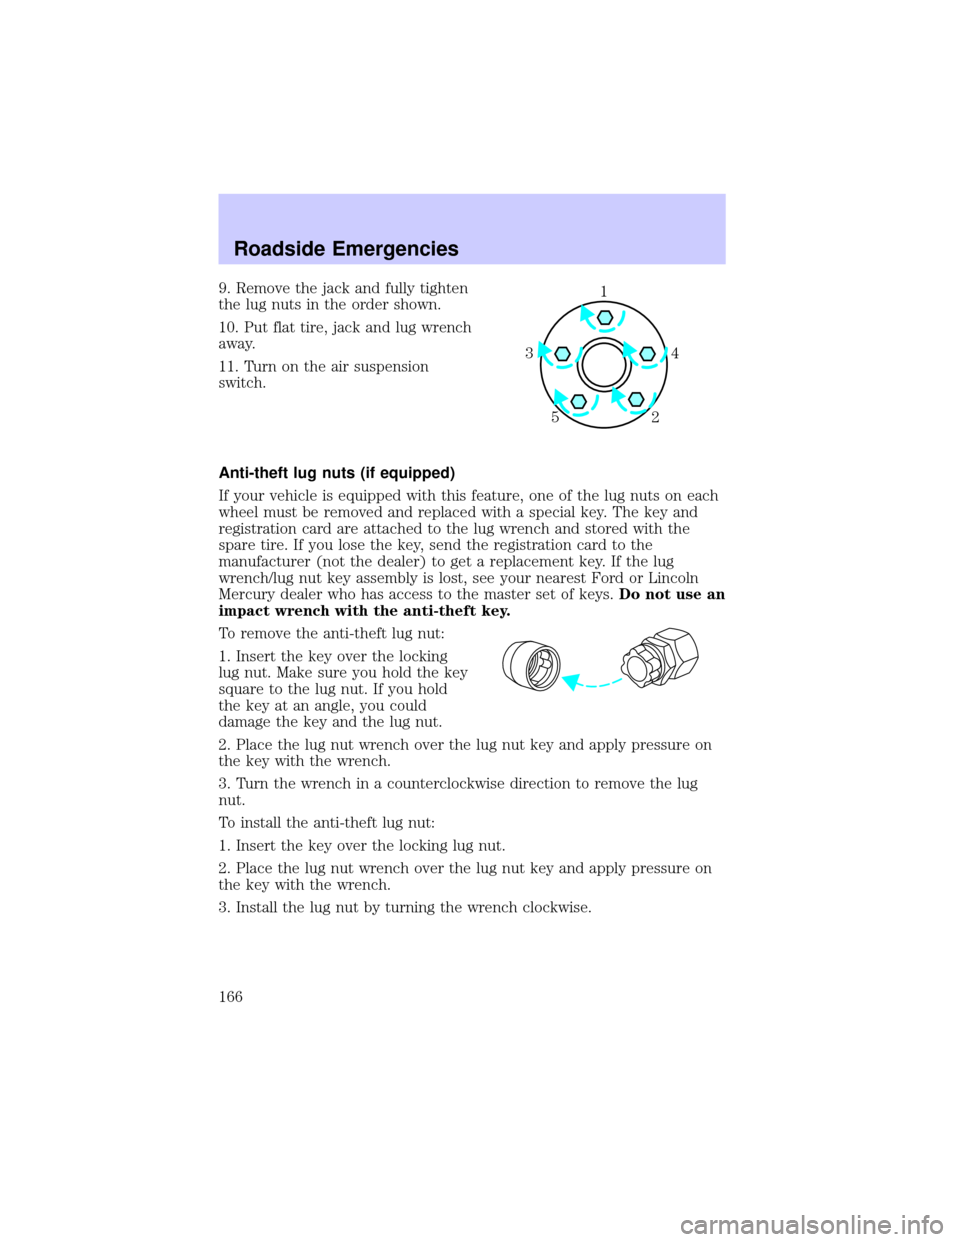
9. Remove the jack and fully tighten
the lug nuts in the order shown.
10. Put flat tire, jack and lug wrench
away.
11. Turn on the air suspension
switch.
Anti-theft lug nuts (if equipped)
If your vehicle is equipped with this feature, one of the lug nuts on each
wheel must be removed and replaced with a special key. The key and
registration card are attached to the lug wrench and stored with the
spare tire. If you lose the key, send the registration card to the
manufacturer (not the dealer) to get a replacement key. If the lug
wrench/lug nut key assembly is lost, see your nearest Ford or Lincoln
Mercury dealer who has access to the master set of keys.Do not use an
impact wrench with the anti-theft key.
To remove the anti-theft lug nut:
1. Insert the key over the locking
lug nut. Make sure you hold the key
square to the lug nut. If you hold
the key at an angle, you could
damage the key and the lug nut.
2. Place the lug nut wrench over the lug nut key and apply pressure on
the key with the wrench.
3. Turn the wrench in a counterclockwise direction to remove the lug
nut.
To install the anti-theft lug nut:
1. Insert the key over the locking lug nut.
2. Place the lug nut wrench over the lug nut key and apply pressure on
the key with the wrench.
3. Install the lug nut by turning the wrench clockwise.1
4 3
2 5
Roadside Emergencies
166
Page 173 of 240

Before your vehicle can be towed, the air suspension control in the
luggage compartment must be turned to the OFF position (if equipped).
If your vehicle must be towed with the drive wheels on the ground:
²place the transaxle in N (Neutral).
²DO NOT exceed the distance of 80 km (50 mph).
²DO NOT exceed the speed of 56 km/h (35 mph).
If the vehicle is towed by other means or incorrectly, vehicle
damage may occur.
Ford Motor Company provides a towing manual for all authorized tow
truck operators. Have your tow truck operator refer to this manual for
proper hook-up and towing procedures for your vehicle.
Roadside Emergencies
173
Page 234 of 240

A
Accessory delay ..........................58
Air bag supplemental restraint
system ................................117, 122
and child safety seats ............119
description ......................117, 122
disposal ....................................125
driver air bag ..................120, 123
indicator light ...........12, 121, 124
operation .........................120, 123
passenger air bag ...........120, 123
side air bag ..............................122
Air cleaner filter .......................224
Air conditioning ..........................33
Air filter, cabin ............................39
Air suspension ...........................142
description ..............................142
Antifreeze (see Engine
coolant) .....................................199
Anti-lock brake system (see
Brakes) ..............................138±139
Anti-theft system ......................101
arming the system ..................101
disarming a triggered
system .....................................102
Automatic transaxle .................143
driving with .............................145
fluid, adding ............................216
fluid, checking ........................216
fluid, refill capacities ..............224
fluid, specification ..................227
Auxiliary power point ...........55±56
Axle
lubricant specifications ..........226B
Battery .......................................197
acid, treating emergencies .....197
charging system warning light 12
jumping a disabled battery ....167
maintenance-free ....................197
replacement, specifications ...224
servicing ..................................197
Belt minder ...............................112
Brakes ........................................138
anti-lock ...........................138±139
anti-lock brake system (ABS)
warning light .....................11, 139
brake warning light ..................11
fluid, checking and adding ....215
fluid, refill capacities ..............224
fluid, specifications .........226±227
lubricant specifications ..226±227
shift interlock ..........................143
Break-in period .............................6
C
Capacities for refilling fluids ....224
CD changer .................................28
Certification Label ....................229
Child safety restraints ..............125
child safety belts ....................125
Child safety seats ......................126
attaching with tether straps ..130
in front seat ............................128
in rear seat ..............................128
Cleaning your vehicle
engine compartment ..............186
exterior ....................................189
instrument cluster lens ..........188
instrument panel ....................187
interior .....................................188
Index
234
Page 237 of 240

Hood ..........................................192
I
Ignition ...............................133, 227
Infant seats (see Safety
seats) .........................................126
Inspection/maintenance (I/M)
testing ........................................213
Instrument panel
cleaning ...................................187
cluster ................................10, 188
lighting up panel and
interior .......................................41
J
Jack ............................................163
positioning ...............................163
storage .....................................163
Jump-starting your vehicle ......167
K
Keyless entry system .................94
autolock .....................................97
keypad .......................................94
programming entry code .........95
Keys .........................87, 97±98, 100
key in ignition chime ...............14
positions of the ignition .........133
L
Lamps
autolamp system .......................41
bulb replacement
specifications chart ..................46
cargo lamps ...............................41
daytime running light ...............40headlamps .................................40
headlamps, flash to pass ..........41
instrument panel, dimming .....41
interior lamps .....................45, 47
replacing bulbs ....... 46±47, 49±52
Lane change indicator (see
Turn signal) .................................44
Lights, warning and indicator ....10
air bag ........................................12
anti-lock brakes (ABS) ....11, 139
brake ..........................................11
charging system ........................12
high beam .................................13
oil pressure ...............................12
safety belt .................................12
service engine soon ..................10
traction control active ..............12
turn signal indicator .................13
Load limits .................................148
GAWR ......................................148
GVWR ......................................148
trailer towing ..........................148
Locks
autolock .....................................97
childproof ..................................87
doors ..........................................87
Lubricant specifications ...226±227
Lug nuts, anti-theft ...................166
Lumbar support, seats .............105
M
Message center ...............76, 78, 84
air leveling disabled .................76
air ride switch off .....................76
check air ride system ...............76
check air suspension ................76
menu button .............................83
reset button ..............................84
Index
237