LINCOLN CONTINENTAL 2017 Owners Manual
Manufacturer: LINCOLN, Model Year: 2017, Model line: CONTINENTAL, Model: LINCOLN CONTINENTAL 2017Pages: 584, PDF Size: 6.13 MB
Page 101 of 584
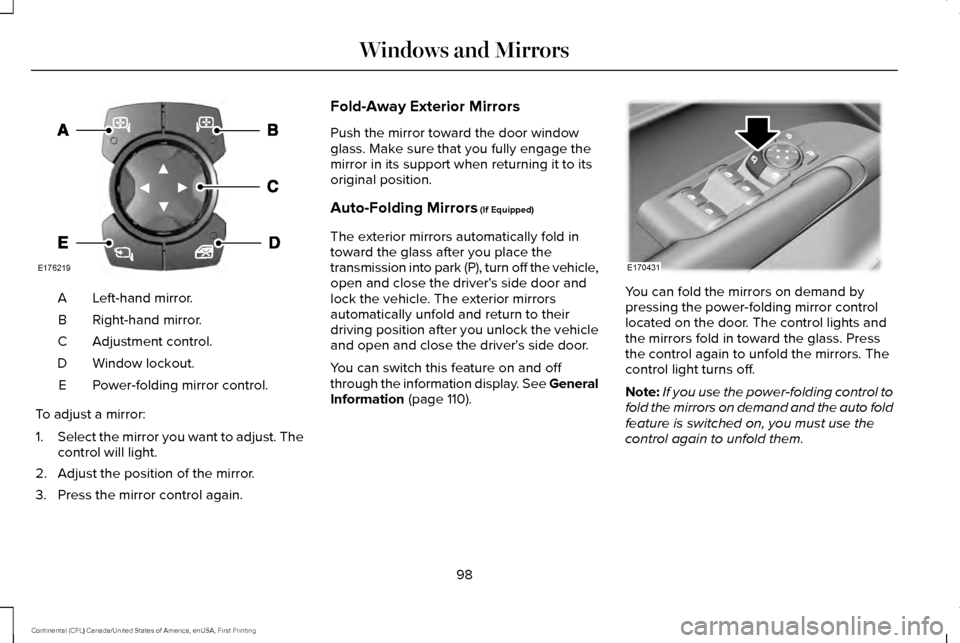
Left-hand mirror.
A
Right-hand mirror.
B
Adjustment control.
C
Window lockout.
D
Power-folding mirror control.
E
To adjust a mirror:
1. Select the mirror you want to adjust. The
control will light.
2. Adjust the position of the mirror.
3. Press the mirror control again. Fold-Away Exterior Mirrors
Push the mirror toward the door window
glass. Make sure that you fully engage the
mirror in its support when returning it to its
original position.
Auto-Folding Mirrors (If Equipped)
The exterior mirrors automatically fold in
toward the glass after you place the
transmission into park (P), turn off the vehicle,
open and close the driver's side door and
lock the vehicle. The exterior mirrors
automatically unfold and return to their
driving position after you unlock the vehicle
and open and close the driver's side door.
You can switch this feature on and off
through the information display. See General
Information
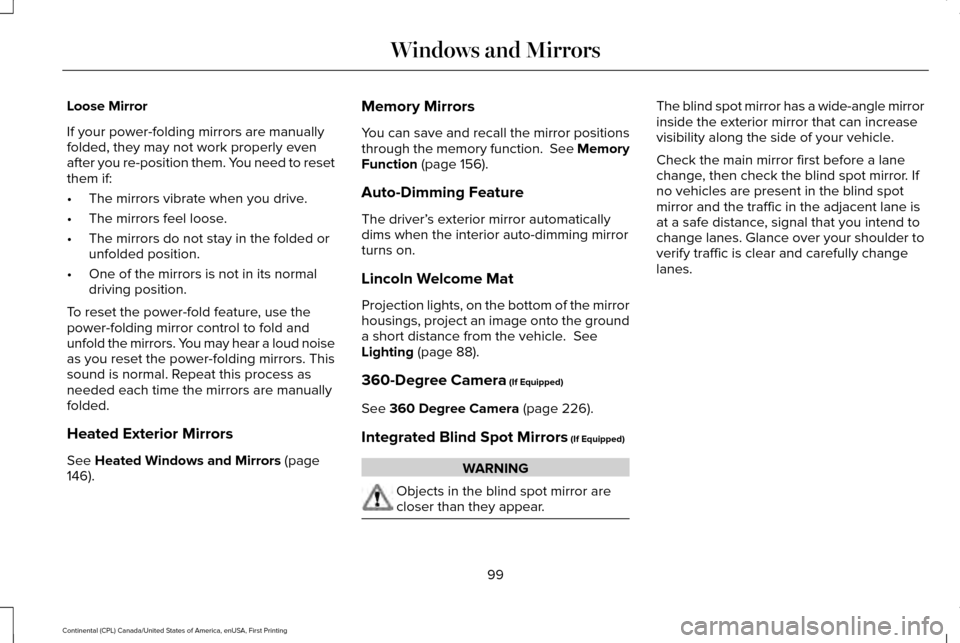
(page 110). You can fold the mirrors on demand by
pressing the power-folding mirror control
located on the door. The control lights and
the mirrors fold in toward the glass. Press
the control again to unfold the mirrors. The
control light turns off.
Note:
If you use the power-folding control to
fold the mirrors on demand and the auto fold
feature is switched on, you must use the
control again to unfold them.
98
Continental (CPL) Canada/United States of America, enUSA, First Printing Windows and MirrorsE176219 E170431
Page 102 of 584
Loose Mirror
If your power-folding mirrors are manually
folded, they may not work properly even
after you re-position them. You need to reset
them if:
•
The mirrors vibrate when you drive.
• The mirrors feel loose.
• The mirrors do not stay in the folded or
unfolded position.
• One of the mirrors is not in its normal
driving position.
To reset the power-fold feature, use the
power-folding mirror control to fold and
unfold the mirrors. You may hear a loud noise
as you reset the power-folding mirrors. This
sound is normal. Repeat this process as
needed each time the mirrors are manually
folded.
Heated Exterior Mirrors
See Heated Windows and Mirrors (page
146). Memory Mirrors
You can save and recall the mirror positions
through the memory function. See Memory
Function
(page 156).
Auto-Dimming Feature
The driver’ s exterior mirror automatically
dims when the interior auto-dimming mirror
turns on.
Lincoln Welcome Mat
Projection lights, on the bottom of the mirror
housings, project an image onto the ground
a short distance from the vehicle.
See
Lighting (page 88).
360-Degree Camera
(If Equipped)
See
360 Degree Camera (page 226).
Integrated Blind Spot Mirrors
(If Equipped) WARNING
Objects in the blind spot mirror are
closer than they appear. The blind spot mirror has a wide-angle mirror
inside the exterior mirror that can increase
visibility along the side of your vehicle.
Check the main mirror first before a lane
change, then check the blind spot mirror. If
no vehicles are present in the blind spot
mirror and the traffic in the adjacent lane is
at a safe distance, signal that you intend to
change lanes. Glance over your shoulder to
verify traffic is clear and carefully change
lanes.
99
Continental (CPL) Canada/United States of America, enUSA, First Printing Windows and Mirrors
Page 103 of 584
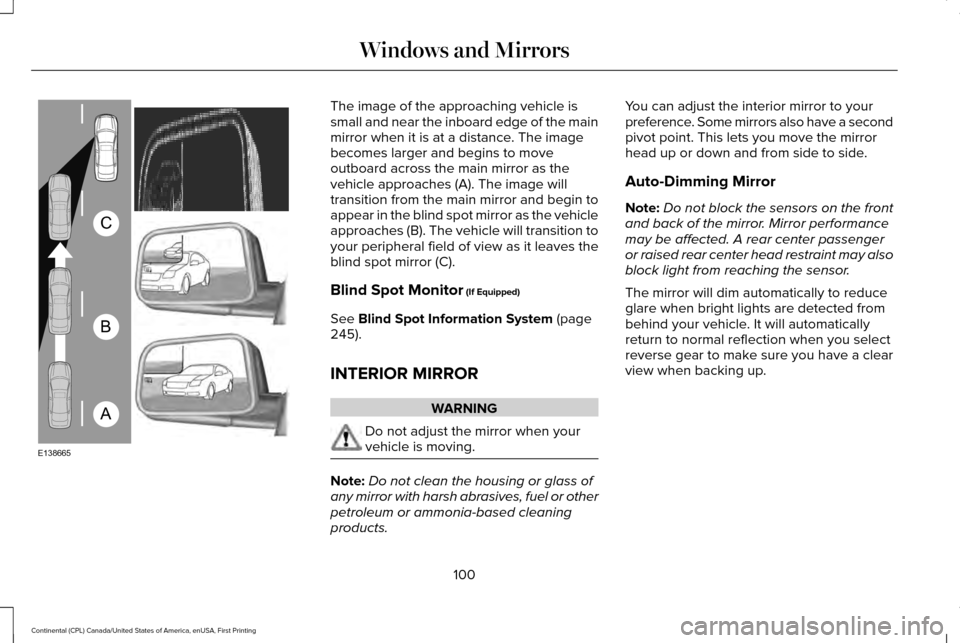
The image of the approaching vehicle is
small and near the inboard edge of the main
mirror when it is at a distance. The image
becomes larger and begins to move
outboard across the main mirror as the
vehicle approaches (A). The image will
transition from the main mirror and begin to
appear in the blind spot mirror as the vehicle
approaches (B). The vehicle will transition to
your peripheral field of view as it leaves the
blind spot mirror (C).
Blind Spot Monitor (If Equipped)
See
Blind Spot Information System (page
245).
INTERIOR MIRROR WARNING
Do not adjust the mirror when your
vehicle is moving.
Note:
Do not clean the housing or glass of
any mirror with harsh abrasives, fuel or other
petroleum or ammonia-based cleaning
products. You can adjust the interior mirror to your
preference. Some mirrors also have a second
pivot point. This lets you move the mirror
head up or down and from side to side.
Auto-Dimming Mirror
Note:
Do not block the sensors on the front
and back of the mirror. Mirror performance
may be affected. A rear center passenger
or raised rear center head restraint may also
block light from reaching the sensor.
The mirror will dim automatically to reduce
glare when bright lights are detected from
behind your vehicle. It will automatically
return to normal reflection when you select
reverse gear to make sure you have a clear
view when backing up.
100
Continental (CPL) Canada/United States of America, enUSA, First Printing Windows and MirrorsA
B
C
E138665
Page 104 of 584
SUN VISORS
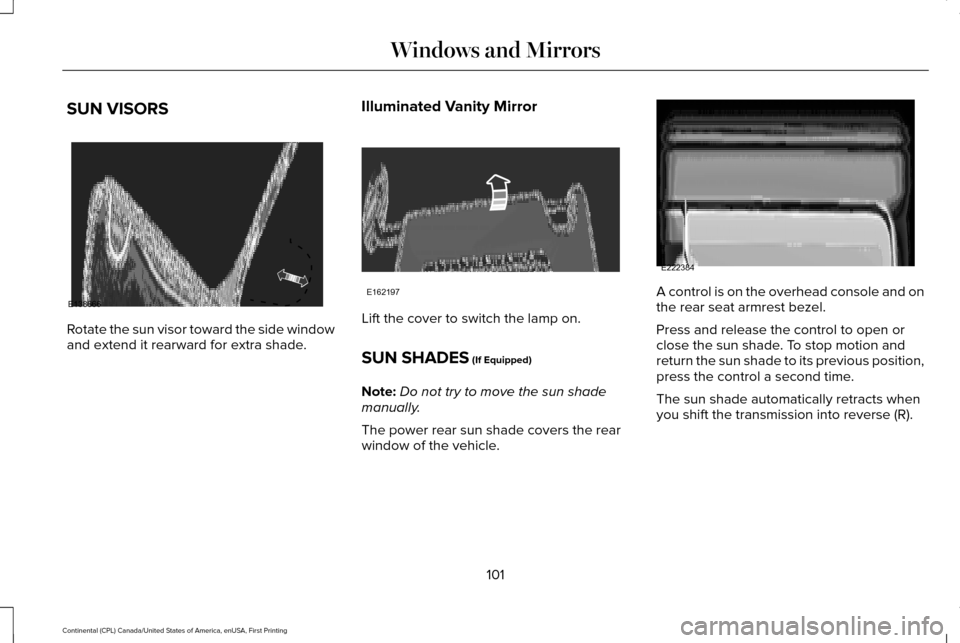
Rotate the sun visor toward the side window
and extend it rearward for extra shade.
Illuminated Vanity Mirror Lift the cover to switch the lamp on.
SUN SHADES (If Equipped)
Note: Do not try to move the sun shade
manually.
The power rear sun shade covers the rear
window of the vehicle. A control is on the overhead console and on
the rear seat armrest bezel.
Press and release the control to open or
close the sun shade. To stop motion and
return the sun shade to its previous position,
press the control a second time.
The sun shade automatically retracts when
you shift the transmission into reverse (R).
101
Continental (CPL) Canada/United States of America, enUSA, First Printing Windows and MirrorsE138666 E162197 E222384
Page 105 of 584
MOONROOF (If Equipped)
WARNINGS
Do not let children play with the
moonroof or leave them unattended in
the vehicle. They may seriously hurt
themselves. When closing the moonroof, you
should verify that it is free of
obstructions and make sure that children and
pets are not in the proximity of the roof
opening. The moonroof controls are located on the
overhead console and have a one-touch
open and close feature. To stop its
movement during one-touch operation, press
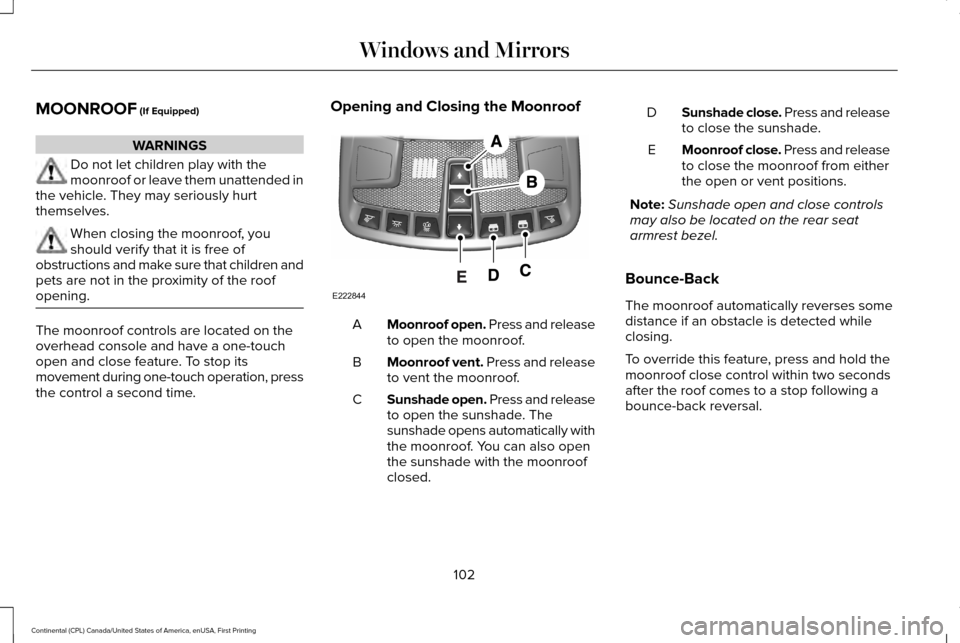
the control a second time. Opening and Closing the Moonroof
Moonroof open. Press and release
to open the moonroof.
A
Moonroof vent. Press and release
to vent the moonroof.
B
Sunshade open. Press and release
to open the sunshade. The
sunshade opens automatically with
the moonroof. You can also open
the sunshade with the moonroof
closed.
C Sunshade close. Press and release
to close the sunshade.
D
Moonroof close. Press and release
to close the moonroof from either
the open or vent positions.
E
Note: Sunshade open and close controls
may also be located on the rear seat
armrest bezel.
Bounce-Back
The moonroof automatically reverses some
distance if an obstacle is detected while
closing.
To override this feature, press and hold the
moonroof close control within two seconds
after the roof comes to a stop following a
bounce-back reversal.
102
Continental (CPL) Canada/United States of America, enUSA, First Printing Windows and MirrorsE222844
Page 106 of 584
GAUGES
Note:
Cluster shown in standard measure –
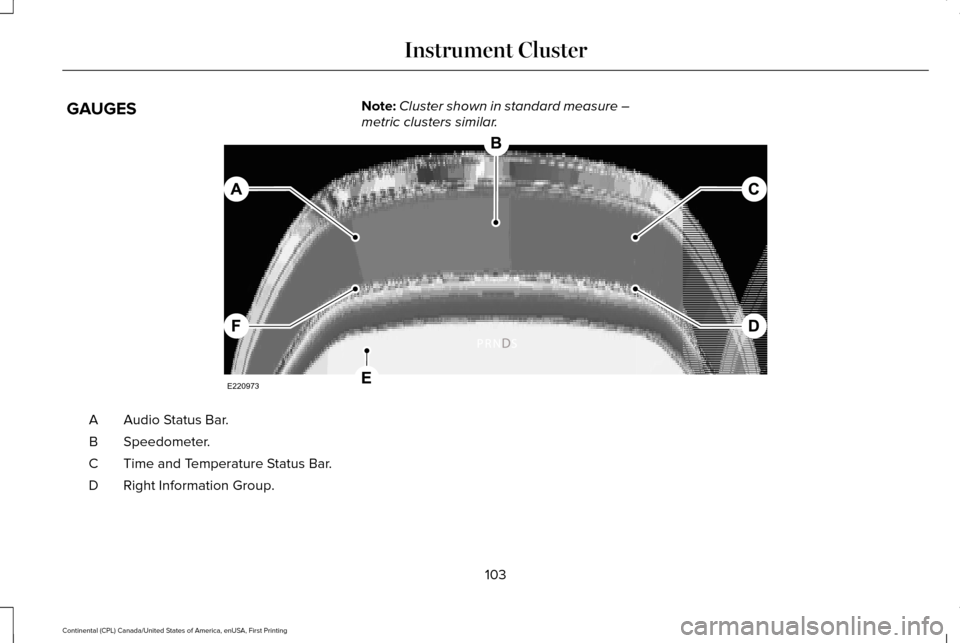
metric clusters similar. Audio Status Bar.
A
Speedometer.
B
Time and Temperature Status Bar.
C
Right Information Group.
D
103
Continental (CPL) Canada/United States of America, enUSA, First Printing Instrument ClusterE220973
Page 107 of 584
Fuel Gauge.
E
Left Information Group.
F
Audio Status Bar
Displays information related to the current
audio source.
Time and Temperature Status Bar
Displays time, temperature and navigation
related information.
Left/Right Information Group
Information that appears in the left and right
information group varies depending on
current gauge, on-demand and HUD (if
equipped) settings. See General
Information (page 110).
Fuel Gauge
Note: The fuel gauge may vary slightly when
your vehicle is moving or on a gradient. Switch the ignition on. The fuel gauge
indicates approximately how much fuel is left
in the fuel tank. The arrow adjacent to the
fuel pump symbol indicates on which side of
your vehicle the fuel filler door is located.
The gauge is divided into four segments and
moves towards F when you refuel your
vehicle. The gauge fill color changes to
yellow in low fuel conditions and to red in
empty conditions. If the gauge fill color is red
after adding fuel, this indicates your vehicle
needs service soon.
After refueling some variability in gauge
position is normal:
•
It may take a short time for the gauge to
reach full after leaving the gas station.
This is normal and depends upon the
slope of pavement at the gas station.
• The fuel amount dispensed into the tank
is a little less or more than the gauge
indicated. This is normal and depends
upon the slope of pavement at the gas
station. •
If the gas station nozzle shuts off before
the tank is full, try a different gas pump
nozzle.
• There is a small reserve left in the tank
when the fuel gauge reaches empty.
Low Fuel Reminder
Note: The low fuel reminder can appear at
different fuel gauge positions depending on
fuel economy conditions. This variation is
normal.
A low fuel reminder triggers when the
distance to empty reaches 50 mph (80 km/h),
25 mph (40 km/h)
and 10 mph (16 km/h) to
empty.
104
Continental (CPL) Canada/United States of America, enUSA, First Printing Instrument Cluster
Page 108 of 584
WARNING LAMPS AND
INDICATORS
The following warning lamps and indicators
alert you to a vehicle condition that may
become serious. Some lamps illuminate
when you start your vehicle to make sure
they work. If any lamps remain on after
starting your vehicle, refer to the respective
system warning lamp for further information.
Note:
Some warning indicators appear in
the information display and function the
same as a warning lamp, but do not display
when you start your vehicle.
Adaptive Cruise Control (If Equipped) The speed control system indicator
light changes color to indicate
what mode the system is in:
See
Using Adaptive Cruise Control (page 230).
On (white light): Illuminates when the
adaptive cruise control system is turned on.
Turns off when the speed control system is
turned off. Engaged (green light): Illuminates when the
adaptive cruise control system is engaged.
Turns off when the speed control system is
disengaged.
Adaptive Steering
(If Equipped)
The adaptive steering system
indicator illuminates if the system
detects a fault during the
continuous diagnostic checks.
Adaptive Steering Initialization (yellow,
flashing): The adaptive steering system
detects a difference between steering wheel
angle and the desired road wheel angle. The
steering wheel adjusts itself to correct this
difference. This adjustment is part of normal
system operation.
Adaptive Steering Off (yellow, solid): The
adaptive steering system is off. It is possible
that the steering wheel may not be straight
when you drive straight ahead. If this
message persists, see an authorized dealer. Adaptive Steering Loss (red, solid): The
adaptive steering system integrity cannot be
verified. Do not drive the vehicle and contact
an authorized dealer immediately.
See
Steering (page 251).
Anti-Lock Braking System If it illuminates when you are
driving, this indicates a
malfunction. You continue to have
the normal braking system (without ABS)
unless the brake system warning lamp is also
illuminated. Have the system checked by
your authorized dealer.
Autohold Active Illuminates when the system holds
your vehicle stationary.
Autohold Unavailable Illuminates when the system is on,
but unavailable to hold your
vehicle stationary.
105
Continental (CPL) Canada/United States of America, enUSA, First Printing Instrument ClusterE144524 E223375 E197933 E197934
Page 109 of 584
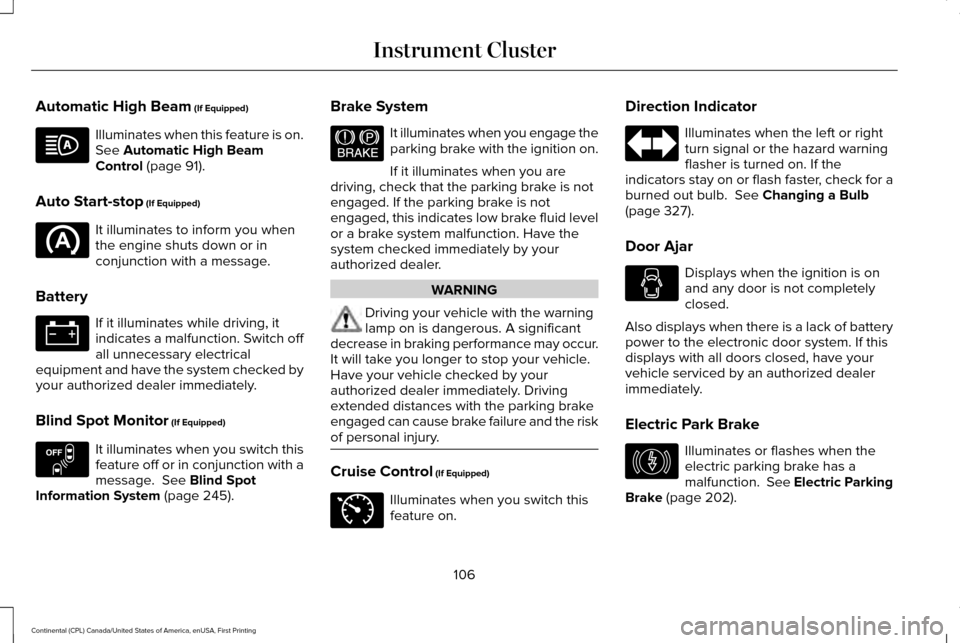
Automatic High Beam (If Equipped)
Illuminates when this feature is on.
See
Automatic High Beam
Control (page 91).
Auto Start-stop
(If Equipped) It illuminates to inform you when
the engine shuts down or in
conjunction with a message.
Battery If it illuminates while driving, it
indicates a malfunction. Switch off
all unnecessary electrical
equipment and have the system checked by
your authorized dealer immediately.
Blind Spot Monitor
(If Equipped) It illuminates when you switch this
feature off or in conjunction with a
message.
See Blind Spot
Information System (page 245). Brake System It illuminates when you engage the
parking brake with the ignition on.
If it illuminates when you are
driving, check that the parking brake is not
engaged. If the parking brake is not
engaged, this indicates low brake fluid level
or a brake system malfunction. Have the
system checked immediately by your
authorized dealer. WARNING
Driving your vehicle with the warning
lamp on is dangerous. A significant
decrease in braking performance may occur.
It will take you longer to stop your vehicle.
Have your vehicle checked by your
authorized dealer immediately. Driving
extended distances with the parking brake
engaged can cause brake failure and the risk
of personal injury. Cruise Control
(If Equipped)
Illuminates when you switch this
feature on.Direction Indicator Illuminates when the left or right
turn signal or the hazard warning
flasher is turned on. If the
indicators stay on or flash faster, check for a
burned out bulb.
See Changing a Bulb
(page 327).
Door Ajar Displays when the ignition is on
and any door is not completely
closed.
Also displays when there is a lack of battery
power to the electronic door system. If this
displays with all doors closed, have your
vehicle serviced by an authorized dealer
immediately.
Electric Park Brake Illuminates or flashes when the
electric parking brake has a
malfunction.
See Electric Parking
Brake (page 202).
106
Continental (CPL) Canada/United States of America, enUSA, First Printing Instrument Cluster E151262 E144522 E71340 E146190
Page 110 of 584
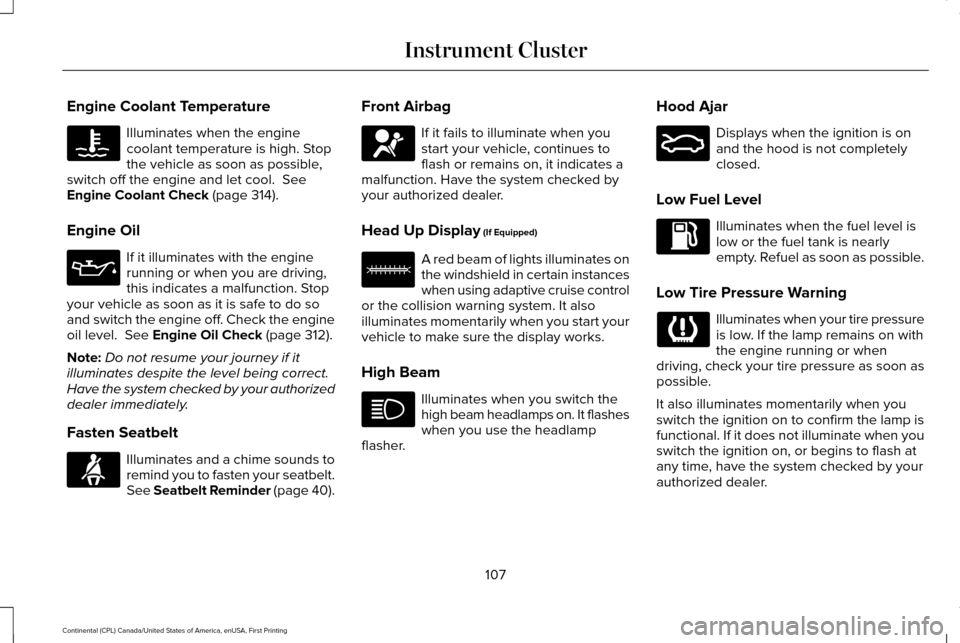
Engine Coolant Temperature
Illuminates when the engine
coolant temperature is high. Stop
the vehicle as soon as possible,
switch off the engine and let cool. See
Engine Coolant Check (page 314).
Engine Oil If it illuminates with the engine
running or when you are driving,
this indicates a malfunction. Stop
your vehicle as soon as it is safe to do so
and switch the engine off. Check the engine
oil level.
See Engine Oil Check (page 312).
Note: Do not resume your journey if it
illuminates despite the level being correct.
Have the system checked by your authorized
dealer immediately.
Fasten Seatbelt Illuminates and a chime sounds to
remind you to fasten your seatbelt.
See
Seatbelt Reminder (page 40).Front Airbag If it fails to illuminate when you
start your vehicle, continues to
flash or remains on, it indicates a
malfunction. Have the system checked by
your authorized dealer.
Head Up Display
(If Equipped) A red beam of lights illuminates on
the windshield in certain instances
when using adaptive cruise control
or the collision warning system. It also
illuminates momentarily when you start your
vehicle to make sure the display works.
High Beam Illuminates when you switch the
high beam headlamps on. It flashes
when you use the headlamp
flasher. Hood Ajar Displays when the ignition is on
and the hood is not completely
closed.
Low Fuel Level Illuminates when the fuel level is
low or the fuel tank is nearly
empty. Refuel as soon as possible.
Low Tire Pressure Warning Illuminates when your tire pressure
is low. If the lamp remains on with
the engine running or when
driving, check your tire pressure as soon as
possible.
It also illuminates momentarily when you
switch the ignition on to confirm the lamp is
functional. If it does not illuminate when you
switch the ignition on, or begins to flash at
any time, have the system checked by your
authorized dealer.
107
Continental (CPL) Canada/United States of America, enUSA, First Printing Instrument Cluster E156133 E159324