headlamp LINCOLN CONTINENTAL 2017 User Guide
[x] Cancel search | Manufacturer: LINCOLN, Model Year: 2017, Model line: CONTINENTAL, Model: LINCOLN CONTINENTAL 2017Pages: 584, PDF Size: 6.13 MB
Page 111 of 584
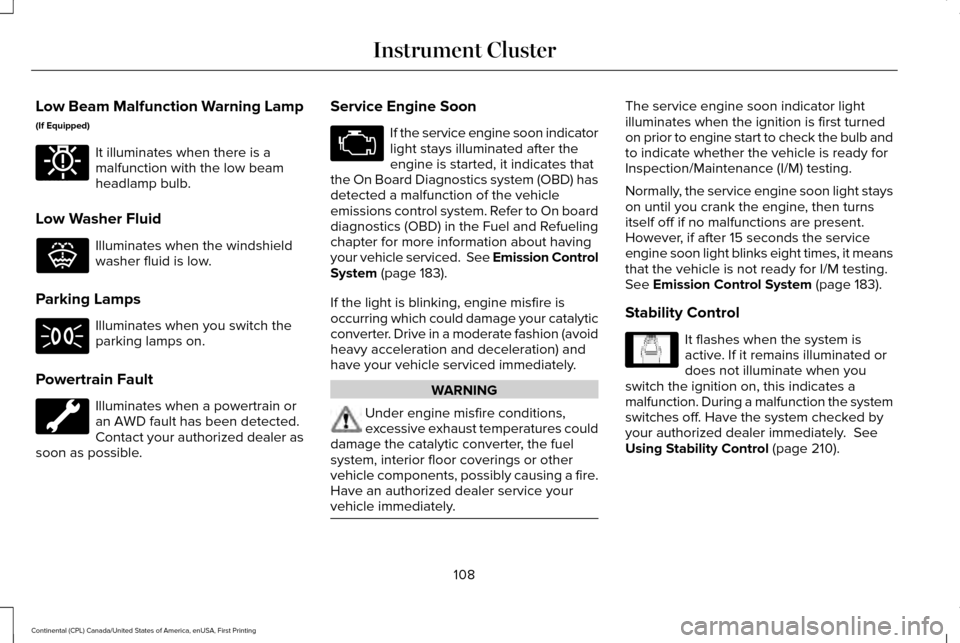
Low Beam Malfunction Warning Lamp
(If Equipped)
It illuminates when there is a
malfunction with the low beam
headlamp bulb.
Low Washer Fluid Illuminates when the windshield
washer fluid is low.
Parking Lamps Illuminates when you switch the
parking lamps on.
Powertrain Fault Illuminates when a powertrain or
an AWD fault has been detected.
Contact your authorized dealer as
soon as possible. Service Engine Soon If the service engine soon indicator
light stays illuminated after the
engine is started, it indicates that
the On Board Diagnostics system (OBD) has
detected a malfunction of the vehicle
emissions control system. Refer to On board
diagnostics (OBD) in the Fuel and Refueling
chapter for more information about having
your vehicle serviced. See Emission Control
System (page 183).
If the light is blinking, engine misfire is
occurring which could damage your catalytic
converter. Drive in a moderate fashion (avoid
heavy acceleration and deceleration) and
have your vehicle serviced immediately. WARNING
Under engine misfire conditions,
excessive exhaust temperatures could
damage the catalytic converter, the fuel
system, interior floor coverings or other
vehicle components, possibly causing a fire.
Have an authorized dealer service your
vehicle immediately. The service engine soon indicator light
illuminates when the ignition is first turned
on prior to engine start to check the bulb and
to indicate whether the vehicle is ready for
Inspection/Maintenance (I/M) testing.
Normally, the service engine soon light stays
on until you crank the engine, then turns
itself off if no malfunctions are present.
However, if after 15 seconds the service
engine soon light blinks eight times, it means
that the vehicle is not ready for I/M testing.
See Emission Control System (page 183).
Stability Control It flashes when the system is
active. If it remains illuminated or
does not illuminate when you
switch the ignition on, this indicates a
malfunction. During a malfunction the system
switches off. Have the system checked by
your authorized dealer immediately.
See
Using Stability Control (page 210).
108
Continental (CPL) Canada/United States of America, enUSA, First Printing Instrument ClusterE181350 E132353 E138639
Page 112 of 584
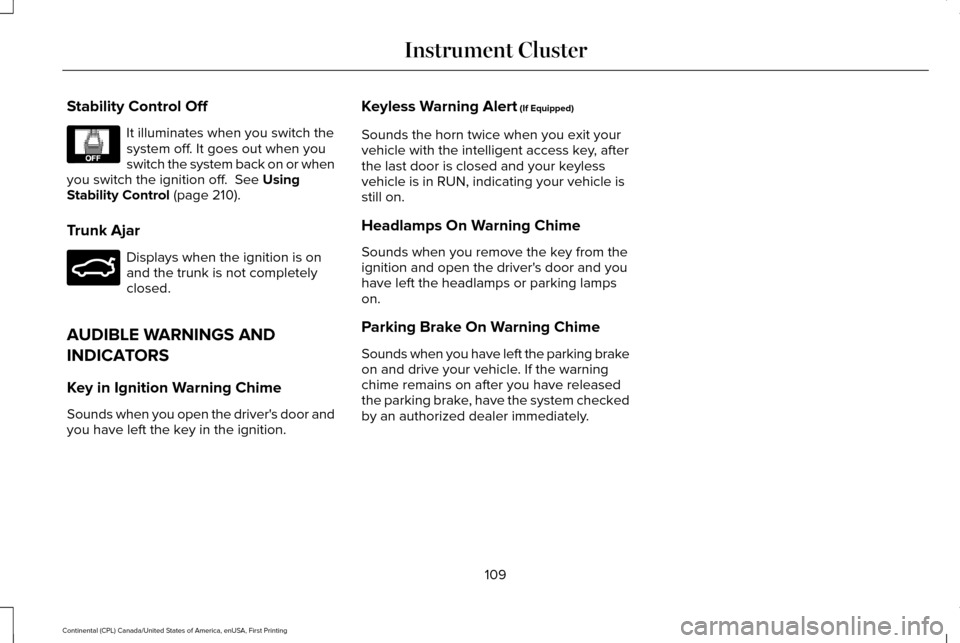
Stability Control Off
It illuminates when you switch the
system off. It goes out when you
switch the system back on or when
you switch the ignition off. See Using
Stability Control (page 210).
Trunk Ajar Displays when the ignition is on
and the trunk is not completely
closed.
AUDIBLE WARNINGS AND
INDICATORS
Key in Ignition Warning Chime
Sounds when you open the driver's door and
you have left the key in the ignition. Keyless Warning Alert
(If Equipped)
Sounds the horn twice when you exit your
vehicle with the intelligent access key, after
the last door is closed and your keyless
vehicle is in RUN, indicating your vehicle is
still on.
Headlamps On Warning Chime
Sounds when you remove the key from the
ignition and open the driver's door and you
have left the headlamps or parking lamps
on.
Parking Brake On Warning Chime
Sounds when you have left the parking brake
on and drive your vehicle. If the warning
chime remains on after you have released
the parking brake, have the system checked
by an authorized dealer immediately.
109
Continental (CPL) Canada/United States of America, enUSA, First Printing Instrument ClusterE130458 E159323
Page 122 of 584
Adaptive Cruise Control
Action
Message
A radar malfunction is preventing the adaptive cruise from engaging. Se\
e Using Adaptive Cruise Control (page 230).
Adaptive Cruise Malfunction
Front Sensor Not Aligned Conditions exist such that the adaptive cruise cannot function properly.
See Using Adaptive
Cruise Control (page 230).
Adaptive Cruise Not Available
The radar is blocked because of poor radar visibility due to bad weather or ice/mud/water \
infront of radar. Driver can typically clean the sensor to resolve.
See Using Adaptive Cruise
Control (page 230).
Adaptive Cruise Not Available Sensor
Blocked See Manual
Displayed when the automatic braking has been disabled.
Normal Cruise Active Automatic Braking
Turned Off
Displayed when the adaptive cruise has reinstated controls to the driver\
.
Adaptive Cruise - Driver Resume Control
Displays when the vehicle speed is too slow to activate the adaptive cru\
ise.
Adaptive Cruise Speed Too Low to
Activate
Adaptive Headlamps Action
Message
Displays when a fault with the system has occurred. Contact an authorize\
d dealer as soon as possible.
Check Headlamp System See Manual
119
Continental (CPL) Canada/United States of America, enUSA, First Printing Information Displays
Page 143 of 584
Maintaining Your Head Up Display
•
Do not place objects onto the transparent
cover, as they may block you from seeing
portions of the image. These objects
could also damage the cover and affect
the quality of the projected image.
• The system uses a special windshield
designed to provide the optimum image
quality. You must replace the windshield
in a vehicle with this system with a
certified original equipment
manufactured (OEM) head up display
windshield. Replacing this system's
windshield with a non-head up display
windshield causes a double image or
distorted image. Have an authorized
dealer or authorized repair facility replace
the windshield.
• Direct light from oncoming headlamps or
a sunrise or sunset can affect the driver's
ability to see the HUD image.
• Clean the windshield often for optimal
HUD performance. See Cleaning the
Instrument Panel and Instrument
Cluster Lens
(page 336).
140
Continental (CPL) Canada/United States of America, enUSA, First Printing Information Displays
Page 175 of 584
Start: Starts your vehicle. The engine may
not start when your vehicle starts.
• Press the brake pedal, and then press
the button for any length of time. An
indicator light on the button illuminates
when the ignition is on and when your
vehicle starts.
STARTING A GASOLINE ENGINE
When you start the engine, the idle speed
increases. This helps to warm up the engine.
if the engine idle speed does not slow down
automatically, have your vehicle checked as
soon as possible. Note:
You can crank the engine for a total
of 60 seconds without the engine starting
before the starting system temporarily
disables. The 60 seconds does not have to
be all at once. For example, if you crank the
engine three times for 20 seconds each time,
without the engine starting, you reached the
60-second time limit. A message appears
in the information display alerting you that
you exceeded the cranking time. You
cannot attempt to start the engine for at
least 15 minutes.
Note: You need to wait 60 minutes before
you can crank the engine for 60 seconds
again.
Before starting your vehicle, check the
following:
• Make sure all occupants have fastened
their seatbelts.
• Make sure the headlamps and electrical
accessories are off.
• Make sure the parking brake is on.
• Make sure the transmission is in park (P). Starting Your Vehicle
Note:
Do not touch the accelerator pedal.
1. Fully depress the brake pedal.
2. Press the push button ignition switch.
Failure to Start
The system does not function if:
• The passive key frequencies are jammed.
• The key battery has no charge.
If you are unable to start your vehicle, do the
following:
1. Remove the key blade from the transmitter.
172
Continental (CPL) Canada/United States of America, enUSA, First Printing Starting and Stopping the Engine
Page 245 of 584
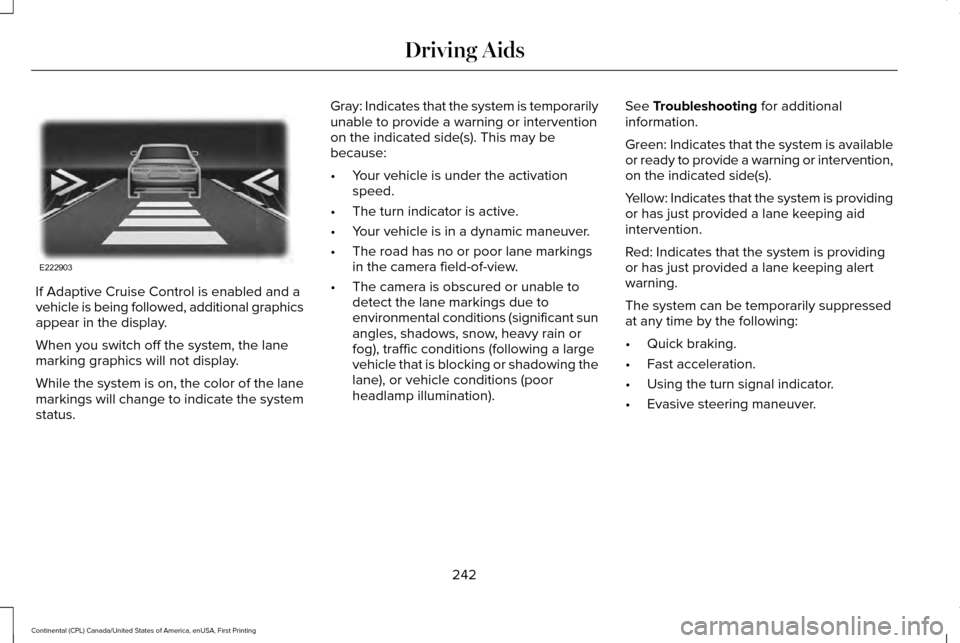
If Adaptive Cruise Control is enabled and a
vehicle is being followed, additional graphics
appear in the display.
When you switch off the system, the lane
marking graphics will not display.
While the system is on, the color of the lane
markings will change to indicate the system
status.
Gray: Indicates that the system is temporarily
unable to provide a warning or intervention
on the indicated side(s). This may be
because:
•
Your vehicle is under the activation
speed.
• The turn indicator is active.
• Your vehicle is in a dynamic maneuver.
• The road has no or poor lane markings
in the camera field-of-view.
• The camera is obscured or unable to
detect the lane markings due to
environmental conditions (significant sun
angles, shadows, snow, heavy rain or
fog), traffic conditions (following a large
vehicle that is blocking or shadowing the
lane), or vehicle conditions (poor
headlamp illumination). See Troubleshooting for additional
information.
Green: Indicates that the system is available
or ready to provide a warning or intervention,
on the indicated side(s).
Yellow: Indicates that the system is providing
or has just provided a lane keeping aid
intervention.
Red: Indicates that the system is providing
or has just provided a lane keeping alert
warning.
The system can be temporarily suppressed
at any time by the following:
• Quick braking.
• Fast acceleration.
• Using the turn signal indicator.
• Evasive steering maneuver.
242
Continental (CPL) Canada/United States of America, enUSA, First Printing Driving AidsE222903
Page 299 of 584
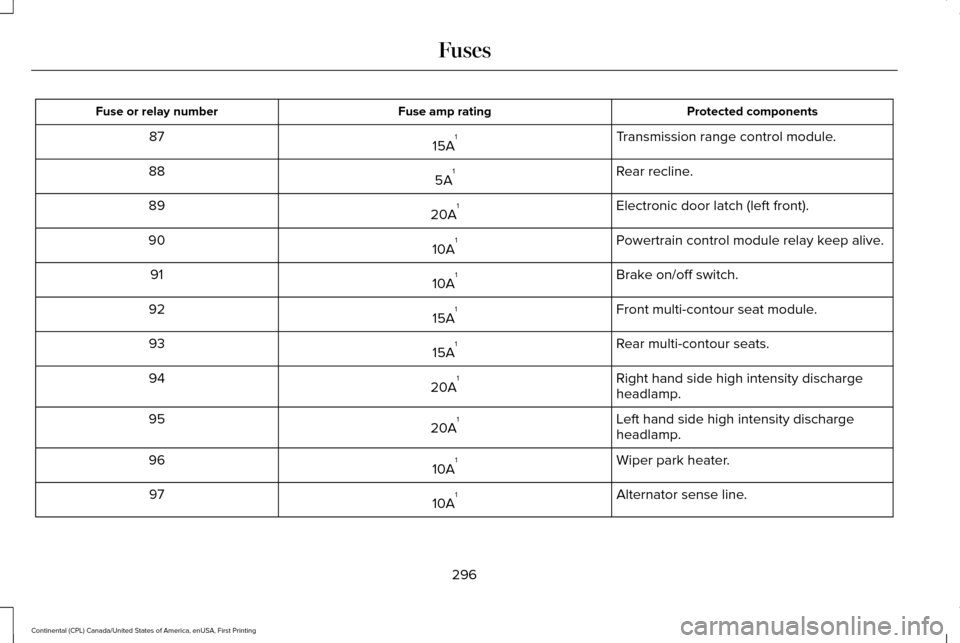
Protected components
Fuse amp rating
Fuse or relay number
Transmission range control module.
15A 1
87
Rear recline.
5A 1
88
Electronic door latch (left front).
20A 1
89
Powertrain control module relay keep alive.
10A 1
90
Brake on/off switch.
10A 1
91
Front multi-contour seat module.
15A 1
92
Rear multi-contour seats.
15A 1
93
Right hand side high intensity discharge
headlamp.
20A 1
94
Left hand side high intensity discharge
headlamp.
20A 1
95
Wiper park heater.
10A 1
96
Alternator sense line.
10A 1
97
296
Continental (CPL) Canada/United States of America, enUSA, First Printing Fuses
Page 303 of 584
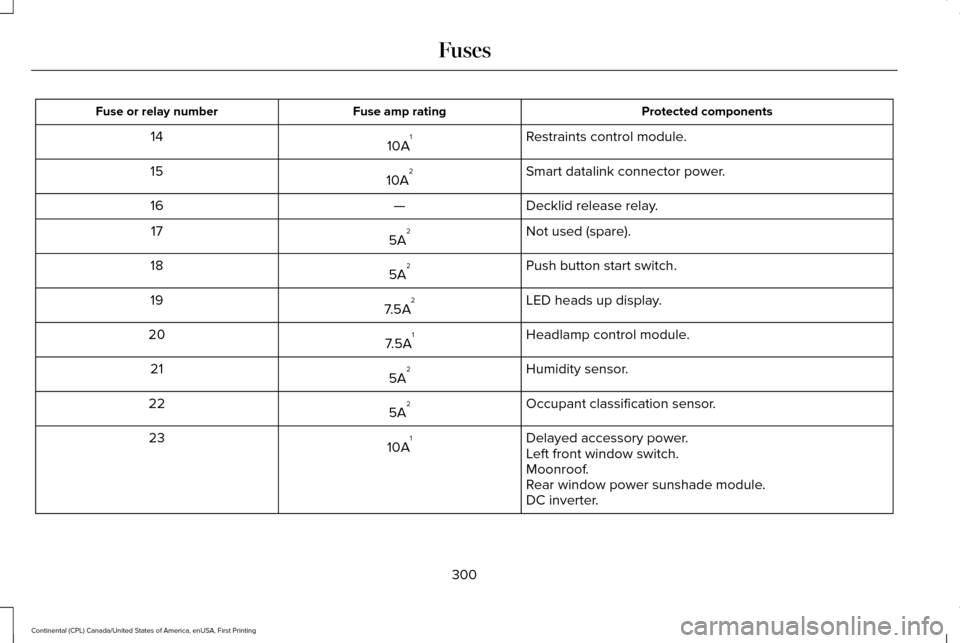
Protected components
Fuse amp rating
Fuse or relay number
Restraints control module.
10A 1
14
Smart datalink connector power.
10A 2
15
Decklid release relay.
—
16
Not used (spare).
5A 2
17
Push button start switch.
5A 2
18
LED heads up display.
7.5A 2
19
Headlamp control module.
7.5A 1
20
Humidity sensor.
5A 2
21
Occupant classification sensor.
5A 2
22
Delayed accessory power.
10A 1
23
Left front window switch.
Moonroof.
Rear window power sunshade module.
DC inverter.
300
Continental (CPL) Canada/United States of America, enUSA, First Printing Fuses
Page 329 of 584
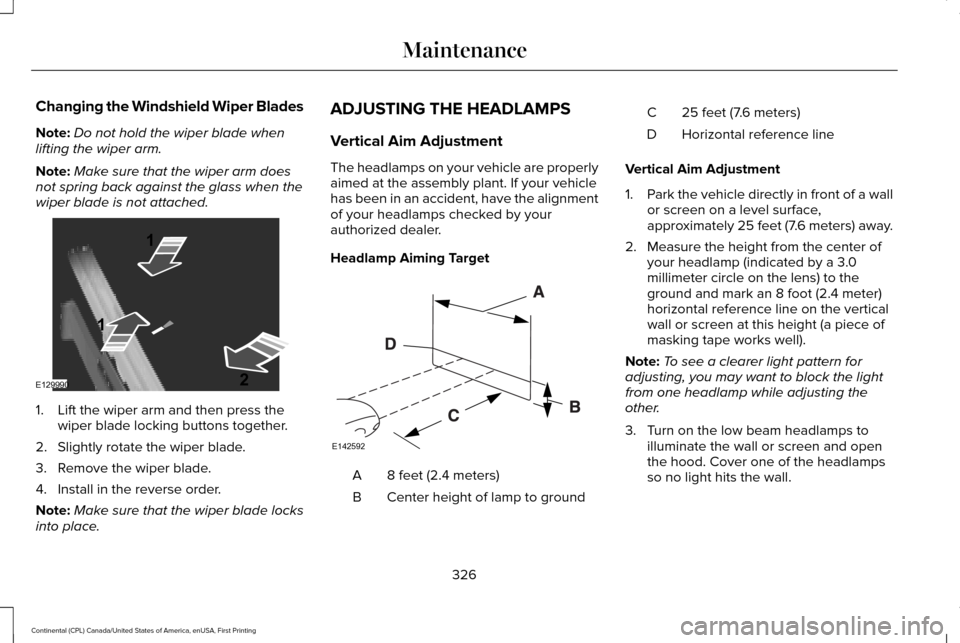
Changing the Windshield Wiper Blades
Note:
Do not hold the wiper blade when
lifting the wiper arm.
Note: Make sure that the wiper arm does
not spring back against the glass when the
wiper blade is not attached. 1. Lift the wiper arm and then press the
wiper blade locking buttons together.
2. Slightly rotate the wiper blade.
3. Remove the wiper blade.
4. Install in the reverse order.
Note: Make sure that the wiper blade locks
into place. ADJUSTING THE HEADLAMPS
Vertical Aim Adjustment
The headlamps on your vehicle are properly
aimed at the assembly plant. If your vehicle
has been in an accident, have the alignment
of your headlamps checked by your
authorized dealer.
Headlamp Aiming Target
8 feet (2.4 meters)
A
Center height of lamp to ground
B 25 feet (7.6 meters)
C
Horizontal reference line
D
Vertical Aim Adjustment
1. Park the vehicle directly in front of a wall
or screen on a level surface,
approximately 25 feet (7.6 meters) away.
2. Measure the height from the center of your headlamp (indicated by a 3.0
millimeter circle on the lens) to the
ground and mark an 8 foot (2.4 meter)
horizontal reference line on the vertical
wall or screen at this height (a piece of
masking tape works well).
Note: To see a clearer light pattern for
adjusting, you may want to block the light
from one headlamp while adjusting the
other.
3. Turn on the low beam headlamps to illuminate the wall or screen and open
the hood. Cover one of the headlamps
so no light hits the wall.
326
Continental (CPL) Canada/United States of America, enUSA, First Printing MaintenanceE129990
1
1 2 E142592
Page 330 of 584
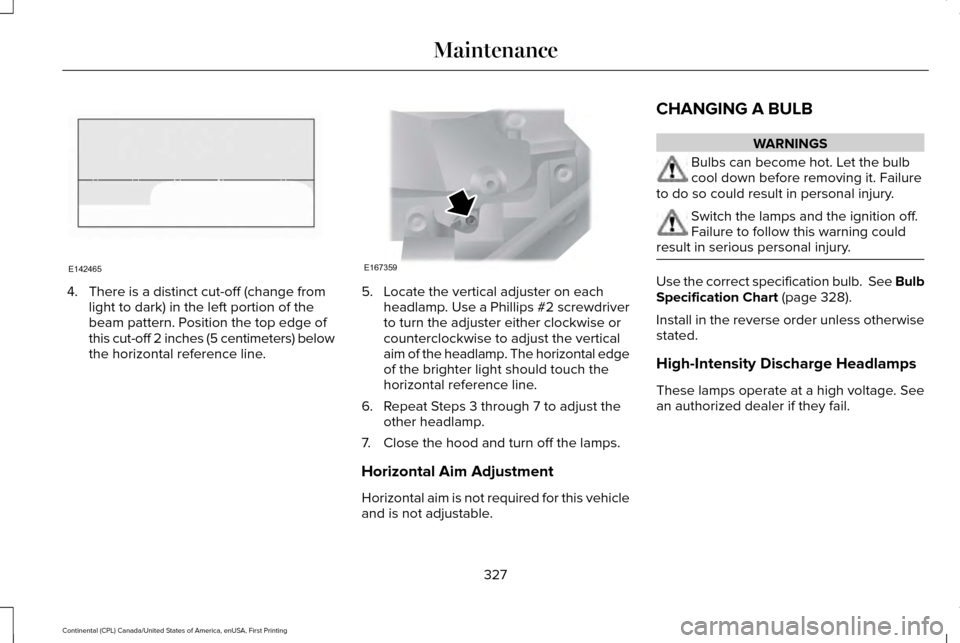
4. There is a distinct cut-off (change from
light to dark) in the left portion of the
beam pattern. Position the top edge of
this cut-off 2 inches (5 centimeters) below
the horizontal reference line. 5. Locate the vertical adjuster on each
headlamp. Use a Phillips #2 screwdriver
to turn the adjuster either clockwise or
counterclockwise to adjust the vertical
aim of the headlamp. The horizontal edge
of the brighter light should touch the
horizontal reference line.
6. Repeat Steps 3 through 7 to adjust the other headlamp.
7. Close the hood and turn off the lamps.
Horizontal Aim Adjustment
Horizontal aim is not required for this vehicle
and is not adjustable. CHANGING A BULB WARNINGS
Bulbs can become hot. Let the bulb
cool down before removing it. Failure
to do so could result in personal injury. Switch the lamps and the ignition off.
Failure to follow this warning could
result in serious personal injury. Use the correct specification bulb. See Bulb
Specification Chart (page 328).
Install in the reverse order unless otherwise
stated.
High-Intensity Discharge Headlamps
These lamps operate at a high voltage. See
an authorized dealer if they fail.
327
Continental (CPL) Canada/United States of America, enUSA, First Printing MaintenanceE142465 E167359