automatic transmission LINCOLN CONTINENTAL 2018 Owners Manual
[x] Cancel search | Manufacturer: LINCOLN, Model Year: 2018, Model line: CONTINENTAL, Model: LINCOLN CONTINENTAL 2018Pages: 615, PDF Size: 5.31 MB
Page 6 of 615
Seats
Sitting in the Correct Position...................153
Head Restraints............................................154
Power Seats...................................................157
Memory Function.........................................163
Rear Seats......................................................165
Heated Seats................................................166
Climate Controlled Seats...........................168
Rear Seat Armrest........................................169
Universal Garage Door Opener
Universal Garage Door Opener................171
Auxiliary Power Points
Auxiliary Power Points................................175
Storage Compartments
Center Console.............................................177
Overhead Console.......................................177
Starting and Stopping the Engine
General Information.....................................178
Keyless Starting............................................178
Starting a Gasoline Engine........................179
Engine Block Heater....................................181
Fuel and Refueling
Safety Precautions.......................................183
Fuel Quality....................................................183
Fuel Filler Funnel Location........................184
Running Out of Fuel....................................184
Refueling........................................................186
Fuel Consumption........................................189
Engine Emission Control
Emission Law................................................190
Catalytic Converter.......................................191
Transmission
Automatic Transmission.............................194
All-Wheel Drive
Using All-Wheel Drive................................200
Brakes
General Information...................................209
Hints on Driving With Anti-Lock Brakes.......................................................................210
Electric Parking Brake.................................210
Hill Start Assist..............................................213
Auto Hold.......................................................213
Traction Control
Principle of Operation.................................216
Using Traction Control................................216
Stability Control
Principle of Operation.................................217
Using Stability Control................................218
Parking Aids
Principle of Operation.................................219
Rear Parking Aid...........................................219
Front Parking Aid........................................220
Side Sensing System..................................221
Active Park Assist........................................223
Rear View Camera.......................................231
3
Continental (CPL) Canada/United States of America, enUSA, Edition date: 201706, Second-Printing
Table of Contents
Page 8 of 615
Automatic Transmission Fluid Check......324
Brake Fluid Check.......................................324
Power Steering Fluid Check....................325
Washer Fluid Check...................................325
Fuel Filter......................................................325
Changing the 12V Battery.........................325
Checking the Wiper Blades......................327
Changing the Wiper Blades......................327
Adjusting the Headlamps.........................328
Changing a Bulb..........................................329
Bulb Specification Chart............................330
Changing the Engine Air Filter - 3.7L......332
Changing the Engine Air Filter - 2.7LEcoBoost™/3.0L EcoBoost™..................332
Vehicle Care
General Information....................................334
Cleaning Products.......................................334
Cleaning the Exterior.................................335
Waxing...........................................................336
Cleaning the Engine...................................337
Cleaning the Windows and Wiper Blades......................................................................337
Cleaning the Interior...................................338
Cleaning the Instrument Panel andInstrument Cluster Lens........................340
Cleaning Leather Seats..............................341
Repairing Minor Paint Damage.................341
Cleaning the Wheels...................................341
Vehicle Storage...........................................342
Body Styling Kits..........................................343
Wheels and Tires
General Information....................................344
Tire Care........................................................344
Using Summer Tires...................................358
Using Snow Chains....................................358
Tire Pressure Monitoring System...........359
Changing a Road Wheel...........................364
Technical Specifications............................370
Capacities and Specifications
Engine Specifications - 2.7L......................373
Engine Specifications - 3.0L.....................374
Engine Specifications - 3.7L......................375
Motorcraft Parts - 2.7L................................377
Motorcraft Parts - 3.0L................................378
Motorcraft Parts - 3.7L................................379
Vehicle Identification Number.................380
Vehicle Certification Label........................380
Transmission Code Designation..............381
Capacities and Specifications - 2.7L......382
Capacities and Specifications - 3.0L......388
Capacities and Specifications - 3.7L......395
Audio System
General Information....................................403
Audio Unit.....................................................405
Satellite Radio..............................................409
USB Port.........................................................412
SYNC™ 3
General Information.....................................413
Home Screen...............................................428
Using Voice Recognition...........................430
Entertainment...............................................440
Climate...........................................................454
Phone.............................................................458
Navigation.....................................................466
5
Continental (CPL) Canada/United States of America, enUSA, Edition date: 201706, Second-Printing
Table of Contents
Page 63 of 615
5. Reinstall the battery cover and the keyblade.
Car Finder
Press the button twice within threeseconds. A tone sounds and thedirection indicators will flash. Werecommend you use this method to locateyour vehicle, rather than using the panicalarm.
Sounding the Panic Alarm
Note:The panic alarm only operates whenthe ignition is off.
Press the button to sound thepanic alarm. Press the buttonagain or switch the ignition on toturn it off.
Remote Start
WARNING: To avoid exhaust fumes,do not use remote start if your vehicle isparked indoors or in areas that are not wellventilated.
Note:Do not use remote start if your fuellevel is low.
The remote start button is on thetransmitter.
This feature allows you to start your vehiclefrom the outside. The transmitter has anextended operating range.
You can configure your automatic climatecontrol to operate when you remote startyour vehicle. See Climate Control (page146).
Many states and provinces have restrictionsfor the use of remote start. Check your localand state or provincial laws for specificrequirements regarding remote startsystems.
The remote start system does not work if anyof the following occur:
•The ignition is on.
•The anti-theft alarm triggers.
•You switch the feature off in theinformation display.
•The hood is open.
•The transmission is not in park (P).
•The battery voltage is below theminimum operating voltage.
Remote Control Feedback (If Equipped)
An LED on the remote control provides statusfeedback of remote start or stop commands.
StatusLED
Remote startsuccessfulSolid green
Remote stopsuccessfulSolid red
Request failed orstatus not receivedBlinking red
Status incompleteBlinking green
60
Continental (CPL) Canada/United States of America, enUSA, Edition date: 201706, Second-Printing
Keys and Remote ControlsE138623 E138624 E138625
Page 98 of 615
Type One - Conventional (Non-Configurable)
The daytime running lamps turn on when:
1. Switching the ignition on.
2. The transmission is not in park (P) forvehicles with automatic transmissions, orreleasing the parking brake for vehicleswith manual transmissions.
3. The lighting control is in the off, parkinglamp or autolamps positions.
4. The headlamps are off.
Type Two - Configurable
Switch the daytime running lamps on or offusing the information display. SeeInformation Displays (page 115).
The daytime running lamps turn on when:
1. The lamps are on in the informationdisplay.
2. Switching the ignition on.
3. The transmission is not in park (P) forvehicles with automatic transmissions, orreleasing the parking brake for vehicleswith manual transmissions.
4. The lighting control is in the autolampsposition.
5. The headlamps are off.
The other lighting control switch positionsdo not turn on the daytime running lamps.
If the daytime running lamps are off in theinformation display, the lamps stay off in allswitch positions.
AUTOMATIC HIGH BEAM
CONTROL (If Equipped)
WARNING: The system does notrelieve you of your responsibility to drive withdue care and attention. You may need tooverride the system if it does not turn thehigh beams on or off.
The system turns on high beams if it is darkenough and no other traffic is present. If itdetects an approaching vehicle’s headlampsor tail lamps, or street lighting ahead, thesystem turns off high beams before they candistract other road users. Low beams remainon.
Note:The system may not operate properlyif the sensor is blocked. Keep the windshieldfree from obstruction or damage.
Note:The system may not operate properlyin cold or inclement conditions. You canswitch on the high beams by overriding thesystem.
Note:If the system detects a blockage, forexample bird droppings, bug splatter, snowor ice, the system goes into low beam modeuntil you clear the blockage. A message mayappear in the information display if thecamera is blocked.
Note:Using much larger tires or equippingvehicle accessories such as snowplows canmodify your vehicle's ride height anddegrade automatic high beam controlperformance.
95
Continental (CPL) Canada/United States of America, enUSA, Edition date: 201706, Second-Printing
Lighting
Page 106 of 615
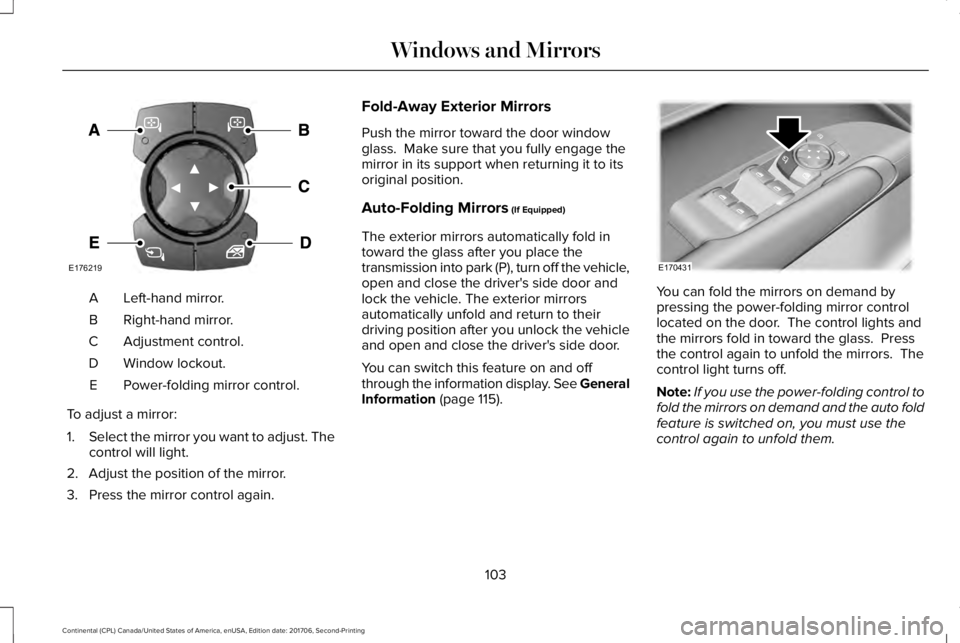
Left-hand mirror.A
Right-hand mirror.B
Adjustment control.C
Window lockout.D
Power-folding mirror control.E
To adjust a mirror:
1.Select the mirror you want to adjust. Thecontrol will light.
2. Adjust the position of the mirror.
3. Press the mirror control again.
Fold-Away Exterior Mirrors
Push the mirror toward the door windowglass. Make sure that you fully engage themirror in its support when returning it to itsoriginal position.
Auto-Folding Mirrors (If Equipped)
The exterior mirrors automatically fold intoward the glass after you place thetransmission into park (P), turn off the vehicle,open and close the driver's side door andlock the vehicle. The exterior mirrorsautomatically unfold and return to theirdriving position after you unlock the vehicleand open and close the driver's side door.
You can switch this feature on and offthrough the information display. See GeneralInformation (page 115).
You can fold the mirrors on demand bypressing the power-folding mirror controllocated on the door. The control lights andthe mirrors fold in toward the glass. Pressthe control again to unfold the mirrors. Thecontrol light turns off.
Note:If you use the power-folding control tofold the mirrors on demand and the auto foldfeature is switched on, you must use thecontrol again to unfold them.
103
Continental (CPL) Canada/United States of America, enUSA, Edition date: 201706, Second-Printing
Windows and MirrorsE176219 E170431
Page 110 of 615
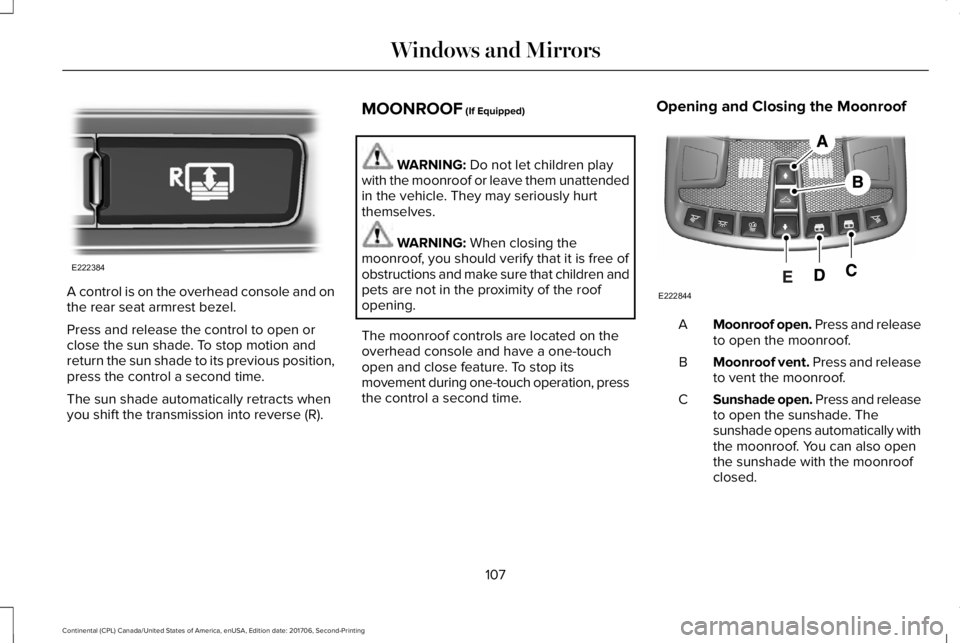
A control is on the overhead console and onthe rear seat armrest bezel.
Press and release the control to open orclose the sun shade. To stop motion andreturn the sun shade to its previous position,press the control a second time.
The sun shade automatically retracts whenyou shift the transmission into reverse (R).
MOONROOF (If Equipped)
WARNING: Do not let children playwith the moonroof or leave them unattendedin the vehicle. They may seriously hurtthemselves.
WARNING: When closing themoonroof, you should verify that it is free ofobstructions and make sure that children andpets are not in the proximity of the roofopening.
The moonroof controls are located on theoverhead console and have a one-touchopen and close feature. To stop itsmovement during one-touch operation, pressthe control a second time.
Opening and Closing the Moonroof
Moonroof open. Press and releaseto open the moonroof.A
Moonroof vent. Press and releaseto vent the moonroof.B
Sunshade open. Press and releaseto open the sunshade. Thesunshade opens automatically withthe moonroof. You can also openthe sunshade with the moonroofclosed.
C
107
Continental (CPL) Canada/United States of America, enUSA, Edition date: 201706, Second-Printing
Windows and MirrorsE222384 E222844
Page 145 of 615
ActionMessage
Displays when the brake pedal needs to be depressed to enable the transmission to shift frompark.Depress Brake to Shift from Park
Displays when neutral hold is active. See Automatic Transmission (page 194).Stay in Neutral Mode Engaged
Displays when the neutral button N needs to be pressed again to enter neutral hold. See Auto-matic Transmission (page 194).To Stay in Neutral When Exiting VehicleSelect N Again
HEAD UP DISPLAY (If Equipped)
Head Up Display (HUD)
This is a visual system that shows informationin your field of view as you drive. Theinformation comes from various vehiclesystems and includes vehicle speed, speedlimit, navigation, and advanced driverassistance systems (ADAS), such as adaptivecruise control (ACC) and the lane keepingsystem. This system projects the informationoff the windshield, and focuses the image
near the end of the hood approximately 7 ft(2 m) in front of the driver. Viewing thisinformation does not require you tosignificantly move your head, allowing youto keep your eyes on the road while havingquick and easy access to information.
Head Up Display Information
Signaling and Traffic Indication.A
Left Information Group.B
ADAS Display Area.C
142
Continental (CPL) Canada/United States of America, enUSA, Edition date: 201706, Second-Printing
Information DisplaysE228521
Page 146 of 615
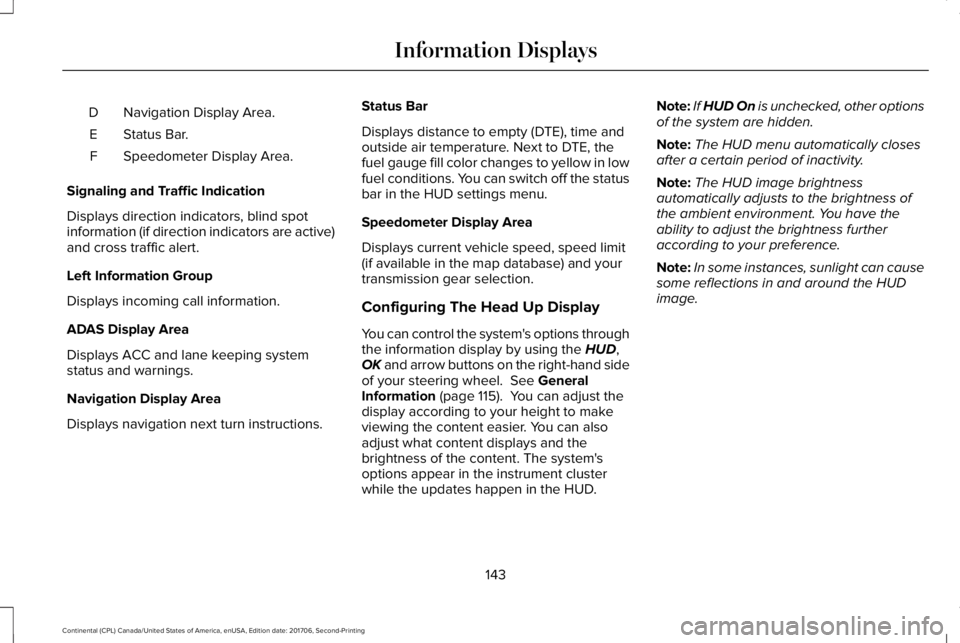
Navigation Display Area.D
Status Bar.E
Speedometer Display Area.F
Signaling and Traffic Indication
Displays direction indicators, blind spotinformation (if direction indicators are active)and cross traffic alert.
Left Information Group
Displays incoming call information.
ADAS Display Area
Displays ACC and lane keeping systemstatus and warnings.
Navigation Display Area
Displays navigation next turn instructions.
Status Bar
Displays distance to empty (DTE), time andoutside air temperature. Next to DTE, thefuel gauge fill color changes to yellow in lowfuel conditions. You can switch off the statusbar in the HUD settings menu.
Speedometer Display Area
Displays current vehicle speed, speed limit(if available in the map database) and yourtransmission gear selection.
Configuring The Head Up Display
You can control the system's options throughthe information display by using the HUD,OK and arrow buttons on the right-hand sideof your steering wheel. See GeneralInformation (page 115). You can adjust thedisplay according to your height to makeviewing the content easier. You can alsoadjust what content displays and thebrightness of the content. The system'soptions appear in the instrument clusterwhile the updates happen in the HUD.
Note:If HUD On is unchecked, other optionsof the system are hidden.
Note:The HUD menu automatically closesafter a certain period of inactivity.
Note:The HUD image brightnessautomatically adjusts to the brightness ofthe ambient environment. You have theability to adjust the brightness furtheraccording to your preference.
Note:In some instances, sunlight can causesome reflections in and around the HUDimage.
143
Continental (CPL) Canada/United States of America, enUSA, Edition date: 201706, Second-Printing
Information Displays
Page 197 of 615
AUTOMATIC TRANSMISSION
WARNING: Always fully apply theparking brake and make sure you shift intopark (P). Failure to follow this instructioncould result in personal injury or death.
WARNING: Do not apply the brakepedal and accelerator pedal simultaneously.Applying both pedals simultaneously formore than a few seconds will limit engineperformance, which may result in difficultymaintaining speed in traffic and could leadto serious injury.
Note:You may not be able to shift out ofpark (P) unless the intelligent access key isinside your vehicle.
Push Button Shift Transmission
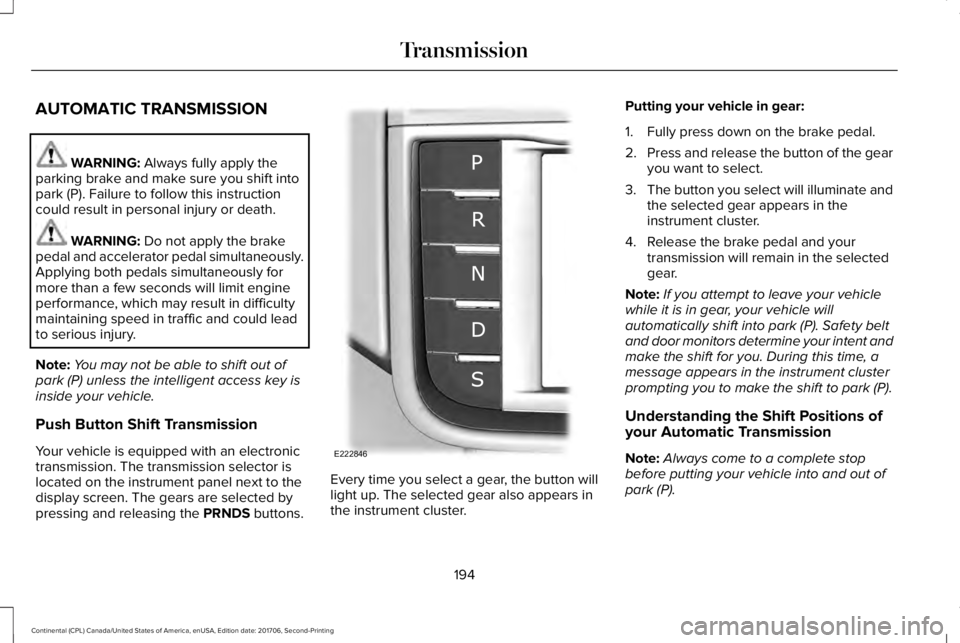
Your vehicle is equipped with an electronictransmission. The transmission selector islocated on the instrument panel next to thedisplay screen. The gears are selected bypressing and releasing the PRNDS buttons.
Every time you select a gear, the button willlight up. The selected gear also appears inthe instrument cluster.
Putting your vehicle in gear:
1. Fully press down on the brake pedal.
2.Press and release the button of the gearyou want to select.
3.The button you select will illuminate andthe selected gear appears in theinstrument cluster.
4. Release the brake pedal and yourtransmission will remain in the selectedgear.
Note:If you attempt to leave your vehiclewhile it is in gear, your vehicle willautomatically shift into park (P). Safety beltand door monitors determine your intent andmake the shift for you. During this time, amessage appears in the instrument clusterprompting you to make the shift to park (P).
Understanding the Shift Positions ofyour Automatic Transmission
Note:Always come to a complete stopbefore putting your vehicle into and out ofpark (P).
194
Continental (CPL) Canada/United States of America, enUSA, Edition date: 201706, Second-Printing
TransmissionE222846
Page 198 of 615
Park (P)
With the transmission in park (P), your vehiclelocks the transmission and prevents thewheels from turning. Always come to acomplete stop before putting your vehicleinto and out of park (P). An audible chimesounds once you select park (P).
When the ignition is turned off, the vehiclewill automatically shift into park (P). If theignition is turned off while the vehicle ismoving, it will first shift into neutral (N) untila slow enough speed is reached. The vehiclewill then shift into park (P) automatically.
Automatic Return to Park
Note:This feature will not operate when yourvehicle is in Stay in Neutral mode or neutraltow.
Your vehicle has a safety feature that willautomatically shift your vehicle into park (P)when any of the following conditions occur:
•You turn the ignition off
•You open the driver's door with yoursafety belt unlatched
•Your safety belt is unlatched while thedriver's door is open
If you turn your vehicle off while moving, yourvehicle will first shift into neutral (N) until itslows down enough to shift into park (P)automatically.
Note:If you have waited an extended periodof time (2-15 minutes) before starting yourvehicle, unlatching your safety belt will causethis feature to activate, even with the driver'sdoor closed.
Note:This feature may not work properly ifthe door ajar switch is malfunctioning. If yourdoor ajar indicator does not illuminate whenyou open the driver’s door or the indicatorilluminates with the driver’s door closed, seeyour authorized dealer.
Reverse (R)
With the transmission in reverse (R), yourvehicle will move backward. Always cometo a complete stop before shifting into andout of reverse (R).
Neutral (N)
With the transmission in neutral (N), you canstart your vehicle and it is free to roll. Holdthe brake pedal down while in this position.
Stay in Neutral mode
Stay in Neutral mode allows your vehicle tostay in neutral (N) when you exit the vehicle.Your vehicle must be stationary to enter thismode.
To enter Stay in Neutral mode:
1. Press the neutral (N) button on yourshifter assembly.
2. A message will appear in yourinformation display screen prompting youto press the neutral (N) button again toenter Stay in Neutral mode.
3. Press the neutral (N) button again toenter Stay in Neutral mode.
195
Continental (CPL) Canada/United States of America, enUSA, Edition date: 201706, Second-Printing
Transmission