display LINCOLN CONTINENTAL 2020 Repair Manual
[x] Cancel search | Manufacturer: LINCOLN, Model Year: 2020, Model line: CONTINENTAL, Model: LINCOLN CONTINENTAL 2020Pages: 609, PDF Size: 6.24 MB
Page 148 of 609
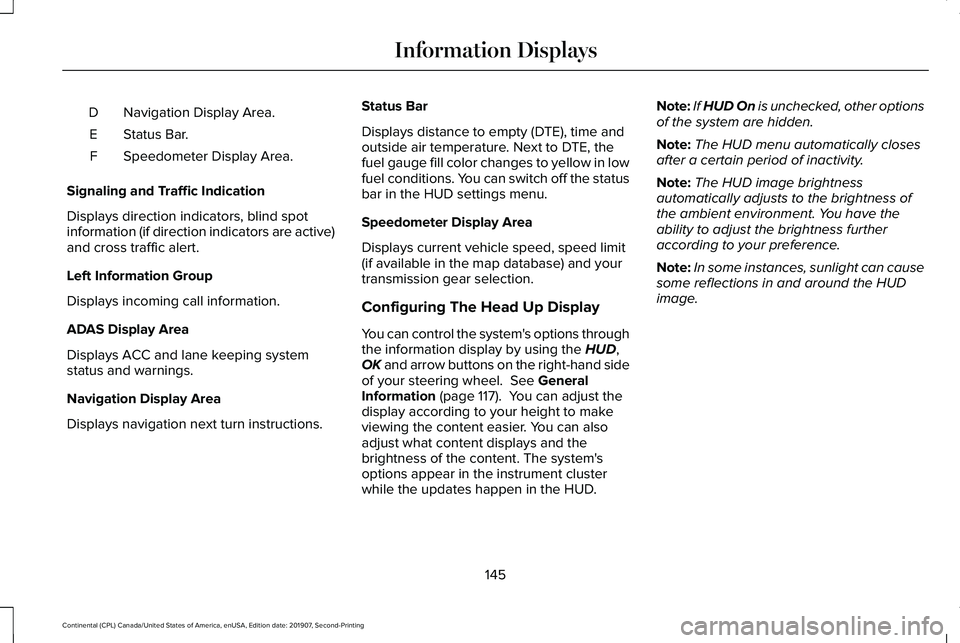
Navigation Display Area.
D
Status Bar.
E
Speedometer Display Area.
F
Signaling and Traffic Indication
Displays direction indicators, blind spot
information (if direction indicators are active)
and cross traffic alert.
Left Information Group
Displays incoming call information.
ADAS Display Area
Displays ACC and lane keeping system
status and warnings.
Navigation Display Area
Displays navigation next turn instructions. Status Bar
Displays distance to empty (DTE), time and
outside air temperature. Next to DTE, the
fuel gauge fill color changes to yellow in low
fuel conditions. You can switch off the status
bar in the HUD settings menu.
Speedometer Display Area
Displays current vehicle speed, speed limit
(if available in the map database) and your
transmission gear selection.
Configuring The Head Up Display
You can control the system's options through
the information display by using the HUD,
OK and arrow buttons on the right-hand side
of your steering wheel.
See General
Information (page 117). You can adjust the
display according to your height to make
viewing the content easier. You can also
adjust what content displays and the
brightness of the content. The system's
options appear in the instrument cluster
while the updates happen in the HUD. Note:
If HUD On is unchecked, other options
of the system are hidden.
Note: The HUD menu automatically closes
after a certain period of inactivity.
Note: The HUD image brightness
automatically adjusts to the brightness of
the ambient environment. You have the
ability to adjust the brightness further
according to your preference.
Note: In some instances, sunlight can cause
some reflections in and around the HUD
image.
145
Continental (CPL) Canada/United States of America, enUSA, Edition date: 201907, Second-Printing Information Displays
Page 149 of 609
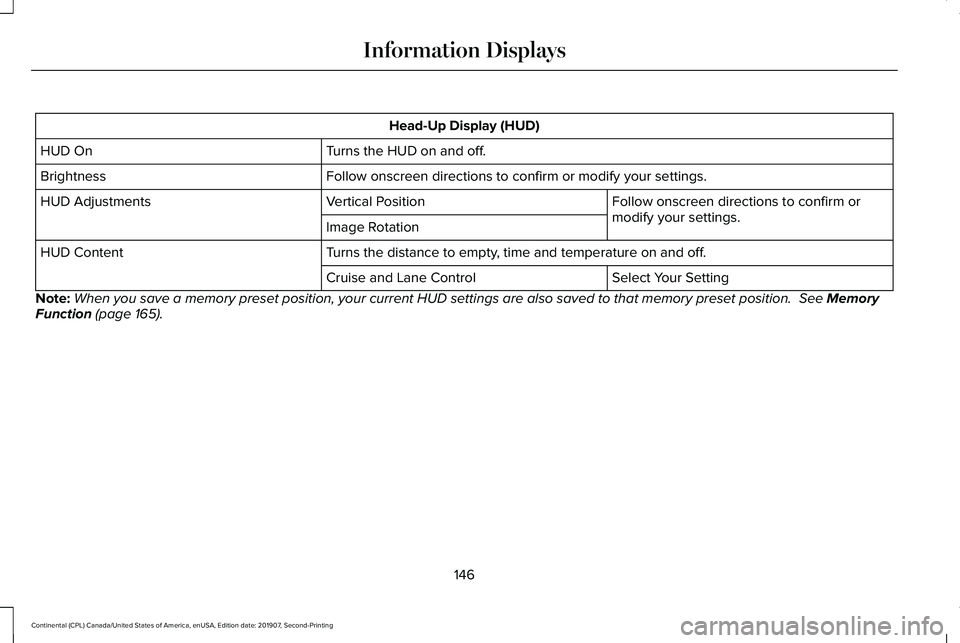
Head-Up Display (HUD)
Turns the HUD on and off.
HUD On
Follow onscreen directions to confirm or modify your settings.
Brightness
Follow onscreen directions to confirm or
modify your settings.
Vertical Position
HUD Adjustments
Image Rotation
Turns the distance to empty, time and temperature on and off.
HUD Content
Select Your Setting
Cruise and Lane Control
Note: When you save a memory preset position, your current HUD settings are al\
so saved to that memory preset position. See Memory
Function (page 165).
146
Continental (CPL) Canada/United States of America, enUSA, Edition date: 201907, Second-Printing Information Displays
Page 150 of 609
Maintaining Your Head Up Display
•
Do not place objects onto the transparent
cover, as they may block you from seeing
portions of the image. These objects
could also damage the cover and affect
the quality of the projected image.
• The system uses a special windshield
designed to provide the optimum image
quality. You must replace the windshield
in a vehicle with this system with a
certified original equipment
manufactured (OEM) head up display
windshield. Replacing this system's
windshield with a non-head up display
windshield causes a double image or
distorted image. Have an authorized
dealer or authorized repair facility replace
the windshield.
• Light conditions such as oncoming
headlamps, sunrise, sunset or reflections
off of wet road surfaces can affect the
driver's ability to see the HUD image.
• Clean the windshield often for optimal
HUD performance. See Cleaning the
Windows and Wiper Blades (page 344).
147
Continental (CPL) Canada/United States of America, enUSA, Edition date: 201907, Second-Printing Information Displays
Page 157 of 609
CABIN AIR FILTER
Your vehicle is equipped with a cabin air
filter, which gives you and your passengers
the following benefits:
•
It improves your driving comfort by
reducing particle and odor concentration.
• It improves the interior compartment
cleanliness.
• It protects the climate control
components from particle deposits.
You can locate the cabin air filter behind the
glove box.
Note: Make sure you have a cabin air filter
installed at all times. This prevents foreign
objects from entering the system. Running
the system without a filter in place could
result in degradation or damage to the
system.
Replace the filter at regular intervals. See
Scheduled Maintenance (page 510).
For additional cabin air filter information, or
to replace the filter, see a qualified
technician. REMOTE START
You can switch this feature on or off and
adjust the settings using the information
display controls.
See Information Displays
(page 117).
The climate control system adjusts the
interior temperature during remote start.
You cannot adjust the climate control setting
during remote start operation. Switch the
ignition on to make adjustments.
Based on your remote start settings, the
following vehicle-dependent features may
or may not remain on after remote starting
your vehicle:
• Climate controlled seats.
• Heated steering wheel.
• Heated mirrors.
• Heated rear window.
• Windshield wiper de-icer.
Note: For dual zone climate controlled seats,
the passenger seat setting defaults to match
the driver seat during remote start. Automatic Settings
If
Auto is on, the system sets the interior
temperature to 72°F (22°C) and heats or
cools the vehicle interior as required to
achieve comfort.
Note: In cold weather, the heated rear
window and heated mirrors turn on.
Last Settings
If
Last Settings is on, the system uses the
settings last selected before you turned off
the vehicle.
Heated and Cooled Features
In
Auto mode, certain heated features may
switch on during cold weather, and cooled
features during hot weather.
154
Continental (CPL) Canada/United States of America, enUSA, Edition date: 201907, Second-Printing Climate Control
Page 168 of 609
You can also adjust this feature through the
touchscreen.
Press the Menu Settings icon, then
Vehicle. Choose Multi-Contour
Seats.
When switched on, the system displays
directions for you to adjust the lumbar
settings in your seat or to set the massage
function.
To access and make adjustments to the
lumbar setting:
1. Choose the desired seat to adjust.
2. Press the + or - to adjust the lumbar intensity.
To access and make adjustments to the
massage setting:
1. Press the Menu Settings icon, then Vehicle. Choose Multi-Contour Seats.
2. Choose the desired seat to adjust.
3. Press OFF, Low or High. MEMORY FUNCTION WARNING: Before activating the
memory seat, make sure that the area
immediately surrounding the seat is clear
of obstructions and that all occupants are
clear of moving parts. WARNING:
Do not use the memory
function when your vehicle is moving.
This feature automatically recalls the position
of the following:
• Driver seat.
• Power mirrors.
• Power steering column.
The memory control is on the driver door. Saving a Preset Position
1. Switch the ignition on.
2. Adjust the memory features to your
desired position.
3. Press and hold the desired preset button
until you hear a single tone.
165
Continental (CPL) Canada/United States of America, enUSA, Edition date: 201907, Second-Printing SeatsE142607 E222235
Page 169 of 609
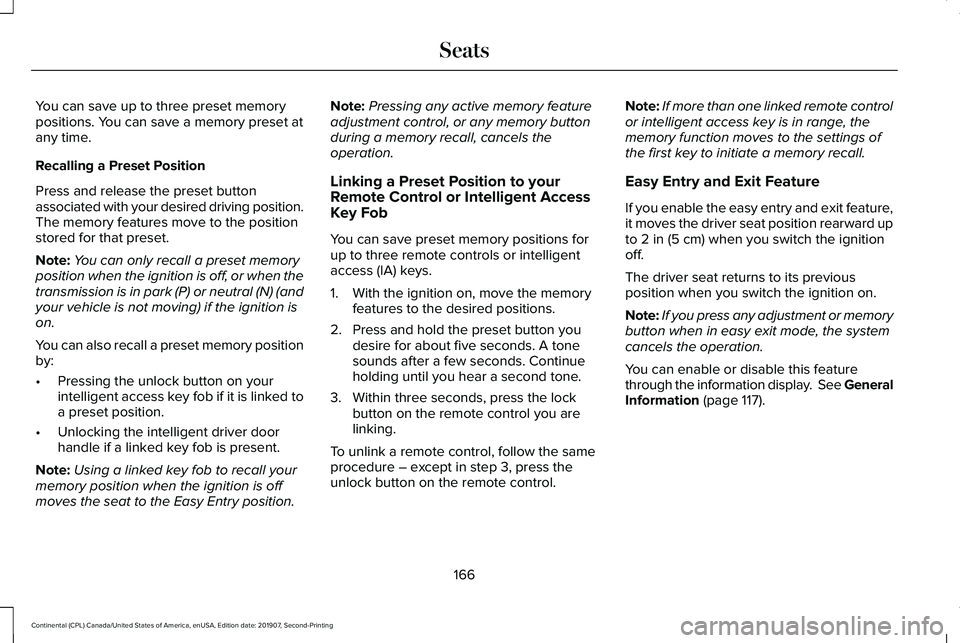
You can save up to three preset memory
positions. You can save a memory preset at
any time.
Recalling a Preset Position
Press and release the preset button
associated with your desired driving position.
The memory features move to the position
stored for that preset.
Note:
You can only recall a preset memory
position when the ignition is off, or when the
transmission is in park (P) or neutral (N) (and
your vehicle is not moving) if the ignition is
on.
You can also recall a preset memory position
by:
• Pressing the unlock button on your
intelligent access key fob if it is linked to
a preset position.
• Unlocking the intelligent driver door
handle if a linked key fob is present.
Note: Using a linked key fob to recall your
memory position when the ignition is off
moves the seat to the Easy Entry position. Note:
Pressing any active memory feature
adjustment control, or any memory button
during a memory recall, cancels the
operation.
Linking a Preset Position to your
Remote Control or Intelligent Access
Key Fob
You can save preset memory positions for
up to three remote controls or intelligent
access (IA) keys.
1. With the ignition on, move the memory features to the desired positions.
2. Press and hold the preset button you desire for about five seconds. A tone
sounds after a few seconds. Continue
holding until you hear a second tone.
3. Within three seconds, press the lock button on the remote control you are
linking.
To unlink a remote control, follow the same
procedure – except in step 3, press the
unlock button on the remote control. Note:
If more than one linked remote control
or intelligent access key is in range, the
memory function moves to the settings of
the first key to initiate a memory recall.
Easy Entry and Exit Feature
If you enable the easy entry and exit feature,
it moves the driver seat position rearward up
to 2 in (5 cm) when you switch the ignition
off.
The driver seat returns to its previous
position when you switch the ignition on.
Note: If you press any adjustment or memory
button when in easy exit mode, the system
cancels the operation.
You can enable or disable this feature
through the information display. See General
Information
(page 117).
166
Continental (CPL) Canada/United States of America, enUSA, Edition date: 201907, Second-Printing Seats
Page 173 of 609
Press the heated seat symbol to cycle
through the various heat settings and off.
More indicator lights indicate warmer
settings.
The heated seat module resets at every
ignition run cycle. While the ignition is on,
press the high or low heated seat switch to
enable heating mode. When activated, they
will turn off automatically when you turn the
engine off.
CLIMATE CONTROLLED SEATS (IF
EQUIPPED)
Heated Seats WARNING:
Use caution when using
the heated seat if you are unable to feel
pain to your skin because of advanced
age, chronic illness, diabetes, spinal cord
injury, medication, alcohol use, exhaustion
or other physical conditions. The heated
seat could cause burns even at low
temperatures, especially if used for long
periods of time. Failure to follow this
instruction could result in personal injury. WARNING:
Do not poke sharp
objects into the seat cushion or seat
backrest. This could damage the heated
seat element and cause it to overheat.
Failure to follow this instruction could result
in personal injury. WARNING:
Do not place anything on
the seat that blocks the heat, for example
a seat cover or a cushion. This could cause
the seat to overheat. Failure to follow this
instruction could result in personal injury.
Note: The heated seats switch on during a
remote start if they are enabled through the
information display.
See General
Information (page 117).
Note: The heated seats may also switch on
when you start your vehicle if they were on
when you previously switched your vehicle
off.
Note: Do not do the following:
• Place heavy objects on the seat.
• Operate the seat heater if water or any
other liquid spills on the seat. Allow the
seat to dry thoroughly.
170
Continental (CPL) Canada/United States of America, enUSA, Edition date: 201907, Second-Printing SeatsE146322
Page 174 of 609
Press this symbol to cycle through the
various heat settings and off. More indicator
lights indicate warmer settings.
The rear heated seat controls are on the rear
of the center console.
Ventilated Seats
Note:
The ventilated seats switch on during
a remote start if they are enabled through
the information display. See General
Information (page 117).
Note: The ventilated seats may also switch
on when you start your vehicle if they were
on when you previously switched your
vehicle off.
Note: Do not do the following: •
Place cargo or objects under the seats.
They may block the air intake causing
the air vents to not work properly.
• Spill liquid on the front seats. This may
cause the air vent holes to become
blocked and not work properly.
The ventilated seats only function when the
engine is running. Press this symbol to cycle through the
various ventilation settings and off. More
indicator lights indicate higher fan speeds.
The rear ventilated seat controls are on the
rear of the center console.
If the engine falls below 350 RPM while the
ventilated seats are on, the feature switches
itself off. You need to reactivate it.
Note:
To improve comfort, use the ventilated
seats along with the vehicle ’s air
conditioning system.
171
Continental (CPL) Canada/United States of America, enUSA, Edition date: 201907, Second-Printing SeatsE146322 E224689
Page 184 of 609
•
Without applying the brake pedal, press
and release the button once when the
ignition is in the on mode, or when your
vehicle is running but is not moving.
On: All electrical circuits are operational and
the warning lamps and indicators illuminate.
• Without applying the brake pedal, press
and release the button once.
Start:
Starts your vehicle. The engine may
not start when your vehicle starts.
• Press the brake pedal, and then press
the button for any length of time. An
indicator light on the button illuminates
when the ignition is on and when your
vehicle starts.
STARTING A GASOLINE ENGINE
When you start the engine, the idle speed
increases. This helps to warm up the engine.
If the engine idle speed does not slow down
by itself, have your vehicle checked as soon
as possible. Note:
You can crank the engine for a total
of 60 seconds without the engine starting
before the starting system temporarily
disables. The 60 seconds does not have to
be all at once. For example, if you crank the
engine three times for 20 seconds each time,
without the engine starting, you reached the
60-second time limit. A message appears in
the information display alerting you that you
exceeded the cranking time. You cannot
attempt to start the engine for at least 15
minutes. After 15 minutes, you are limited to
a 15-second engine cranking time. You need
to wait 60 minutes before you can crank the
engine for 60 seconds again.
Before starting your vehicle, check the
following:
• Make sure all occupants have fastened
their seatbelts.
• Make sure the headlamps and electrical
accessories are off.
• Make sure the parking brake is on.
• Make sure the transmission is in park (P).
Starting Your Vehicle
Note: Do not touch the accelerator pedal. 1. Press the brake pedal.
2. Press the push button ignition switch.
Failure to Start
The system does not function if:
•
The passive key frequencies are jammed.
• The key battery has no charge.
If you are unable to start your vehicle, do the
following:
1. Remove the key blade from the transmitter.
181
Continental (CPL) Canada/United States of America, enUSA, Edition date: 201907, Second-Printing Starting and Stopping the Engine
Page 185 of 609
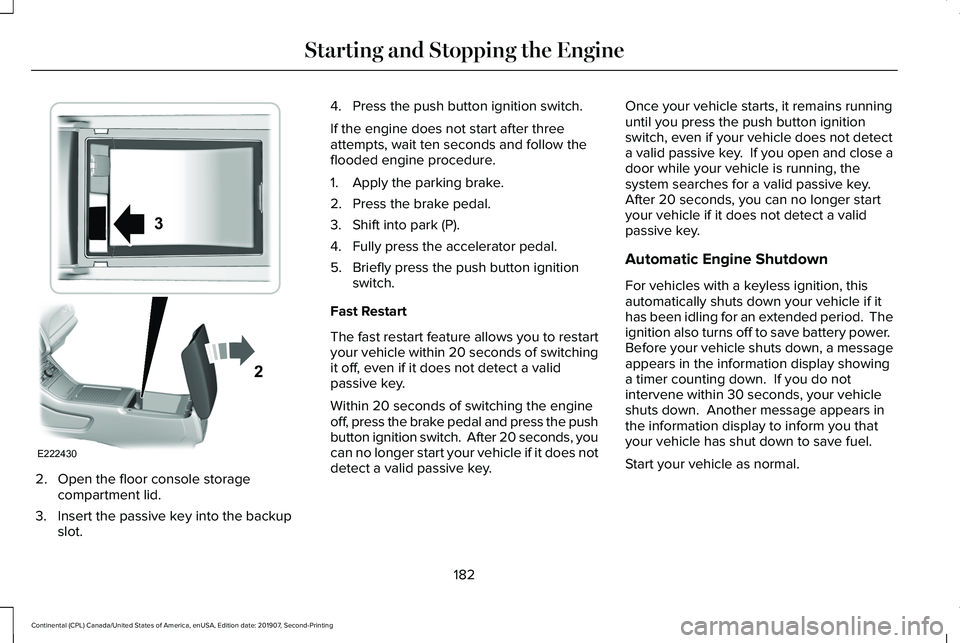
2. Open the floor console storage
compartment lid.
3. Insert the passive key into the backup slot. 4. Press the push button ignition switch.
If the engine does not start after three
attempts, wait ten seconds and follow the
flooded engine procedure.
1. Apply the parking brake.
2. Press the brake pedal.
3. Shift into park (P).
4. Fully press the accelerator pedal.
5. Briefly press the push button ignition
switch.
Fast Restart
The fast restart feature allows you to restart
your vehicle within 20 seconds of switching
it off, even if it does not detect a valid
passive key.
Within 20 seconds of switching the engine
off, press the brake pedal and press the push
button ignition switch. After 20 seconds, you
can no longer start your vehicle if it does not
detect a valid passive key. Once your vehicle starts, it remains running
until you press the push button ignition
switch, even if your vehicle does not detect
a valid passive key. If you open and close a
door while your vehicle is running, the
system searches for a valid passive key.
After 20 seconds, you can no longer start
your vehicle if it does not detect a valid
passive key.
Automatic Engine Shutdown
For vehicles with a keyless ignition, this
automatically shuts down your vehicle if it
has been idling for an extended period. The
ignition also turns off to save battery power.
Before your vehicle shuts down, a message
appears in the information display showing
a timer counting down. If you do not
intervene within 30 seconds, your vehicle
shuts down. Another message appears in
the information display to inform you that
your vehicle has shut down to save fuel.
Start your vehicle as normal.
182
Continental (CPL) Canada/United States of America, enUSA, Edition date: 201907, Second-Printing Starting and Stopping the EngineE222430
2
3