automatic transmission LINCOLN CONTINENTAL 2020 Owners Manual
[x] Cancel search | Manufacturer: LINCOLN, Model Year: 2020, Model line: CONTINENTAL, Model: LINCOLN CONTINENTAL 2020Pages: 609, PDF Size: 6.24 MB
Page 6 of 609
Audible Warnings and Indicators
..............116
Information Displays
General Information ......................................
117
Information Messages ................................
125
Head Up Display ..........................................
144
Climate Control
Automatic Climate Control ........................
148
Hints on Controlling the Interior Climate .......................................................................
150
Rear Passenger Climate Controls .............
151
Heated Windshield ......................................
153
Heated Rear Window ..................................
153
Heated Exterior Mirrors ..............................
153
Cabin Air Filter ..............................................
154
Remote Start ..................................................
154
Seats
Sitting in the Correct Position ...................
155
Head Restraints ............................................
156
Power Seats ..................................................
159
Memory Function .........................................
165Rear Seats
......................................................
167
Heated Seats ................................................
168
Climate Controlled Seats ...........................
170
Garage Door Opener
Universal Garage Door Opener ...............
172
Auxiliary Power Points
Auxiliary Power Points ................................
176
Storage Compartments
Center Console .............................................
178
Overhead Console .......................................
178
Rear Seat Armrest ........................................
178
Starting and Stopping the Engine
General Information ....................................
180
Keyless Starting ............................................
180
Starting a Gasoline Engine .........................
181
Engine Block Heater ...................................
184Fuel and Refueling
Safety Precautions
.......................................
186
Fuel Quality ....................................................
187
Fuel Filler Funnel Location .........................
187
Running Out of Fuel ....................................
188
Refueling ........................................................
189
Fuel Consumption .......................................
192
Engine Emission Control
Emission Law .................................................
193
Catalytic Converter ......................................
194
Transmission
Automatic Transmission ..............................
197
All-Wheel Drive
Using All-Wheel Drive ................................
203
Brakes
General Information ....................................
212
Hints on Driving With Anti-Lock Brakes .......................................................................
213
Electric Parking Brake .................................
213
3
Continental (CPL) Canada/United States of America, enUSA, Edition date: 201907, Second-Printing Table of Contents
Page 8 of 609
Fuses
Fuse Specification Chart
...........................300
Changing a Fuse ..........................................
315
Maintenance
General Information .....................................
318
Opening and Closing the Hood ...............
318
Under Hood Overview - 2.7L/3.0L ..........
320
Under Hood Overview - 3.7L ...................
322
Engine Oil Dipstick - 2.7L/3.0L .................
324
Engine Oil Dipstick - 3.7L ..........................
324
Engine Oil Check .........................................
324
Oil Change Indicator Reset ......................
325
Changing the Engine Air Filter - 3.7L ......
326
Changing the Engine Air Filter - 2.7L/3.0L ......................................................................
327
Engine Coolant Check ...............................
328
Automatic Transmission Fluid Check ......
333
Brake Fluid Check .......................................
333
Power Steering Fluid Check .....................
334
Changing the 12V Battery .........................
334
Adjusting the Headlamps ..........................
337
Washer Fluid Check ....................................
338Fuel Filter - 2.7L/3.7L
..................................
339
Fuel Filter - 3.0L ...........................................
339
Checking the Wiper Blades ......................
339
Changing the Wiper Blades .....................
339
Changing a Bulb ..........................................
340
Vehicle Care
General Information .....................................
341
Cleaning Products ........................................
341
Cleaning the Exterior .................................
342
Waxing ............................................................
343
Cleaning the Engine ...................................
344
Cleaning the Windows and Wiper Blades ......................................................................
344
Cleaning the Interior ...................................
345
Cleaning the Instrument Panel and Instrument Cluster Lens ........................
347
Cleaning Leather Seats ..............................
347
Repairing Minor Paint Damage ................
348
Cleaning the Wheels ..................................
348
Vehicle Storage ...........................................
349
Body Styling Kits ...........................................
351Wheels and Tires
General Information
....................................
352
Tire Care ........................................................
352
Using Summer Tires ...................................
366
Using Snow Chains ....................................
366
Tire Pressure Monitoring System ............
367
Changing a Road Wheel ............................
372
Technical Specifications ............................
379
Capacities and Specifications
Engine Specifications - 2.7L ......................
381
Engine Specifications - 3.0L .....................
382
Engine Specifications - 3.7L ......................
384
Motorcraft Parts - 2.7L ................................
385
Motorcraft Parts - 3.0L ...............................
386
Motorcraft Parts - 3.7L ................................
387
Vehicle Identification Number .................
389
Vehicle Certification Label ........................
389
Transmission Code Designation .............
390
Capacities and Specifications - 2.7L .......
391
Capacities and Specifications - 3.0L ......
402
Capacities and Specifications - 3.7L ........
413
Bulb Specification Chart ............................
424
5
Continental (CPL) Canada/United States of America, enUSA, Edition date: 201907, Second-Printing Table of Contents
Page 68 of 609
•
The transmission is not in park (P).
• The battery voltage is below the
minimum operating voltage.
Remote Control Feedback
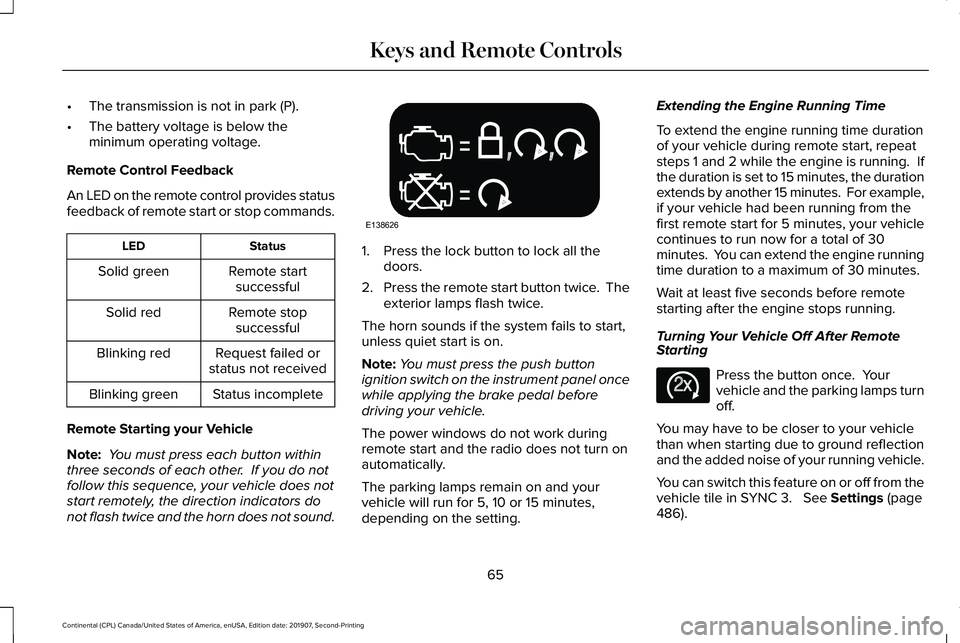
An LED on the remote control provides status
feedback of remote start or stop commands. Status
LED
Remote startsuccessful
Solid green
Remote stopsuccessful
Solid red
Request failed or
status not received
Blinking red
Status incomplete
Blinking green
Remote Starting your Vehicle
Note: You must press each button within
three seconds of each other. If you do not
follow this sequence, your vehicle does not
start remotely, the direction indicators do
not flash twice and the horn does not sound. 1. Press the lock button to lock all the
doors.
2. Press the remote start button twice. The
exterior lamps flash twice.
The horn sounds if the system fails to start,
unless quiet start is on.
Note: You must press the push button
ignition switch on the instrument panel once
while applying the brake pedal before
driving your vehicle.
The power windows do not work during
remote start and the radio does not turn on
automatically.
The parking lamps remain on and your
vehicle will run for 5, 10 or 15 minutes,
depending on the setting. Extending the Engine Running Time
To extend the engine running time duration
of your vehicle during remote start, repeat
steps 1 and 2 while the engine is running. If
the duration is set to 15 minutes, the duration
extends by another 15 minutes. For example,
if your vehicle had been running from the
first remote start for 5 minutes, your vehicle
continues to run now for a total of 30
minutes. You can extend the engine running
time duration to a maximum of 30 minutes.
Wait at least five seconds before remote
starting after the engine stops running.
Turning Your Vehicle Off After Remote
Starting
Press the button once. Your
vehicle and the parking lamps turn
off.
You may have to be closer to your vehicle
than when starting due to ground reflection
and the added noise of your running vehicle.
You can switch this feature on or off from the
vehicle tile in SYNC 3. See Settings (page
486).
65
Continental (CPL) Canada/United States of America, enUSA, Edition date: 201907, Second-Printing Keys and Remote ControlsE138626 E138625
Page 102 of 609
Note:
If you switch the autolamps and the
autowipers on, the headlamps turn on when
the windshield wipers continuously operate.
INSTRUMENT LIGHTING DIMMER
The instrument lighting dimmer buttons are
on the lighting control. Repeatedly press one of the
buttons to adjust the brightness.
HEADLAMP EXIT DELAY
After you switch the ignition off, you can
switch the headlamps on by pulling the
direction indicator lever toward you. You will
hear a short tone. The headlamps will switch
off automatically after three minutes with any
door open or 30 seconds after the last door
has been closed. You can cancel this feature
by pulling the direction indicator toward you
again or switching the ignition on. DAYTIME RUNNING LAMPS -
VEHICLES WITH: CONFIGURABLE
DAYTIME RUNNING LAMPS WARNING: The daytime running
lamps system does not activate the rear
lamps and may not provide adequate
lighting during low visibility driving
conditions. Make sure you switch the
headlamps on, as appropriate, during all
low visibility conditions. Failure to do so
may result in a crash.
Switch the daytime running lamps on or off
using the information display.
See General
Information (page 117).
The daytime running lamps turn on when:
1. The lamps are on in the information display.
2. You switch the ignition on.
3. The transmission is not in park (P) for vehicles with automatic transmissions or
you release the parking brake for
vehicles with manual transmissions. 4. The lighting control is in the autolamps
position.
5. The headlamps are off.
The other lighting control switch positions
do not turn on the daytime running lamps.
If the daytime running lamps are off in the
information display, the lamps stay off in all
switch positions.
DAYTIME RUNNING LAMPS -
VEHICLES WITH: DAYTIME
RUNNING LAMPS (DRL) WARNING: The daytime running
lamps system does not activate the rear
lamps and may not provide adequate
lighting during low visibility driving
conditions. Make sure you switch the
headlamps on, as appropriate, during all
low visibility conditions. Failure to do so
may result in a crash.
The system turns the lamps on in daylight
conditions.
99
Continental (CPL) Canada/United States of America, enUSA, Edition date: 201907, Second-Printing LightingE291299 E291298
Page 110 of 609
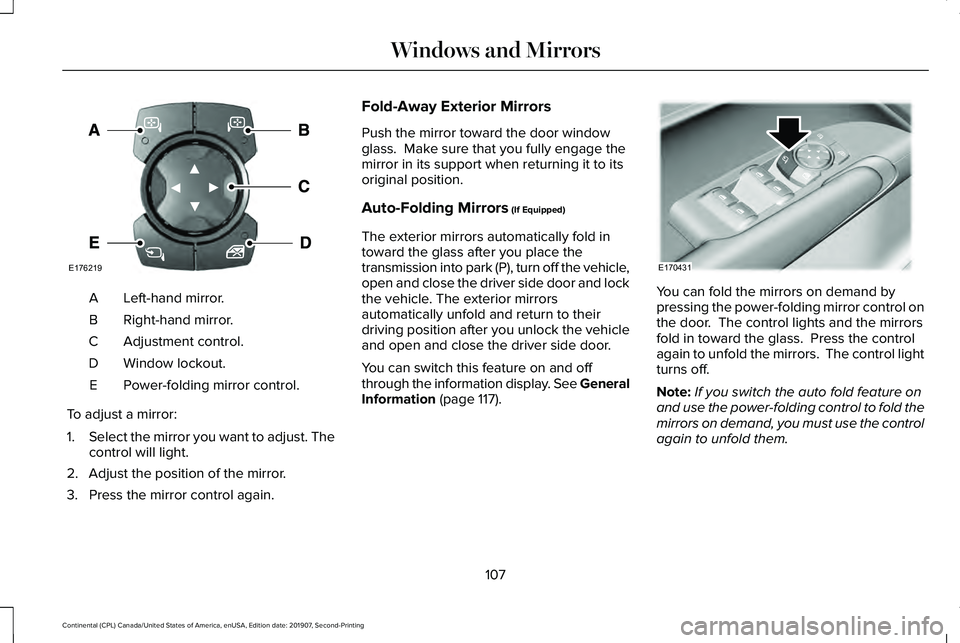
Left-hand mirror.
A
Right-hand mirror.
B
Adjustment control.
C
Window lockout.
D
Power-folding mirror control.
E
To adjust a mirror:
1. Select the mirror you want to adjust. The
control will light.
2. Adjust the position of the mirror.
3. Press the mirror control again. Fold-Away Exterior Mirrors
Push the mirror toward the door window
glass. Make sure that you fully engage the
mirror in its support when returning it to its
original position.
Auto-Folding Mirrors (If Equipped)
The exterior mirrors automatically fold in
toward the glass after you place the
transmission into park (P), turn off the vehicle,
open and close the driver side door and lock
the vehicle. The exterior mirrors
automatically unfold and return to their
driving position after you unlock the vehicle
and open and close the driver side door.
You can switch this feature on and off
through the information display. See General
Information
(page 117). You can fold the mirrors on demand by
pressing the power-folding mirror control on
the door. The control lights and the mirrors
fold in toward the glass. Press the control
again to unfold the mirrors. The control light
turns off.
Note:
If you switch the auto fold feature on
and use the power-folding control to fold the
mirrors on demand, you must use the control
again to unfold them.
107
Continental (CPL) Canada/United States of America, enUSA, Edition date: 201907, Second-Printing Windows and MirrorsE176219 E170431
Page 112 of 609
The mirror will dim automatically to reduce
glare when bright lights are detected from
behind your vehicle. It will automatically
return to normal reflection when you select
reverse gear to make sure you have a clear
view when backing up.
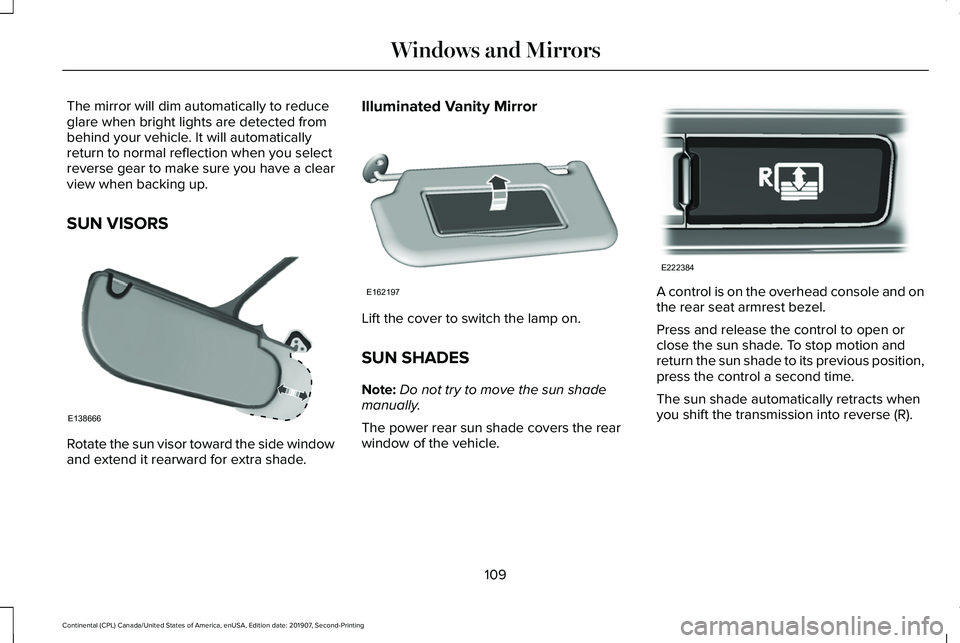
SUN VISORS
Rotate the sun visor toward the side window
and extend it rearward for extra shade. Illuminated Vanity Mirror
Lift the cover to switch the lamp on.
SUN SHADES
Note:
Do not try to move the sun shade
manually.
The power rear sun shade covers the rear
window of the vehicle. A control is on the overhead console and on
the rear seat armrest bezel.
Press and release the control to open or
close the sun shade. To stop motion and
return the sun shade to its previous position,
press the control a second time.
The sun shade automatically retracts when
you shift the transmission into reverse (R).
109
Continental (CPL) Canada/United States of America, enUSA, Edition date: 201907, Second-Printing Windows and MirrorsE138666 E162197 E222384
Page 147 of 609
Action
Message
Displays when the brake pedal needs to be depressed to enable the transmission to shift from park.
Depress Brake to Shift from Park
Displays when neutral hold is active. See Automatic Transmission (page 197).
Stay in Neutral Mode Engaged
Displays when the neutral button N needs to be pressed again to enter ne\
utral hold. See Auto-matic Transmission
(page 197).
To Stay in Neutral When Exiting Vehicle
Select N Again
HEAD UP DISPLAY
(IF EQUIPPED)
Head Up Display (HUD)
This is a visual system that shows information
in your field of view as you drive. The
information comes from various vehicle
systems and includes vehicle speed, speed
limit, navigation, and advanced driver
assistance systems (ADAS), such as adaptive
cruise control (ACC) and the lane keeping
system. This system projects the information
off the windshield, and focuses the image near the end of the hood approximately
7 ft
(2 m) in front of the driver. Viewing this
information does not require you to
significantly move your head, allowing you
to keep your eyes on the road while having
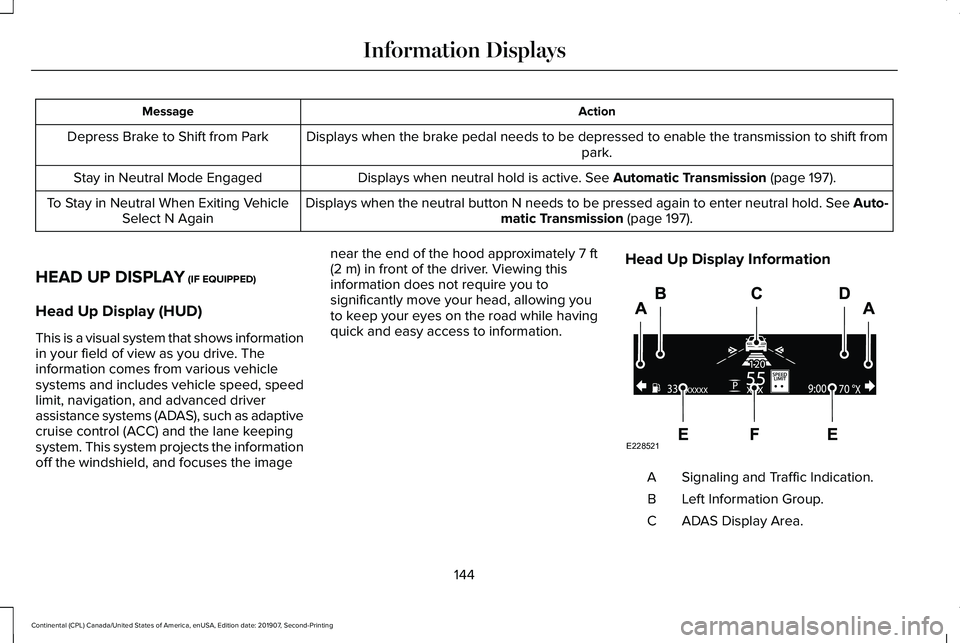
quick and easy access to information. Head Up Display Information Signaling and Traffic Indication.
A
Left Information Group.
B
ADAS Display Area.
C
144
Continental (CPL) Canada/United States of America, enUSA, Edition date: 201907, Second-Printing Information DisplaysE228521
Page 148 of 609
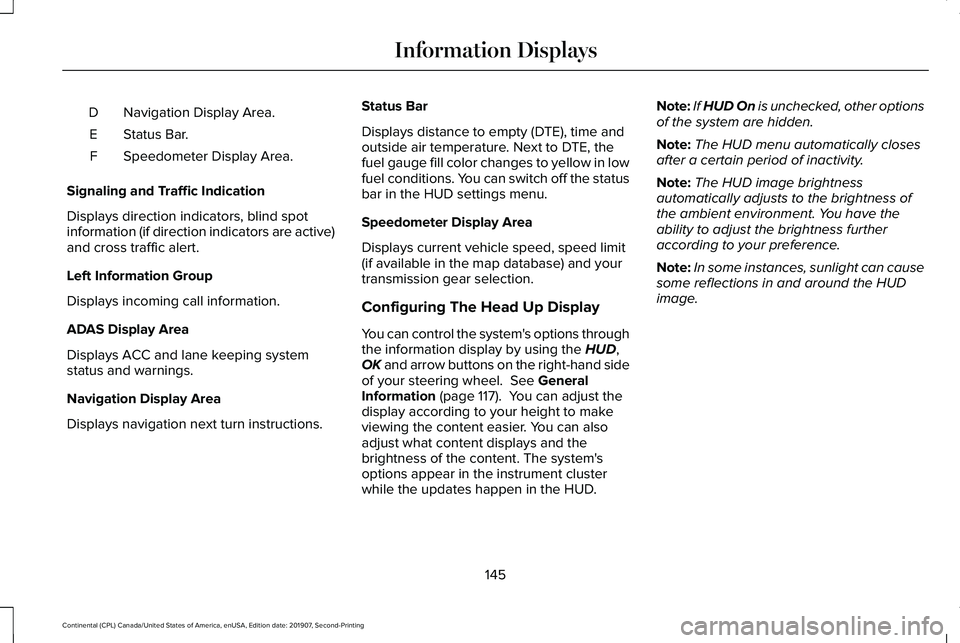
Navigation Display Area.
D
Status Bar.
E
Speedometer Display Area.
F
Signaling and Traffic Indication
Displays direction indicators, blind spot
information (if direction indicators are active)
and cross traffic alert.
Left Information Group
Displays incoming call information.
ADAS Display Area
Displays ACC and lane keeping system
status and warnings.
Navigation Display Area
Displays navigation next turn instructions. Status Bar
Displays distance to empty (DTE), time and
outside air temperature. Next to DTE, the
fuel gauge fill color changes to yellow in low
fuel conditions. You can switch off the status
bar in the HUD settings menu.
Speedometer Display Area
Displays current vehicle speed, speed limit
(if available in the map database) and your
transmission gear selection.
Configuring The Head Up Display
You can control the system's options through
the information display by using the HUD,
OK and arrow buttons on the right-hand side
of your steering wheel.
See General
Information (page 117). You can adjust the
display according to your height to make
viewing the content easier. You can also
adjust what content displays and the
brightness of the content. The system's
options appear in the instrument cluster
while the updates happen in the HUD. Note:
If HUD On is unchecked, other options
of the system are hidden.
Note: The HUD menu automatically closes
after a certain period of inactivity.
Note: The HUD image brightness
automatically adjusts to the brightness of
the ambient environment. You have the
ability to adjust the brightness further
according to your preference.
Note: In some instances, sunlight can cause
some reflections in and around the HUD
image.
145
Continental (CPL) Canada/United States of America, enUSA, Edition date: 201907, Second-Printing Information Displays
Page 200 of 609
AUTOMATIC TRANSMISSION
WARNING: Always fully apply the
parking brake and make sure you shift into
park (P). Failure to follow this instruction
could result in personal injury or death. WARNING:
Do not apply the brake
pedal and accelerator pedal
simultaneously. Applying both pedals
simultaneously for more than a few
seconds will limit engine performance,
which may result in difficulty maintaining
speed in traffic and could lead to serious
injury.
Note: You may not be able to shift out of
park (P) unless the intelligent access key is
inside your vehicle.
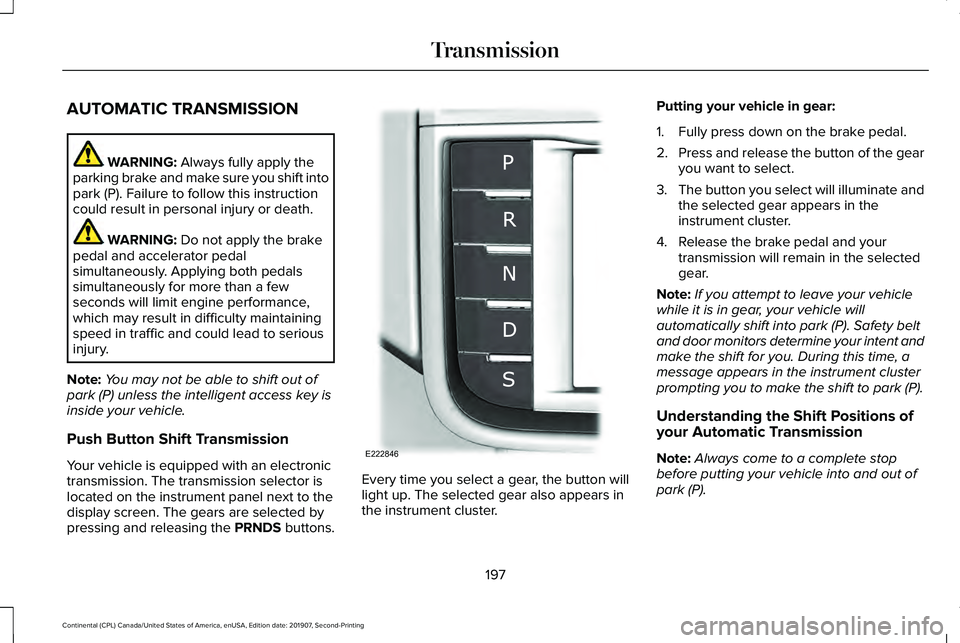
Push Button Shift Transmission
Your vehicle is equipped with an electronic
transmission. The transmission selector is
located on the instrument panel next to the
display screen. The gears are selected by
pressing and releasing the PRNDS buttons. Every time you select a gear, the button will
light up. The selected gear also appears in
the instrument cluster.Putting your vehicle in gear:
1. Fully press down on the brake pedal.
2.
Press and release the button of the gear
you want to select.
3. The button you select will illuminate and
the selected gear appears in the
instrument cluster.
4. Release the brake pedal and your transmission will remain in the selected
gear.
Note: If you attempt to leave your vehicle
while it is in gear, your vehicle will
automatically shift into park (P). Safety belt
and door monitors determine your intent and
make the shift for you. During this time, a
message appears in the instrument cluster
prompting you to make the shift to park (P).
Understanding the Shift Positions of
your Automatic Transmission
Note: Always come to a complete stop
before putting your vehicle into and out of
park (P).
197
Continental (CPL) Canada/United States of America, enUSA, Edition date: 201907, Second-Printing TransmissionE222846
Page 201 of 609
Park (P)
With the transmission in park (P), your vehicle
locks the transmission and prevents the
wheels from turning. Always come to a
complete stop before putting your vehicle
into and out of park (P). An audible chime
sounds once you select park (P).
When the ignition is turned off, the vehicle
will automatically shift into park (P). If the
ignition is turned off while the vehicle is
moving, it will first shift into neutral (N) until
a slow enough speed is reached. The vehicle
will then shift into park (P) automatically.
Automatic Return to Park
Note:
This feature will not operate when your
vehicle is in Stay in Neutral mode or neutral
tow.
Your vehicle has a safety feature that will
automatically shift your vehicle into park (P)
when any of the following conditions occur: •
You turn the ignition off
• You open the driver's door with your
safety belt unlatched
• Your safety belt is unlatched while the
driver's door is open
If you turn your vehicle off while moving, your
vehicle will first shift into neutral (N) until it
slows down enough to shift into park (P)
automatically.
Note: If you have waited an extended period
of time (2-15 minutes) before starting your
vehicle, unlatching your safety belt will cause
this feature to activate, even with the driver's
door closed.
Note: This feature may not work properly if
the door ajar switch is malfunctioning. If your
door ajar indicator does not illuminate when
you open the driver’ s door or the indicator
illuminates with the driver’ s door closed, see
your authorized dealer. Reverse (R)
With the transmission in reverse (R), your
vehicle will move backward. Always come
to a complete stop before shifting into and
out of reverse (R).
Neutral (N)
With the transmission in neutral (N), you can
start your vehicle and it is free to roll. Hold
the brake pedal down while in this position.
Stay in Neutral mode
Stay in Neutral mode allows your vehicle to
stay in neutral (N) when you exit the vehicle.
Your vehicle must be stationary to enter this
mode.
To enter Stay in Neutral mode:
1. Press the neutral (N) button on your
shifter assembly.
2. A message will appear in your information display screen prompting you
to press the neutral (N) button again to
enter Stay in Neutral mode.
3. Press the neutral (N) button again to enter Stay in Neutral mode.
198
Continental (CPL) Canada/United States of America, enUSA, Edition date: 201907, Second-Printing Transmission