instrument panel LINCOLN CORSAIR 2023 User Guide
[x] Cancel search | Manufacturer: LINCOLN, Model Year: 2023, Model line: CORSAIR, Model: LINCOLN CORSAIR 2023Pages: 690, PDF Size: 15.04 MB
Page 176 of 690
SWITCHING DUAL MODE ON AND OFF
Press the button to activate theselection screen.
Press the button.
Note:When dual mode is off, setting thetemperature using the driver side controls,sets the temperature for both sides.
Note:Setting the temperature using thepassenger side controls, sets the passengertemperature and switches dual mode on.
CLIMATE CONTROL HINTS
General Hints
•Prolonged use of recirculated air maycause the windows to fog up.
•You may feel a small amount of air fromthe footwell air vents regardless of theair distribution setting.
•To reduce humidity build-up inside yourvehicle, do not drive with the systemswitched off or with recirculated airalways switched on.
•Do not place objects under the frontseats as this may interfere with theairflow to the rear seats.
•Remove any snow, ice or leaves from theair intake area at the base of thewindshield.
•To improve the time to reach acomfortable temperature in hot weather,drive with the windows open until youfeel cold air through the air vents.
Automatic Climate Control
•Adjusting the settings when your vehicleinterior is extremely hot or cold is notnecessary. Automatic mode is bestrecommended to maintain settemperature.
•The system adjusts to heat or cool theinterior to the temperature you select asquickly as possible.
•For the system to function efficiently, theinstrument panel and side air ventsshould be fully open.
•If you press AUTO during cold outsidetemperatures, the system directs air flowto the windshield and side window airvents.In addition, the blower motor mayrun at a slower speed until the enginewarms up.
•If you press AUTO during hottemperatures and the inside of thevehicle is hot, the system usesrecirculated air to maximize interiorcooling. Blower motor speed may alsoreduce until the air cools.
Quickly Heating the Interior
1.Press AUTO.
2.Adjust the temperature function to thesetting you prefer.
Recommended Settings for Heating
1.Press AUTO.
172
2023 Corsair (CTF) Canada/United States of America, enUSA, Edition date: 202208, DOMClimate ControlE265283 E265280
Page 203 of 690
LOCATING THE USB PORTS
Data Transfer USB Ports
The USB ports could be in the followinglocations:
•On the lower instrument panel.
•Inside the center console.
Note: These USB ports can also chargedevices.
Note: Not all USB ports in your vehicle havedata transfer capabilities.
Note: We recommend using only USB-IFcertified cables and adapters. Non-certifiedcables and adapters may not work.
Charge Only USB Ports
The USB ports could be in the followinglocations:
•On the lower instrument panel.
•On the upper instrument panel.
•Inside the media bin.
•Inside the center console.
•On the rear of the center console.
•In the cargo area.
PLAYING MEDIA USING THE USB
PORT
WARNING: Driving while distractedcan result in loss of vehicle control, crashand injury. We strongly recommend thatyou use extreme caution when using anydevice that may take your focus off theroad. Your primary responsibility is the safeoperation of your vehicle. We recommendagainst the use of any hand-held devicewhile driving and encourage the use ofvoice-operated systems when possible.Make sure you are aware of all applicablelocal laws that may affect the use ofelectronic devices while driving.
Connect your device to a data transfer USBport.
Press the audio button on thefeature bar.
Select Sources.
Select the USB option.
Press to play a track. Press againto pause the track.
Press to skip to the next track.
Press and hold to fast forwardthrough the track.
Press once to return to thebeginning of a track. Repeatedlypress to return to previous tracks.
Press and hold to fast rewind.
CHARGING A DEVICE
Connect your device to the USB port.
199
2023 Corsair (CTF) Canada/United States of America, enUSA, Edition date: 202208, DOMUSB PortsE250655 E263583 E100027
Page 205 of 690
WHAT IS THE POWER OUTLET
The power outlet can power devices usinga 12 V outlet adapter.
POWER OUTLET PRECAUTIONS
WARNING: Do not plug optionalelectrical accessories into the cigar lightersocket. Incorrect use of the cigar lightercan cause damage not covered by thevehicle warranty, and can result in fire orserious injury.
When you switch the vehicle on, you can usethe socket to power 12 V appliances with amaximum current rating of 20 A. Do not usethe power point over the vehicle capacity of12 V DC 240 W or a fuse could blow. Do notplug in any device that supplies power to thevehicle through the power points. This couldresult in damage to vehicle systems. Do nothang any accessory from the accessory plug.Always keep the power point caps closedwhen not in use. Do not insert objects otherthan an accessory plug into the power point.
To prevent the battery from running out ofcharge:
•Do not use the power point longer thannecessary when the vehicle is off.
•Do not leave devices plugged inovernight or when you park your vehiclefor extended periods.
LOCATING THE POWER OUTLETS
Power outlets may be in the followinglocations:
•On the lower instrument panel.
•Inside the center console.
•On the front of the center console.
•On the rear of the center console.
•In the cargo area.
•On the passenger side floor panel.
•3rd row on the quarter trim panels.
201
2023 Corsair (CTF) Canada/United States of America, enUSA, Edition date: 202208, DOMPower Outlet
Page 206 of 690
WHAT IS THE WIRELESS
ACCESSORY CHARGER
The wireless accessory charger allows youto charge one compatible Qi wirelesscharging device on the charging area.
WIRELESS ACCESSORY CHARGER
PRECAUTIONS
WARNING: Wireless chargingdevices can affect the operation ofimplanted medical devices, includingcardiac pacemakers. If you have anyimplanted medical devices, we recommendthat you consult with your physician.
Keep the charging area clean and removeforeign objects prior to charging a device.
Do not place items with a magnetic strip orradio-frequency identification chip, forexample passports, parking tickets,transportation passes or credit cards, nearthe charging area when charging a device.Damage could occur to the magnetic stripor radio-frequency identification chip.
Do not place metal objects, for exampleremote controls, coins and candy wrappers,on or near the charging area when charginga device. Metal objects may heat up anddegrade the charging performance, inaddition to causing interruptions in charging.
Charging could be interrupted, degraded, orcould stop if any of the following occur:
•The system detects a foreign object.
•The device is misaligned on the chargingarea.
•The device moves on the active chargingarea when the vehicle is in motion.
•The vehicle ambient temperature is toohigh.
•You attempt to charge a non-Qicompatible device on the wirelesscharger.
Note:During charging, the device and thecharger could heat up, this is normal. If thebattery gets hotter than usual, the devicemay stop charging.
LOCATING THE WIRELESS
ACCESSORY CHARGER
The charging area is on the centerconsole or in the media bin belowthe instrument panel.
CHARGING A WIRELESS DEVICE
Place the device on the center of thecharging surface with the charging sidedown. The charging stops after your devicereaches a full charge.
You can use the charger when the vehicleis in accessory mode, when the vehicle isrunning, or when SYNC is on.
Displays on the status bar whenwireless charging is in progress.
202
2023 Corsair (CTF) Canada/United States of America, enUSA, Edition date: 202208, DOMWireless Accessory Charger (If Equipped)E297549 E263583
Page 233 of 690
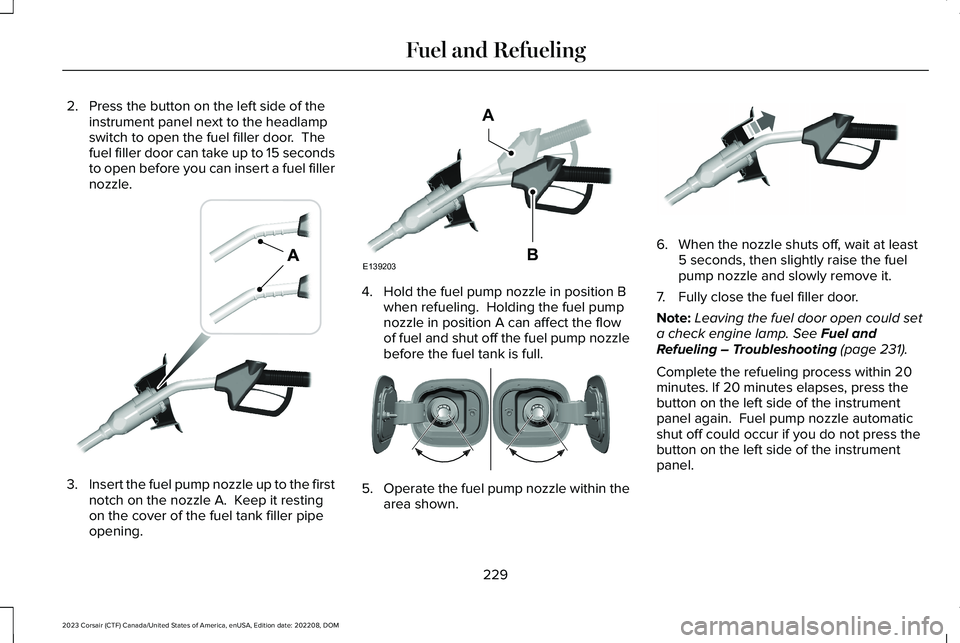
2.Press the button on the left side of theinstrument panel next to the headlampswitch to open the fuel filler door. Thefuel filler door can take up to 15 secondsto open before you can insert a fuel fillernozzle.
3.Insert the fuel pump nozzle up to the firstnotch on the nozzle A. Keep it restingon the cover of the fuel tank filler pipeopening.
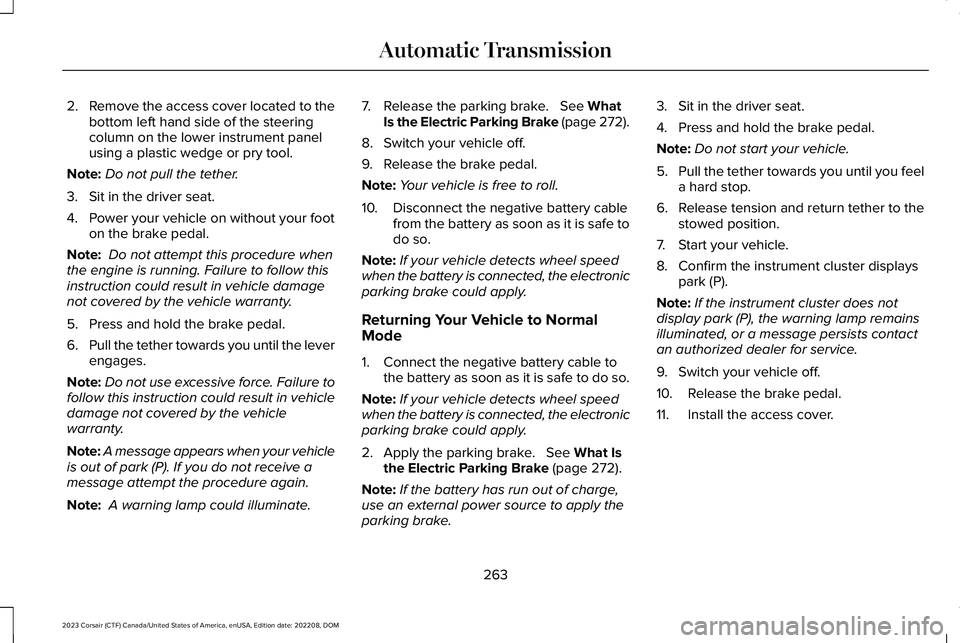
4.Hold the fuel pump nozzle in position Bwhen refueling. Holding the fuel pumpnozzle in position A can affect the flowof fuel and shut off the fuel pump nozzlebefore the fuel tank is full.
5.Operate the fuel pump nozzle within thearea shown.
6.When the nozzle shuts off, wait at least5 seconds, then slightly raise the fuelpump nozzle and slowly remove it.
7.Fully close the fuel filler door.
Note:Leaving the fuel door open could seta check engine lamp. See Fuel andRefueling – Troubleshooting (page 231).
Complete the refueling process within 20minutes. If 20 minutes elapses, press thebutton on the left side of the instrumentpanel again. Fuel pump nozzle automaticshut off could occur if you do not press thebutton on the left side of the instrumentpanel.
229
2023 Corsair (CTF) Canada/United States of America, enUSA, Edition date: 202208, DOMFuel and RefuelingE139202 E139203AB E337454 E119081
Page 267 of 690
2.Remove the access cover located to thebottom left hand side of the steeringcolumn on the lower instrument panelusing a plastic wedge or pry tool.
Note:Do not pull the tether.
3.Sit in the driver seat.
4.Power your vehicle on without your footon the brake pedal.
Note: Do not attempt this procedure whenthe engine is running. Failure to follow thisinstruction could result in vehicle damagenot covered by the vehicle warranty.
5.Press and hold the brake pedal.
6.Pull the tether towards you until the leverengages.
Note:Do not use excessive force. Failure tofollow this instruction could result in vehicledamage not covered by the vehiclewarranty.
Note:A message appears when your vehicleis out of park (P). If you do not receive amessage attempt the procedure again.
Note: A warning lamp could illuminate.
7.Release the parking brake. See WhatIs the Electric Parking Brake (page 272).
8.Switch your vehicle off.
9.Release the brake pedal.
Note:Your vehicle is free to roll.
10.Disconnect the negative battery cablefrom the battery as soon as it is safe todo so.
Note:If your vehicle detects wheel speedwhen the battery is connected, the electronicparking brake could apply.
Returning Your Vehicle to NormalMode
1.Connect the negative battery cable tothe battery as soon as it is safe to do so.
Note:If your vehicle detects wheel speedwhen the battery is connected, the electronicparking brake could apply.
2.Apply the parking brake. See What Isthe Electric Parking Brake (page 272).
Note:If the battery has run out of charge,use an external power source to apply theparking brake.
3.Sit in the driver seat.
4.Press and hold the brake pedal.
Note:Do not start your vehicle.
5.Pull the tether towards you until you feela hard stop.
6.Release tension and return tether to thestowed position.
7.Start your vehicle.
8.Confirm the instrument cluster displayspark (P).
Note:If the instrument cluster does notdisplay park (P), the warning lamp remainsilluminated, or a message persists contactan authorized dealer for service.
9.Switch your vehicle off.
10.Release the brake pedal.
11.Install the access cover.
263
2023 Corsair (CTF) Canada/United States of America, enUSA, Edition date: 202208, DOMAutomatic Transmission
Page 276 of 690
WHAT IS THE ELECTRIC PARKING
BRAKE
The electric parking brake is used to holdyour vehicle on slopes and flat roads.
APPLYING THE ELECTRIC
PARKING BRAKE
WARNING: Apply the parking brake,shift into park (P), switch the ignition offand remove the key before you leave yourvehicle. Failure to follow this instructioncould result in personal injury or death.
WARNING: If you drive extendeddistances with the parking brake applied,you could cause damage to the brakesystem.
WARNING: The electric parkingbrake does not operate if the vehiclebattery has run out of charge.
The switch is on the lower part ofthe instrument panel.
Pull the switch up to apply the electricparking brake. The red warning lamp flashes,then steadily illuminates when the parkingbrake is applied.
Note:You can apply the electric parkingbrake when the ignition is off.
Note:The electric parking brake couldautomatically apply when park (P) isselected. See Park (P) (page 258).
APPLYING THE ELECTRIC
PARKING BRAKE IN AN
EMERGENCY
You can use the electric parking brake toslow or stop your vehicle in an emergency.
Pull the switch up and hold it.
The red warning lamp illuminates, a tonesounds and the stoplamps turn on when youuse the electric parking brake in anemergency.
The electric parking brake continues to slowyour vehicle down unless you release theswitch.
Note:Do not apply the electric parking brakewhen your vehicle is moving, except in anemergency. If you repeatedly use the electricparking brake to slow or stop your vehicle,you could cause damage to the brakesystem.
MANUALLY RELEASING THE
ELECTRIC PARKING BRAKE
1.Switch the ignition on.
2.Press and hold the brake pedal.
3.Push the switch down.
The red warning lamp turns off.
Pulling Away on a Hill When Towing aTrailer
1.Press and hold the brake pedal.
2.Pull the switch upward and hold it.
3.Shift into gear.
272
2023 Corsair (CTF) Canada/United States of America, enUSA, Edition date: 202208, DOMElectric Parking BrakeE267156
Page 308 of 690
Note:Active guide lines and fixed guide linesare only available when the transmission isin reverse (R).
Note:The centerline is only available if theactive or fixed guide lines are on.
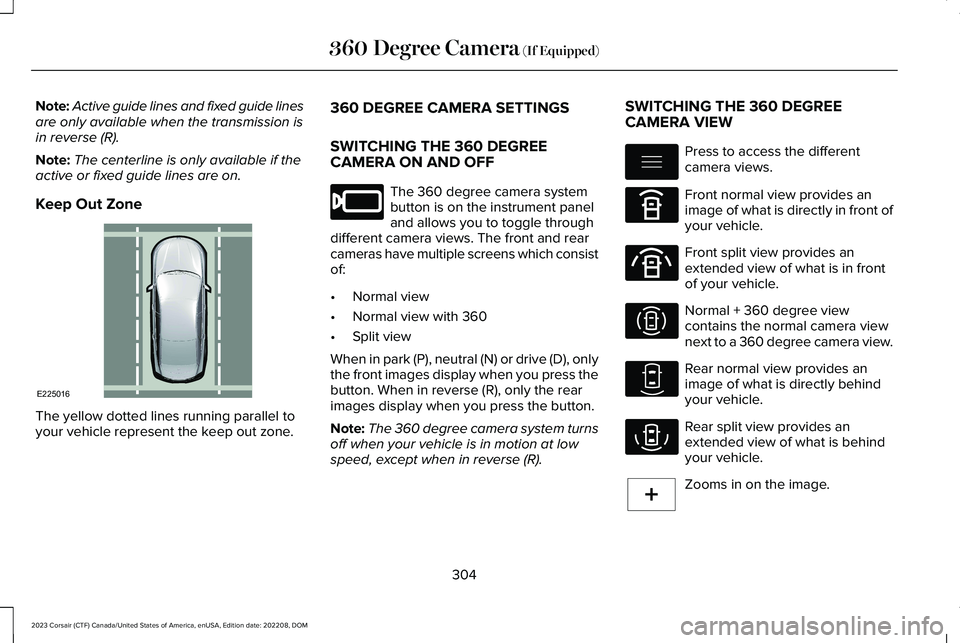
Keep Out Zone
The yellow dotted lines running parallel toyour vehicle represent the keep out zone.
360 DEGREE CAMERA SETTINGS
SWITCHING THE 360 DEGREECAMERA ON AND OFF
The 360 degree camera systembutton is on the instrument paneland allows you to toggle throughdifferent camera views. The front and rearcameras have multiple screens which consistof:
•Normal view
•Normal view with 360
•Split view
When in park (P), neutral (N) or drive (D), onlythe front images display when you press thebutton. When in reverse (R), only the rearimages display when you press the button.
Note:The 360 degree camera system turnsoff when your vehicle is in motion at lowspeed, except when in reverse (R).
SWITCHING THE 360 DEGREECAMERA VIEW
Press to access the differentcamera views.
Front normal view provides animage of what is directly in front ofyour vehicle.
Front split view provides anextended view of what is in frontof your vehicle.
Normal + 360 degree viewcontains the normal camera viewnext to a 360 degree camera view.
Rear normal view provides animage of what is directly behindyour vehicle.
Rear split view provides anextended view of what is behindyour vehicle.
Zooms in on the image.
304
2023 Corsair (CTF) Canada/United States of America, enUSA, Edition date: 202208, DOM360 Degree Camera (If Equipped)E225016 E205884 E337002 E336516 E336517 E310996 E310967 E310974 E224485
Page 405 of 690
Crashes
A crash or impact significant enough torequire an emergency response forconventional vehicles would also require thesame response for an electric orhybrid-electric vehicle.
If Possible:
1.Move your vehicle to a safe, nearbylocation and remain on the scene.
2.Roll down the windows before you switchyour vehicle off.
3.Place your vehicle in park (P), set theparking brake, switch off the vehicle,activate the hazard flashers and moveyour key(s) at least 16 ft (5 m) away fromthe vehicle.
Always:
•Call emergency assistance if needed andadvise that an electric or hybrid-electricvehicle is involved.
•Avoid contact with leaking fluids andgases, and remain out of the way ofoncoming traffic until emergencyresponders arrive.
•When emergency responders arrive, tellthem that the vehicle involved is anelectric vehicle or hybrid-electric vehicle.
Fires
As with any vehicle, call emergencyassistance immediately if you see sparks,smoke or flames coming from the vehicle. Remain a safe distance from the vehicle andtry to stay clear of the smoke.
1.Exit the vehicle immediately.
2.Advise emergency assistance that anelectric or hybrid-electric vehicle isinvolved.
3.As with any vehicle fire, do not inhalesmoke, vapors or gas from the vehicle,as they may be hazardous.
Post-Incident
1.Do not store a severely damaged vehiclewith a lithium-ion battery inside astructure or within 49 ft (15 m) of anystructure or vehicle.
2.Make sure that passenger and luggagecompartments remain ventilated.
3.Call emergency assistance if you observeleaking fluids, sparks, smoke or flames,or hear gurgling or bubbling from thehigh-voltage battery.
SWITCHING THE HAZARD
FLASHERS ON AND OFF
The hazard flasher button is on theinstrument panel. Press the buttonto switch the hazard flashers on ifyour vehicle is creating a safety hazard forother road users.
When you switch the hazard flashers on, allfront and rear direction indicators flash.
401
2023 Corsair (CTF) Canada/United States of America, enUSA, Edition date: 202208, DOMCrash and Breakdown InformationE75790
Page 456 of 690
SpecificationName
Motorcraft® Spot and Stain Remover, ZC-14 (U.S.)
ESR-M14P5-AMotorcraft® Ultra-Clear Spray Glass Cleaner, ZC-23 (U.S.)
Motorcraft® Wheel and Tire Cleaner, ZC-37-A (U.S. & Canada)
CLEANING THE EXTERIOR
CLEANING THE EXTERIORPRECAUTIONS
Immediately remove fuel spillages, additiveresiduals, bird droppings, insect depositsand road tar. These may cause damage toyour vehicle’s paintwork or trim over time.Remove any exterior accessories, forexample antennas, before entering a carwash.
CLEANING HEADLAMPS AND REARLAMPS
We recommend that you only use cold orlukewarm water containing car shampoo toclean the headlamps and the rear lamps.
Do not scrape the lamps.
Do not wipe lamps when they are dry.
CLEANING WINDOWS AND WIPERBLADES
To clean the windshield and wiper blades:
•Clean the windshield with a non-abrasiveglass cleaner.
Note:When cleaning the interior of thewindshield, avoid getting any glass cleaneron the instrument panel or door panels. Wipeany glass cleaner off these surfacesimmediately.
•Clean the wiper blades with washer fluidor water applied with a soft sponge orcloth.
Note: Do not use razor blades or othersharp objects to clean or remove decals fromthe inside of the heated rear window. Thiscan cause damage not covered by thevehicle Warranty.
452
2023 Corsair (CTF) Canada/United States of America, enUSA, Edition date: 202208, DOMVehicle Care