headlamp LINCOLN LS 2000 User Guide
[x] Cancel search | Manufacturer: LINCOLN, Model Year: 2000, Model line: LS, Model: LINCOLN LS 2000Pages: 272, PDF Size: 2.36 MB
Page 178 of 272
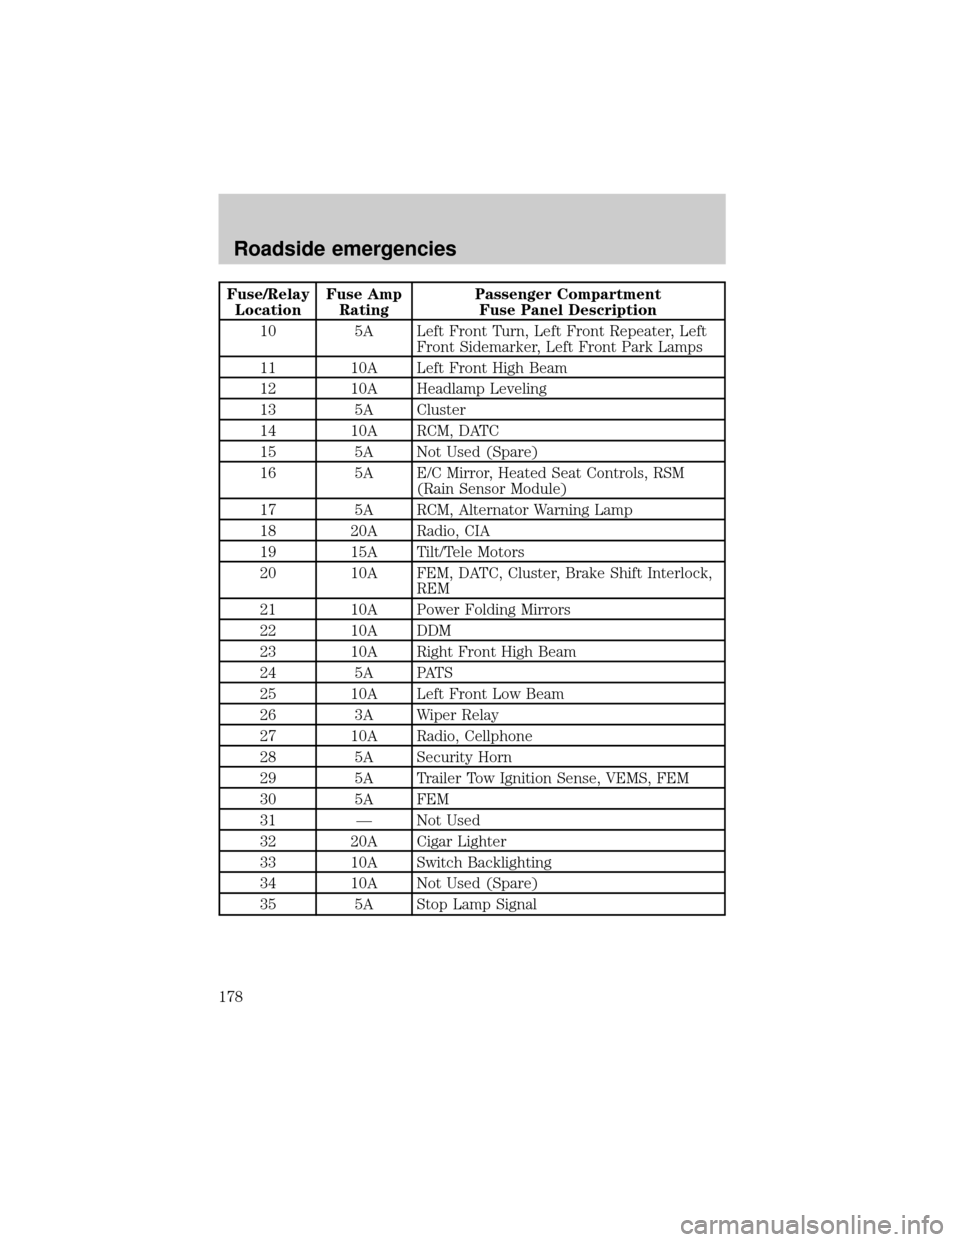
Fuse/Relay
LocationFuse Amp
RatingPassenger Compartment
Fuse Panel Description
10 5A Left Front Turn, Left Front Repeater, Left
Front Sidemarker, Left Front Park Lamps
11 10A Left Front High Beam
12 10A Headlamp Leveling
13 5A Cluster
14 10A RCM, DATC
15 5A Not Used (Spare)
16 5A E/C Mirror, Heated Seat Controls, RSM
(Rain Sensor Module)
17 5A RCM, Alternator Warning Lamp
18 20A Radio, CIA
19 15A Tilt/Tele Motors
20 10A FEM, DATC, Cluster, Brake Shift Interlock,
REM
21 10A Power Folding Mirrors
22 10A DDM
23 10A Right Front High Beam
24 5A PATS
25 10A Left Front Low Beam
26 3A Wiper Relay
27 10A Radio, Cellphone
28 5A Security Horn
29 5A Trailer Tow Ignition Sense, VEMS, FEM
30 5A FEM
31 Ð Not Used
32 20A Cigar Lighter
33 10A Switch Backlighting
34 10A Not Used (Spare)
35 5A Stop Lamp Signal
Roadside emergencies
178
Page 236 of 272
Exhaust leaks may result in entry of harmful and potentially
lethal fumes into the passenger compartment.
Do not make any unauthorized changes to your vehicle or engine. By
law, vehicle owners and anyone who manufactures, repairs, services,
sells, leases, trades vehicles, or supervises a fleet of vehicles are not
permitted to intentionally remove an emission control device or prevent
it from working. Information about your vehicle's emission system is on
the Vehicle Emission Control Information Decal located on or near the
engine. This decal identifies engine displacement and gives some tune up
specifications.
Please consult your ªWarranty Guideº for complete emission warranty
information.
Readiness for Inspection/Maintenance (I/M) testing
In some localities, it may be a legal requirement to pass an I/M test of
the on-board diagnostics system. If your ªCheck Engine/Service Engine
Soonº light is on, refer to the description in theWarning Lights and
Chimessection of theInstrumentationchapter. Your vehicle may not
pass the I/M test with the ªCheck Engine/Service Engine Soonº light on.
If the vehicle's powertrain system or its battery has just been serviced,
the on-board diagnostics system is reset to a ªnot ready for I/M testº
condition. To ready the on-board diagnostics system for I/M testing, a
minimum of 30 minutes of city and highway driving is necessary as
described below:
²First, at least 10 minutes of driving on an expressway or highway.
²Next, at least 20 minutes driving in stop-and-go, city-type traffic with
at least four idle periods.
Allow the vehicle to sit for at least eight hours without starting the
engine. Then, start the engine and complete the above driving cycle. The
engine must warm up to its normal operating temperature. Once started,
do not turn off the engine until the above driving cycle is complete.
BULBS
Replacing exterior bulbs
Check the operation of the following lamps frequently:
²Headlamps
Maintenance and care
236
Page 237 of 272
²Tail lamps
²Brakelamps
²High-mount brakelamp
²Turn signals
²Backup lamps
²License plate lamp
²Fog lamps
Do not remove lamp bulbs unless they will be replaced immediately. If a
bulb is removed for an extended period of time, contaminants may enter
the lamp housings and affect performance.
Replacing headlamp bulbs
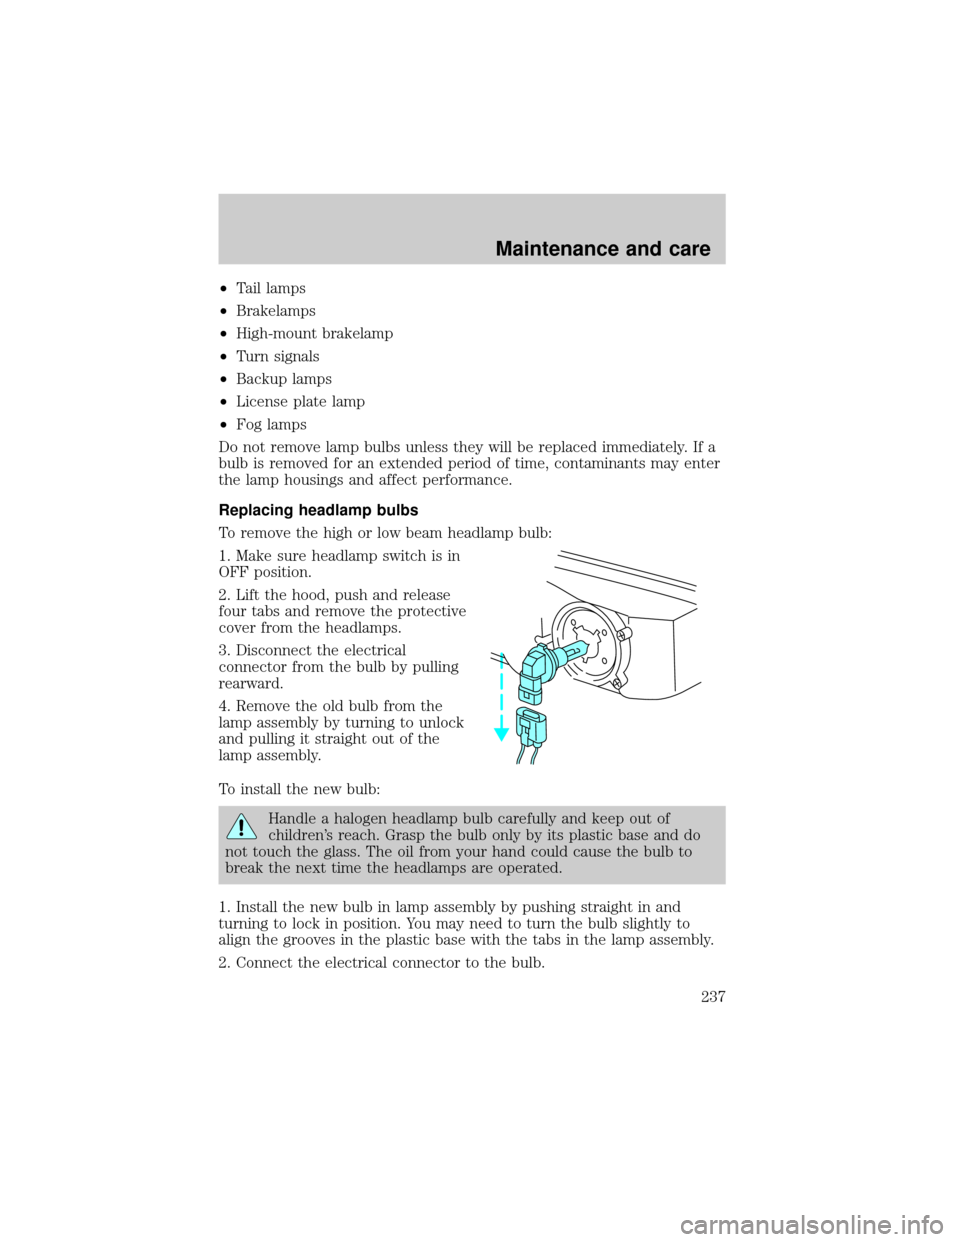
To remove the high or low beam headlamp bulb:
1. Make sure headlamp switch is in
OFF position.
2. Lift the hood, push and release
four tabs and remove the protective
cover from the headlamps.
3. Disconnect the electrical
connector from the bulb by pulling
rearward.
4. Remove the old bulb from the
lamp assembly by turning to unlock
and pulling it straight out of the
lamp assembly.
To install the new bulb:
Handle a halogen headlamp bulb carefully and keep out of
children's reach. Grasp the bulb only by its plastic base and do
not touch the glass. The oil from your hand could cause the bulb to
break the next time the headlamps are operated.
1. Install the new bulb in lamp assembly by pushing straight in and
turning to lock in position. You may need to turn the bulb slightly to
align the grooves in the plastic base with the tabs in the lamp assembly.
2. Connect the electrical connector to the bulb.
Maintenance and care
237
Page 238 of 272
3. Install the protective cover and secure with four tabs.
4. Turn the headlamps on and make sure they work properly. If the
headlamp was correctly aligned before you changed the bulb, you should
not need to align it again.
Replacing foglamp bulbs
The halogen bulb contains gas under pressure. The bulb may
shatter if the glass envelope is scratched or if the bulb is
dropped. Handle the bulb carefully. Grasp the bulb only by its
base. Avoid touching the glass envelope.
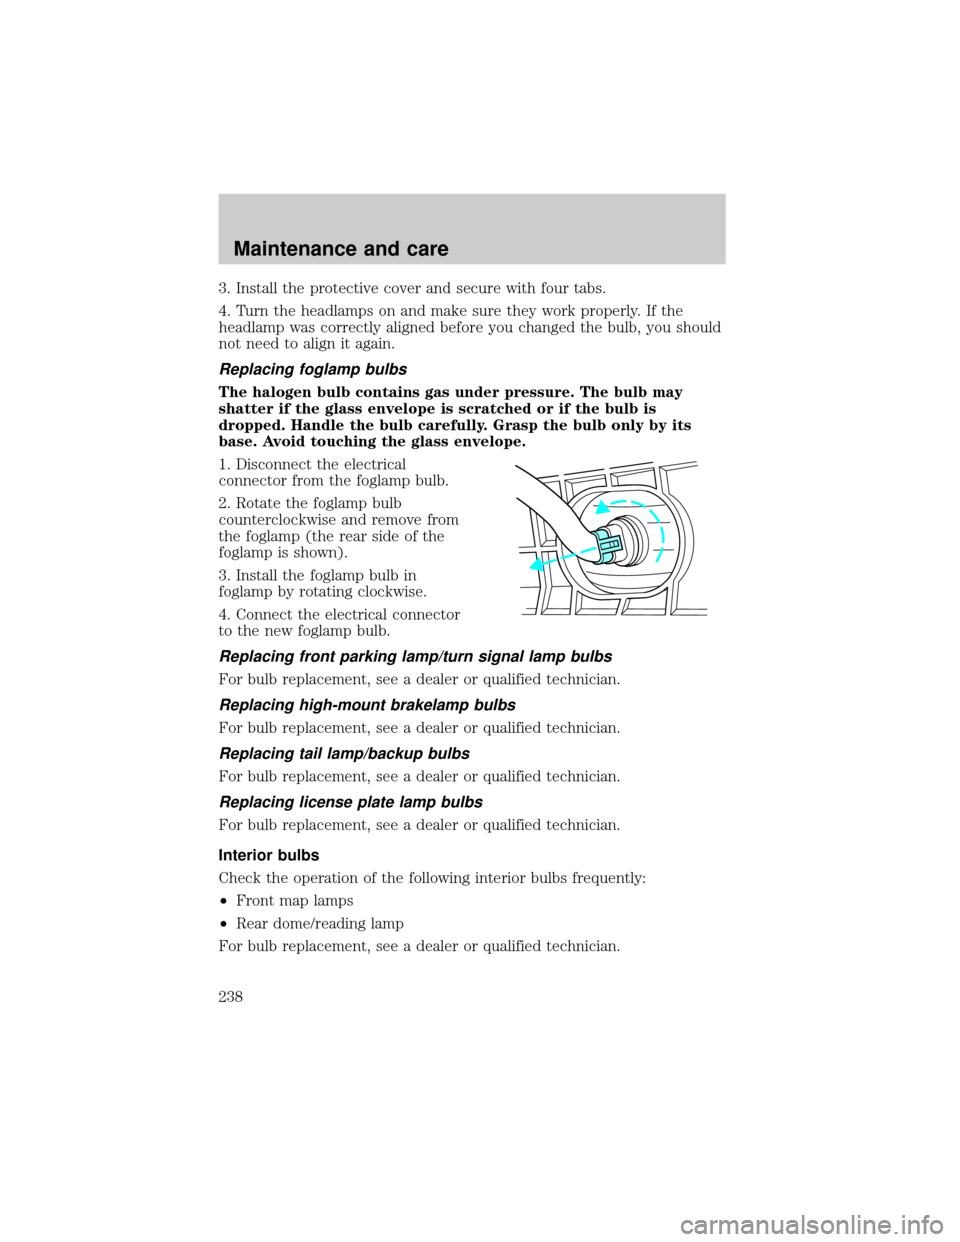
1. Disconnect the electrical
connector from the foglamp bulb.
2. Rotate the foglamp bulb
counterclockwise and remove from
the foglamp (the rear side of the
foglamp is shown).
3. Install the foglamp bulb in
foglamp by rotating clockwise.
4. Connect the electrical connector
to the new foglamp bulb.
Replacing front parking lamp/turn signal lamp bulbs
For bulb replacement, see a dealer or qualified technician.
Replacing high-mount brakelamp bulbs
For bulb replacement, see a dealer or qualified technician.
Replacing tail lamp/backup bulbs
For bulb replacement, see a dealer or qualified technician.
Replacing license plate lamp bulbs
For bulb replacement, see a dealer or qualified technician.
Interior bulbs
Check the operation of the following interior bulbs frequently:
²Front map lamps
²Rear dome/reading lamp
For bulb replacement, see a dealer or qualified technician.
Maintenance and care
238
Page 239 of 272
Map lamps
For bulb replacement, see a qualified service technician or your dealer.
Using the right bulbs
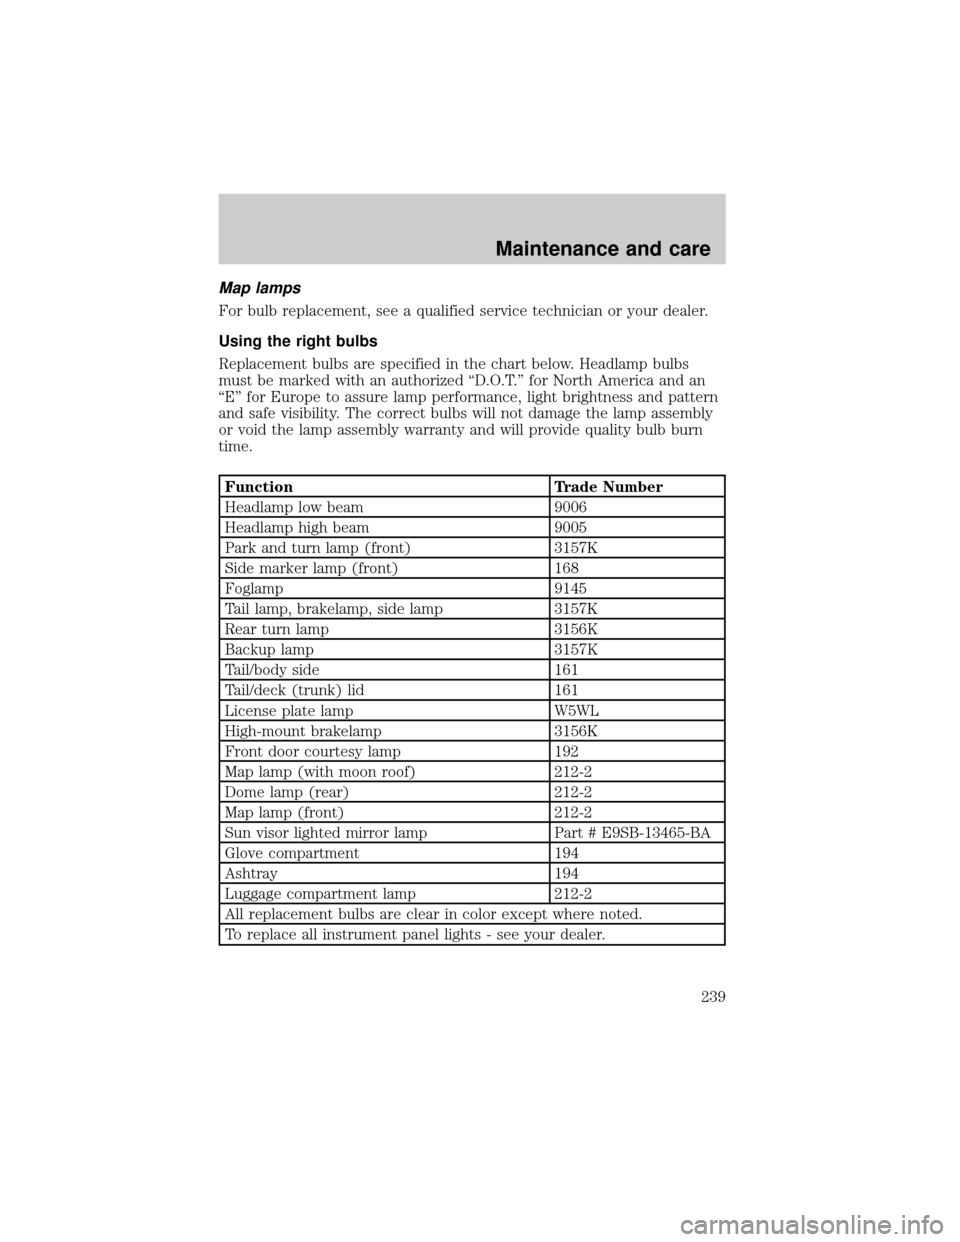
Replacement bulbs are specified in the chart below. Headlamp bulbs
must be marked with an authorized ªD.O.T.º for North America and an
ªEº for Europe to assure lamp performance, light brightness and pattern
and safe visibility. The correct bulbs will not damage the lamp assembly
or void the lamp assembly warranty and will provide quality bulb burn
time.
Function Trade Number
Headlamp low beam 9006
Headlamp high beam 9005
Park and turn lamp (front) 3157K
Side marker lamp (front) 168
Foglamp 9145
Tail lamp, brakelamp, side lamp 3157K
Rear turn lamp 3156K
Backup lamp 3157K
Tail/body side 161
Tail/deck (trunk) lid 161
License plate lamp W5WL
High-mount brakelamp 3156K
Front door courtesy lamp 192
Map lamp (with moon roof) 212-2
Dome lamp (rear) 212-2
Map lamp (front) 212-2
Sun visor lighted mirror lamp Part # E9SB-13465-BA
Glove compartment 194
Ashtray 194
Luggage compartment lamp 212-2
All replacement bulbs are clear in color except where noted.
To replace all instrument panel lights - see your dealer.
Maintenance and care
239
Page 240 of 272
AIMING THE HEADLAMPS
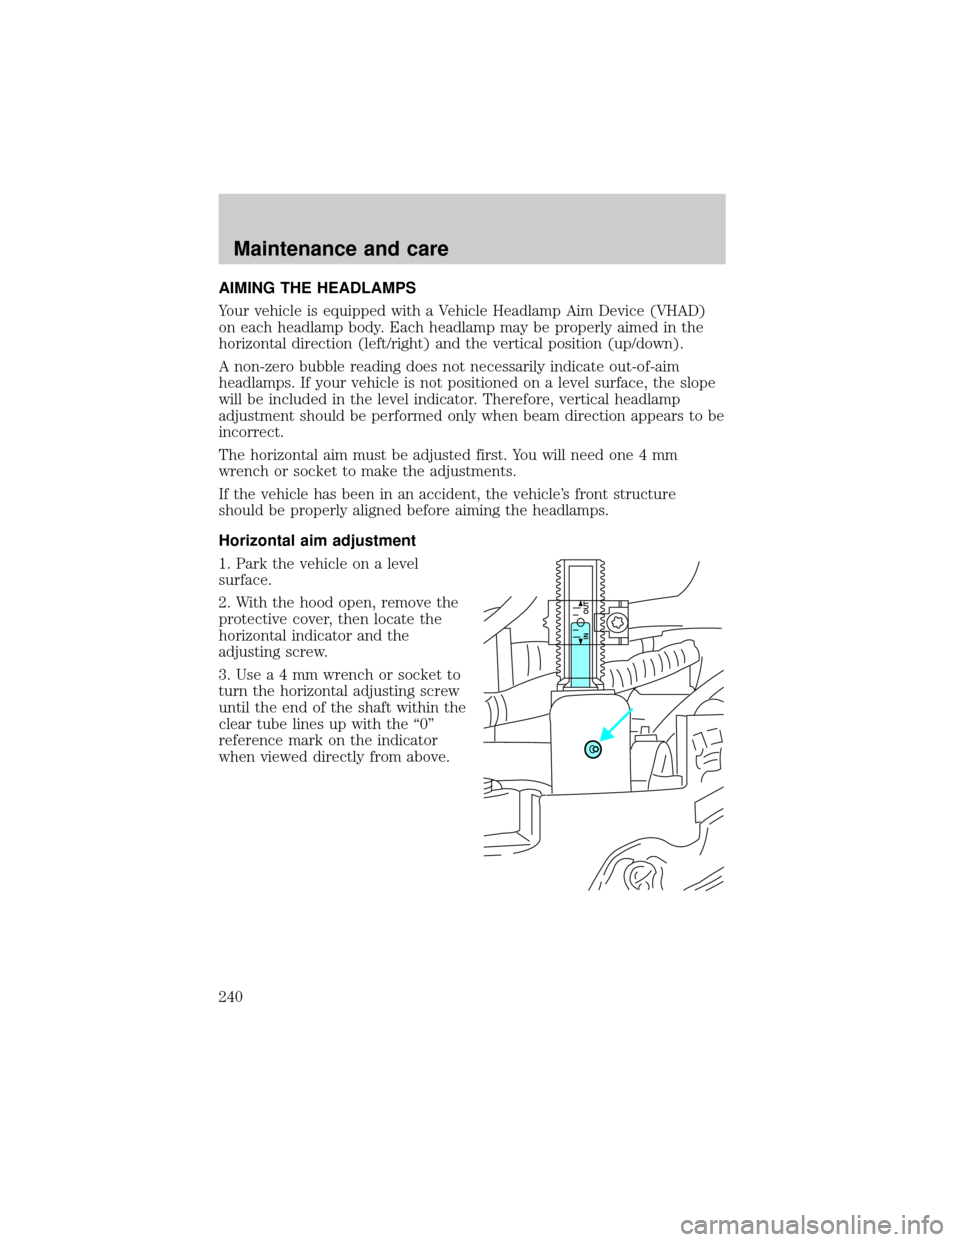
Your vehicle is equipped with a Vehicle Headlamp Aim Device (VHAD)
on each headlamp body. Each headlamp may be properly aimed in the
horizontal direction (left/right) and the vertical position (up/down).
A non-zero bubble reading does not necessarily indicate out-of-aim
headlamps. If your vehicle is not positioned on a level surface, the slope
will be included in the level indicator. Therefore, vertical headlamp
adjustment should be performed only when beam direction appears to be
incorrect.
The horizontal aim must be adjusted first. You will need one 4 mm
wrench or socket to make the adjustments.
If the vehicle has been in an accident, the vehicle's front structure
should be properly aligned before aiming the headlamps.
Horizontal aim adjustment
1. Park the vehicle on a level
surface.
2. With the hood open, remove the
protective cover, then locate the
horizontal indicator and the
adjusting screw.
3.Usea4mmwrench or socket to
turn the horizontal adjusting screw
until the end of the shaft within the
clear tube lines up with the ª0º
reference mark on the indicator
when viewed directly from above.
IN OUT
Maintenance and care
240
Page 241 of 272
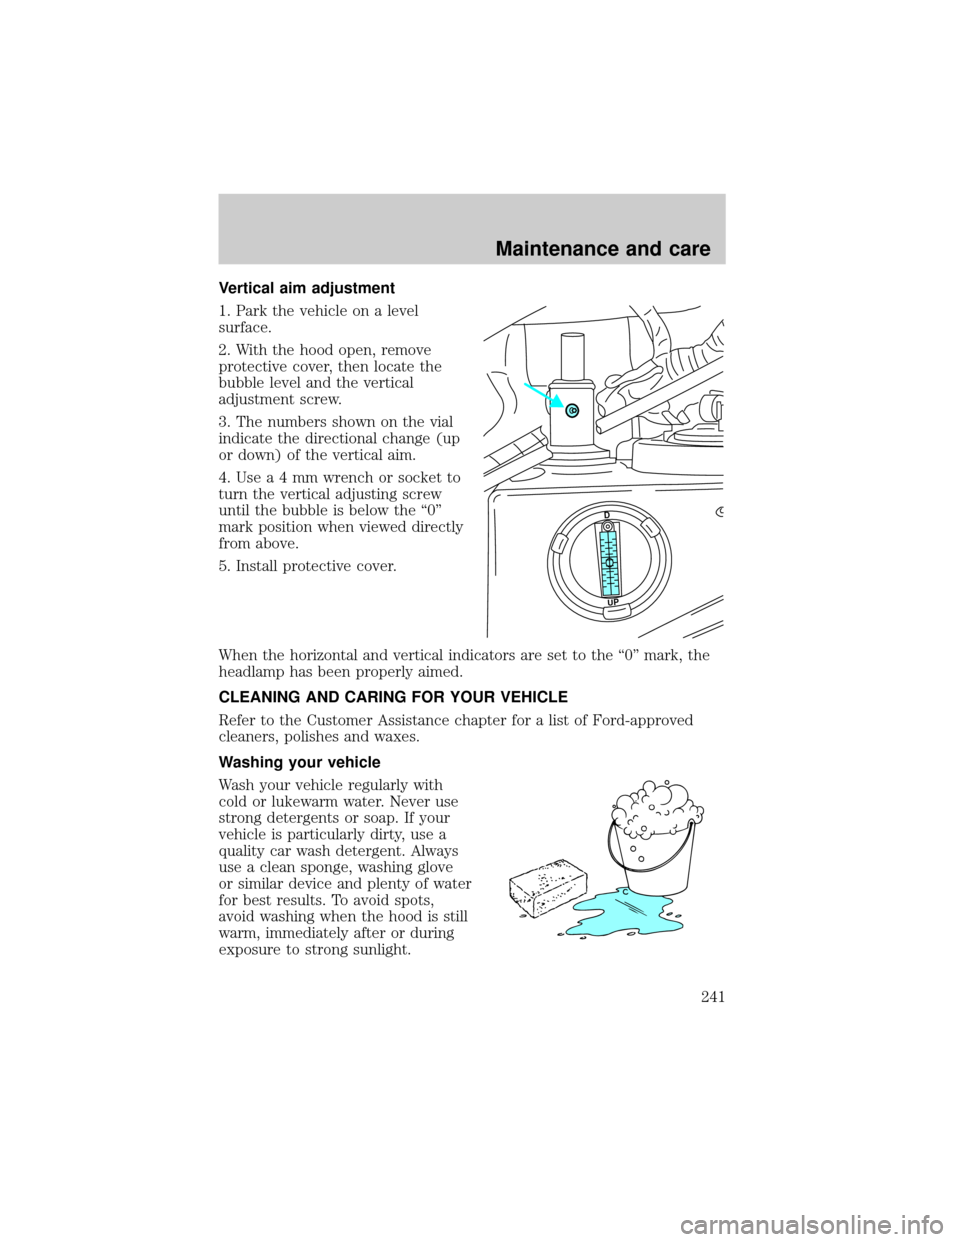
Vertical aim adjustment
1. Park the vehicle on a level
surface.
2. With the hood open, remove
protective cover, then locate the
bubble level and the vertical
adjustment screw.
3. The numbers shown on the vial
indicate the directional change (up
or down) of the vertical aim.
4.Usea4mmwrench or socket to
turn the vertical adjusting screw
until the bubble is below the ª0º
mark position when viewed directly
from above.
5. Install protective cover.
When the horizontal and vertical indicators are set to the ª0º mark, the
headlamp has been properly aimed.
CLEANING AND CARING FOR YOUR VEHICLE
Refer to the Customer Assistance chapter for a list of Ford-approved
cleaners, polishes and waxes.
Washing your vehicle
Wash your vehicle regularly with
cold or lukewarm water. Never use
strong detergents or soap. If your
vehicle is particularly dirty, use a
quality car wash detergent. Always
use a clean sponge, washing glove
or similar device and plenty of water
for best results. To avoid spots,
avoid washing when the hood is still
warm, immediately after or during
exposure to strong sunlight.
UPD
Maintenance and care
241
Page 268 of 272

comparisons with EPA fuel
economy estimates .................235
detergent in fuel .....................231
filling your vehicle
with fuel ....................227,229,232
filter, specifications .........231,247
fuel pump shut-off switch .....174
gauge .........................................16
improving fuel economy ........232
low fuel warning light ..............11
octane rating ....................230,251
quality ......................................230
running out of fuel .................231
safety information relating
to automotive fuels ................227
Fuses ...................................175,176
Garage door opener ....................84
Gas cap (see Fuel cap) ............229
Gas mileage
(see Fuel economy) .................232
Gauges .........................................14
engine coolant
temperature gauge ...................14
fuel gauge ..................................16
odometer ...................................16
speedometer .............................15
tachometer ................................15
trip odometer ............................16
GAWR
(Gross Axle Weight Rating) .....167
definition .................................167
driving with a heavy load ......167
location ....................................167
GVWR (Gross
Vehicle Weight Rating) .............167
calculating ...............................167
definition .................................167
driving with a heavy load ......167
location ....................................167
Hazard flashers .........................174
Head restraints .........................112
Headlamps ...................................27aiming ...............................240,241
autolamp system .......................29
bulb specifications ..................239
daytime running lights .............27
flash to pass ..............................28
high beam .................................10
replacing bulbs .......................237
turning on and off ....................27
warning chime ..........................13
Heating ........................................31
HomeLink universal
transceiver (see Garage
door opener) ................84,85,86,87
Hood ..........................................196
Ignition .......................................251
positions of the ignition ...........71
removing the key ....................166
Infant seats
(see Safety seats) .....................137
Inspection/maintenance
(I/M) testing ..............................236
Instrument panel
cleaning ...................................245
cluster ...................................8,245
lighting up panel
and interior ...............................29
location of components ..............8
Jump-starting your vehicle ......188
Keyless entry system
autolock ...................................105
Keys .............................................71
key in ignition chime ...............14
positions of the ignition ...........71
removing from the ignition ....166
Lamps
autolamp system .......................29
bulb replacement
specifications chart ................239
cargo lamps ...............................29
daytime running light ...............27
fog lamps ...................................28
headlamps .................................27
Index
268
Page 269 of 272

headlamps, flash to pass ..........28
instrument panel, dimming .....29
interior lamps .............83,238,239
replacing bulbs .........236,237,238
Lane change indicator
(see Turn signal) ........................72
Lights, warning and indicator ......8
AdvanceTrac .............................12
air bag ........................................11
anti-lock brakes (ABS) .....10,150
brake ..........................................10
bulb warning .............................12
charging system ........................11
check engine ...............................8
cruise indicator .........................13
door ajar ....................................13
high beam ............................10,12
low coolant ..................................8
low fuel ......................................11
low washer fluid .......................12
oil pressure ...............................11
safety belt .................................11
speed control ............................82
steering column lock ................13
transmission PRNDL
indicator ....................................13
turn signal indicator .................10
Load limits .................................167
GAWR ......................................167
GVWR ......................................167
trailer towing ..........................167
Locks
autolock ...................................105
childproof ................................100
doors ..........................................99
Lubricant specifications ....249,251
Lug nuts, anti-theft ...................187
Lumbar support, seats .............115
Manual transmission .................163
fluid capacities ........................247
lubricant specifications ..........251
reverse .....................................166Message center ......................16,18
select button .............................17
warning messages .....................21
Mirrors .........................................84
automatic dimming
rearview mirror .........................83
cleaning ...................................243
heated ........................................30
programmable memory ..........106
side view mirrors (power) .......29
Moon roof ....................................82
Motorcraft parts .................231,247
Octane rating ............................230
Odometer .....................................16
Oil (see Engine oil) ..................198
Panic alarm feature,
remote entry system ................103
Parking brake ............................150
Parts (see Motorcraft parts) ....247
Power distribution box
(see Fuses) ........................179,182
Power door locks .................99,105
Power steering ...................151,152
fluid, checking and adding ....211
fluid, refill capacity ................247
fluid, specifications ..........249,251
Radio ............................................42
Relays ........................................175
Remote entry system ........101,103
illuminated entry ....................103
locking/unlocking doors ..101,102
opening the trunk ...................103
panic alarm .............................103
replacement/additional
transmitters .............................105
replacing the batteries ...........104
Roof rack ...................................172
Safety belts (see Safety
restraints) ......................14,117,119
120,121,122,123
Safety defects, reporting ..........265
Index
269