relay LINCOLN LS 2002 Owners Manual
[x] Cancel search | Manufacturer: LINCOLN, Model Year: 2002, Model line: LS, Model: LINCOLN LS 2002Pages: 288, PDF Size: 2.44 MB
Page 2 of 288
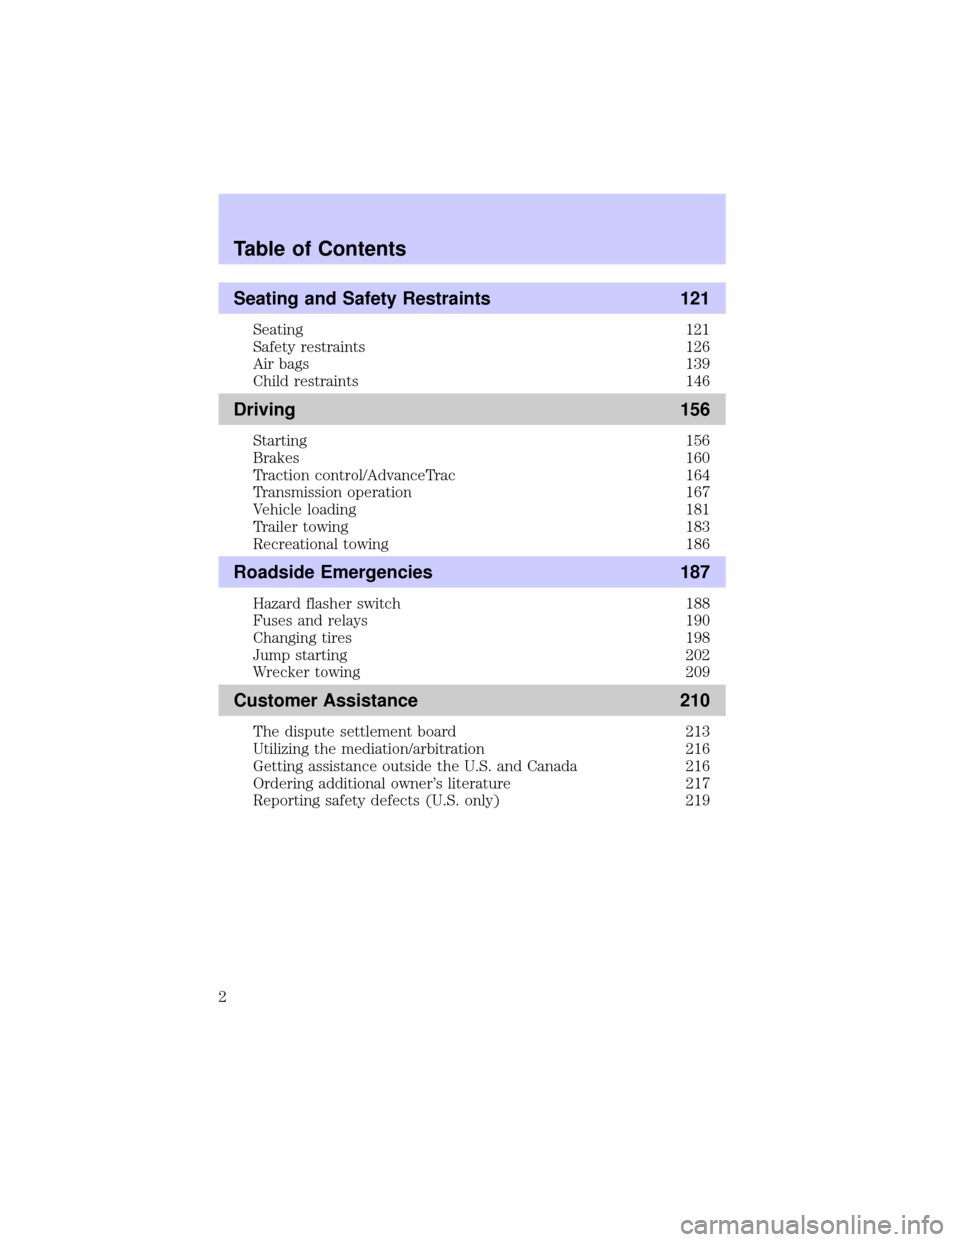
Seating and Safety Restraints 121
Seating 121
Safety restraints 126
Air bags 139
Child restraints 146
Driving 156
Starting 156
Brakes 160
Traction control/AdvanceTrac 164
Transmission operation 167
Vehicle loading 181
Trailer towing 183
Recreational towing 186
Roadside Emergencies 187
Hazard flasher switch 188
Fuses and relays 190
Changing tires 198
Jump starting 202
Wrecker towing 209
Customer Assistance 210
The dispute settlement board 213
Utilizing the mediation/arbitration 216
Getting assistance outside the U.S. and Canada 216
Ordering additional owner's literature 217
Reporting safety defects (U.S. only) 219
Table of Contents
2
Page 168 of 288
If it is necessary to use the above procedure to move the gearshift lever,
it is possible that a fuse has blown or the vehicle's brakelamps are not
operating properly. Refer toFuses and relaysin theRoadside
emergencieschapter.
Do not drive your vehicle until you verify that the brakelamps
are working.
If your vehicle gets stuck in mud or snow it may be rocked out by
shifting from forward and reverse gears, stopping between shifts, in a
steady pattern. Press lightly on the accelerator in each gear.
Do not rock the vehicle if the engine is not at normal operating
temperature or damage to the transmission may occur.
Do not rock the vehicle for more than a few minutes or damage
to the transmission and tires may occur or the engine may
overheat.
Always set the parking brake fully and make sure the gearshift is
latched in P (Park). Turn off the ignition whenever you leave
your vehicle.
If the parking brake is fully released, but the brake warning lamp
remains illuminated, the brakes may not be working properly.
See your dealer or a qualified service technician.
Driving with a 5±speed automatic transmission (if equipped)
Your automatic transmission electronically controls the shift feel by using
an adaptive learning strategy. This feature is designed to increase
durability, and provide consistent shift feel over the life of the vehicle. It
is normal for a new transmission to shift firmly. This operation is
considered normal and will not affect function durability of the
transmission. Once the vehicle is at operating temperature it may take
several shifts at the same operating condition for the transmission to
properly adapt. Over time the adaptive learning process will fully update
transmission operation. The more varied the driving habits, speed and
torque, the longer it may take to adapt but the more complete the
process will be.
Driving
168
Page 190 of 288
FUSES AND RELAYS
Fuses
If electrical components in the
vehicle are not working, a fuse may
have blown. Blown fuses are
identified by a broken wire within
the fuse. Check the appropriate
fuses before replacing any electrical
components.
Note:Always replace a fuse with one that has the specified amperage
rating. Using a fuse with a higher amperage rating can cause severe wire
damage and could start a fire.
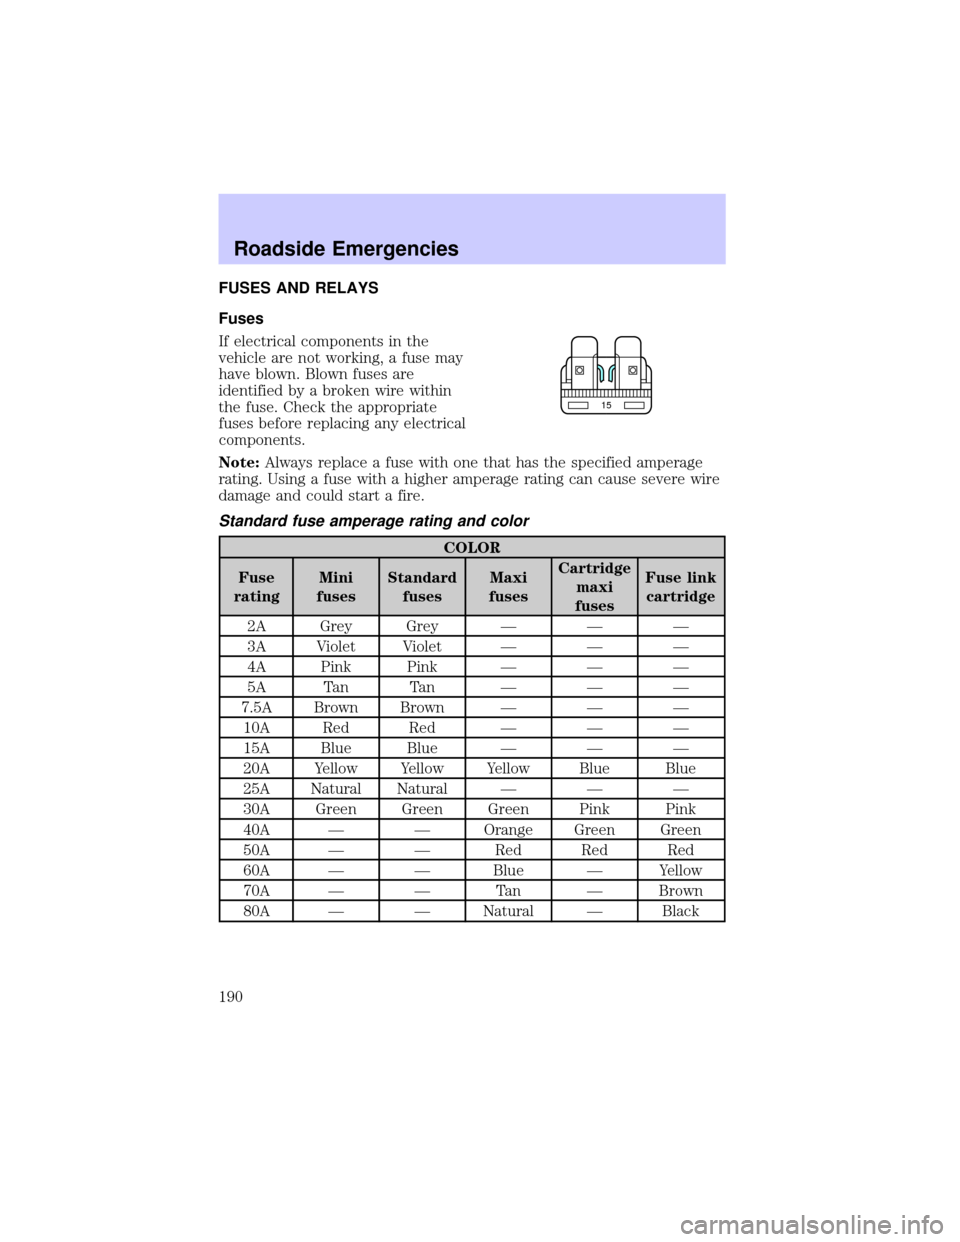
Standard fuse amperage rating and color
COLOR
Fuse
ratingMini
fusesStandard
fusesMaxi
fusesCartridge
maxi
fusesFuse link
cartridge
2A Grey Grey Ð Ð Ð
3A Violet Violet Ð Ð Ð
4A Pink Pink Ð Ð Ð
5A Tan Tan Ð Ð Ð
7.5A Brown Brown Ð Ð Ð
10A Red Red Ð Ð Ð
15A Blue Blue Ð Ð Ð
20A Yellow Yellow Yellow Blue Blue
25A Natural Natural Ð Ð Ð
30A Green Green Green Pink Pink
40A Ð Ð Orange Green Green
50A Ð Ð Red Red Red
60A Ð Ð Blue Ð Yellow
70A Ð Ð Tan Ð Brown
80A Ð Ð Natural Ð Black
15
Roadside Emergencies
190
Page 191 of 288
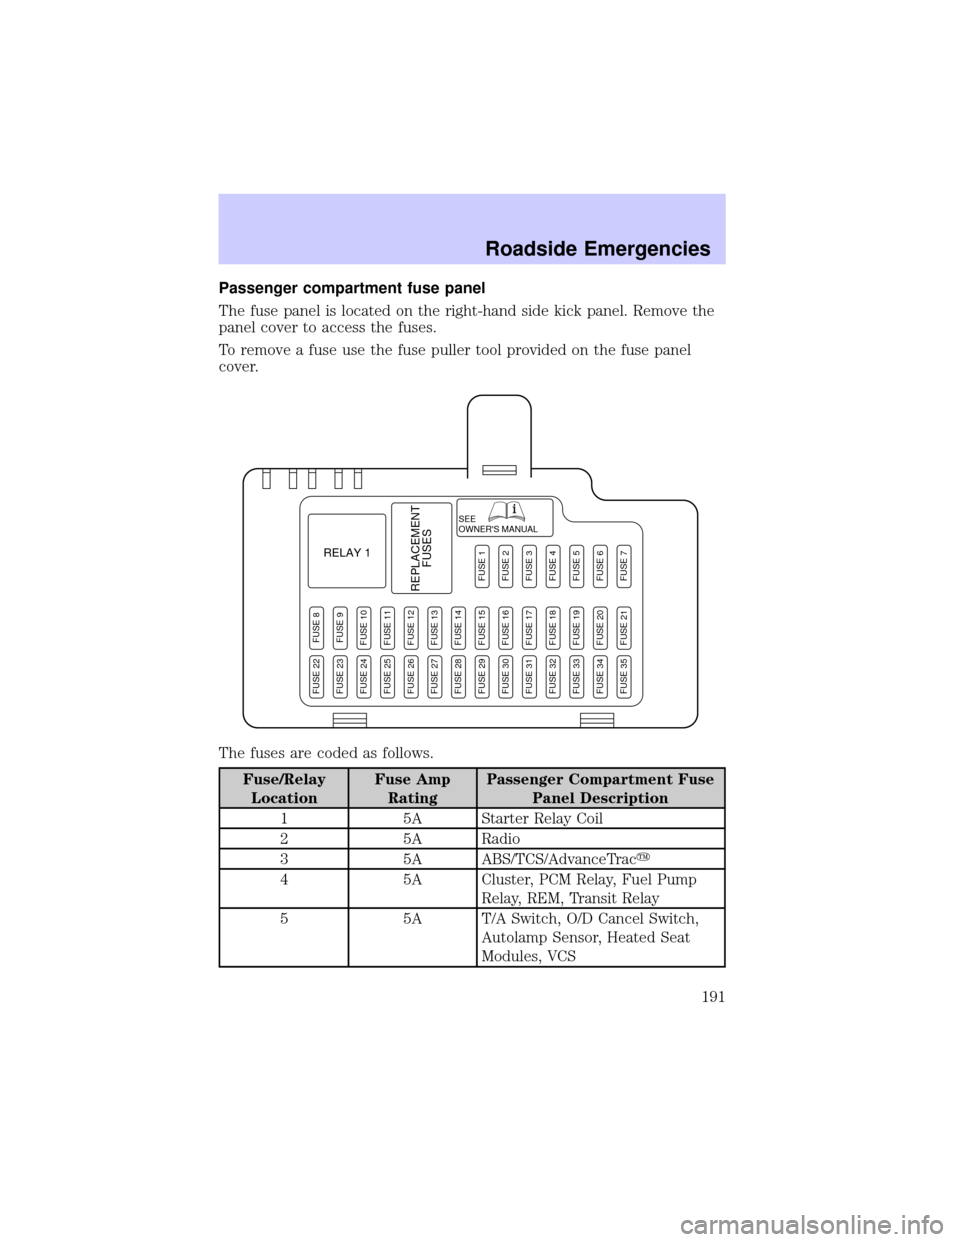
Passenger compartment fuse panel
The fuse panel is located on the right-hand side kick panel. Remove the
panel cover to access the fuses.
To remove a fuse use the fuse puller tool provided on the fuse panel
cover.
The fuses are coded as follows.
Fuse/Relay
LocationFuse Amp
RatingPassenger Compartment Fuse
Panel Description
1 5A Starter Relay Coil
2 5A Radio
3 5A ABS/TCS/AdvanceTracy
4 5A Cluster, PCM Relay, Fuel Pump
Relay, REM, Transit Relay
5 5A T/A Switch, O/D Cancel Switch,
Autolamp Sensor, Heated Seat
Modules, VCS
SEE
OWNER'S MANUAL
RELAY 1
REPLACEMENT
FUSES
FUSE 8FUSE 9FUSE 10FUSE 11FUSE 12FUSE 13FUSE 14FUSE 15FUSE 16FUSE 17FUSE 18FUSE 19FUSE 20FUSE 21
FUSE 1FUSE 2FUSE 3FUSE 4FUSE 5FUSE 6FUSE 7
FUSE 22FUSE 23FUSE 24FUSE 25FUSE 26FUSE 27FUSE 28FUSE 29FUSE 30FUSE 31FUSE 32FUSE 33FUSE 34FUSE 35
Roadside Emergencies
191
Page 192 of 288
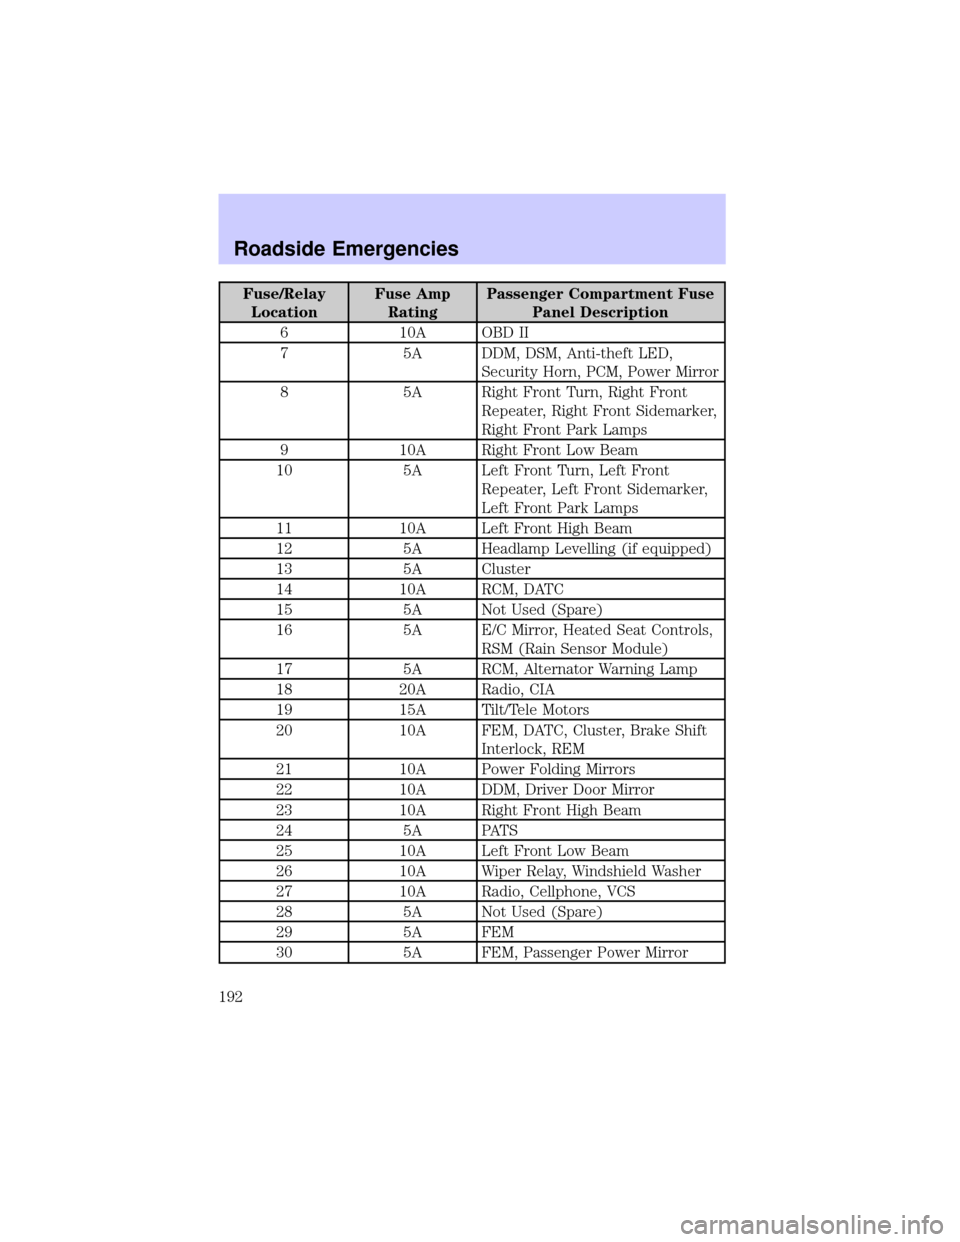
Fuse/Relay
LocationFuse Amp
RatingPassenger Compartment Fuse
Panel Description
6 10A OBD II
7 5A DDM, DSM, Anti-theft LED,
Security Horn, PCM, Power Mirror
8 5A Right Front Turn, Right Front
Repeater, Right Front Sidemarker,
Right Front Park Lamps
9 10A Right Front Low Beam
10 5A Left Front Turn, Left Front
Repeater, Left Front Sidemarker,
Left Front Park Lamps
11 10A Left Front High Beam
12 5A Headlamp Levelling (if equipped)
13 5A Cluster
14 10A RCM, DATC
15 5A Not Used (Spare)
16 5A E/C Mirror, Heated Seat Controls,
RSM (Rain Sensor Module)
17 5A RCM, Alternator Warning Lamp
18 20A Radio, CIA
19 15A Tilt/Tele Motors
20 10A FEM, DATC, Cluster, Brake Shift
Interlock, REM
21 10A Power Folding Mirrors
22 10A DDM, Driver Door Mirror
23 10A Right Front High Beam
24 5A PATS
25 10A Left Front Low Beam
26 10A Wiper Relay, Windshield Washer
27 10A Radio, Cellphone, VCS
28 5A Not Used (Spare)
29 5A FEM
30 5A FEM, Passenger Power Mirror
Roadside Emergencies
192
Page 193 of 288
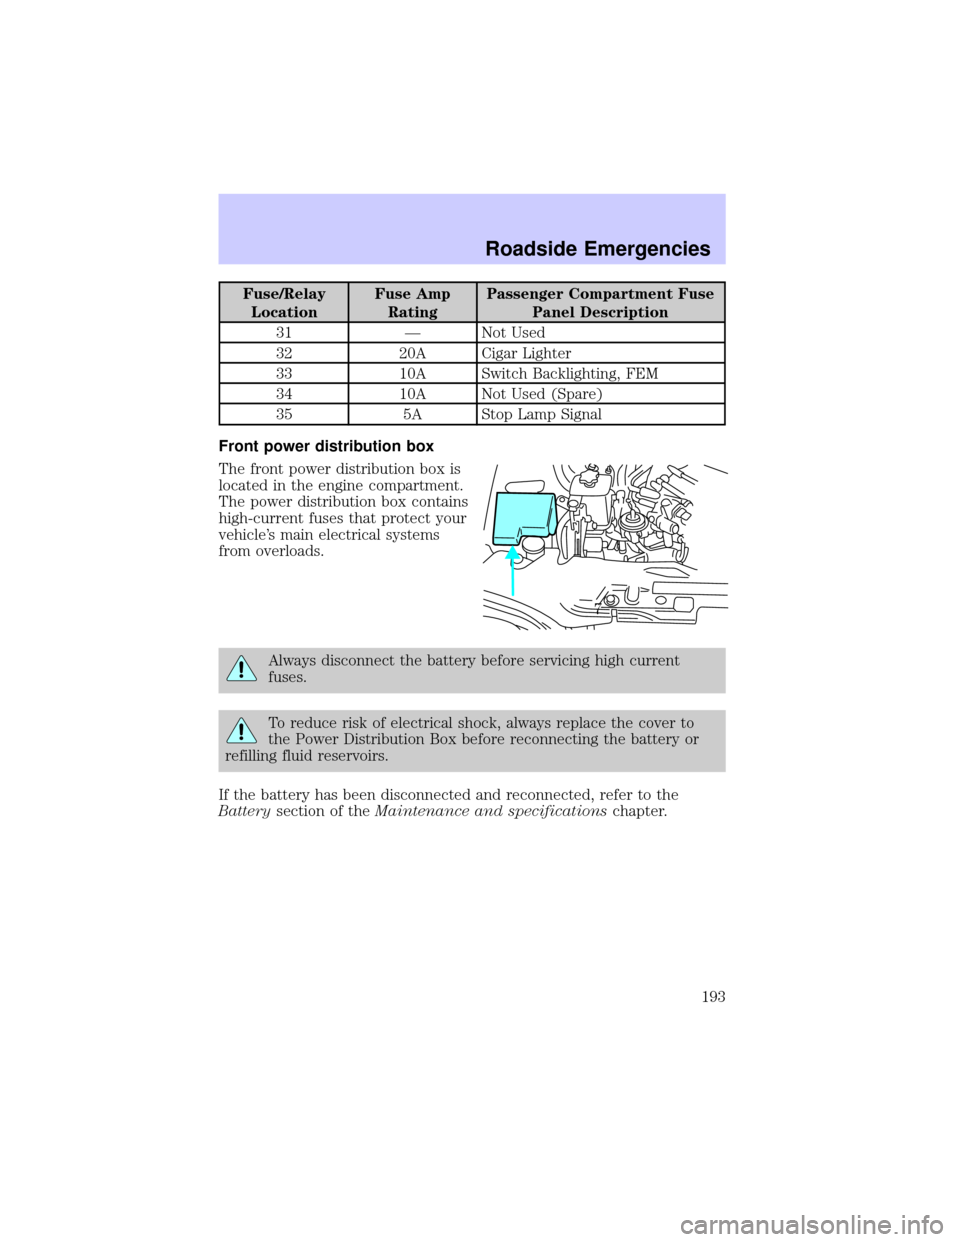
Fuse/Relay
LocationFuse Amp
RatingPassenger Compartment Fuse
Panel Description
31 Ð Not Used
32 20A Cigar Lighter
33 10A Switch Backlighting, FEM
34 10A Not Used (Spare)
35 5A Stop Lamp Signal
Front power distribution box
The front power distribution box is
located in the engine compartment.
The power distribution box contains
high-current fuses that protect your
vehicle's main electrical systems
from overloads.
Always disconnect the battery before servicing high current
fuses.
To reduce risk of electrical shock, always replace the cover to
the Power Distribution Box before reconnecting the battery or
refilling fluid reservoirs.
If the battery has been disconnected and reconnected, refer to the
Batterysection of theMaintenance and specificationschapter.
7
Roadside Emergencies
193
Page 194 of 288
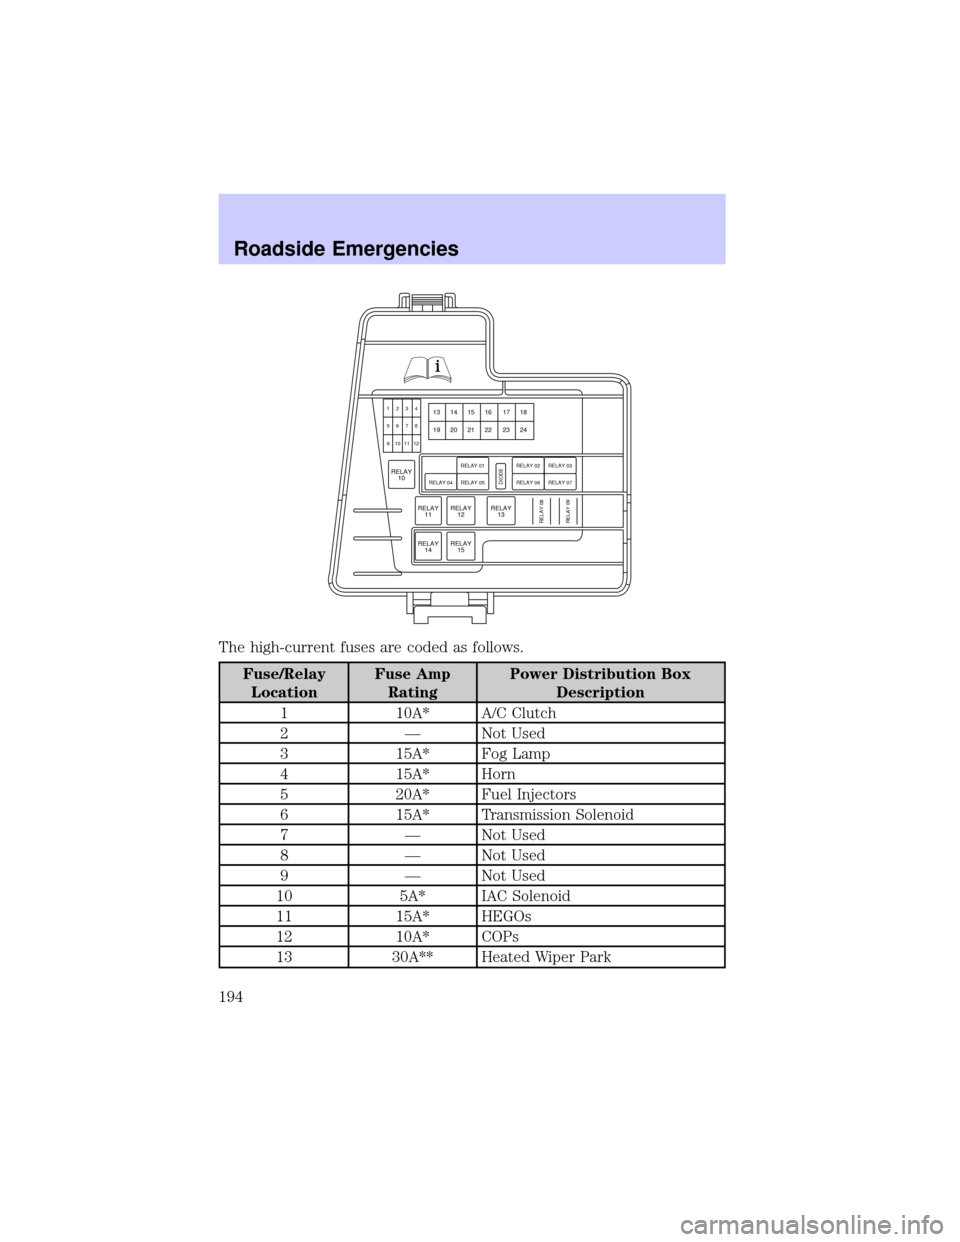
The high-current fuses are coded as follows.
Fuse/Relay
LocationFuse Amp
RatingPower Distribution Box
Description
1 10A* A/C Clutch
2 Ð Not Used
3 15A* Fog Lamp
4 15A* Horn
5 20A* Fuel Injectors
6 15A* Transmission Solenoid
7 Ð Not Used
8 Ð Not Used
9 Ð Not Used
10 5A* IAC Solenoid
11 15A* HEGOs
12 10A* COPs
13 30A** Heated Wiper Park
RELAY
14RELAY
15
RELAY
11RELAY
12
RELAY
1013
1234
5678
9 10111214 15 16 17 18
19 20 21 22 23 24
RELAY
13RELAY 08DIODE
RELAY 04 RELAY 05RELAY 01
RELAY 09
RELAY 06
RELAY 02RELAY 07
RELAY 03
Roadside Emergencies
194
Page 195 of 288
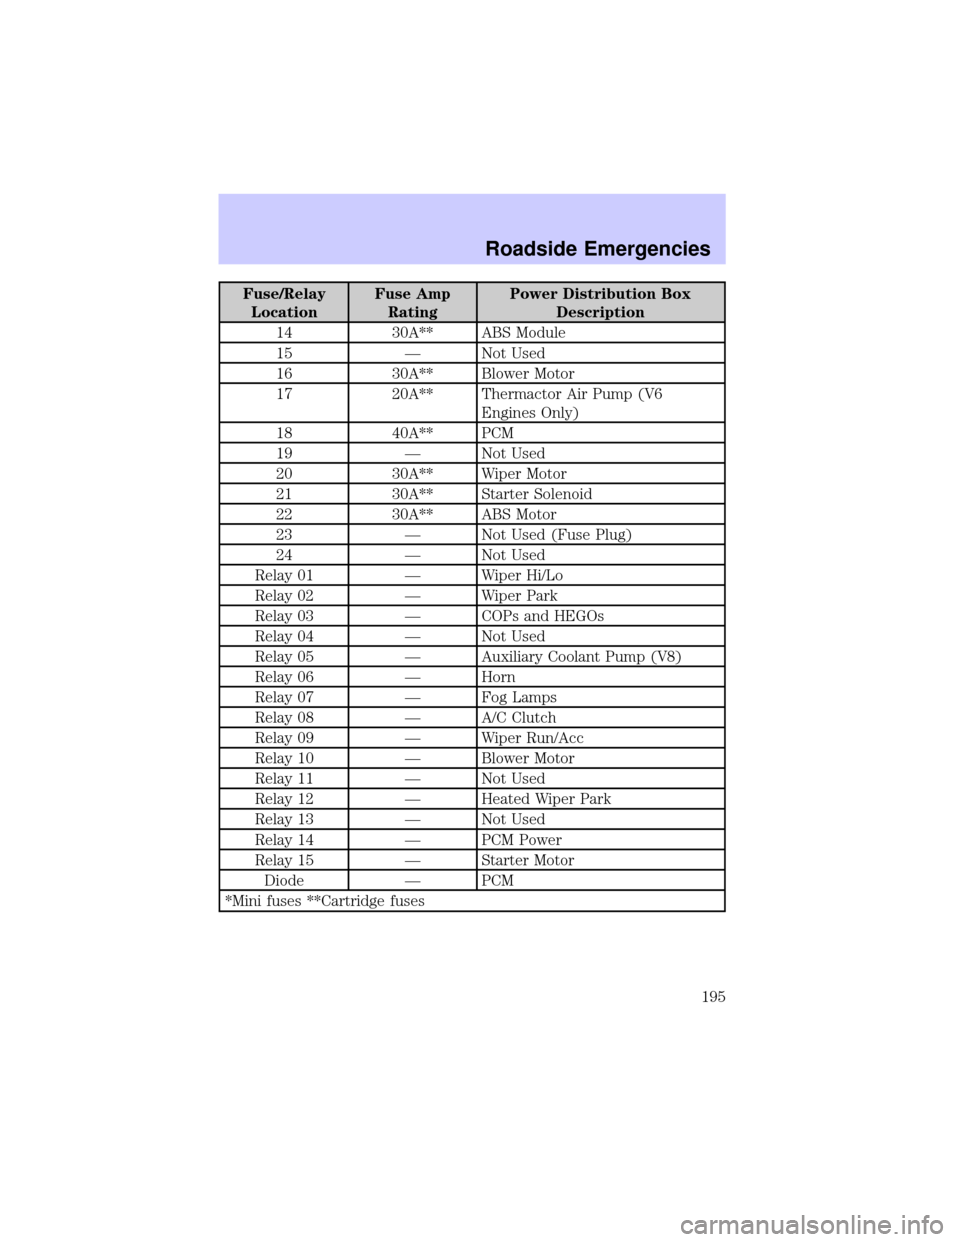
Fuse/Relay
LocationFuse Amp
RatingPower Distribution Box
Description
14 30A** ABS Module
15 Ð Not Used
16 30A** Blower Motor
17 20A** Thermactor Air Pump (V6
Engines Only)
18 40A** PCM
19 Ð Not Used
20 30A** Wiper Motor
21 30A** Starter Solenoid
22 30A** ABS Motor
23 Ð Not Used (Fuse Plug)
24 Ð Not Used
Relay 01 Ð Wiper Hi/Lo
Relay 02 Ð Wiper Park
Relay 03 Ð COPs and HEGOs
Relay 04 Ð Not Used
Relay 05 Ð Auxiliary Coolant Pump (V8)
Relay 06 Ð Horn
Relay 07 Ð Fog Lamps
Relay 08 Ð A/C Clutch
Relay 09 Ð Wiper Run/Acc
Relay 10 Ð Blower Motor
Relay 11 Ð Not Used
Relay 12 Ð Heated Wiper Park
Relay 13 Ð Not Used
Relay 14 Ð PCM Power
Relay 15 Ð Starter Motor
Diode Ð PCM
*Mini fuses **Cartridge fuses
Roadside Emergencies
195
Page 196 of 288
Rear power distribution box
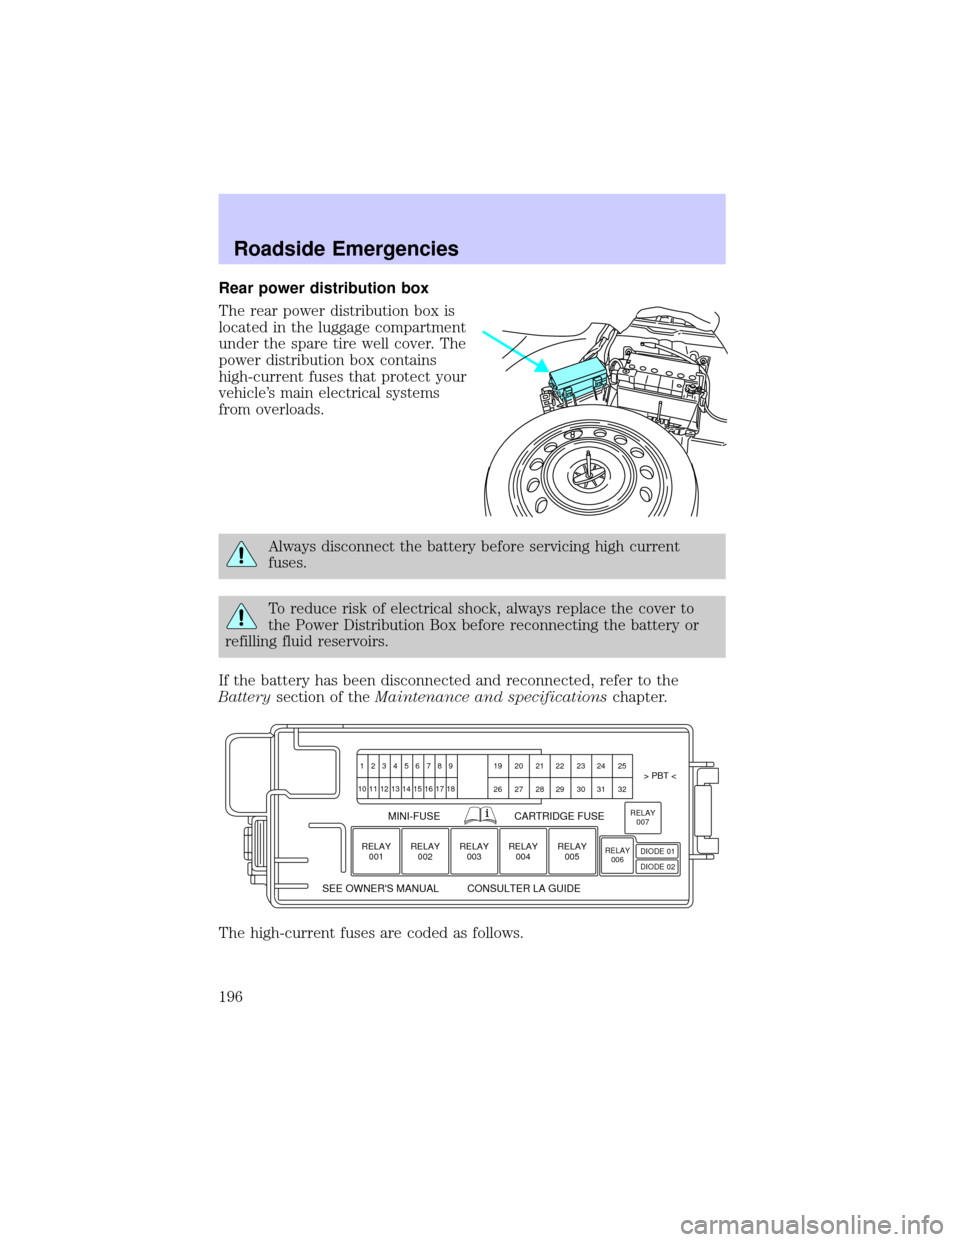
The rear power distribution box is
located in the luggage compartment
under the spare tire well cover. The
power distribution box contains
high-current fuses that protect your
vehicle's main electrical systems
from overloads.
Always disconnect the battery before servicing high current
fuses.
To reduce risk of electrical shock, always replace the cover to
the Power Distribution Box before reconnecting the battery or
refilling fluid reservoirs.
If the battery has been disconnected and reconnected, refer to the
Batterysection of theMaintenance and specificationschapter.
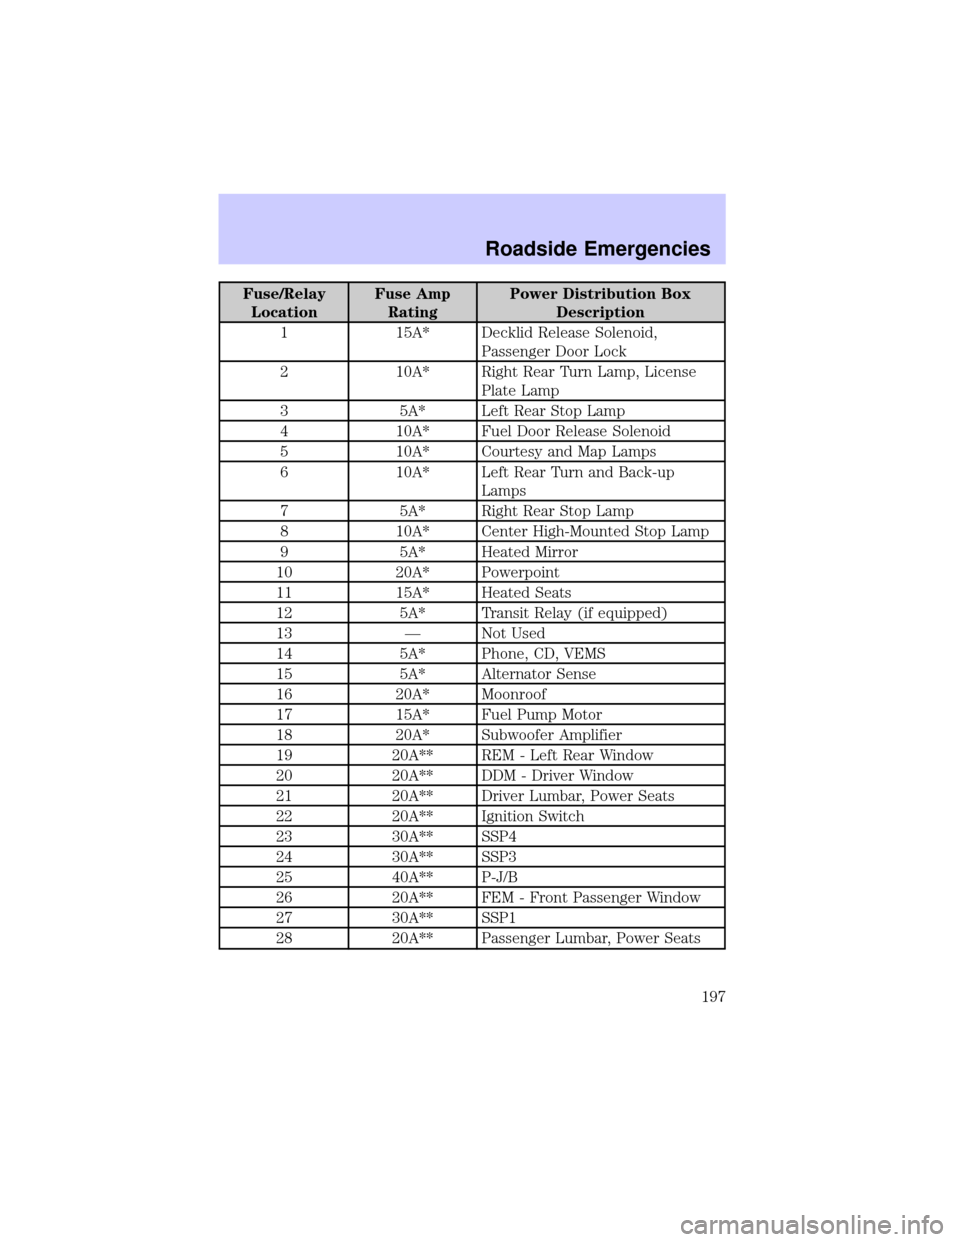
The high-current fuses are coded as follows.
123456789 19 20 21 22 23 24 25> PBT <
MINI-FUSE
SEE OWNER'S MANUAL CONSULTER LA GUIDECARTRIDGE FUSE
26 27 28 29 30 31 32 10 11
RELAY
001
12 13 14 15 16 17 18
RELAY
002RELAY
003RELAY
004RELAY
005RELAY
006RELAY
007
DIODE 01
DIODE 02
Roadside Emergencies
196
Page 197 of 288
Fuse/Relay
LocationFuse Amp
RatingPower Distribution Box
Description
1 15A* Decklid Release Solenoid,
Passenger Door Lock
2 10A* Right Rear Turn Lamp, License
Plate Lamp
3 5A* Left Rear Stop Lamp
4 10A* Fuel Door Release Solenoid
5 10A* Courtesy and Map Lamps
6 10A* Left Rear Turn and Back-up
Lamps
7 5A* Right Rear Stop Lamp
8 10A* Center High-Mounted Stop Lamp
9 5A* Heated Mirror
10 20A* Powerpoint
11 15A* Heated Seats
12 5A* Transit Relay (if equipped)
13 Ð Not Used
14 5A* Phone, CD, VEMS
15 5A* Alternator Sense
16 20A* Moonroof
17 15A* Fuel Pump Motor
18 20A* Subwoofer Amplifier
19 20A** REM - Left Rear Window
20 20A** DDM - Driver Window
21 20A** Driver Lumbar, Power Seats
22 20A** Ignition Switch
23 30A** SSP4
24 30A** SSP3
25 40A** P-J/B
26 20A** FEM - Front Passenger Window
27 30A** SSP1
28 20A** Passenger Lumbar, Power Seats
Roadside Emergencies
197