remove seats LINCOLN LS 2003 Owners Manual
[x] Cancel search | Manufacturer: LINCOLN, Model Year: 2003, Model line: LS, Model: LINCOLN LS 2003Pages: 288, PDF Size: 3.19 MB
Page 88 of 288
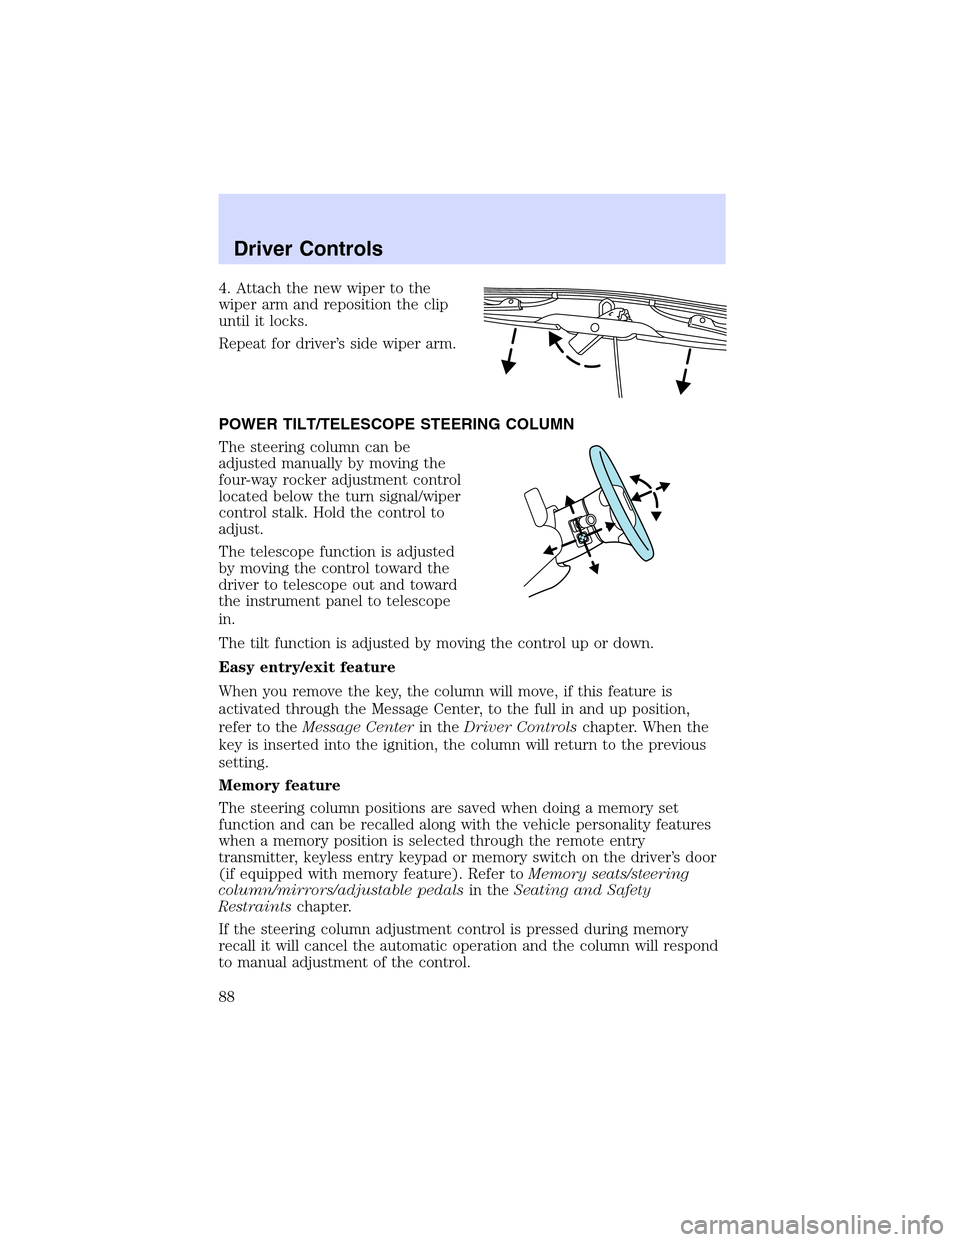
4. Attach the new wiper to the
wiper arm and reposition the clip
until it locks.
Repeat for driver’s side wiper arm.
POWER TILT/TELESCOPE STEERING COLUMN
The steering column can be
adjusted manually by moving the
four-way rocker adjustment control
located below the turn signal/wiper
control stalk. Hold the control to
adjust.
The telescope function is adjusted
by moving the control toward the
driver to telescope out and toward
the instrument panel to telescope
in.
The tilt function is adjusted by moving the control up or down.
Easy entry/exit feature
When you remove the key, the column will move, if this feature is
activated through the Message Center, to the full in and up position,
refer to theMessage Centerin theDriver Controlschapter. When the
key is inserted into the ignition, the column will return to the previous
setting.
Memory feature
The steering column positions are saved when doing a memory set
function and can be recalled along with the vehicle personality features
when a memory position is selected through the remote entry
transmitter, keyless entry keypad or memory switch on the driver’s door
(if equipped with memory feature). Refer toMemory seats/steering
column/mirrors/adjustable pedalsin theSeating and Safety
Restraintschapter.
If the steering column adjustment control is pressed during memory
recall it will cancel the automatic operation and the column will respond
to manual adjustment of the control.
Driver Controls
88
Page 94 of 288
![LINCOLN LS 2003 Owners Manual 3. Drive the vehicle slowly (less than 5 km/h [3 mph]) in circles or on
your everyday routine until the display reads a direction.
4. The compass is now calibrated.
Power side view mirrors
To adjust y LINCOLN LS 2003 Owners Manual 3. Drive the vehicle slowly (less than 5 km/h [3 mph]) in circles or on
your everyday routine until the display reads a direction.
4. The compass is now calibrated.
Power side view mirrors
To adjust y](/img/15/6885/w960_6885-93.png)
3. Drive the vehicle slowly (less than 5 km/h [3 mph]) in circles or on
your everyday routine until the display reads a direction.
4. The compass is now calibrated.
Power side view mirrors
To adjust your mirrors
1. Select
to adjust the left
mirror or
to adjust the right
mirror.
2. Move the disk control in the
direction you wish to tilt the mirror.
3. Return to the center position to
disable the adjust function.
Memory feature
The power side view mirror positions are saved when doing a memory
set function and can be recalled along with the vehicle personality
features when a memory position is selected through the remote entry
transmitter, keyless entry keypad or memory switch on the driver’s door
(if equipped with memory feature). Refer toMemory seats/steering
column/mirrors/adjustable pedalsin theSeating and Safety
Restraintschapter.
Heated outside mirrors
(if equipped)
Both mirrors are heated
automatically to remove ice, mist
and fog when the rear window
defrost is activated.
Do not remove ice from the
mirrors with a scraper or
attempt to readjust the mirror
glass if it is frozen in place.
These actions could cause damage to the glass and mirrors.
Driver Controls
94
Page 139 of 288
Theclimatecontrolled seat system includes an air filter that has to be
replaced periodically. Refer to theScheduled Maintenance Guidefor
more information.
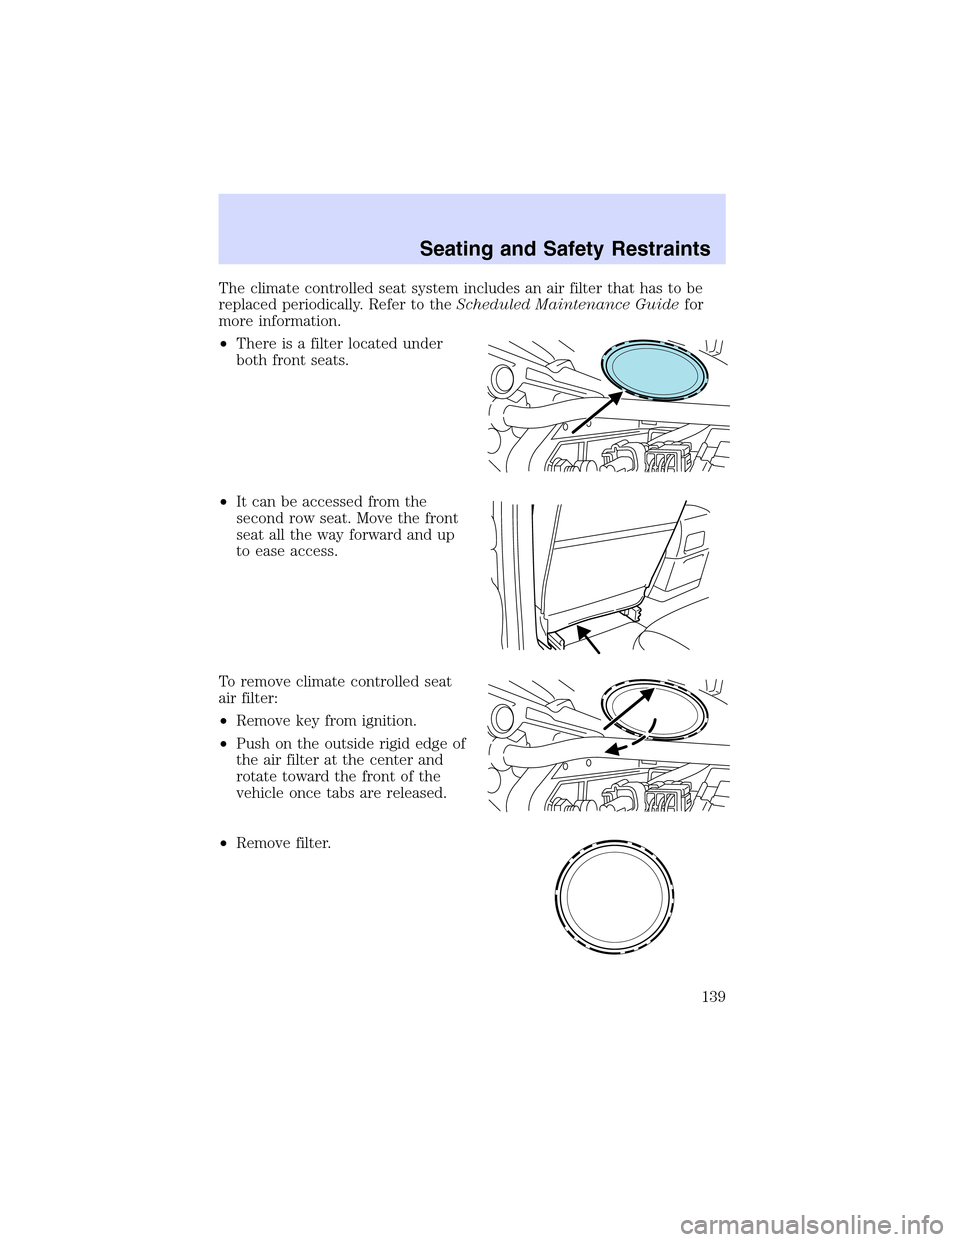
•There is a filter located under
both front seats.
•It can be accessed from the
second row seat. Move the front
seat all the way forward and up
to ease access.
To remove climate controlled seat
air filter:
•Remove key from ignition.
•Push on the outside rigid edge of
the air filter at the center and
rotate toward the front of the
vehicle once tabs are released.
•Remove filter.
Seating and Safety Restraints
139
Page 148 of 288
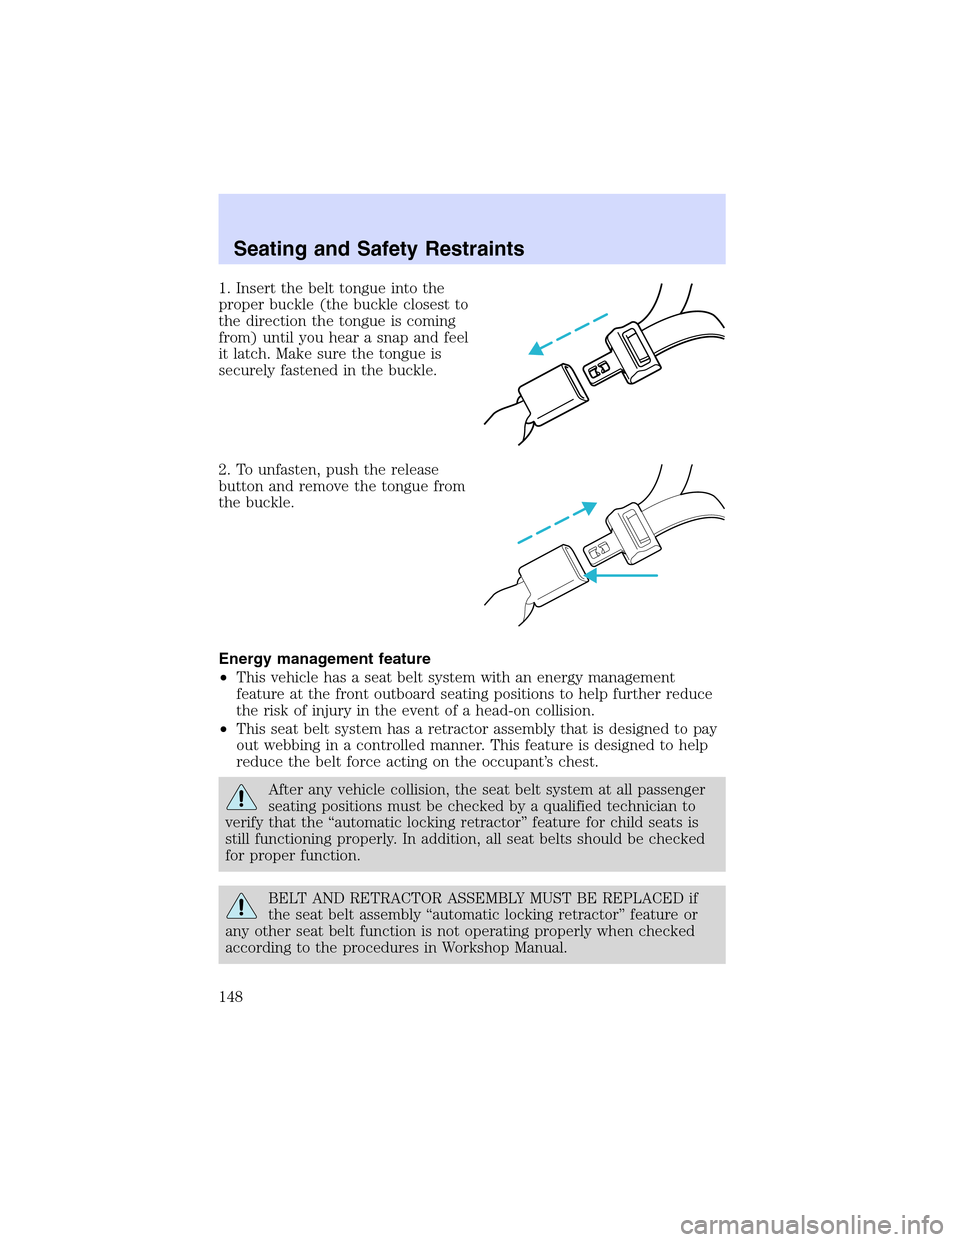
1. Insert the belt tongue into the
proper buckle (the buckle closest to
the direction the tongue is coming
from) until you hear a snap and feel
it latch. Make sure the tongue is
securely fastened in the buckle.
2. To unfasten, push the release
button and remove the tongue from
the buckle.
Energy management feature
•This vehicle has a seat belt system with an energy management
feature at the front outboard seating positions to help further reduce
the risk of injury in the event of a head-on collision.
•This seat belt system has a retractor assembly that is designed to pay
out webbing in a controlled manner. This feature is designed to help
reduce the belt force acting on the occupant’s chest.
After any vehicle collision, the seat belt system at all passenger
seating positions must be checked by a qualified technician to
verify that the“automatic locking retractor”feature for child seats is
still functioning properly. In addition, all seat belts should be checked
for proper function.
BELT AND RETRACTOR ASSEMBLY MUST BE REPLACED if
the seat belt assembly“automatic locking retractor”feature or
any other seat belt function is not operating properly when checked
according to the procedures in Workshop Manual.
Seating and Safety Restraints
148
Page 150 of 288
In this mode, the shoulder belt is automatically pre-locked. The belt will
still retract to remove any slack in the shoulder belt. The automatic
locking mode is not available on the driver safety belt.
This mode should be usedany timea child safety seat is installed in the
vehicle. Children 12 years old and under should be properly restrained in
the rear seat whenever possible. Refer toSafety restraints for children
orSafety seats for childrenlater in this chapter.
How to disengage the automatic locking mode
Unbuckle the combination lap and shoulder belt and allow it to retract
completely to disengage the automatic locking mode and activate the
vehicle sensitive (emergency) locking mode.
After any vehicle collision, the combination lap and shoulder belt
system at all passenger seating positions must be checked by a
qualified technician to verify that the“automatic locking retractor”
feature for child seats is still functioning properly, in addition to other
checks for proper seat belt system function.
BELT AND RETRACTOR ASSEMBLY MUST BE REPLACED if
the safety belt assembly“automatic locking retractor”feature or
any other safety belt function is not operating properly. In addition, all
safety belts should be checked for proper function. Failure to replace
the belt and retractor assembly could increase the risk of injury in
collisions.
Safety belt pretensioner
Your vehicle is equipped with safety belt pretensioners at the driver and
front passenger seating positions.
The safety belt pretensioner is a device which removes excess webbing
from the safety belt system. The safety belt pretensioner uses the same
crash sensor system as the front air bag supplemental restraint system
(SRS). When the safety belt pretensioner deploys, webbing from the lap
and shoulder belt is tightened. The driver and front passenger seat belt
system (including retractors, buckles and height adjusters) must be
replaced if the vehicle is involved in a collision that results in
deployment of front air bags and safety belt pretensioners. Refer to the
Safety belt maintenancesection in this chapter.
Seating and Safety Restraints
150
Page 171 of 288
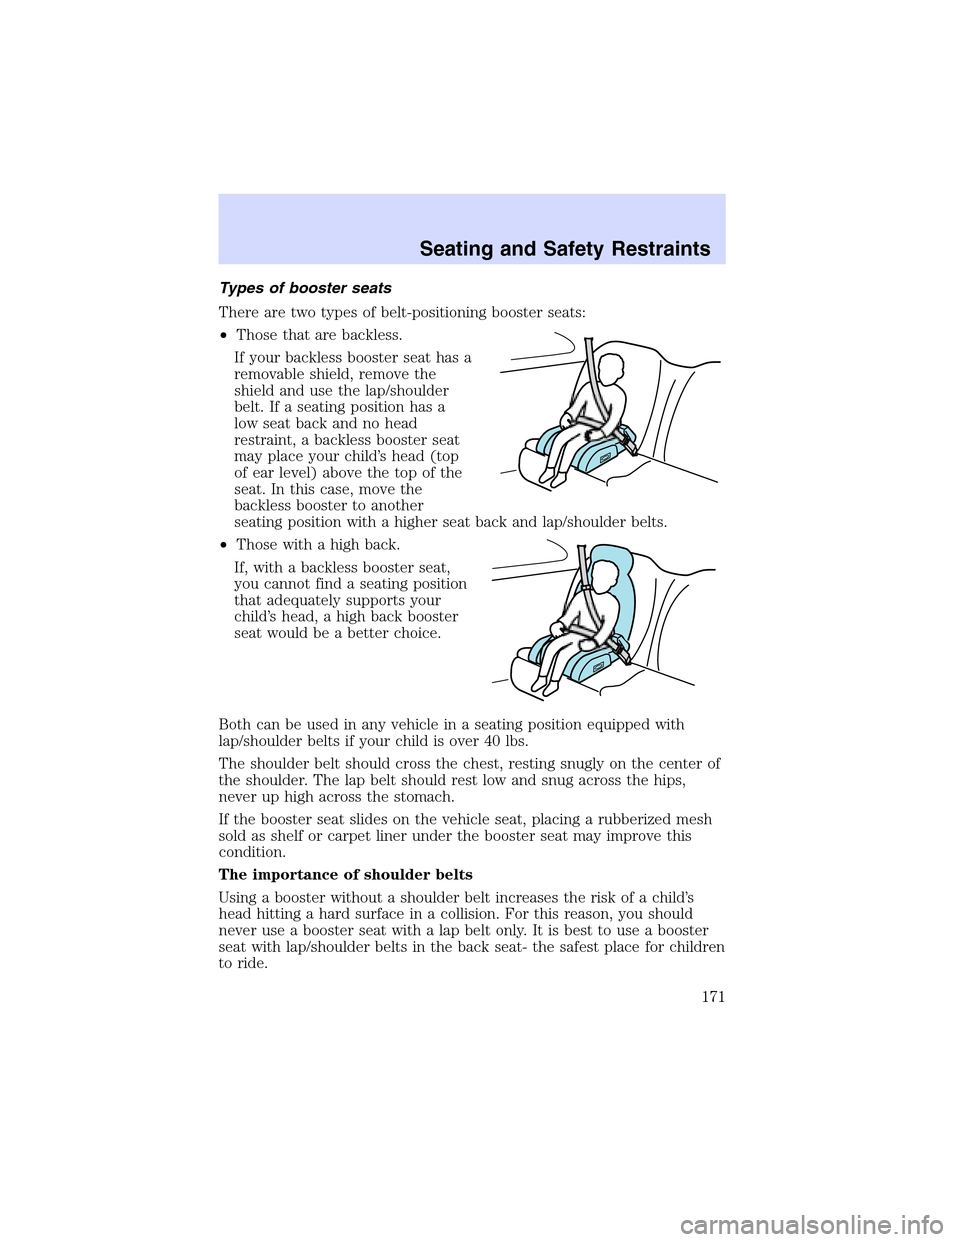
Typesofboosterseats
There are two types of belt-positioning booster seats:
•Those that are backless.
If your backless booster seat has a
removable shield, remove the
shield and use the lap/shoulder
belt. If a seating position has a
low seat back and no head
restraint, a backless booster seat
may place your child’s head (top
of ear level) above the top of the
seat. In this case, move the
backless booster to another
seating position with a higher seat back and lap/shoulder belts.
•Those with a high back.
If, with a backless booster seat,
you cannot find a seating position
that adequately supports your
child’s head, a high back booster
seat would be a better choice.
Both can be used in any vehicle in a seating position equipped with
lap/shoulder belts if your child is over 40 lbs.
The shoulder belt should cross the chest, resting snugly on the center of
the shoulder. The lap belt should rest low and snug across the hips,
never up high across the stomach.
If the booster seat slides on the vehicle seat, placing a rubberized mesh
sold as shelf or carpet liner under the booster seat may improve this
condition.
The importance of shoulder belts
Using a booster without a shoulder belt increases the risk of a child’s
head hitting a hard surface in a collision. For this reason, you should
never use a booster seat with a lap belt only. It is best to use a booster
seat with lap/shoulder belts in the back seat- the safest place for children
to ride.
Seating and Safety Restraints
171
Page 176 of 288
8.Allowthesafetybelttoretract to
remove any slack in the belt.
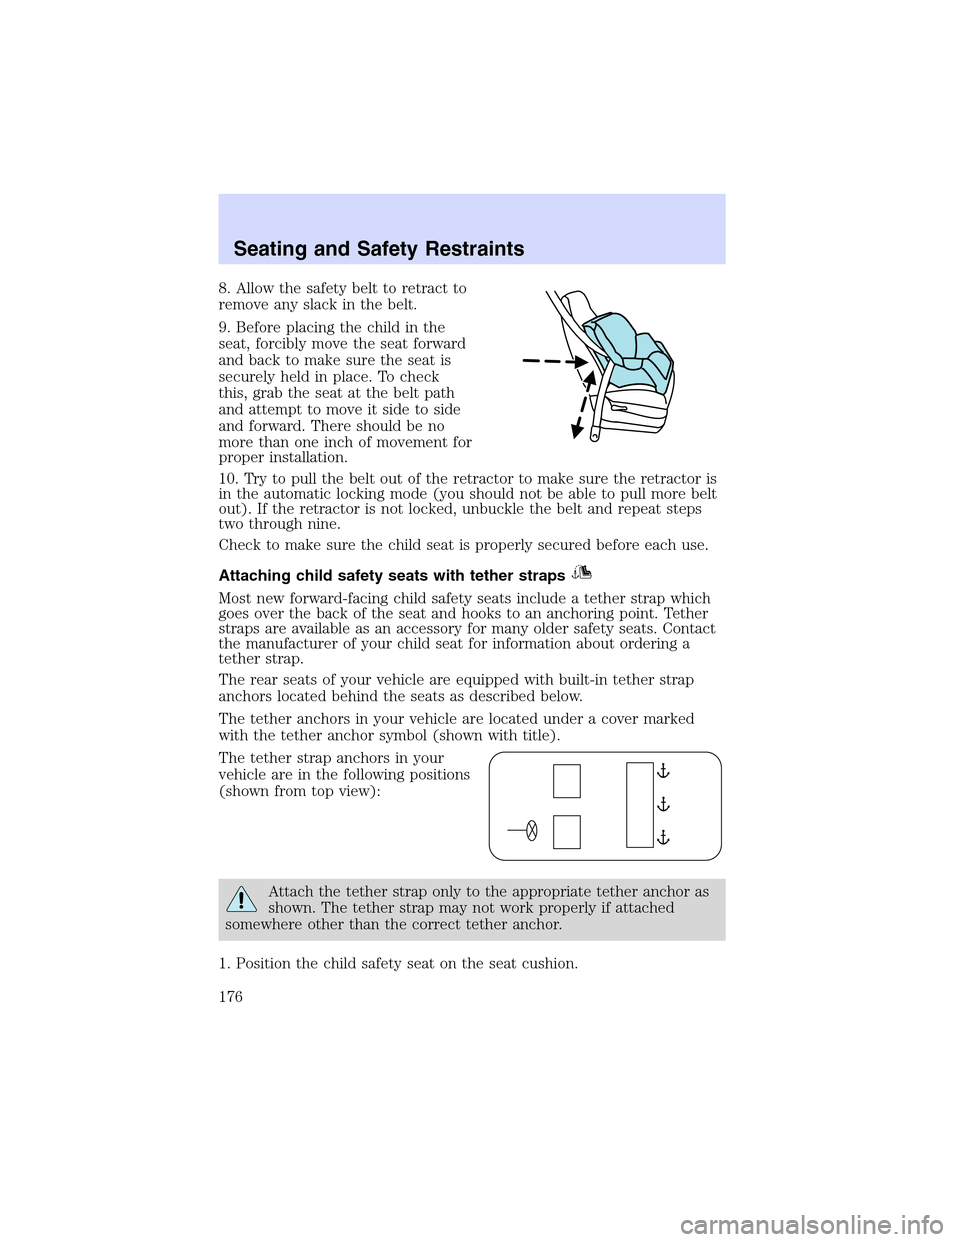
9. Before placing the child in the
seat, forcibly move the seat forward
and back to make sure the seat is
securely held in place. To check
this, grab the seat at the belt path
and attempt to move it side to side
and forward. There should be no
more than one inch of movement for
proper installation.
10. Try to pull the belt out of the retractor to make sure the retractor is
in the automatic locking mode (you should not be able to pull more belt
out). If the retractor is not locked, unbuckle the belt and repeat steps
two through nine.
Check to make sure the child seat is properly secured before each use.
Attaching child safety seats with tether straps
Most new forward-facing child safety seats include a tether strap which
goes over the back of the seat and hooks to an anchoring point. Tether
straps are available as an accessory for many older safety seats. Contact
the manufacturer of your child seat for information about ordering a
tether strap.
The rear seats of your vehicle are equipped with built-in tether strap
anchors located behind the seats as described below.
The tether anchors in your vehicle are located under a cover marked
with the tether anchor symbol (shown with title).
The tether strap anchors in your
vehicle are in the following positions
(shown from top view):
Attach the tether strap only to the appropriate tether anchor as
shown. The tether strap may not work properly if attached
somewhere other than the correct tether anchor.
1. Position the child safety seat on the seat cushion.
Seating and Safety Restraints
176
Page 236 of 288
•If tar or grease spots are present, use Ford Extra Strength Tar and
Road Oil Removal (B7A-19520–AA).
WINDOWS AND WIPER BLADES
The windshield, rear window and wiper blades should be cleaned
regularly. If the wiper does not wipe properly, substances on the
windshield, rear window or the wiper blades may be the cause. These
may include hot wax treatments used by commercial car washes, tree
sap, or other organic contamination. To clean these items, please follow
these tips:
•The windshield or rear window may be cleaned with a non-abrasive
cleaner such as Motorcraft Ultra Clear Spray Glass Cleaner (ZC-23),
available from your dealer.
•Do not use abrasives, as they may cause scratches.
•Do not use fuel, kerosene, or paint thinner to clean any parts.
•Wiper blades can be cleaned with isopropyl (rubbing) alcohol or
windshield washer solution. Be sure to replace wiper blades when they
appear worn or do not function properly.
INSTRUMENT PANEL AND CLUSTER LENS
Clean the instrument panel with a damp cloth, then dry with a dry cloth.
•Avoid cleaners or polish that increase the gloss of the upper portion of
the instrument panel. The dull finish in this area helps protect the
driver from undesirable windshield reflection.
Do not use chemical solvents or strong detergents when cleaning
the steering wheel or instrument panel to avoid contamination of
the air bag system.
•Be certain to wash or wipe your hands clean if you have been in
contact with certain products such as insect repellent and suntan
lotion in order to avoid possible damage to the interior painted
surfaces.
CLEANING SEATS EQUIPPED WITH SIDE AIR BAGS
Remove dust and loose dirt with a vacuum cleaner. In order to remove
stains and soil, clean with Extra Strength Upholstery Cleaner
(E8AZ-19523–AA).
Never saturate the seat covers with any cleaning solution.
Cleaning
236
Page 237 of 288
Do not use chemical solvents or strong detergents when cleaning
the seat where the side air bag is mounted. Such products could
contaminate the side air bag system and affect performance of the side
air bag in a collision. The air bag may not function correctly and not
provide injury reduction benefits.
INTERIOR TRIM
•Clean the interior trim areas with a damp cloth, then dry by wiping
with a dry, soft, clean cloth.
•Do not use household or glass cleaners as these may damage the
finish.
INTERIOR
For fabric, carpets, cloth seats, safety belts and seats equipped with side
air bags:
•Remove dust and loose dirt with a vacuum cleaner.
•Remove light stains and soil with Ford Extra Strength Upholstery
Cleaner (E8AZ-19523–AA).
•If grease or tar is present on the material, spot-clean the area first
with Motorcraft Spot and Stain Remover (ZC-14).
•Never saturate the seat covers with cleaning solution.
•Do not use household cleaning products or glass cleaners, which can
stain and discolor the fabric and affect the flame retardant abilities of
the seat materials.
Do not use cleaning solvents, bleach or dye on the vehicle’s
safety belts, as these actions may weaken the belt webbing.
LEATHER SEATS (IF EQUIPPED)
Your leather seating surfaces have a clear, protective coating over the
leather.
•To clean, use a soft cloth with Motorcraft Deluxe Leather and Vinyl
Cleaner (ZC-11–A). Dry the area with a soft cloth.
•To help maintain its resiliency and color, use the Motorcraft Deluxe
Leather Care Kit (ZC-11–D), available from your authorized dealer.
•Do not use household cleaning products, alcohol solutions, solvents or
cleaners intended for rubber, vinyl and plastics, or oil/petroleum-based
leather conditioners. These products may cause premature wearing of
the clear, protective coating.
Cleaning
237