check engine LINCOLN MKC 2015 User Guide
[x] Cancel search | Manufacturer: LINCOLN, Model Year: 2015, Model line: MKC, Model: LINCOLN MKC 2015Pages: 490, PDF Size: 4.74 MB
Page 164 of 490
Note:
If the engine is idling for 30 minutes,
the ignition and engine automatically shut
down.
Stopping the Engine When Your
Vehicle is Moving WARNING
Switching off the engine when the
vehicle is still moving will result in a
loss of brake and steering assistance. The
steering will not lock, but higher effort will
be required. When the ignition is switched
off, some electrical circuits, warning lamps
and indicators may also be off. 1. Put the transmission in position N and
use the brakes to bring your vehicle to a
safe stop.
2. When your vehicle has stopped, put the transmission in position
P.
3. Press and hold the button for one second, or press it three times within two
seconds.
4. Apply the parking brake. Guarding Against Exhaust Fumes WARNING
If you smell exhaust fumes inside your
vehicle, have your vehicle checked by
your authorized dealer immediately. Do not
drive your vehicle if you smell exhaust fumes.
Carbon monoxide is present in exhaust
fumes. Take precautions to avoid its
dangerous effects. Important Ventilating Information
If you stop your vehicle and the leave the
engine idling for long periods, we
recommend that you do one of the following:
•
Open the windows at least 1 inch (2.5
centimeters)
• Set your climate control to outside air.
ENGINE BLOCK HEATER (If Equipped) WARNINGS
Failure to follow engine block heater
instructions could result in property
damage or serious personal injury. WARNINGS
Do not use your heater with
ungrounded electrical systems or
two-pronged adapters. There is a risk of
electrical shock. Note:
The heater is most effective when
outdoor temperatures are below 0°F (-18°C).
The heater acts as a starting aid by warming
the engine coolant. This allows the climate
control system to respond quickly. The
equipment includes a heater element
(installed in the engine block) and a wire
harness. You can connect the system to a
grounded 120-volt AC electrical source.
161
MKC (TME), enUSA Starting and Stopping the Engine
Page 165 of 490
We recommend that you do the following for
a safe and correct operation:
•
Use a 16-gauge outdoor extension cord
that is product certified by Underwriter’ s
Laboratory (UL) or Canadian Standards
Association (CSA). This extension cord
must be suitable for use outdoors, in cold
temperatures, and be clearly marked
Suitable for Use with Outdoor
Appliances. Do not use an indoor
extension cord outdoors. This could
result in an electric shock or become a
fire hazard.
• Use as short an extension cord as
possible.
• Do not use multiple extension cords.
• Make sure that when in operation, the
extension cord plug and heater cord plug
connections are free and clear of water.
This could cause an electric shock or fire.
• Make sure your vehicle is parked in a
clean area, clear of combustibles.
• Make sure the heater, heater cord and
extension cord are firmly connected. •
Check for heat anywhere in the electrical
hookup once the system has been
operating for approximately 30 minutes.
• Make sure the system is unplugged and
properly stowed before driving your
vehicle. Make sure the protective cover
seals the prongs of the block heater cord
plug when not in use.
• Make sure the heater system is checked
for proper operation before winter.
Using the Engine Block Heater
Make sure the receptacle terminals are clean
and dry prior to use. Clean them with a dry
cloth if necessary.
The heater uses 0.4 to 1.0 kilowatt-hours of
energy per hour of use. The system does not
have a thermostat. It achieves maximum
temperature after approximately three hours
of operation. Using the heater longer than
three hours does not improve system
performance and unnecessarily uses
electricity.
162
MKC (TME), enUSA Starting and Stopping the Engine
Page 170 of 490
3.
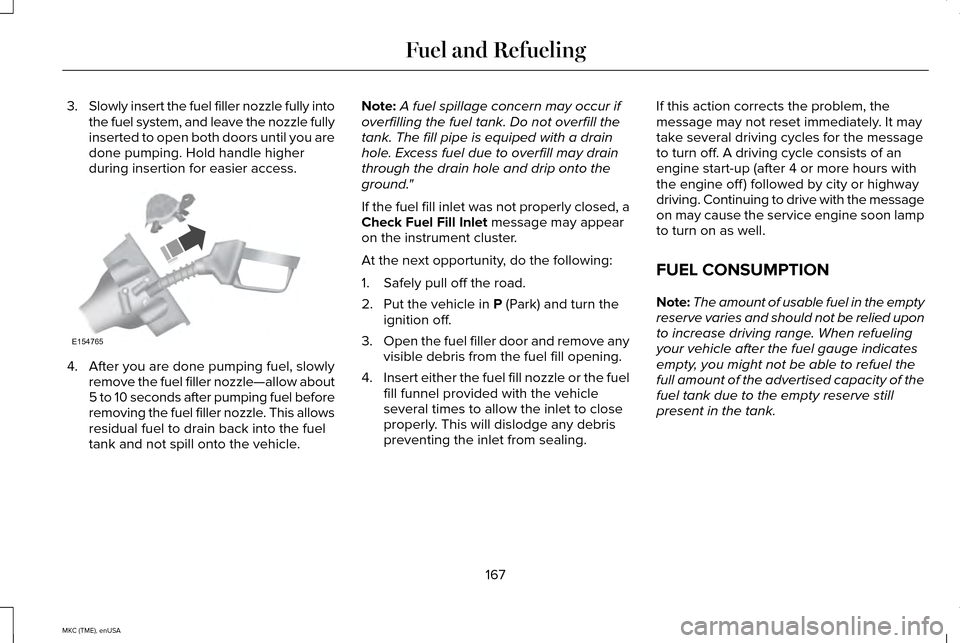
Slowly insert the fuel filler nozzle fully into
the fuel system, and leave the nozzle fully
inserted to open both doors until you are
done pumping. Hold handle higher
during insertion for easier access. 4. After you are done pumping fuel, slowly
remove the fuel filler nozzle—allow about
5 to 10 seconds after pumping fuel before
removing the fuel filler nozzle. This allows
residual fuel to drain back into the fuel
tank and not spill onto the vehicle. Note:
A fuel spillage concern may occur if
overfilling the fuel tank. Do not overfill the
tank. The fill pipe is equiped with a drain
hole. Excess fuel due to overfill may drain
through the drain hole and drip onto the
ground."
If the fuel fill inlet was not properly closed, a
Check Fuel Fill Inlet message may appear
on the instrument cluster.
At the next opportunity, do the following:
1. Safely pull off the road.
2. Put the vehicle in
P (Park) and turn the
ignition off.
3. Open the fuel filler door and remove any
visible debris from the fuel fill opening.
4. Insert either the fuel fill nozzle or the fuel
fill funnel provided with the vehicle
several times to allow the inlet to close
properly. This will dislodge any debris
preventing the inlet from sealing. If this action corrects the problem, the
message may not reset immediately. It may
take several driving cycles for the message
to turn off. A driving cycle consists of an
engine start-up (after 4 or more hours with
the engine off ) followed by city or highway
driving. Continuing to drive with the message
on may cause the service engine soon lamp
to turn on as well.
FUEL CONSUMPTION
Note:
The amount of usable fuel in the empty
reserve varies and should not be relied upon
to increase driving range. When refueling
your vehicle after the fuel gauge indicates
empty, you might not be able to refuel the
full amount of the advertised capacity of the
fuel tank due to the empty reserve still
present in the tank.
167
MKC (TME), enUSA Fuel and RefuelingE154765
Page 173 of 490
You can correct these temporary
malfunctions by filling the fuel tank with good
quality fuel, properly closing the fuel fill inlet
or letting the electrical system dry out. After
three driving cycles without these or any
other temporary malfunctions present, the
service engine soon indicator should stay off
the next time you start the engine. A driving
cycle consists of a cold engine startup
followed by mixed city/highway driving. No
additional vehicle service is required.
If the service engine soon indicator remains
on, have your vehicle serviced at the first
available opportunity. Although some
malfunctions detected by the OBD-II may not
have symptoms that are apparent, continued
driving with the service engine soon indicator
on can result in increased emissions, lower
fuel economy, reduced engine and
transmission smoothness, and lead to more
costly repairs.
Readiness for Inspection/Maintenance
(I/M) Testing
Some state/provincial and local governments
may have Inspection/Maintenance (I/M)
programs to inspect the emission control
equipment on your vehicle. Failure to pass
this inspection could prevent you from
getting a vehicle registration. If the service engine soon indicator
is on or the bulb does not work,
you may need to have the vehicle
serviced. See On-Board Diagnostics (OBD-II).
Your vehicle may not pass the I/M test if the
service engine soon indicator is on or not
working properly (bulb is burned out), or if
the OBD-II system has determined that some
of the emission control systems have not
been properly checked. In this case, your
vehicle is not ready for I/M testing.
If the vehicle ’s engine or transmission has
just been serviced, or the battery has
recently run down or been replaced, the
OBD-II system may indicate that the vehicle
is not ready for I/M testing. To determine if
the vehicle is ready for I/M testing, turn the ignition key to the on position for 15 seconds
without cranking the engine. If the service
engine soon indicator blinks eight times, it
means that the vehicle is not ready for I/M
testing; if the service engine soon indicator
stays on solid, it means that the vehicle is
ready for I/M testing.
The OBD-II system monitors the emission
control system during normal driving. A
complete check may take several days. If the
vehicle is not ready for I/M testing, you may
need to perform the following driving cycle
consisting of mixed city and highway driving:
Drive on an expressway or highway for a
steady 15 minutes, followed by 20 minutes
of stop-and-go driving with at least four
30-second idle periods.
Allow the vehicle to sit for at least eight hours
without starting the engine. Then, start the
engine and complete the above driving
cycle. The engine must warm up to its normal
operating temperature. Once started, do not
turn off the engine until the above driving
cycle is complete. If the vehicle is still not
ready for I/M testing, you will have to repeat
the above driving cycle.
170
MKC (TME), enUSA Fuel and Refueling
Page 180 of 490
USING ALL-WHEEL DRIVE
Note:
When a system malfunction is present,
a warning message appears in the
information display. See Information
Messages (page 118). This means the system
is not functioning correctly and only
front-wheel drive is available. Have your
vehicle checked by an authorized dealer.
Note: When the system overheats and
switches to front-wheel drive, a warning
message appears in the information display.
This may occur if you operate your vehicle
in extreme high load conditions or with
excessive wheel spin (for example, deep
sand). To resume all-wheel drive function,
stop your vehicle in a safe location and turn
off the ignition. When the system cools,
normal all-wheel drive function will return.
The information display indicates, for about
five seconds, this return.
Note: When using the spare tire, a warning
message may appear in the information
display. This message turns off after
reinstalling the repaired or replaced road
tire and you switch on the ignition. Note:
Re-install the repaired tire or replace
the tire as soon as possible. Different tire
sizes between the front and rear axles can
cause system damage, or turn off the
all-wheel drive.
This system anticipates wheel spin and
transfers power to the rear wheels before
the spin occurs. Even when wheel spin is not
occurring, the system is continuously
adjusting power distribution to the wheels,
in an attempt to improve straight line and
cornering, both on and off road.
The system automatically turns on every time
you switch on the ignition.
The all-wheel drive system does not require
maintenance.
The all-wheel drive system gives your vehicle
some limited off-road capabilities. Operating
your vehicle in conditions other than
moderate sand, snow, mud or rough roads
could subject it to excessive stress and heat.
This could result in system damage. Your
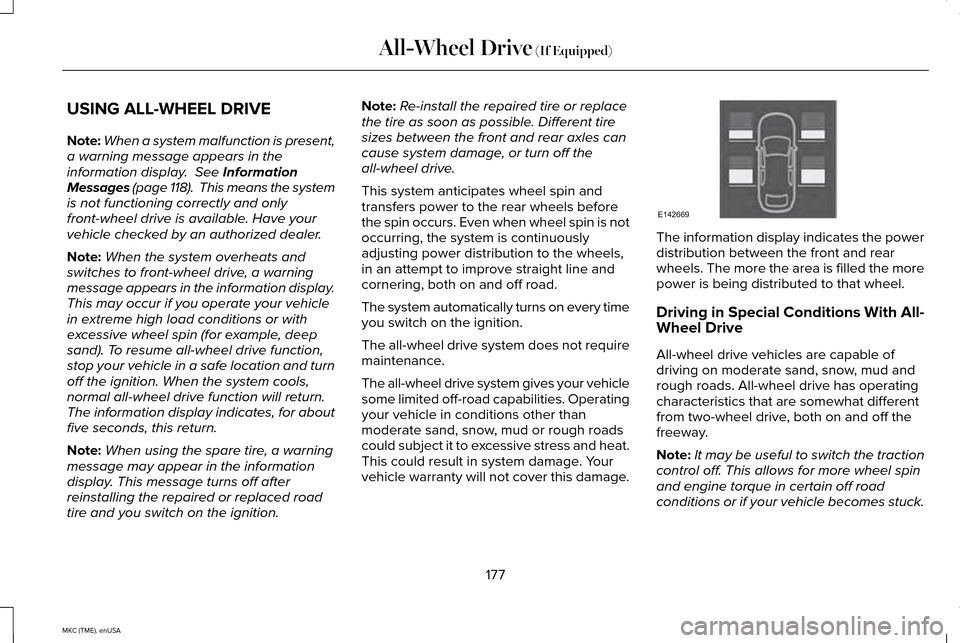
vehicle warranty will not cover this damage. The information display indicates the power
distribution between the front and rear
wheels. The more the area is filled the more
power is being distributed to that wheel.
Driving in Special Conditions With All-
Wheel Drive
All-wheel drive vehicles are capable of
driving on moderate sand, snow, mud and
rough roads. All-wheel drive has operating
characteristics that are somewhat different
from two-wheel drive, both on and off the
freeway.
Note:
It may be useful to switch the traction
control off. This allows for more wheel spin
and engine torque in certain off road
conditions or if your vehicle becomes stuck.
177
MKC (TME), enUSA All-Wheel Drive
(If Equipped)E142669
Page 182 of 490
To resume operation, switch the ignition off
and allow the system to cool down for a
minimum of 15 minutes. After the system has
cooled down, you will see a brief message
display in the information display. See
Information Messages (page 118).
When driving at slow speeds in deep sand
under high outside temperatures, use a low
gear when possible. Low gear operation will
maximize the engine and transmission
cooling capability.
Tips when driving over sand:
• Keep all four wheels on the most solid
area of the trail.
• Shift to a lower gear.
• Apply the accelerator slowly.
• Drive steadily through the terrain.
• Avoid excessive wheel spin.
• Avoid reducing the tire pressures. Mud and Water
Mud
Avoid sudden changes in vehicle speed or
direction when you are driving in mud. Even
all-wheel drive vehicles can lose traction in
mud. If your vehicle does slide, steer in the
direction of the slide until you regain control
of your vehicle.
After driving through mud, clean off excess
mud stuck to rotating driveshafts and tires.
Excess mud stuck on tires and rotating
driveshafts can cause an imbalance that
could damage drive components.
Water
Drive slowly through high water. Traction or
brake capability may be limited.
When driving through water, determine the
depth and avoid water higher than the
bottom of the wheel rims. If the ignition
system gets wet, your vehicle may stall. Once through water, always try the brakes.
Wet brakes will not stop your vehicle as
quickly as dry brakes. Apply light pressure
to the brake pedal while slowly moving the
vehicle to dry the brakes.
Note:
Driving through deep water may
damage the transmission. If the front or rear
axle is submerged in water, the axle
lubricant and power transfer unit lubricant
should be checked and changed if
necessary.
Driving on Hilly or Sloping Terrain
Although natural obstacles may make it
necessary to travel diagonally up or down a
hill or steep incline, always try to drive
straight up or straight down the sloping
terrain.
Note: To maintain traction and avoid
possibly rolling your vehicle, avoid turning
on steep slopes or hills. When you drive on
a hill, determine beforehand the route you
will use. Do not drive over a hill without first
seeing what is on the other side. Do not drive
in reverse over a hill without the aid of an
observer.
179
MKC (TME), enUSA All-Wheel Drive
(If Equipped)
Page 211 of 490
You should select a lower gear when the
system is active in situations such as
prolonged downhill driving on steep grades,
for example in mountainous areas. The
system needs additional engine braking in
these situations to reduce the load on the
vehicle
’s regular brake system to prevent it
from overheating.
Switching the System Off
Note: The set speed memory erases when
you switch off the system.
Press and release OFF or turn off the ignition.
Detection Issues
The radar sensor has a limited field of vision.
It may not detect vehicles at all or detect a
vehicle later than expected in some
situations. The lead vehicle graphic will not
illuminate if the system does not detect a
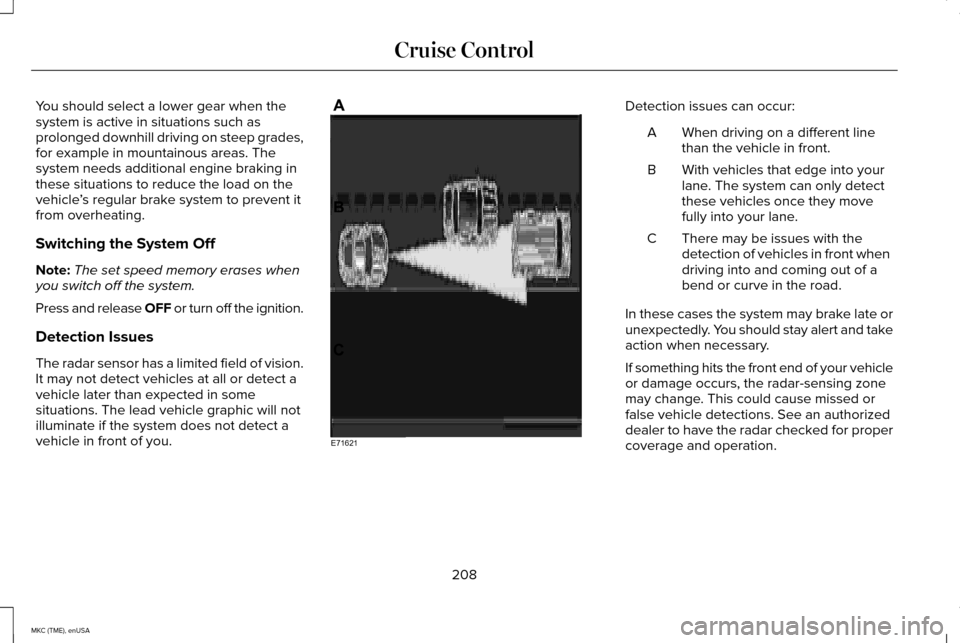
vehicle in front of you. Detection issues can occur:
When driving on a different line
than the vehicle in front.
A
With vehicles that edge into your
lane. The system can only detect
these vehicles once they move
fully into your lane.
B
There may be issues with the
detection of vehicles in front when
driving into and coming out of a
bend or curve in the road.
C
In these cases the system may brake late or
unexpectedly. You should stay alert and take
action when necessary.
If something hits the front end of your vehicle
or damage occurs, the radar-sensing zone
may change. This could cause missed or
false vehicle detections. See an authorized
dealer to have the radar checked for proper
coverage and operation.
208
MKC (TME), enUSA Cruise ControlE71621
Page 226 of 490
False Alerts
Note:
If your vehicle has a factory equipped
tow bar and it is towing a trailer, the sensors
will detect the trailer and turn the Blind Spot
Information and Cross Traffic Alert systems
off to avoid false alerts. For non-factory
equipped tow bars, you may want to turn
the Blind Spot Information System off
manually.
There may be certain instances when there
is a false alert by either the Blind Spot
Information or the Cross Traffic Alert systems
that illuminates the alert indicator with no
vehicle in the coverage zone. Some amount
of false alerts are normal; they are temporary
and self-correct.
System Errors
If either system senses a problem with the
left or right sensor, the Blind Spot Information
System telltale will illuminate and a message
will appear in the information display. See
Information Messages (page 118).
All other system faults will display only with
a message in the information display. Switching the Systems Off and On
You can temporarily switch off one or both
systems in the information display.
See
General Information (page 112). When you
switch off the Blind Spot Information System,
you will not receive alerts and the information
display will display a system off message.
The system switches back on whenever you
switch the ignition on.
You can also have one or both systems
switched off permanently at an authorized
dealer. Once switched off, the system can
only be switched back on at an authorized
dealer.
STEERING
Electric Power Steering WARNINGS
The electric power steering system has
diagnostic checks that continuously
monitor the system to ensure proper
operation. When a system error is detected
a steering message will appear in the
information display. WARNINGS
The electric power steering system has
diagnostic checks that continuously
monitor the system to ensure proper
operation of the electronic system. When an
electronic error is detected, a message will
be displayed in the information display. If this
happens, stop the vehicle in a safe place,
and turn off the engine. After at least 10
seconds, reset the system by restarting the
engine, and watch the information display
for a steering message. If a steering message
returns, or returns while driving, take the
vehicle to your dealer to have it checked. Obtain immediate service if a system
error is detected. You may not notice
any difference in the feel of your steering,
but a serious condition may exist. Failure to
do so may result in loss of steering control. Your vehicle is equipped with an electric
power-assisted steering system. There is no
fluid reservoir to check or fill.
223
MKC (TME), enUSA Driving Aids
Page 231 of 490
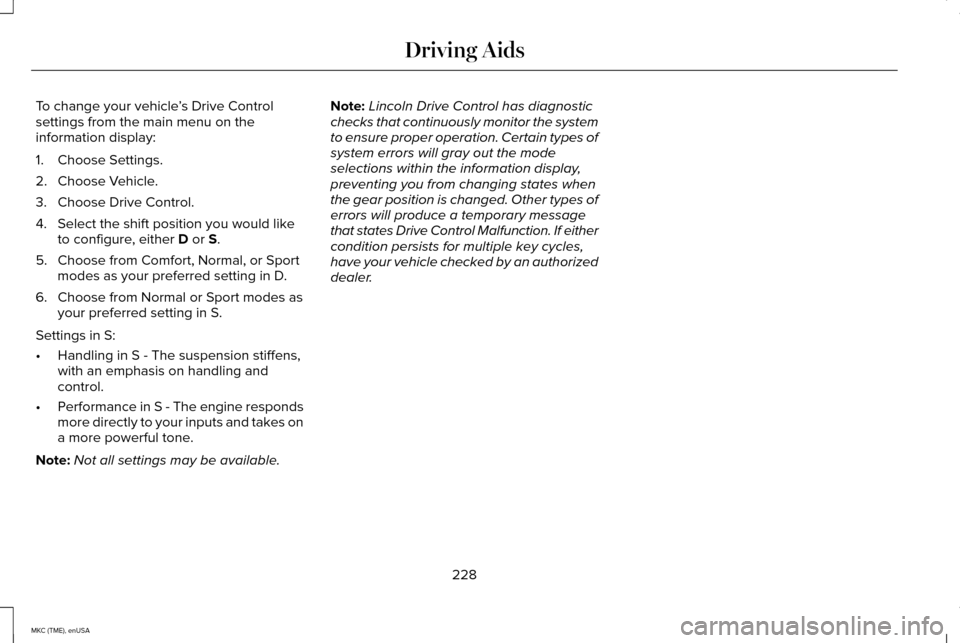
To change your vehicle
’s Drive Control
settings from the main menu on the
information display:
1. Choose Settings.
2. Choose Vehicle.
3. Choose Drive Control.
4. Select the shift position you would like to configure, either D or S.
5. Choose from Comfort, Normal, or Sport modes as your preferred setting in D.
6. Choose from Normal or Sport modes as your preferred setting in S.
Settings in S:
• Handling in S - The suspension stiffens,
with an emphasis on handling and
control.
• Performance in S - The engine responds
more directly to your inputs and takes on
a more powerful tone.
Note: Not all settings may be available. Note:
Lincoln Drive Control has diagnostic
checks that continuously monitor the system
to ensure proper operation. Certain types of
system errors will gray out the mode
selections within the information display,
preventing you from changing states when
the gear position is changed. Other types of
errors will produce a temporary message
that states Drive Control Malfunction. If either
condition persists for multiple key cycles,
have your vehicle checked by an authorized
dealer.
228
MKC (TME), enUSA Driving Aids
Page 243 of 490
Note:
This feature does not prevent trailer
sway, but reduces it once it begins.
Note: This feature cannot stop all trailers
from swaying.
Note: In some cases, if vehicle speed is too
high, the system may activate multiple times,
gradually reducing vehicle speed.
This feature applies the vehicle brakes at
individual wheels and, if necessary, reduces
engine power. If the trailer begins to sway,
the stability control light flashes. The first
thing to do is slow the vehicle down, then
pull safely to the side of the road and check
for proper tongue load and trailer load
distribution. See Load Carrying (page 229). RECOMMENDED TOWING
WEIGHTS
Note:
Do not exceed the trailer weight
for your vehicle configuration listed in
the chart below.
Note: Be sure to take into consideration
trailer frontal area. Do not exceed 20
feet 2
(1.86 meters 2
) if your vehicle is not
equipped with a towing package or 30
feet 2
(2.79 meters 2
) if your vehicle is
equipped with a towing package.
Note: For high altitude operation,
reduce the gross combined weight by
2% per 1000 feet (300 meters) starting
at the 1000 foot (300 meter) elevation
point. Note:
Certain states require electric
trailer brakes for trailers over a specified
weight. Be sure to check state
regulations for this specified weight. The
maximum trailer weights listed may be
limited to this specified weight, as the
vehicle ’s electrical system may not
include the wiring connector needed to
activate electric trailer brakes.
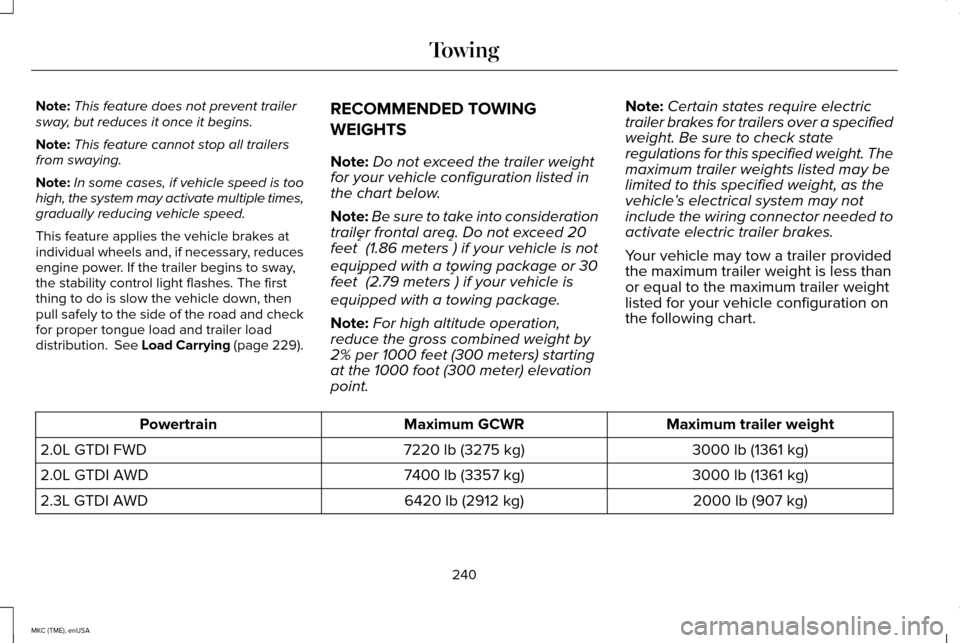
Your vehicle may tow a trailer provided
the maximum trailer weight is less than
or equal to the maximum trailer weight
listed for your vehicle configuration on
the following chart. Maximum trailer weight
Maximum GCWR
Powertrain
3000 lb (1361 kg)
7220 lb (3275 kg)
2.0L GTDI FWD
3000 lb (1361 kg)
7400 lb (3357 kg)
2.0L GTDI AWD
2000 lb (907 kg)
6420 lb (2912 kg)
2.3L GTDI AWD
240
MKC (TME), enUSA Towing