Rear door LINCOLN MKC 2015 Owners Manual
[x] Cancel search | Manufacturer: LINCOLN, Model Year: 2015, Model line: MKC, Model: LINCOLN MKC 2015Pages: 490, PDF Size: 4.74 MB
Page 5 of 490
Security
Passive Anti-Theft System............................80
Anti-Theft Alarm...............................................81
Steering Wheel
Adjusting the Steering Wheel.....................82
Audio Control
...................................................83
Voice Control...................................................84
Cruise Control
..................................................84
Information Display Control.........................84
Heated Steering Wheel
................................85
Wipers and Washers
Windshield Wipers
.........................................86
Autowipers........................................................87
Windshield Washers......................................88
Rear Window Wiper and Washers..............88
Lighting
Lighting Control..............................................90
Autolamps ..........................................................
91
Instrument Lighting Dimmer........................92
Headlamp Exit Delay.....................................92 Daytime Running Lamps...............................92
Automatic High Beam Control....................93
Direction Indicators........................................94
Welcome Lighting...........................................95
Interior Lamps
..................................................95
Ambient Lighting............................................96
Windows and Mirrors
Power Windows
...............................................97
Global Opening and Closing.......................98
Exterior Mirrors
................................................98
Interior Mirror
..................................................101
Sun Visors
.......................................................102
Moonroof.........................................................102
Instrument Cluster
Gauges............................................................105
Warning Lamps and Indicators
..................107
Audible Warnings and Indicators................111
Information Displays
General Information
.......................................112
Information Messages
...................................118 Climate Control
Automatic Climate Control..........................136
Hints on Controlling the Interior
Climate.........................................................138
Heated Windows and Mirrors....................139
Cabin Air Filter
...............................................140
Remote Start
...................................................140
Seats
Sitting in the Correct Position.....................141
Head Restraints
..............................................141
Power Seats....................................................143
Memory Function..........................................145
Rear Seats.......................................................146
Heated Seats
..................................................147
Climate Controlled Seats
............................148
Rear Seat Armrest
.........................................149
Universal Garage Door Opener
Universal Garage Door Opener................150
Auxiliary Power Points
Auxiliary Power Points.................................155
2
MKC (TME), enUSA Table of Contents
Page 38 of 490
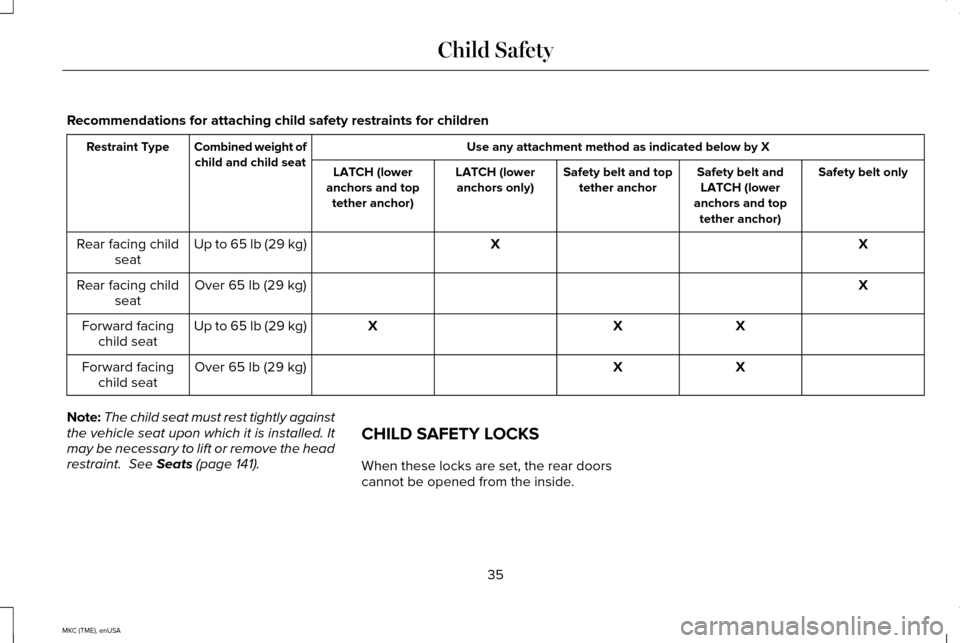
Recommendations for attaching child safety restraints for children
Use any attachment method as indicated below by X
Combined weight of
child and child seat
Restraint Type
Safety belt only
Safety belt and
LATCH (lower
anchors and top tether anchor)
Safety belt and top
tether anchor
LATCH (lower
anchors only)
LATCH (lower
anchors and top tether anchor)
X
X
Up to 65 lb (29 kg)
Rear facing child
seat
X
Over 65 lb (29 kg)
Rear facing child
seat
X
X
X
Up to 65 lb (29 kg)
Forward facing
child seat
X
X
Over 65 lb (29 kg)
Forward facing
child seat
Note: The child seat must rest tightly against
the vehicle seat upon which it is installed. It
may be necessary to lift or remove the head
restraint. See Seats (page 141). CHILD SAFETY LOCKS
When these locks are set, the rear doors
cannot be opened from the inside.
35
MKC (TME), enUSA Child Safety
Page 39 of 490
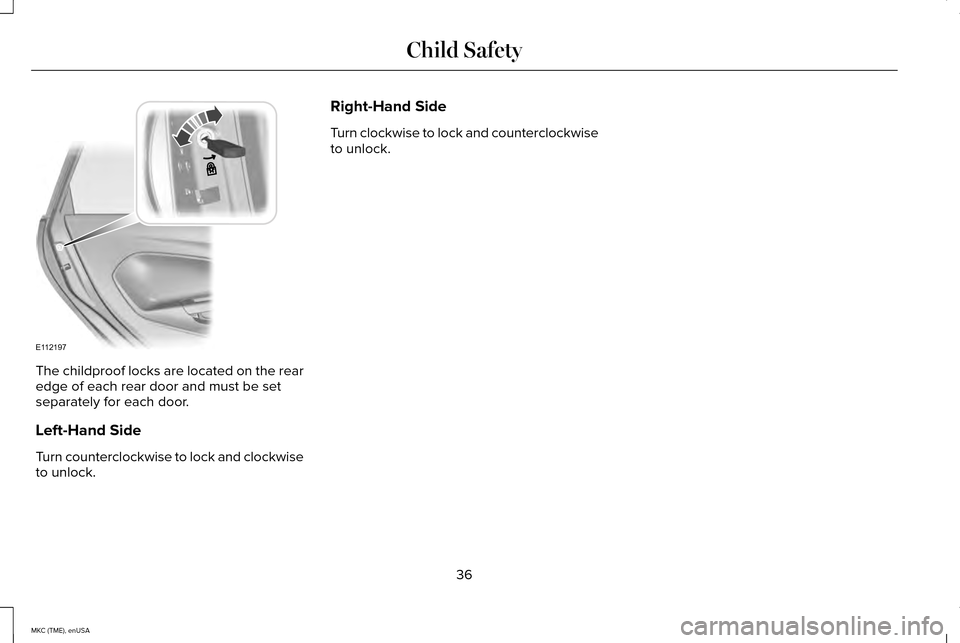
The childproof locks are located on the rear
edge of each rear door and must be set
separately for each door.
Left-Hand Side
Turn counterclockwise to lock and clockwise
to unlock. Right-Hand Side
Turn clockwise to lock and counterclockwise
to unlock.
36
MKC (TME), enUSA Child SafetyE112197
Page 57 of 490
WARNINGS
To reduce risk of injury, do not obstruct
or place objects in the deployment
path of the curtain airbag. If the curtain airbags have deployed,
the curtain airbags will not function
again. The curtain airbags (including the A,
B and C pillar trim and headliner) must be
inspected and serviced by an authorized
dealer. If the curtain airbag is not replaced,
the unrepaired area will increase the risk of
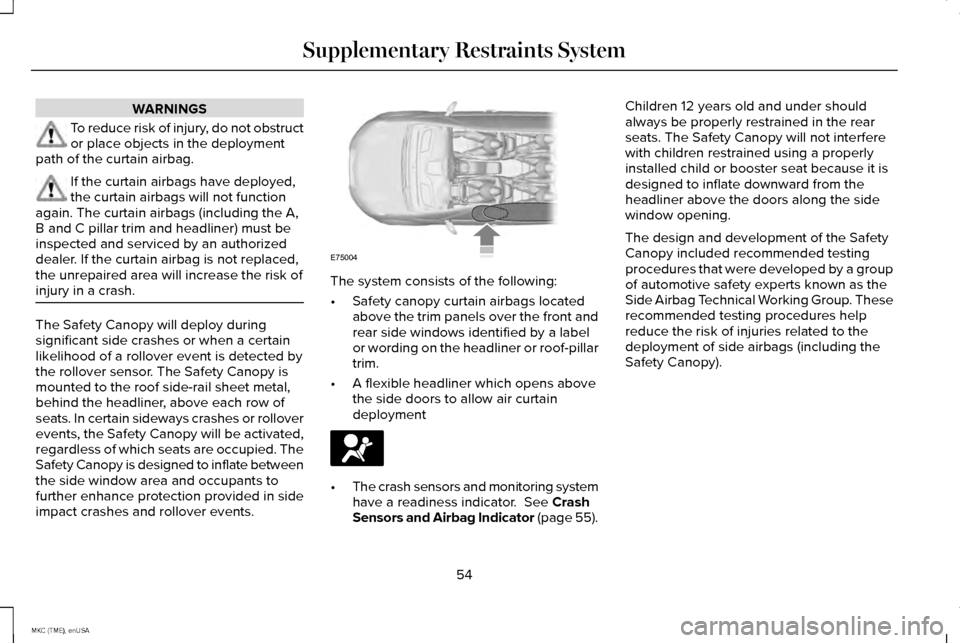
injury in a crash. The Safety Canopy will deploy during
significant side crashes or when a certain
likelihood of a rollover event is detected by
the rollover sensor. The Safety Canopy is
mounted to the roof side-rail sheet metal,
behind the headliner, above each row of
seats. In certain sideways crashes or rollover
events, the Safety Canopy will be activated,
regardless of which seats are occupied. The
Safety Canopy is designed to inflate between
the side window area and occupants to
further enhance protection provided in side
impact crashes and rollover events. The system consists of the following:
•
Safety canopy curtain airbags located
above the trim panels over the front and
rear side windows identified by a label
or wording on the headliner or roof-pillar
trim.
• A flexible headliner which opens above
the side doors to allow air curtain
deployment •
The crash sensors and monitoring system
have a readiness indicator. See Crash
Sensors and Airbag Indicator (page 55). Children 12 years old and under should
always be properly restrained in the rear
seats. The Safety Canopy will not interfere
with children restrained using a properly
installed child or booster seat because it is
designed to inflate downward from the
headliner above the doors along the side
window opening.
The design and development of the Safety
Canopy included recommended testing
procedures that were developed by a group
of automotive safety experts known as the
Side Airbag Technical Working Group. These
recommended testing procedures help
reduce the risk of injuries related to the
deployment of side airbags (including the
Safety Canopy).
54
MKC (TME), enUSA Supplementary Restraints SystemE75004
Page 72 of 490
Intelligent access at the driver door will
unlock all doors when you disable two-stage
unlocking.
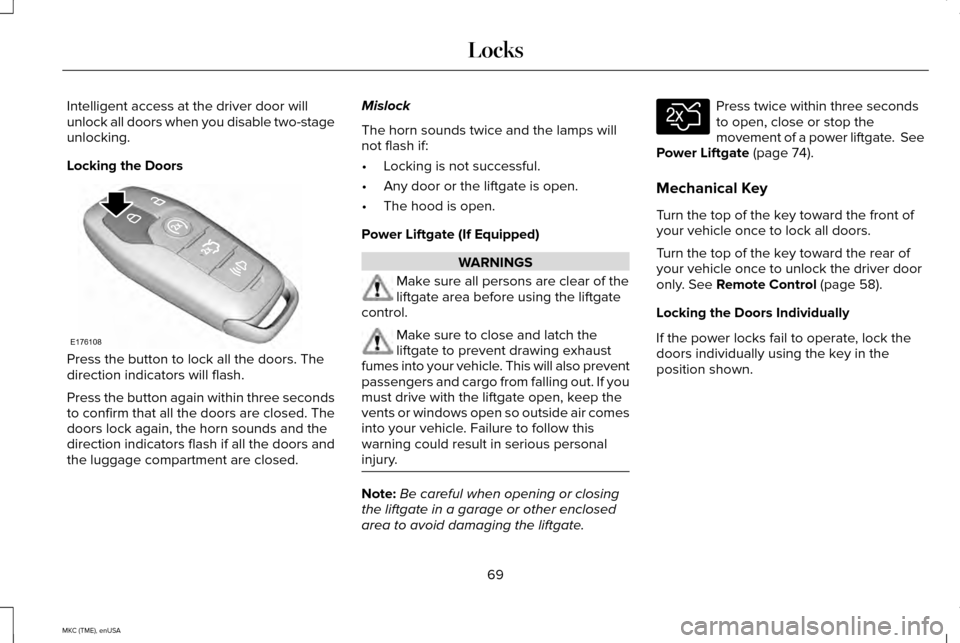
Locking the Doors
Press the button to lock all the doors. The
direction indicators will flash.
Press the button again within three seconds
to confirm that all the doors are closed. The
doors lock again, the horn sounds and the
direction indicators flash if all the doors and
the luggage compartment are closed. Mislock
The horn sounds twice and the lamps will
not flash if:
•
Locking is not successful.
• Any door or the liftgate is open.
• The hood is open.
Power Liftgate (If Equipped) WARNINGS
Make sure all persons are clear of the
liftgate area before using the liftgate
control. Make sure to close and latch the
liftgate to prevent drawing exhaust
fumes into your vehicle. This will also prevent
passengers and cargo from falling out. If you
must drive with the liftgate open, keep the
vents or windows open so outside air comes
into your vehicle. Failure to follow this
warning could result in serious personal
injury. Note:
Be careful when opening or closing
the liftgate in a garage or other enclosed
area to avoid damaging the liftgate. Press twice within three seconds
to open, close or stop the
movement of a power liftgate. See
Power Liftgate (page 74).
Mechanical Key
Turn the top of the key toward the front of
your vehicle once to lock all doors.
Turn the top of the key toward the rear of
your vehicle once to unlock the driver door
only.
See Remote Control (page 58).
Locking the Doors Individually
If the power locks fail to operate, lock the
doors individually using the key in the
position shown.
69
MKC (TME), enUSA LocksE176108 E138630
Page 73 of 490
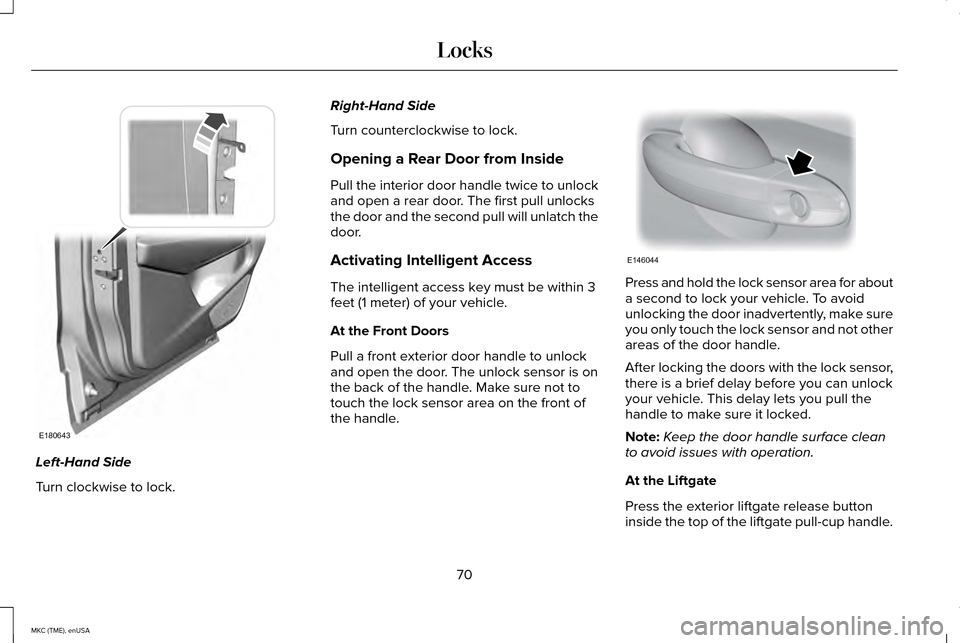
Left-Hand Side
Turn clockwise to lock. Right-Hand Side
Turn counterclockwise to lock.
Opening a Rear Door from Inside
Pull the interior door handle twice to unlock
and open a rear door. The first pull unlocks
the door and the second pull will unlatch the
door.
Activating Intelligent Access
The intelligent access key must be within 3
feet (1 meter) of your vehicle.
At the Front Doors
Pull a front exterior door handle to unlock
and open the door. The unlock sensor is on
the back of the handle. Make sure not to
touch the lock sensor area on the front of
the handle.
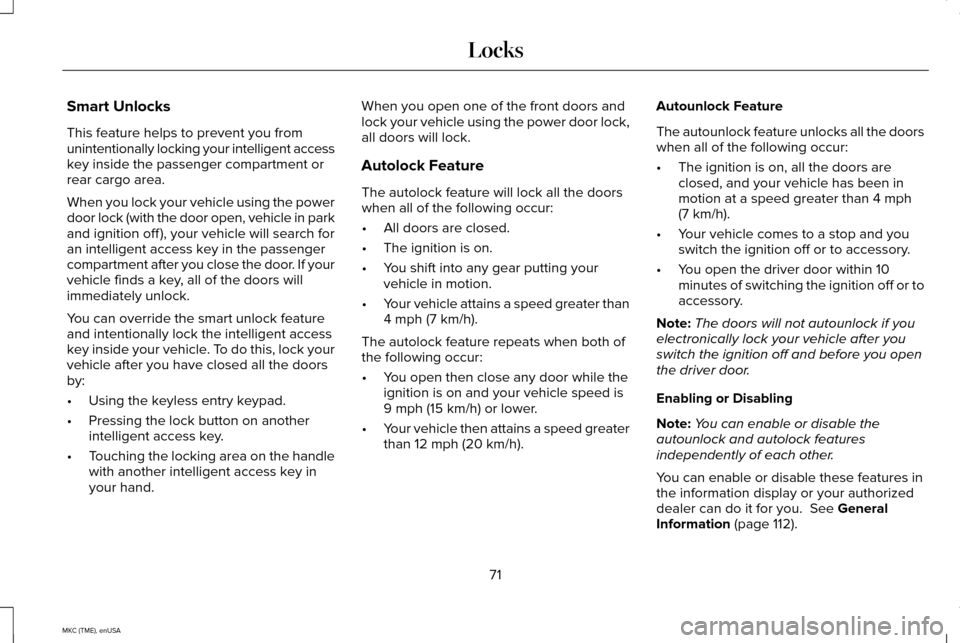
Press and hold the lock sensor area for about
a second to lock your vehicle. To avoid
unlocking the door inadvertently, make sure
you only touch the lock sensor and not other
areas of the door handle.
After locking the doors with the lock sensor,
there is a brief delay before you can unlock
your vehicle. This delay lets you pull the
handle to make sure it locked.
Note:
Keep the door handle surface clean
to avoid issues with operation.
At the Liftgate
Press the exterior liftgate release button
inside the top of the liftgate pull-cup handle.
70
MKC (TME), enUSA LocksE180643 E146044
Page 74 of 490
Smart Unlocks
This feature helps to prevent you from
unintentionally locking your intelligent access
key inside the passenger compartment or
rear cargo area.
When you lock your vehicle using the power
door lock (with the door open, vehicle in park
and ignition off ), your vehicle will search for
an intelligent access key in the passenger
compartment after you close the door. If your
vehicle finds a key, all of the doors will
immediately unlock.
You can override the smart unlock feature
and intentionally lock the intelligent access
key inside your vehicle. To do this, lock your
vehicle after you have closed all the doors
by:
•
Using the keyless entry keypad.
• Pressing the lock button on another
intelligent access key.
• Touching the locking area on the handle
with another intelligent access key in
your hand. When you open one of the front doors and
lock your vehicle using the power door lock,
all doors will lock.
Autolock Feature
The autolock feature will lock all the doors
when all of the following occur:
•
All doors are closed.
• The ignition is on.
• You shift into any gear putting your
vehicle in motion.
• Your vehicle attains a speed greater than
4 mph (7 km/h).
The autolock feature repeats when both of
the following occur:
• You open then close any door while the
ignition is on and your vehicle speed is
9 mph (15 km/h)
or lower.
• Your vehicle then attains a speed greater
than
12 mph (20 km/h). Autounlock Feature
The autounlock feature unlocks all the doors
when all of the following occur:
•
The ignition is on, all the doors are
closed, and your vehicle has been in
motion at a speed greater than
4 mph
(7 km/h).
• Your vehicle comes to a stop and you
switch the ignition off or to accessory.
• You open the driver door within 10
minutes of switching the ignition off or to
accessory.
Note: The doors will not autounlock if you
electronically lock your vehicle after you
switch the ignition off and before you open
the driver door.
Enabling or Disabling
Note: You can enable or disable the
autounlock and autolock features
independently of each other.
You can enable or disable these features in
the information display or your authorized
dealer can do it for you.
See General
Information (page 112).
71
MKC (TME), enUSA Locks
Page 79 of 490
Note:
Splashing water may cause the
hands-free liftgate to open. Keep the
intelligent access transmitter away from the
rear bumper detection area while washing
your car.
From Outside the Vehicle
Opening
1. Unlock the liftgate with the remote control or power door unlock control. If
an intelligent access transmitter is within
3 feet (1 meter) of the liftgate, the liftgate
will unlock when you press the button in
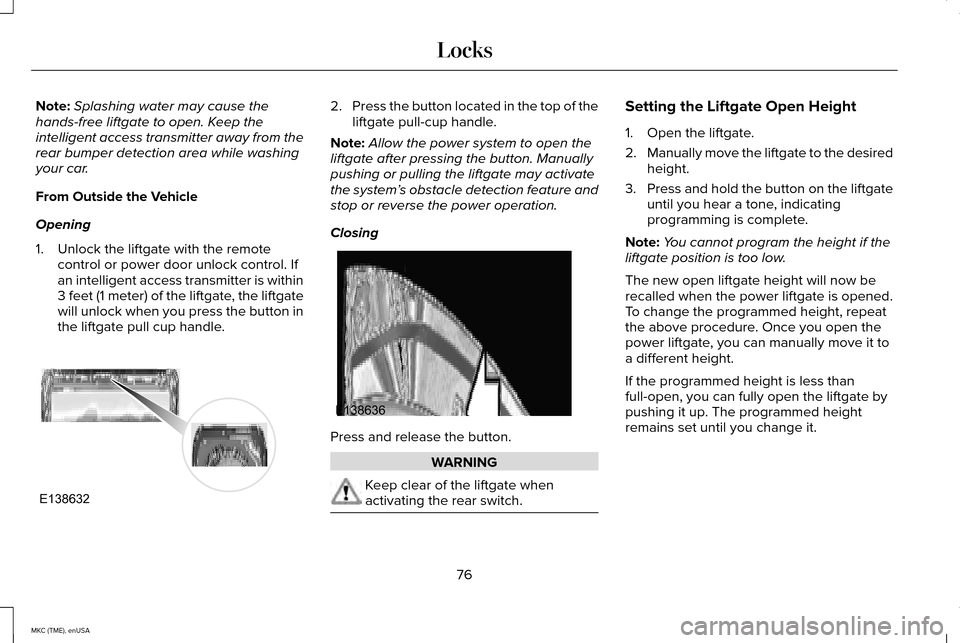
the liftgate pull cup handle. 2.
Press the button located in the top of the
liftgate pull-cup handle.
Note: Allow the power system to open the
liftgate after pressing the button. Manually
pushing or pulling the liftgate may activate
the system’ s obstacle detection feature and
stop or reverse the power operation.
Closing Press and release the button.
WARNING
Keep clear of the liftgate when
activating the rear switch. Setting the Liftgate Open Height
1. Open the liftgate.
2.
Manually move the liftgate to the desired
height.
3. Press and hold the button on the liftgate
until you hear a tone, indicating
programming is complete.
Note: You cannot program the height if the
liftgate position is too low.
The new open liftgate height will now be
recalled when the power liftgate is opened.
To change the programmed height, repeat
the above procedure. Once you open the
power liftgate, you can manually move it to
a different height.
If the programmed height is less than
full-open, you can fully open the liftgate by
pushing it up. The programmed height
remains set until you change it.
76
MKC (TME), enUSA LocksE138632 E138636
Page 101 of 490
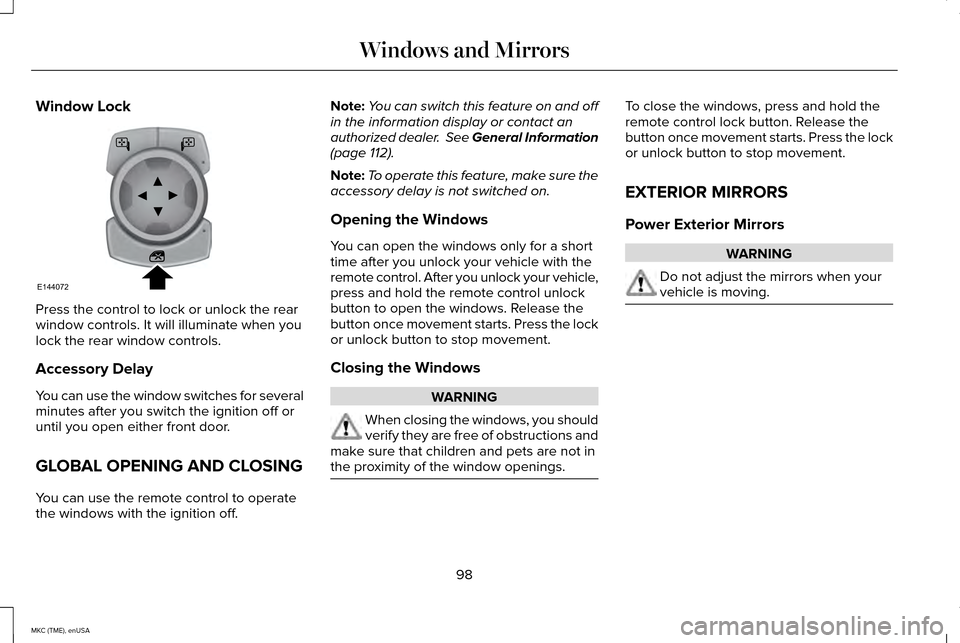
Window Lock
Press the control to lock or unlock the rear
window controls. It will illuminate when you
lock the rear window controls.
Accessory Delay
You can use the window switches for several
minutes after you switch the ignition off or
until you open either front door.
GLOBAL OPENING AND CLOSING
You can use the remote control to operate
the windows with the ignition off. Note:
You can switch this feature on and off
in the information display or contact an
authorized dealer. See General Information
(page 112).
Note: To operate this feature, make sure the
accessory delay is not switched on.
Opening the Windows
You can open the windows only for a short
time after you unlock your vehicle with the
remote control. After you unlock your vehicle,
press and hold the remote control unlock
button to open the windows. Release the
button once movement starts. Press the lock
or unlock button to stop movement.
Closing the Windows WARNING
When closing the windows, you should
verify they are free of obstructions and
make sure that children and pets are not in
the proximity of the window openings. To close the windows, press and hold the
remote control lock button. Release the
button once movement starts. Press the lock
or unlock button to stop movement.
EXTERIOR MIRRORS
Power Exterior Mirrors
WARNING
Do not adjust the mirrors when your
vehicle is moving.
98
MKC (TME), enUSA Windows and MirrorsE144072
Page 149 of 490
A pre-set memory position can also be
recalled by:
•
Pressing the unlock button on your
intelligent access key fob if it is linked to
a pre-set position.
• Unlocking the intelligent driver door
handle if a linked key fob is present.
• Entering a personal entry code on the
Securicode keypad. See Locks (page
68).
Note: Using a linked key fob to recall your
memory position when the ignition is off will
move the seat and steering column to the
Easy Entry position.
Linking a Pre-Set Position to your
Remote Control or Intelligent Access
Key
Your vehicle can save the pre-set memory
positions for up to three remote controls or
intelligent access (IA) keys.
1. With the ignition on, move the memory positions to the desired positions. 2.
Press and hold the desired pre-set button
for about five seconds. A chime will
sound after about two seconds. Continue
holding until a second chime is heard.
3. Within three seconds, press the lock button on the remote control you are
linking.
To unlink a remote control, follow the same
procedure – except in Step 3, press the
unlock button on the remote control.
Easy Entry and Exit Feature
If you enable the easy entry and exit feature,
it automatically moves the driver seat
position rearward up to two inches (five
centimeters) when you switch the ignition
off. The driver seat will return to the previous
position when you switch the ignition on.
You can enable or disable this feature in the
information display.
See Information
Displays (page 112). REAR SEATS
146
MKC (TME), enUSA SeatsE171298