headlamp LINCOLN MKC 2018 User Guide
[x] Cancel search | Manufacturer: LINCOLN, Model Year: 2018, Model line: MKC, Model: LINCOLN MKC 2018Pages: 571, PDF Size: 4.39 MB
Page 111 of 571
Service Engine Soon
If it illuminates when the engine isrunning this indicates amalfunction. The On BoardDiagnostics system has detected amalfunction of the vehicle emission controlsystem.
If it flashes, engine misfire may be occurring. Increased exhaust gas temperatures coulddamage the catalytic converter or othervehicle components. Drive in a moderatefashion (avoid heavy acceleration anddeceleration) and have your vehicleimmediately serviced.
It illuminates when you switch the ignitionon prior to engine start to check the bulb andto indicate whether your vehicle is ready forInspection and Maintenance (I/M) testing.
Normally, it illuminates until the engine iscranked and automatically turns off if nomalfunctions are present. However, if after15 seconds it flashes eight times, thisindicates that your vehicle is not ready forInspection and Maintenance (I/M) testing.
See Catalytic Converter (page 172).
Stability Control and Traction ControlIndicator
Flashes during operation.
If it does not illuminate when youswitch the ignition on, or remainson when the engine is running, this indicatesa malfunction. Have your vehicle checkedas soon as possible.
Note:The system automatically turns off ifthere is a malfunction.
See Using Stability Control (page 196). SeeUsing Traction Control (page 193).
Stability Control and Traction ControlOff Warning Lamp
It illuminates when you switch thesystem off.
AUDIBLE WARNINGS AND
INDICATORS
Keyless Warning Alert
The horn will sound twice when you exit yourvehicle with the intelligent access key andyour vehicle is in RUN, indicating your vehicleis still on.
Headlamps On Warning Chime
Sounds when you remove the key from theignition and open the driver's door and youhave left the headlamps or parking lampson.
Parking Brake On Warning Chime
Sounds when you have left the parking brakeon and drive your vehicle. If the warningchime remains on after you have releasedthe parking brake, have the system checkedby your authorized dealer immediately.
108
MKC (TME) Canada/United States of America, JJ7J 19A321 AA enUSA, Edition date: 201707, Second Printing
Instrument Cluster E138639 E130458
Page 160 of 571
Note:You may have to press the pushbutton ignition switch twice to switch theignition on.
Start: Starts the engine.
•Press the brake pedal, and then pressthe button for any length of time. Anindicator light on the button illuminateswhen then ignition is on and when theengine starts.
STARTING A GASOLINE ENGINE
When you start the engine, the idle speedincreases, this helps to warm up the engine.If the engine idle speed does not slow downautomatically, have your vehicle checked byan authorized dealer.
Note:If your vehicle is equipped with remotestart, you can start your vehicle with theremote, and then drive away by pressing thebrake pedal and pushing a button on thetransmission. This allows you to drive awaywithout pressing the engine start button.
Before starting the engine, check thefollowing:
•Make sure all occupants have fastenedtheir safety belts.
•Make sure the headlamps and electricalaccessories are off.
•Make sure the parking brake is on.
•Put the transmission in P.
Note:Do not touch the accelerator pedal.
1. Fully press the brake pedal.
2. Press the button.
The system does not function if:
•The key frequencies are jammed.
•The key battery has no charge.
If you are unable to start the engine, do thefollowing:
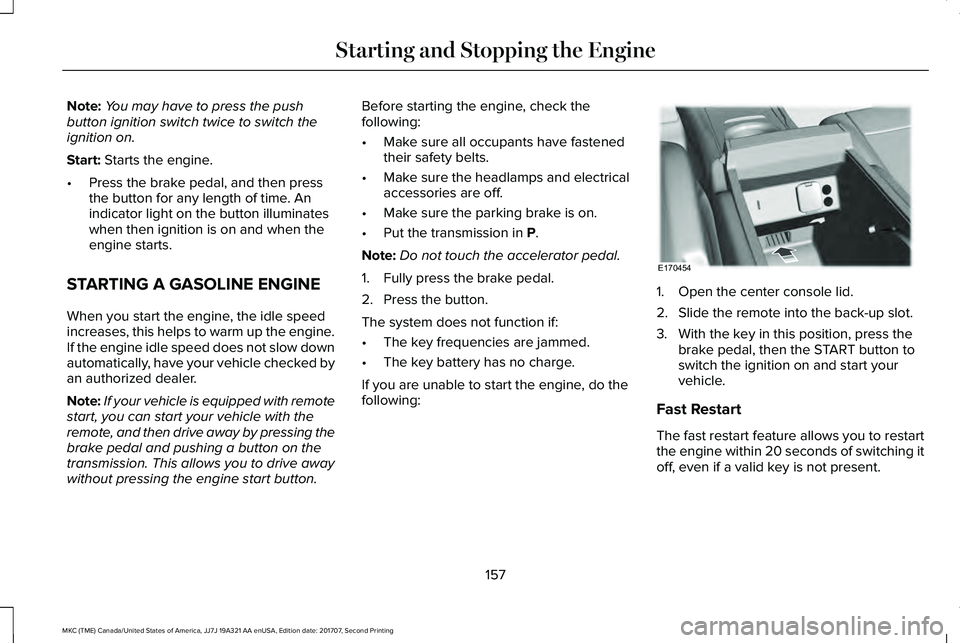
1. Open the center console lid.
2. Slide the remote into the back-up slot.
3. With the key in this position, press thebrake pedal, then the START button toswitch the ignition on and start yourvehicle.
Fast Restart
The fast restart feature allows you to restartthe engine within 20 seconds of switching itoff, even if a valid key is not present.
157
MKC (TME) Canada/United States of America, JJ7J 19A321 AA enUSA, Edition date: 201707, Second Printing
Starting and Stopping the EngineE170454
Page 224 of 571
Note:The alert and aid diagrams illustrategeneral zone coverage. They do not provideexact zone parameters.
Intensity: This setting affects the intensity ofthe steering wheel vibration used for the alertand alert + aid modes. This setting does notaffect the aid mode.
•Low
•Normal
•High
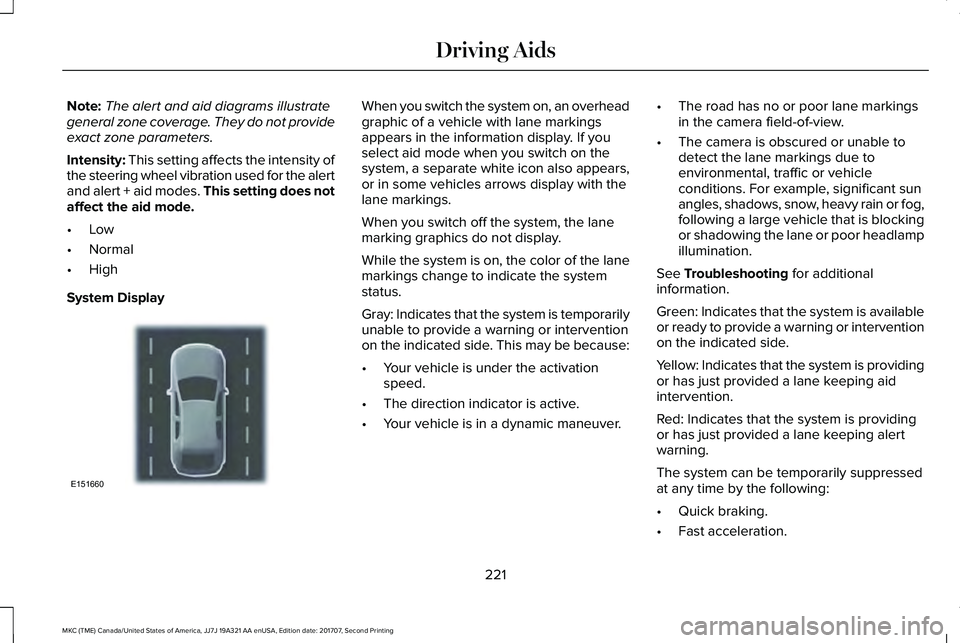
System Display
When you switch the system on, an overheadgraphic of a vehicle with lane markingsappears in the information display. If youselect aid mode when you switch on thesystem, a separate white icon also appears,or in some vehicles arrows display with thelane markings.
When you switch off the system, the lanemarking graphics do not display.
While the system is on, the color of the lanemarkings change to indicate the systemstatus.
Gray: Indicates that the system is temporarilyunable to provide a warning or interventionon the indicated side. This may be because:
•Your vehicle is under the activationspeed.
•The direction indicator is active.
•Your vehicle is in a dynamic maneuver.
•The road has no or poor lane markingsin the camera field-of-view.
•The camera is obscured or unable todetect the lane markings due toenvironmental, traffic or vehicleconditions. For example, significant sunangles, shadows, snow, heavy rain or fog,following a large vehicle that is blockingor shadowing the lane or poor headlampillumination.
See Troubleshooting for additionalinformation.
Green: Indicates that the system is availableor ready to provide a warning or interventionon the indicated side.
Yellow: Indicates that the system is providingor has just provided a lane keeping aidintervention.
Red: Indicates that the system is providingor has just provided a lane keeping alertwarning.
The system can be temporarily suppressedat any time by the following:
•Quick braking.
•Fast acceleration.
221
MKC (TME) Canada/United States of America, JJ7J 19A321 AA enUSA, Edition date: 201707, Second Printing
Driving AidsE151660
Page 236 of 571
ActionCause
Clean the radar sensor cover or remove the obstruction.The radar sensor cover in the grille is dirty or obstructed.
Wait a short time. The radar may take several minutes to reset afteryou remove the obstruction.The surface of the radar sensor cover is clean but the messageremains in the display.
The collision warning system is temporarily disabled. Shortly afterweather conditions improve, the collision warning system automaticallyreactivates.
Heavy rain, spray, snow or fog in the air interferes with the radarsignals.
The collision warning system is temporarily disabled. Shortly afterweather conditions improve, the collision warning system automaticallyreactivates.
Swirling water, snow or ice on the road surface interferes with theradar signals.
System Limitations
Due to the nature of radar technology, theremay be certain instances where vehicles donot provide a collision warning. Theseinclude:
•Stationary vehicles or vehicles movingbelow 6 mph (10 km/h).
•Pedestrians or objects in the roadway.
•Oncoming vehicles in the same lane.
•Severe weather conditions (see blockedsensor section).
•Debris build-up on the grille near theheadlamps (see blocked sensor section).
•Small distance to vehicle ahead.
•Large steering wheel and pedalmovements (very active driving style).
Damage to the front end of the vehicle mayalter the radar sensor's coverage area. Thismay result in missed or false collisionwarnings. Have an authorized dealer checkyour radar sensor for proper coverage andoperation.
233
MKC (TME) Canada/United States of America, JJ7J 19A321 AA enUSA, Edition date: 201707, Second Printing
Driving Aids
Page 261 of 571
WARNINGS
Make sure that the cables are clear ofany moving parts and fuel deliverysystem parts.
To Start the Engine
1. Start the engine of the booster vehicleand rev the engine moderately, or pressthe accelerator gently to keep yourengine speed between 2000 and 3000RPM, as shown in your tachometer.
2. Start the engine of the disabled vehicle.
3. Once the disabled vehicle has beenstarted, run both vehicle engines for anadditional three minutes beforedisconnecting the jumper cables.
Remove the jumper cables in the reverseorder that they were connected.
Note:Do not switch the headlamps on whendisconnecting the cables. The peak voltagecould blow the bulbs.
POST-CRASH ALERT SYSTEM
The system flashes the direction indicatorsand sounds the horn (intermittently) in theevent of a serious impact that deploys anairbag (front, side, side curtain or SafetyCanopy) or the seatbelt pretensioners.
The horn and indicators turn off when:
•You press the hazard control button.
•You press the panic button on the remoteentry transmitter (if equipped).
•Your vehicle runs out of power.
•Sounding of the horn is only enabled inspecific markets.
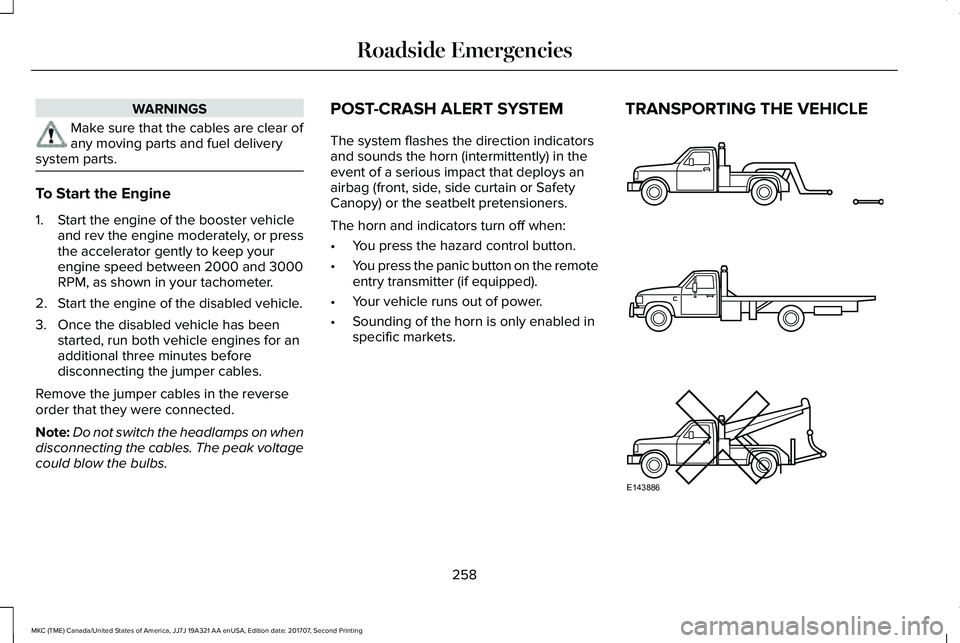
TRANSPORTING THE VEHICLE
258
MKC (TME) Canada/United States of America, JJ7J 19A321 AA enUSA, Edition date: 201707, Second Printing
Roadside EmergenciesE143886
Page 275 of 571
Protected ComponentsFuse RatingFuse Number
Rain sensor.15A 2F29Rear wiper.Rear washer pump relay coil.
Left-hand headlamp.20A 2F30
Right-hand headlamp.20A 2F31
Vehicle power 1 (powertrain control module).15A 2F32
Vehicle power 2 (canister vent solenoid, universal exhaustedgas oxygen sensor, variable camshaft timing, catalyst monitorsensor, canister purge solenoid).
15A 2F33
Vehicle power 3 (A/C clutch control relay coil, variable A/Ccompressor, fan control relay coil, engine charge air bypassvalve solenoid, active grill shutters).
15A 2F34
Vehicle power 4 (ignition coils).15A 2F35
Not used.—F36
Not used.—F37
Voltage quality module run/start (vehicles equipped withstop/start).15A 2F38
272
MKC (TME) Canada/United States of America, JJ7J 19A321 AA enUSA, Edition date: 201707, Second Printing
Fuses
Page 302 of 571
Note:Make sure that the wiper blade locksinto place.
ADJUSTING THE HEADLAMPS
Vertical Aim Adjustment
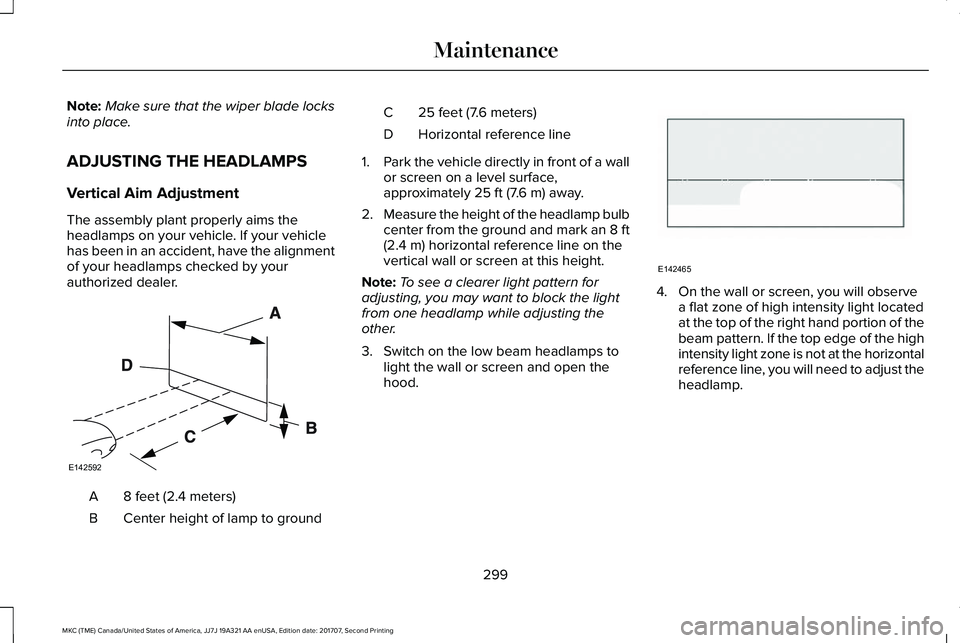
The assembly plant properly aims theheadlamps on your vehicle. If your vehiclehas been in an accident, have the alignmentof your headlamps checked by yourauthorized dealer.
8 feet (2.4 meters)A
Center height of lamp to groundB
25 feet (7.6 meters)C
Horizontal reference lineD
1.Park the vehicle directly in front of a wallor screen on a level surface,approximately 25 ft (7.6 m) away.
2.Measure the height of the headlamp bulbcenter from the ground and mark an 8 ft(2.4 m) horizontal reference line on thevertical wall or screen at this height.
Note:To see a clearer light pattern foradjusting, you may want to block the lightfrom one headlamp while adjusting theother.
3. Switch on the low beam headlamps tolight the wall or screen and open thehood.
4. On the wall or screen, you will observea flat zone of high intensity light locatedat the top of the right hand portion of thebeam pattern. If the top edge of the highintensity light zone is not at the horizontalreference line, you will need to adjust theheadlamp.
299
MKC (TME) Canada/United States of America, JJ7J 19A321 AA enUSA, Edition date: 201707, Second Printing
MaintenanceE142592 E142465
Page 303 of 571
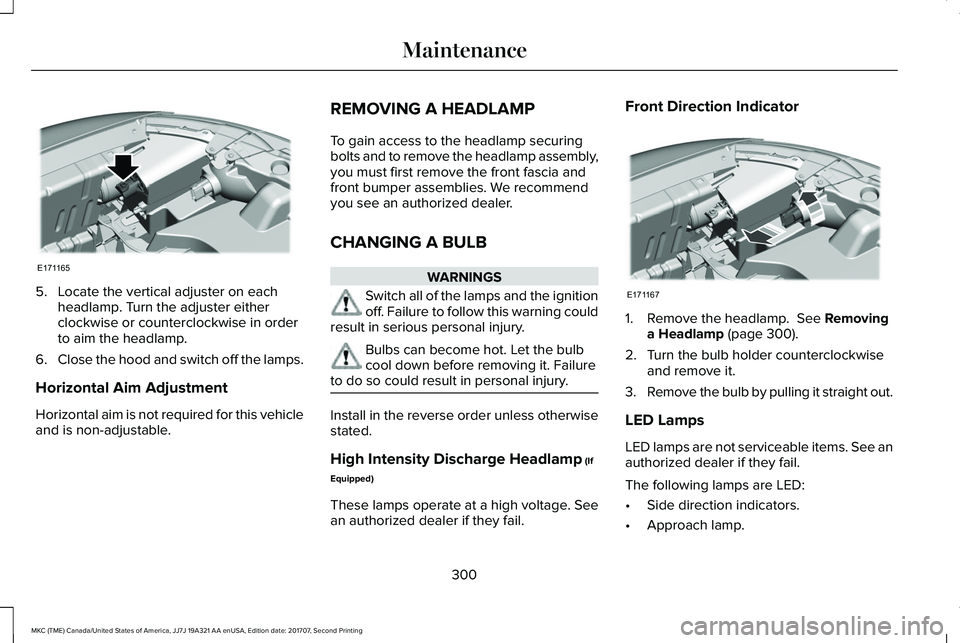
5. Locate the vertical adjuster on eachheadlamp. Turn the adjuster eitherclockwise or counterclockwise in orderto aim the headlamp.
6.Close the hood and switch off the lamps.
Horizontal Aim Adjustment
Horizontal aim is not required for this vehicleand is non-adjustable.
REMOVING A HEADLAMP
To gain access to the headlamp securingbolts and to remove the headlamp assembly,you must first remove the front fascia andfront bumper assemblies. We recommendyou see an authorized dealer.
CHANGING A BULB
WARNINGS
Switch all of the lamps and the ignitionoff. Failure to follow this warning couldresult in serious personal injury.
Bulbs can become hot. Let the bulbcool down before removing it. Failureto do so could result in personal injury.
Install in the reverse order unless otherwisestated.
High Intensity Discharge Headlamp (If
Equipped)
These lamps operate at a high voltage. Seean authorized dealer if they fail.
Front Direction Indicator
1. Remove the headlamp. See Removinga Headlamp (page 300).
2. Turn the bulb holder counterclockwiseand remove it.
3.Remove the bulb by pulling it straight out.
LED Lamps
LED lamps are not serviceable items. See anauthorized dealer if they fail.
The following lamps are LED:
•Side direction indicators.
•Approach lamp.
300
MKC (TME) Canada/United States of America, JJ7J 19A321 AA enUSA, Edition date: 201707, Second Printing
MaintenanceE171165 E171167
Page 304 of 571
•Brake and rear lamps.
•Rear direction indicators.
•Reversing lamps.
•Central high mounted brake lamp.
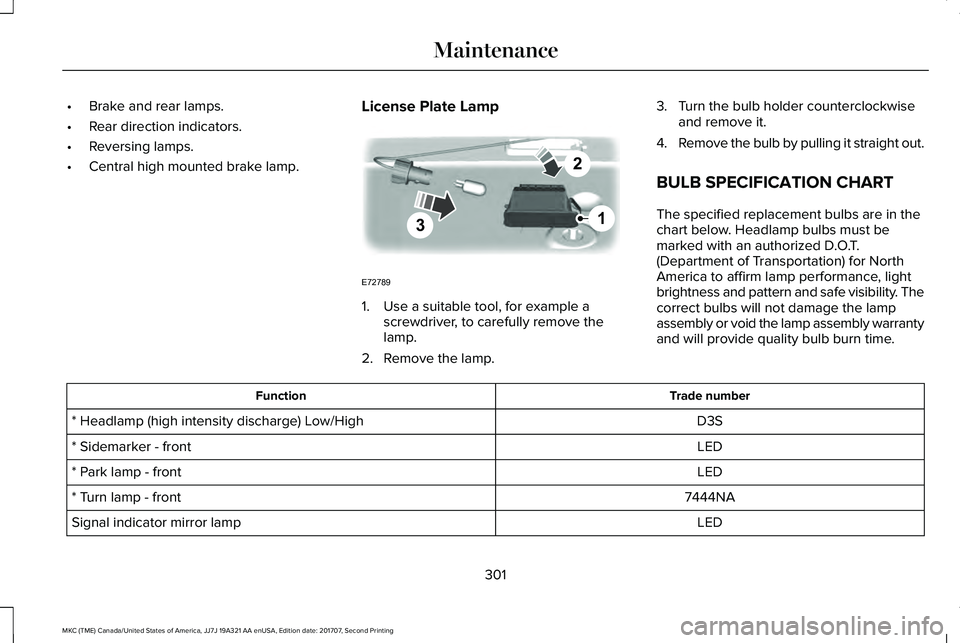
License Plate Lamp
1. Use a suitable tool, for example ascrewdriver, to carefully remove thelamp.
2. Remove the lamp.
3. Turn the bulb holder counterclockwiseand remove it.
4.Remove the bulb by pulling it straight out.
BULB SPECIFICATION CHART
The specified replacement bulbs are in thechart below. Headlamp bulbs must bemarked with an authorized D.O.T.(Department of Transportation) for NorthAmerica to affirm lamp performance, lightbrightness and pattern and safe visibility. Thecorrect bulbs will not damage the lampassembly or void the lamp assembly warrantyand will provide quality bulb burn time.
Trade numberFunction
D3S* Headlamp (high intensity discharge) Low/High
LED* Sidemarker - front
LED* Park lamp - front
7444NA* Turn lamp - front
LEDSignal indicator mirror lamp
301
MKC (TME) Canada/United States of America, JJ7J 19A321 AA enUSA, Edition date: 201707, Second Printing
Maintenance3
2
1
E72789
Page 309 of 571
SpecificationName
Motorcraft® Spot and Stain Remover, ZC-14 (U.S.)
ESR-M14P5-AMotorcraft® Ultra-Clear Spray Glass Cleaner, ZC-23 (U.S.)
Motorcraft® Wheel and Tire Cleaner, ZC-37-A (U.S. & Canada)
CLEANING THE EXTERIOR
Wash your vehicle regularly with cool orlukewarm water and a neutral pH shampoo,we recommend Motorcraft Detail Wash.
•Never use strong household detergentsor soap, for example dish washing orlaundry liquid. These products candiscolor and spot painted surfaces.
•Never wash your vehicle when it is hotto the touch, or during strong or directsunlight.
•Dry your vehicle with a chamois or softterry cloth towel to eliminate waterspotting.
•Immediately remove fuel spillages, birddroppings, insect deposits and road tar.These may cause damage to yourvehicle’s paintwork or trim over time. Werecommend Motorcraft Bug and TarRemover.
•Remove any exterior accessories, forexample antennas, before entering a carwash.
•When filling with AdBlue®, remove anyresidue on painted surfaces immediately.
Note:Suntan lotions and insect repellentscan damage painted surfaces. If thesesubstances come in contact with yourvehicle, wash the affected area as soon aspossible.
Cleaning the Headlamps
Note:Do not scrape the headlamp lensesor use abrasives, alcoholic solvents orchemical solvents to clean them.
Note:Do not wipe the headlamps when theyare dry.
306
MKC (TME) Canada/United States of America, JJ7J 19A321 AA enUSA, Edition date: 201707, Second Printing
Vehicle Care