headlamp LINCOLN MKS 2009 User Guide
[x] Cancel search | Manufacturer: LINCOLN, Model Year: 2009, Model line: MKS, Model: LINCOLN MKS 2009Pages: 323, PDF Size: 2.58 MB
Page 48 of 323
INTERIOR LAMPS
Second row map lamps
The second row lamps are located
at the rear of the headliner above
each outboard seat.
The second row lamps light when:
•any door is opened,
•the instrument panel dimmer
switch is rotated up until the
courtesy lamps come on, and
•any of the remote entry controls are pressed and the ignition is off.
Press the lamp lens to activate the reading lamps.
BULB REPLACEMENT
Headlamp condensation
The headlamps are vented to equalize pressure. When moist air enters
the headlamp(s) through the vents, there is a possibility that
condensation can occur. This condensation is normal and will clear
within 45 minutes of headlamp operation.
Using the right bulbs
Replacement bulbs are specified in the chart below. Headlamp bulbs
must be marked with an authorized “D.O.T.” for North America and an
“E” for Europe to ensure lamp performance, light brightness and pattern
and safe visibility. The correct bulbs will not damage the lamp assembly
or void the lamp assembly warranty and will provide quality bulb burn
time.
Function Number of bulbsTrade
number
Headlamp high beam/low beam 2 D3S
Front park/turn/sidemarker
lamp2 3457
* Sidemarker lamp (rear) 2 LED
* Tail lamp 2 LED
Turn signal 4 HPC 16WY
2009 MKS(mks)
Owners Guide (post-2002-fmt)
USA(fus)
Lights
48
Page 49 of 323
Function Number of bulbsTrade
number
License plate lamp 2 168
* High-mount brake lamp 1 LED
Fog lamp (if equipped) 2 H11
Map lamp 2 12V6W
Dome/reading lamps 3 578
To replace all instrument panel lights, see your authorized dealer.
* To replace these lamps, see your authorized dealer.
Replacing the interior bulbs
Check the operation of all bulbs frequently.
Replacing exterior bulbs
Check the operation of all the bulbs frequently.
Replacing HID headlamp bulbs
The headlamps on your vehicle use a “high intensity discharge” source.
These lamps operate at a high voltage. When the bulb is burned out, the
bulb assembly must be replaced by your authorized dealer.
Replacing front parking lamp/turn signal/sidemarker bulbs
1. Make sure headlamp switch is in the off position, then open the hood.
2. Reach in behind the headlamp assembly to access the bulb sockets
and connectors.
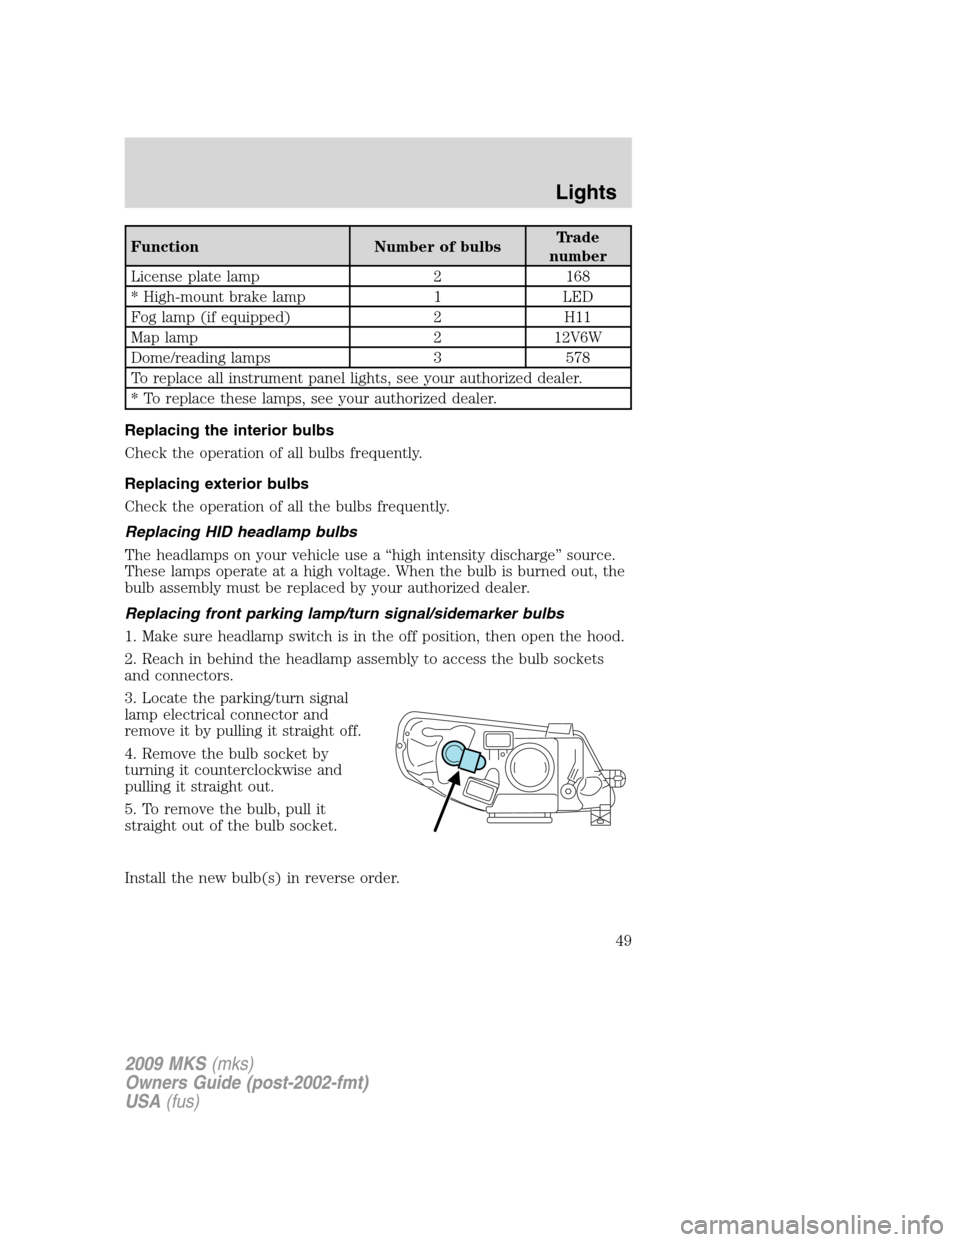
3. Locate the parking/turn signal
lamp electrical connector and
remove it by pulling it straight off.
4. Remove the bulb socket by
turning it counterclockwise and
pulling it straight out.
5. To remove the bulb, pull it
straight out of the bulb socket.
Install the new bulb(s) in reverse order.
2009 MKS(mks)
Owners Guide (post-2002-fmt)
USA(fus)
Lights
49
Page 50 of 323
Replacing rear brake/tail/turn and sidemarker lamp bulbs
The brake/tail/turn/side marker lamp and backup bulbs are located in the
tail lamp assembly. Follow the same steps to replace the bulbs.
Note:Your vehicle is equipped with a tail lamp assembly containing
integral multiple light emitting diodes (LED) for the stop/tail and
sidemarker functions. If replacement is required, see your authorized
dealer.
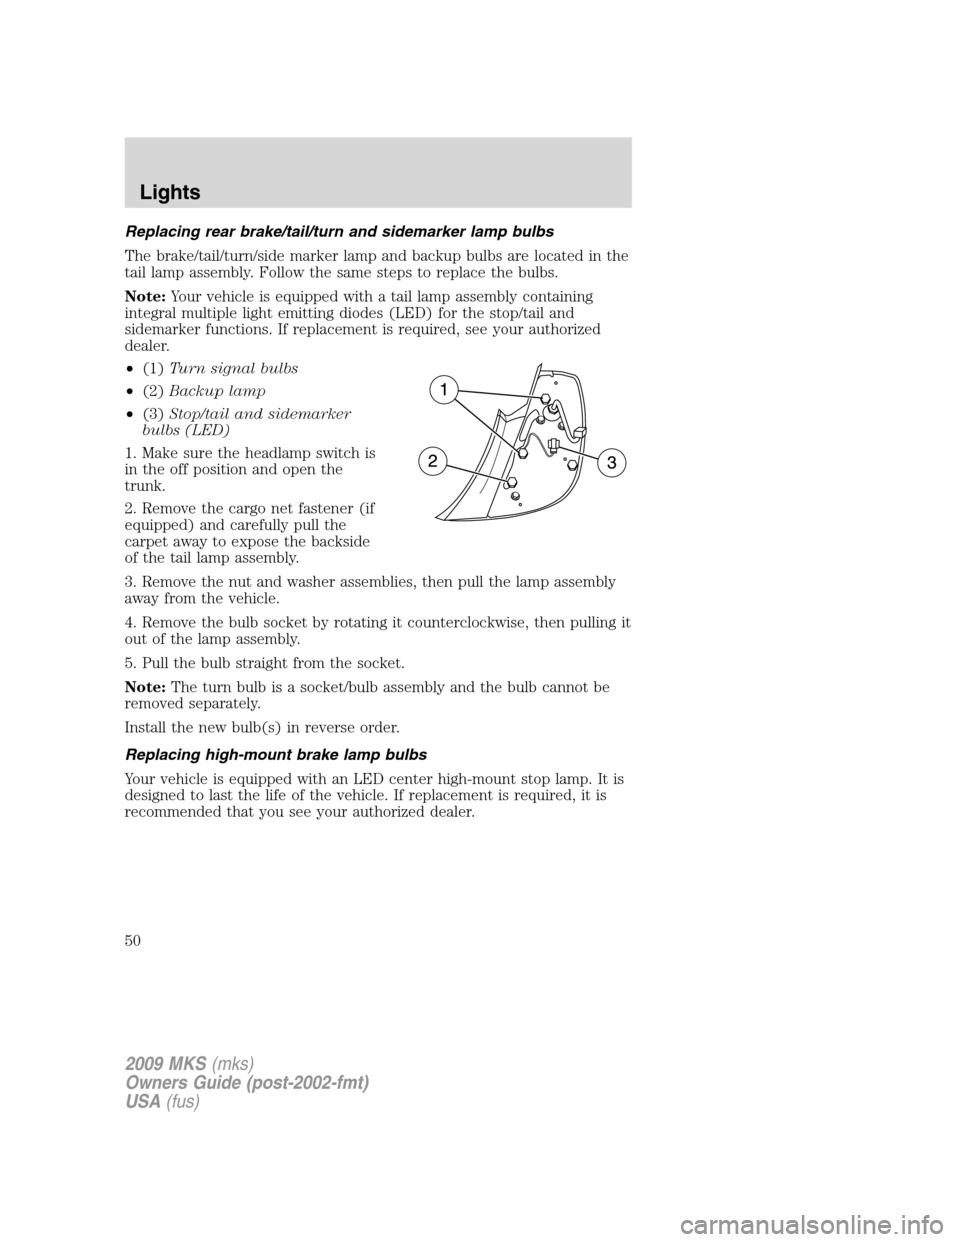
•(1)Turn signal bulbs
•(2)Backup lamp
•(3)Stop/tail and sidemarker
bulbs (LED)
1. Make sure the headlamp switch is
in the off position and open the
trunk.
2. Remove the cargo net fastener (if
equipped) and carefully pull the
carpet away to expose the backside
of the tail lamp assembly.
3. Remove the nut and washer assemblies, then pull the lamp assembly
away from the vehicle.
4. Remove the bulb socket by rotating it counterclockwise, then pulling it
out of the lamp assembly.
5. Pull the bulb straight from the socket.
Note:The turn bulb is a socket/bulb assembly and the bulb cannot be
removed separately.
Install the new bulb(s) in reverse order.
Replacing high-mount brake lamp bulbs
Your vehicle is equipped with an LED center high-mount stop lamp. It is
designed to last the life of the vehicle. If replacement is required, it is
recommended that you see your authorized dealer.
2009 MKS(mks)
Owners Guide (post-2002-fmt)
USA(fus)
Lights
50
Page 51 of 323
Replacing license plate lamp bulbs
1. Make sure the headlamp switch is
in the off position.
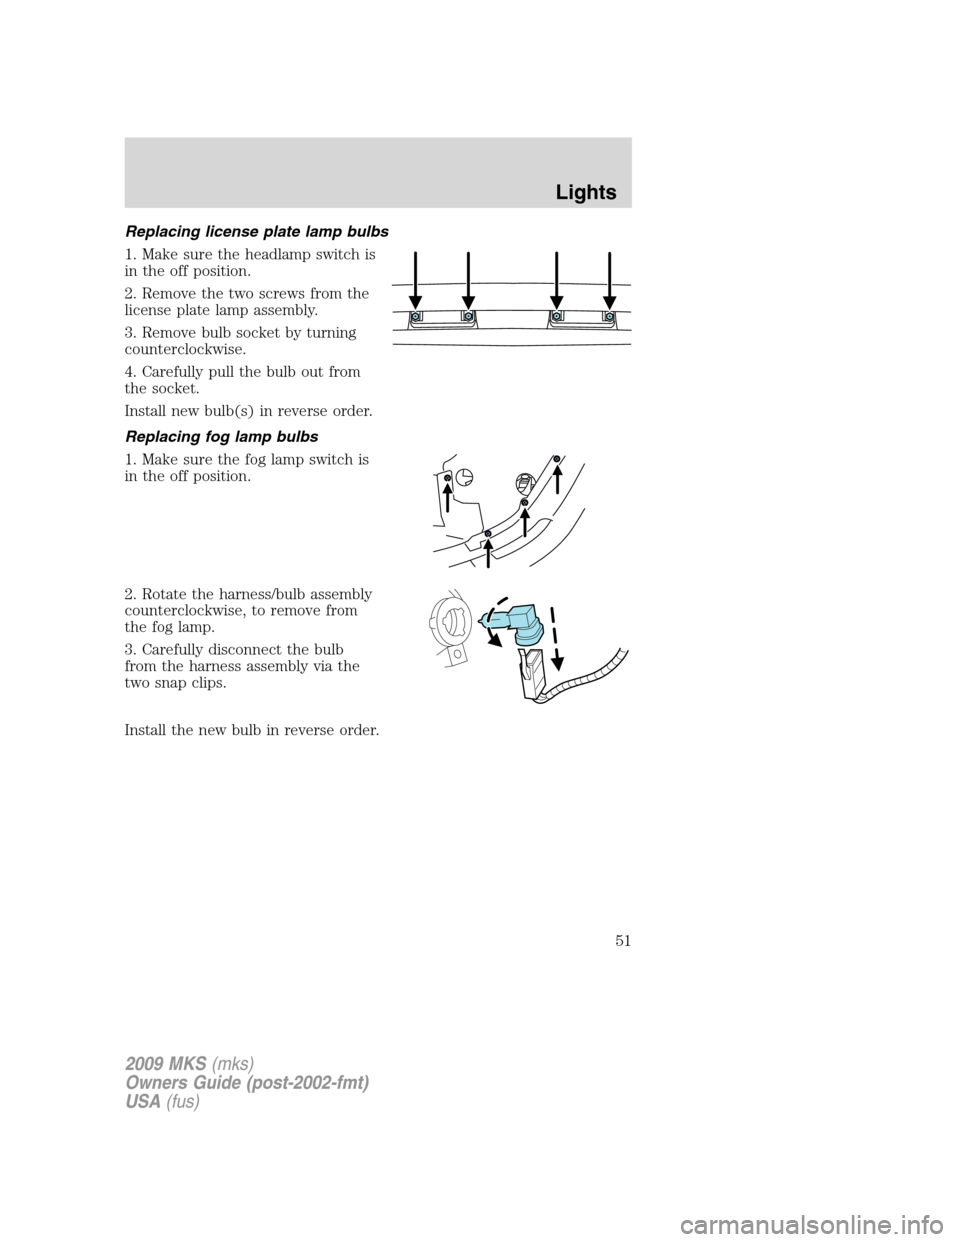
2. Remove the two screws from the
license plate lamp assembly.
3. Remove bulb socket by turning
counterclockwise.
4. Carefully pull the bulb out from
the socket.
Install new bulb(s) in reverse order.
Replacing fog lamp bulbs
1. Make sure the fog lamp switch is
in the off position.
2. Rotate the harness/bulb assembly
counterclockwise, to remove from
the fog lamp.
3. Carefully disconnect the bulb
from the harness assembly via the
two snap clips.
Install the new bulb in reverse order.
2009 MKS(mks)
Owners Guide (post-2002-fmt)
USA(fus)
Lights
51
Page 53 of 323
Windshield wiper rainlamp feature
When the windshield wipers are turned on during daylight, and the
headlamp control is in the autolamp position, the exterior lamps will turn
on after a brief delay and will remain on until the wipers are turned off.
POWER TILT/TELESCOPE STEERING COLUMN
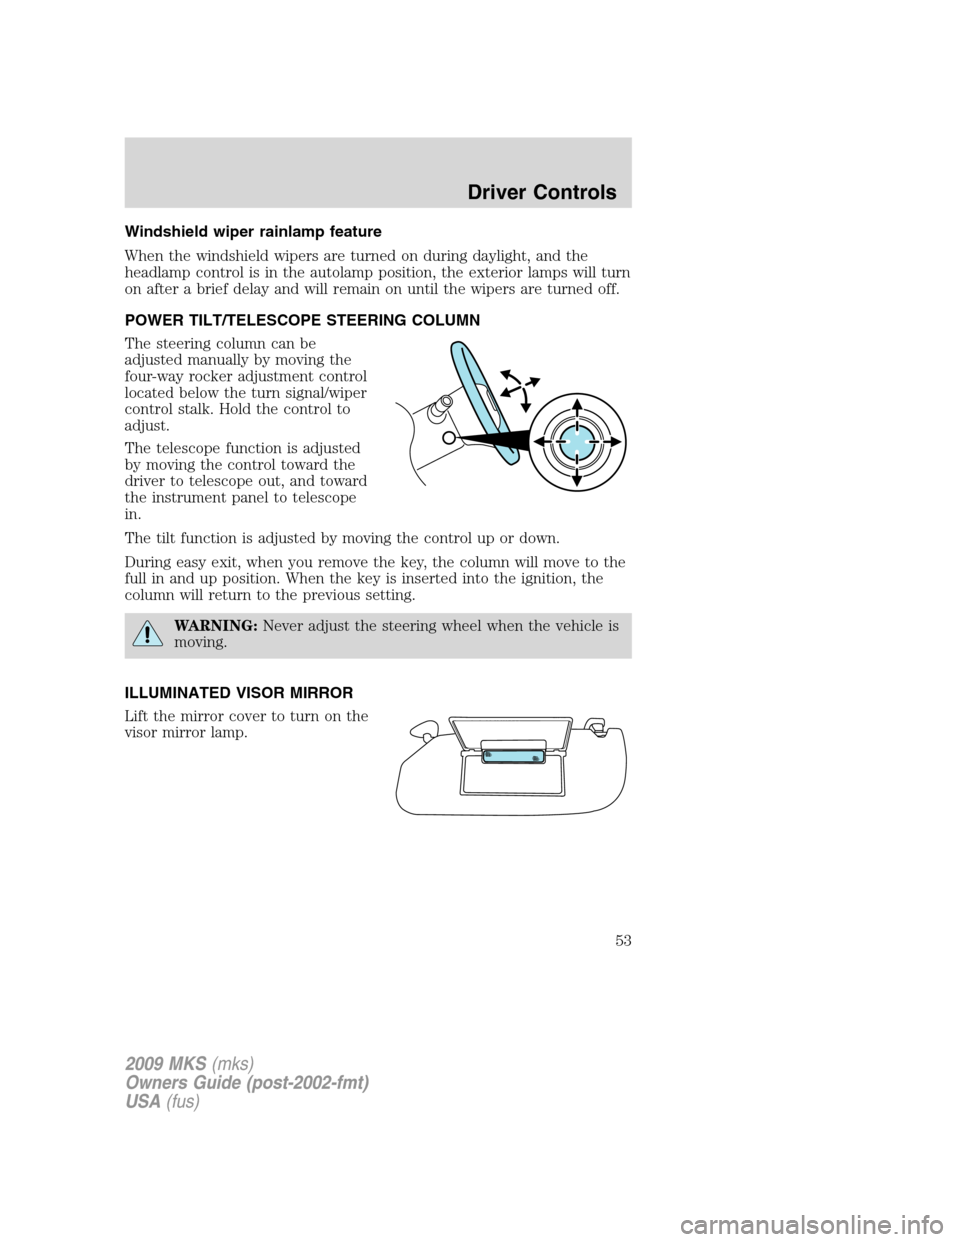
The steering column can be
adjusted manually by moving the
four-way rocker adjustment control
located below the turn signal/wiper
control stalk. Hold the control to
adjust.
The telescope function is adjusted
by moving the control toward the
driver to telescope out, and toward
the instrument panel to telescope
in.
The tilt function is adjusted by moving the control up or down.
During easy exit, when you remove the key, the column will move to the
full in and up position. When the key is inserted into the ignition, the
column will return to the previous setting.
WARNING:Never adjust the steering wheel when the vehicle is
moving.
ILLUMINATED VISOR MIRROR
Lift the mirror cover to turn on the
visor mirror lamp.
2009 MKS(mks)
Owners Guide (post-2002-fmt)
USA(fus)
Driver Controls
53
Page 109 of 323
•thecontrol on the transmitter is pressed, or
•the vehicle is locked using the keyless entry keypad, or
•the vehicle is locked using the key in the driver door cylinder, or
•after 25 seconds of illumination.
The inside lights will not turn off if:
•they have been turned on with the dimmer control, or
•any door is open.
Perimeter lamps illuminated entry
With the remote entry system, the following items will illuminate when
the
control on the transmitter is pressed:
•Headlamps
•Park lamps
•Tail lamps
The lamps will automatically turn off:
•if the ignition switch is turned on, or
•the
control on the transmitter is pressed, or
•the vehicle is locked using the keyless entry keypad, or
•the vehicle is locked using the key in the driver door cylinder, or
•after 25 seconds of illumination.
Note:On some vehicles, the perimeter lamps illuminated entry feature
will not activate in daylight conditions.
Deactivating/activating perimeter lamps illuminated entry
You may enable/disable this feature by having your vehicle serviced by
your authorized dealer.
You may also perform the following power door lock sequence to
enable/disable the perimeter lamps feature.Note:Before starting, ensure
the ignition is off and all vehicle doors are closed. You must complete
Steps 1–5 within 30 seconds or the procedure will have to be repeated. If
the procedure needs to be repeated, wait a minimum of 30 seconds
before beginning again.
2009 MKS(mks)
Owners Guide (post-2002-fmt)
USA(fus)
Locks and Security
109
Page 110 of 323
1. Turn the ignition on.
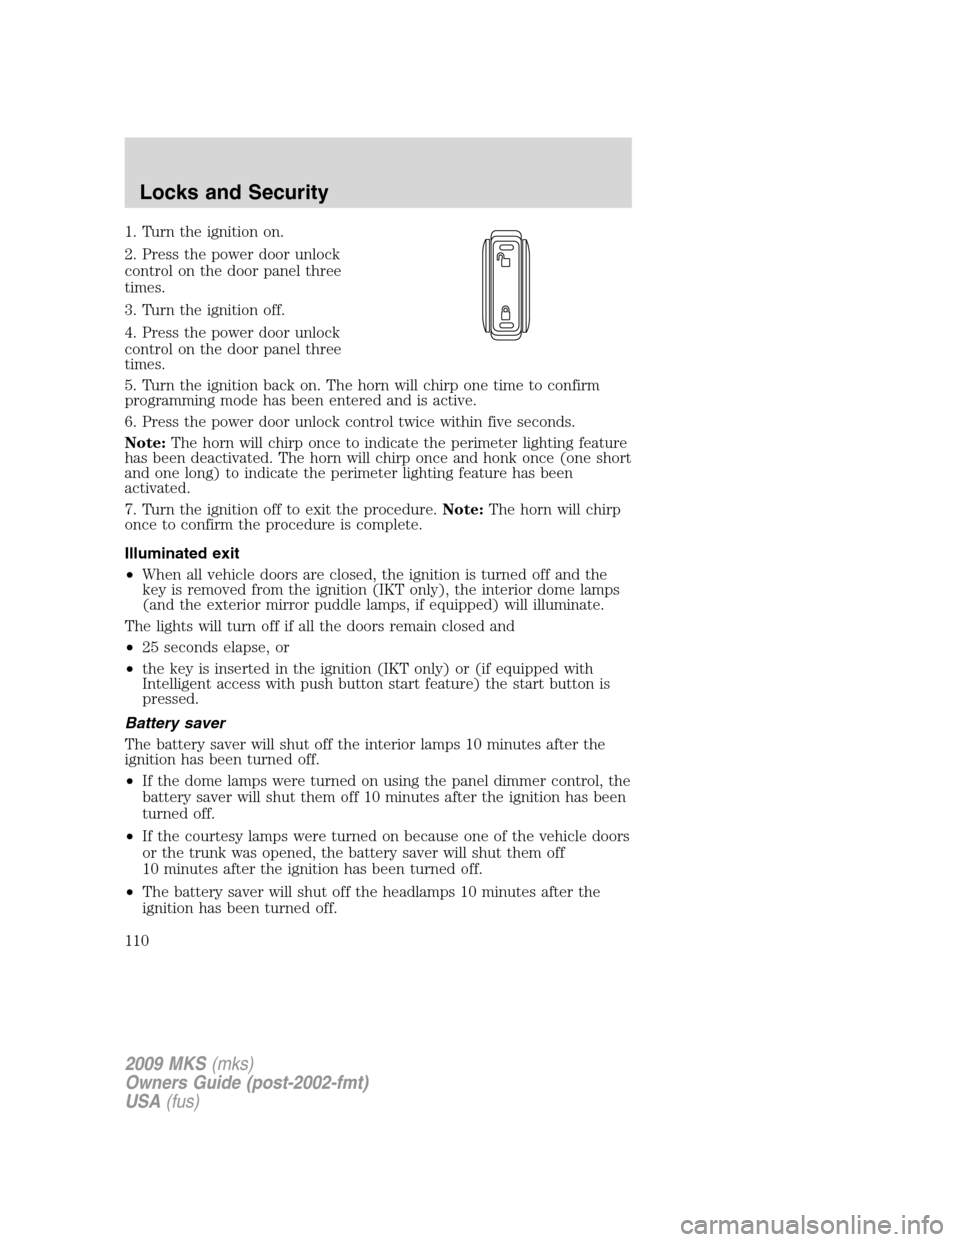
2. Press the power door unlock
control on the door panel three
times.
3. Turn the ignition off.
4. Press the power door unlock
control on the door panel three
times.
5. Turn the ignition back on. The horn will chirp one time to confirm
programming mode has been entered and is active.
6. Press the power door unlock control twice within five seconds.
Note:The horn will chirp once to indicate the perimeter lighting feature
has been deactivated. The horn will chirp once and honk once (one short
and one long) to indicate the perimeter lighting feature has been
activated.
7. Turn the ignition off to exit the procedure.Note:The horn will chirp
once to confirm the procedure is complete.
Illuminated exit
•When all vehicle doors are closed, the ignition is turned off and the
key is removed from the ignition (IKT only), the interior dome lamps
(and the exterior mirror puddle lamps, if equipped) will illuminate.
The lights will turn off if all the doors remain closed and
•25 seconds elapse, or
•the key is inserted in the ignition (IKT only) or (if equipped with
Intelligent access with push button start feature) the start button is
pressed.
Battery saver
The battery saver will shut off the interior lamps 10 minutes after the
ignition has been turned off.
•If the dome lamps were turned on using the panel dimmer control, the
battery saver will shut them off 10 minutes after the ignition has been
turned off.
•If the courtesy lamps were turned on because one of the vehicle doors
or the trunk was opened, the battery saver will shut them off
10 minutes after the ignition has been turned off.
•The battery saver will shut off the headlamps 10 minutes after the
ignition has been turned off.
2009 MKS(mks)
Owners Guide (post-2002-fmt)
USA(fus)
Locks and Security
110
Page 243 of 323
Passenger compartment fuse panel
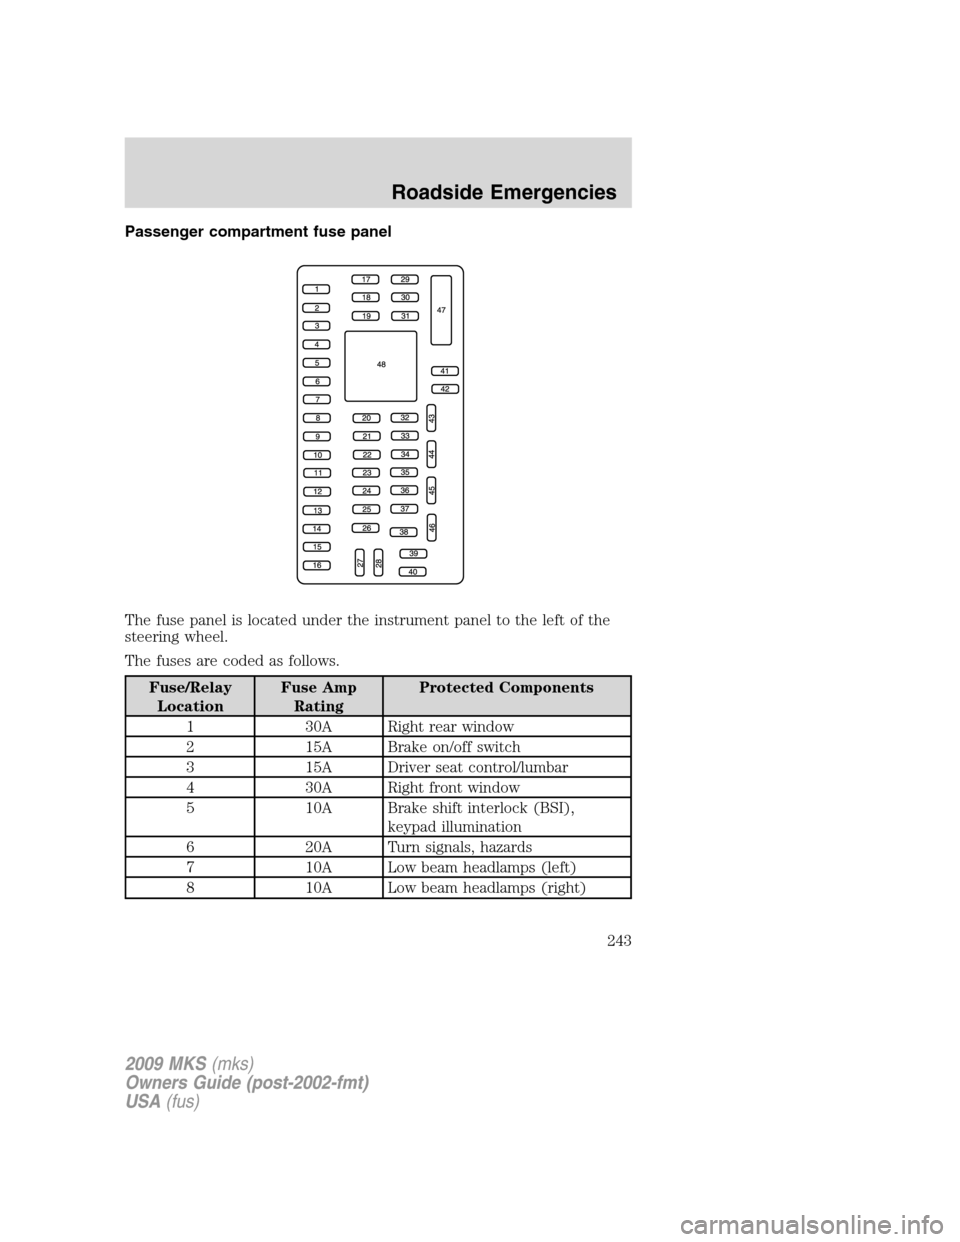
The fuse panel is located under the instrument panel to the left of the
steering wheel.
The fuses are coded as follows.
Fuse/Relay
LocationFuse Amp
RatingProtected Components
1 30A Right rear window
2 15A Brake on/off switch
3 15A Driver seat control/lumbar
4 30A Right front window
5 10A Brake shift interlock (BSI),
keypad illumination
6 20A Turn signals, hazards
7 10A Low beam headlamps (left)
8 10A Low beam headlamps (right)
2009 MKS(mks)
Owners Guide (post-2002-fmt)
USA(fus)
Roadside Emergencies
243
Page 244 of 323
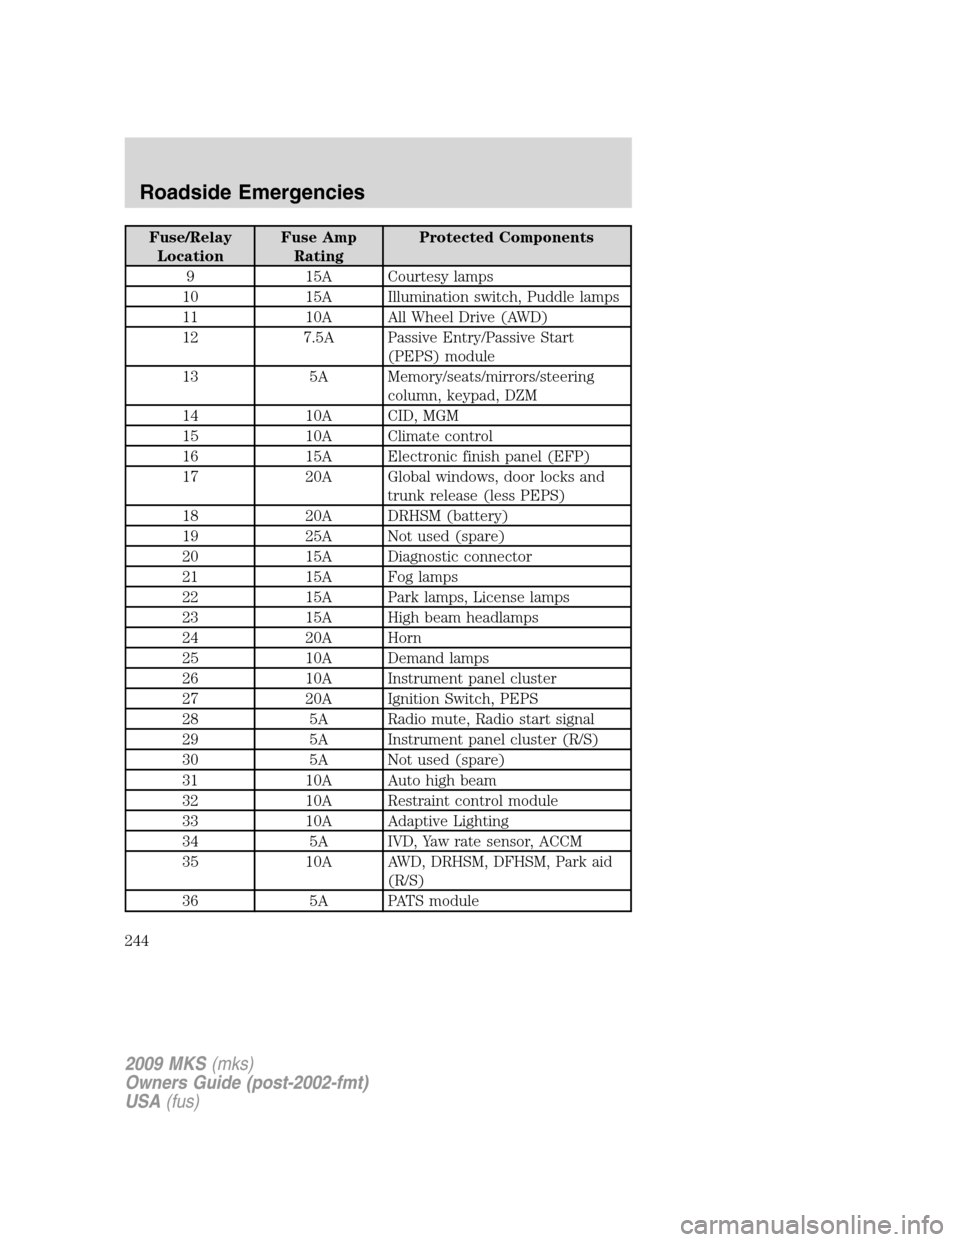
Fuse/Relay
LocationFuse Amp
RatingProtected Components
9 15A Courtesy lamps
10 15A Illumination switch, Puddle lamps
11 10A All Wheel Drive (AWD)
12 7.5A Passive Entry/Passive Start
(PEPS) module
13 5A Memory/seats/mirrors/steering
column, keypad, DZM
14 10A CID, MGM
15 10A Climate control
16 15A Electronic finish panel (EFP)
17 20A Global windows, door locks and
trunk release (less PEPS)
18 20A DRHSM (battery)
19 25A Not used (spare)
20 15A Diagnostic connector
21 15A Fog lamps
22 15A Park lamps, License lamps
23 15A High beam headlamps
24 20A Horn
25 10A Demand lamps
26 10A Instrument panel cluster
27 20A Ignition Switch, PEPS
28 5A Radio mute, Radio start signal
29 5A Instrument panel cluster (R/S)
30 5A Not used (spare)
31 10A Auto high beam
32 10A Restraint control module
33 10A Adaptive Lighting
34 5A IVD, Yaw rate sensor, ACCM
35 10A AWD, DRHSM, DFHSM, Park aid
(R/S)
36 5A PATS module
2009 MKS(mks)
Owners Guide (post-2002-fmt)
USA(fus)
Roadside Emergencies
244
Page 274 of 323
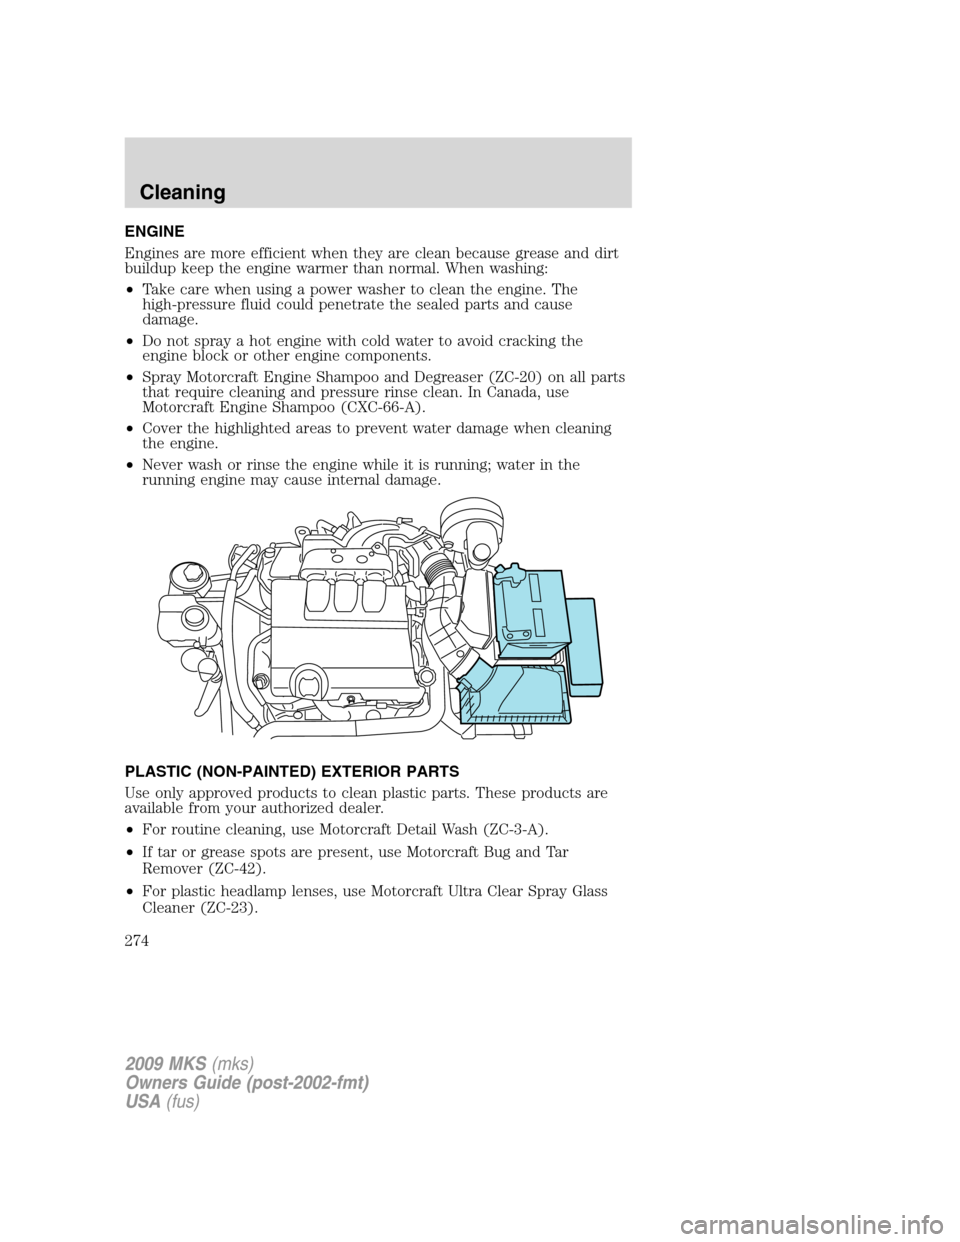
ENGINE
Engines are more efficient when they are clean because grease and dirt
buildup keep the engine warmer than normal. When washing:
•Take care when using a power washer to clean the engine. The
high-pressure fluid could penetrate the sealed parts and cause
damage.
•Do not spray a hot engine with cold water to avoid cracking the
engine block or other engine components.
•Spray Motorcraft Engine Shampoo and Degreaser (ZC-20) on all parts
that require cleaning and pressure rinse clean. In Canada, use
Motorcraft Engine Shampoo (CXC-66-A).
•Cover the highlighted areas to prevent water damage when cleaning
the engine.
•Never wash or rinse the engine while it is running; water in the
running engine may cause internal damage.
PLASTIC (NON-PAINTED) EXTERIOR PARTS
Use only approved products to clean plastic parts. These products are
available from your authorized dealer.
•For routine cleaning, use Motorcraft Detail Wash (ZC-3-A).
•If tar or grease spots are present, use Motorcraft Bug and Tar
Remover (ZC-42).
•For plastic headlamp lenses, use Motorcraft Ultra Clear Spray Glass
Cleaner (ZC-23).
2009 MKS(mks)
Owners Guide (post-2002-fmt)
USA(fus)
Cleaning
274