brake LINCOLN MKT 2014 Owners Manual
[x] Cancel search | Manufacturer: LINCOLN, Model Year: 2014, Model line: MKT, Model: LINCOLN MKT 2014Pages: 498, PDF Size: 7.3 MB
Page 5 of 498
Universal Garage Door Opener (If Equipped) 162
HomeLink® wireless control system.......................162
Auxiliary Power Points 167
Storage Compartments 170
Center console.......................................170
Overhead console.....................................172
Starting and Stopping the Engine 173
Engine block heater...................................177
Fuel and Refueling 179
Fuel quality.........................................180
Running out of fuel....................................181
Refueling...........................................182
Fuel consumption.....................................184
Transmission 188
Automatic transmission.................................188
All-Wheel Drive (If Equipped) 193
All wheel drive.......................................193
Brakes 200
Brakes.............................................200
Hints on driving with anti-lock brakes......................201
Parking brake........................................201
Traction Control 202
TractionControl™ ....................................202
Stability Control 203
AdvanceTrac®.......................................204
Parking Aids 205
Sensing system.......................................205
Active park assist.....................................206
Rear-view camera system...............................211
4Table of Contents
2014 MKT(mkt)
Owners Guide gf, 1st Printing, April 2013
USA(fus)
Page 7 of 498
Customer Assistance 271
Reporting safety defects (U.S. only).......................278
Reporting safety defects (Canada only).....................278
Fuses 279
Changing a fuse......................................279
Fuse specification chart................................280
Maintenance 289
General information...................................289
Opening and closing the hood............................290
Under hood overview..................................291
Engine oil dipstick....................................295
Engine oil check......................................295
Engine coolant check..................................296
Automatic transmission fluid check........................301
Brake fluid check.....................................306
Power steering fluid check..............................306
Fuel filter...........................................306
Washer fluid check....................................307
Battery ............................................307
Checking the wiper blades..............................309
Air filter(s).........................................310
Adjusting the headlamps................................312
Changing a bulb......................................314
Vehicle Care 317
Cleaning products.....................................317
Cleaning the exterior..................................317
Waxing.............................................319
Repairing minor paint damage............................319
Cleaning the engine...................................319
Cleaning the windows and wiper blades.....................320
6Table of Contents
2014 MKT(mkt)
Owners Guide gf, 1st Printing, April 2013
USA(fus)
Page 11 of 498
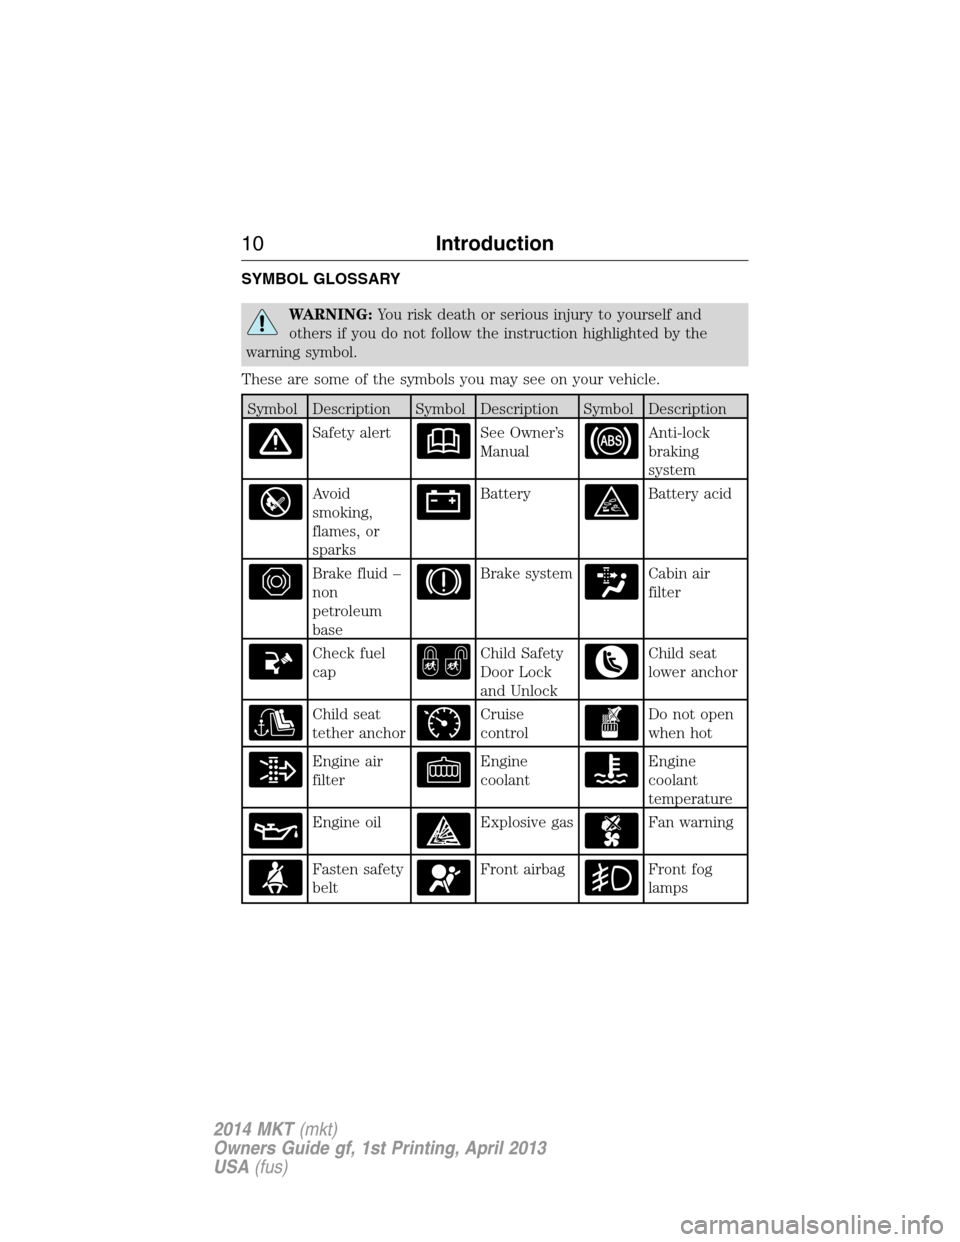
SYMBOL GLOSSARY
WARNING:You risk death or serious injury to yourself and
others if you do not follow the instruction highlighted by the
warning symbol.
These are some of the symbols you may see on your vehicle.
Symbol Description Symbol Description Symbol Description
Safety alertSee Owner’s
ManualAnti-lock
braking
system
Avoid
smoking,
flames, or
sparksBatteryBattery acid
Brake fluid –
non
petroleum
baseBrake systemCabin air
filter
Check fuel
capChild Safety
Door Lock
and UnlockChild seat
lower anchor
Child seat
tether anchorCruise
controlDo not open
when hot
Engine air
filterEngine
coolantEngine
coolant
temperature
Engine oilExplosive gasFan warning
Fasten safety
beltFront airbagFront fog
lamps
10Introduction
2014 MKT(mkt)
Owners Guide gf, 1st Printing, April 2013
USA(fus)
Page 12 of 498
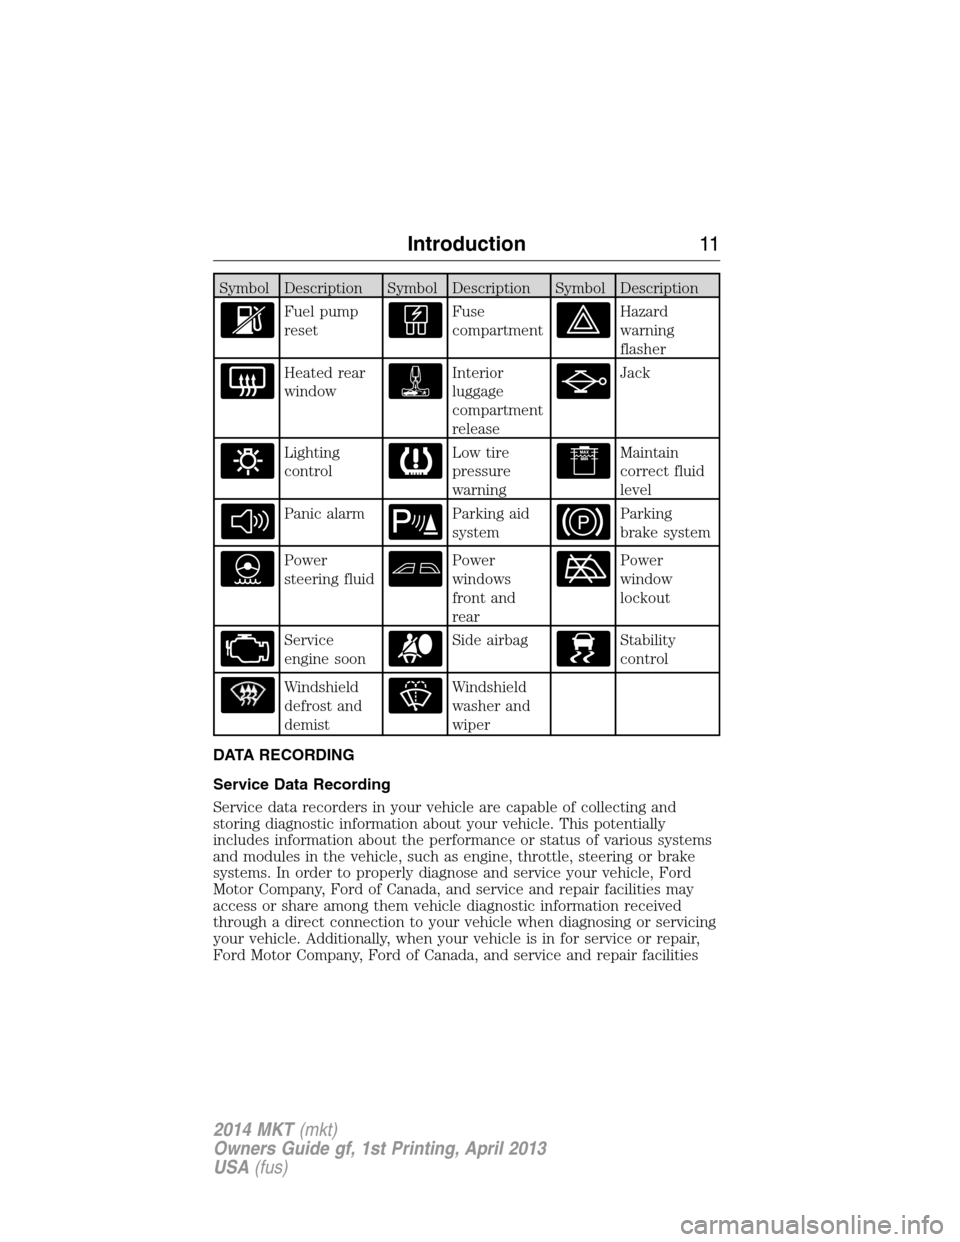
Symbol Description Symbol Description Symbol Description
Fuel pump
resetFuse
compartmentHazard
warning
flasher
Heated rear
windowInterior
luggage
compartment
releaseJack
Lighting
controlLow tire
pressure
warningMaintain
correct fluid
level
Panic alarmParking aid
systemParking
brake system
Power
steering fluidPower
windows
front and
rearPower
window
lockout
Service
engine soonSide airbagStability
control
Windshield
defrost and
demistWindshield
washer and
wiper
DATA RECORDING
Service Data Recording
Service data recorders in your vehicle are capable of collecting and
storing diagnostic information about your vehicle. This potentially
includes information about the performance or status of various systems
and modules in the vehicle, such as engine, throttle, steering or brake
systems. In order to properly diagnose and service your vehicle, Ford
Motor Company, Ford of Canada, and service and repair facilities may
access or share among them vehicle diagnostic information received
through a direct connection to your vehicle when diagnosing or servicing
your vehicle. Additionally, when your vehicle is in for service or repair,
Ford Motor Company, Ford of Canada, and service and repair facilities
Introduction11
2014 MKT(mkt)
Owners Guide gf, 1st Printing, April 2013
USA(fus)
Page 13 of 498
may access or share among them data for vehicle improvement purposes.
For U.S. only (if equipped), if you choose to use the SYNC® Vehicle
Health Report, you consent that certain diagnostic information may also
be accessed electronically by Ford Motor Company and Ford authorized
service facilities, and that the diagnostic information may be used for any
purpose. See theSYNC®chapter for more information.
Event Data Recording
This vehicle is equipped with an event data recorder (EDR). The
main purpose of an EDR is to record, in certain crash or near
crash-like situations, such as an airbag deployment or hitting a
road obstacle; this data will assist in understanding how a
vehicle’s systems performed. The EDR is designed to record data
related to vehicle dynamics and safety systems for a short period
of time, typically 30 seconds or less. The EDR in this vehicle is
designed to record such data as:
•How various systems in your vehicle were operating;
•Whether or not the driver and passenger safety belts were
buckled/fastened;
•How far (if at all) the driver was depressing the accelerator
and/or the brake pedal;
•How fast the vehicle was travelling;
•Where the driver was positioning the steering wheel.
This data can help provide a better understanding of the
circumstances in which crashes and injuries occur.
Note: EDR data is recorded by your vehicle only if a non-trivial
crash situation occurs; no data is recorded by the EDR under
normal driving conditions and no personal data or information
(e.g., name, gender, age, and crash location) is recorded (see
limitations regarding 911 Assist and Traffic, Directions and
Information privacy below). However, parties, such as law
enforcement, could combine the EDR data with the type of
personally identifying data routinely acquired during a crash
investigation.
To read data recorded by an EDR, special equipment is required,
and access to the vehicle or the EDR is needed. In addition to the
vehicle manufacturer, other parties, such as law enforcement,
that have such special equipment, can read the information if
they have access to the vehicle or the EDR. Ford Motor Company
12Introduction
2014 MKT(mkt)
Owners Guide gf, 1st Printing, April 2013
USA(fus)
Page 43 of 498
Safety Belt Locking Modes
WARNING:After any vehicle crash, the safety belt system at all
passenger seating positions must be checked by an authorized
dealer to verify that the automatic locking retractor feature for child
seats is still functioning properly. In addition, all safety belts should be
checked for proper function.
WARNING:The belt and retractor assembly must be replaced if
the safety belt assembly automatic locking retractor feature or
any other safety belt function is not operating properly when checked
by an authorized dealer. Failure to replace the belt and retractor
assembly could increase the risk of injury in crashes.
All safety restraints in the vehicle are combination lap and shoulder
belts. The driver safety belt has the first locking mode and the front
outboard passenger and rear seat safety belts have both types of locking
modes described as follows:
Vehicle Sensitive Mode
This is the normal retractor mode, which allows free shoulder or lap belt
length adjustment to your movements and locking in response to vehicle
movement. For example, if the driver brakes suddenly or turns a corner
sharply, or the vehicle receives an impact of about 5 mph (8 km/h) or
more, the combination safety belts will lock to help reduce forward
movement of the driver and passengers.
In addition, the retractor(s) is designed to lock if the webbing is pulled
out too quickly. If this occurs, let the belt retract slightly and pull
webbing out again in a slow and controlled manner.
Automatic Locking Mode
In this mode, the shoulder belt or lap belt is automatically pre-locked.
The belt will still retract to remove any slack in the shoulder or lap belt.
The automatic locking mode is not available on the driver safety belt.
When to Use the Automatic Locking Mode
This mode should be used any time a child safety seat, except a booster,
is installed in passenger front or rear seating positions. Children 12 years
old and under should be properly restrained in a rear seating position
whenever possible.
42Safety Belts
2014 MKT(mkt)
Owners Guide gf, 1st Printing, April 2013
USA(fus)
Page 48 of 498
Note:The driver and front passenger Belt-Minder are deactivated and
activated independently. When deactivating or activating one seating
position, do not buckle the other position as this will terminate the
process.
Read Steps1-5thoroughly before proceeding with the programming
procedure.
Note:If you are using MyKey®, the Belt-Minder cannot be disabled.
Also, if the Belt-Minder has been previously disabled, it will be
re-enabled during the use of MyKey®. See theMyKey®chapter.
The driver and front passenger Belt-Minder features can be deactivated
or activated by performing the following procedure:
Before following the procedure, make sure that:
•the parking brake is set
•the transmission selector lever is in positionP
•the ignition is off
•the driver and front passenger safety belts are unbuckled
1. Turn the ignition on. Do not start the engine.
2. Wait until the safety belt warning light turns off (about one minute).
3. Wait 10 seconds after the safety belt warning light turns off.
•Step 4 must be completed within 20 seconds after the completion of
Step 3.
4. For the seating position being disabled buckle then unbuckle the
safety belt three times at a moderate speed, ending in the unbuckled
state.
•After Step 4, the safety belt warning light will be turned on for three
seconds.
5. Within about seven seconds of the light turning off, buckle then
unbuckle the safety belt.
•This will disable the Belt-Minder feature for that seating position if it
is currently enabled.
•This will enable the Belt-Minder feature for that seating position if it is
currently disabled.
Safety Belts47
2014 MKT(mkt)
Owners Guide gf, 1st Printing, April 2013
USA(fus)
Page 71 of 498
Remote Starting the Vehicle
Note:You must press each button within three seconds of each other.
Your vehicle will not remote start and the horn will not sound if you do
not follow this sequence.
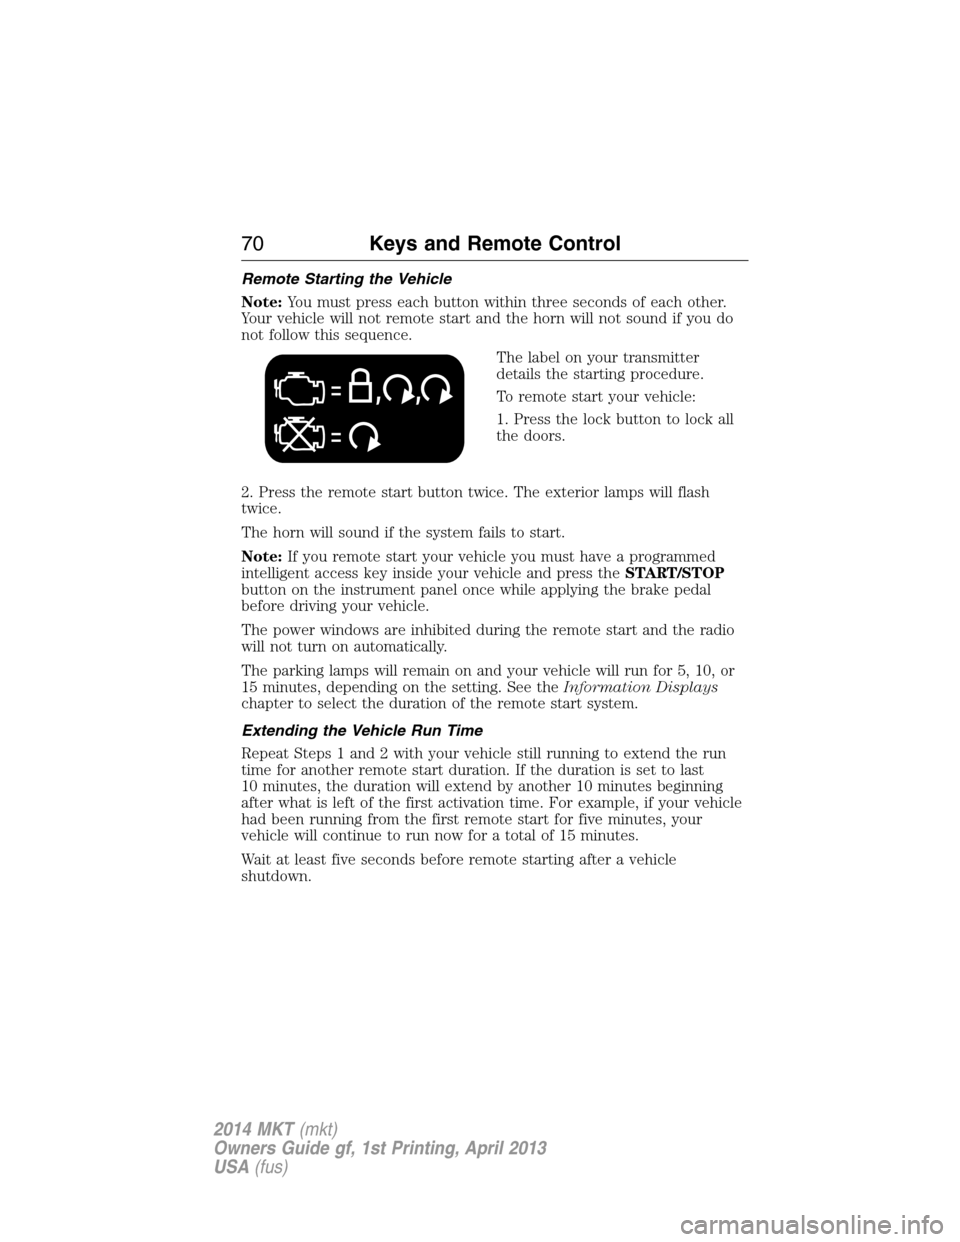
The label on your transmitter
details the starting procedure.
To remote start your vehicle:
1. Press the lock button to lock all
the doors.
2. Press the remote start button twice. The exterior lamps will flash
twice.
The horn will sound if the system fails to start.
Note:If you remote start your vehicle you must have a programmed
intelligent access key inside your vehicle and press theSTART/STOP
button on the instrument panel once while applying the brake pedal
before driving your vehicle.
The power windows are inhibited during the remote start and the radio
will not turn on automatically.
The parking lamps will remain on and your vehicle will run for 5, 10, or
15 minutes, depending on the setting. See theInformation Displays
chapter to select the duration of the remote start system.
Extending the Vehicle Run Time
Repeat Steps 1 and 2 with your vehicle still running to extend the run
time for another remote start duration. If the duration is set to last
10 minutes, the duration will extend by another 10 minutes beginning
after what is left of the first activation time. For example, if your vehicle
had been running from the first remote start for five minutes, your
vehicle will continue to run now for a total of 15 minutes.
Wait at least five seconds before remote starting after a vehicle
shutdown.
70Keys and Remote Control
2014 MKT(mkt)
Owners Guide gf, 1st Printing, April 2013
USA(fus)
Page 88 of 498
Programming a Spare Intelligent Access Key
Note:A maximum of four intelligent access keys can be programmed to
your vehicle. You must take your vehicle and all access keys to your
authorized dealer to be erased and reprogrammed if you would like to
replace a previously programmed access key with a new access key, or if
you already have four access keys programmed to your vehicle.
You must have two previously programmed intelligent access keys
inside your vehicle and the new unprogrammed intelligent access keys
readily accessible. See your authorized dealer to have the spare key
programmed if two previously programmed keys are not available.
Make sure that your vehicle is off before beginning this procedure. Make
sure that all doors are closed before beginning and that they remain
closed throughout the procedure. Perform all steps within 30 seconds of
starting the sequence. Stop and wait for at least one minute before
starting again if any steps are performed out of sequence.
Read and understand the entire procedure before you begin.
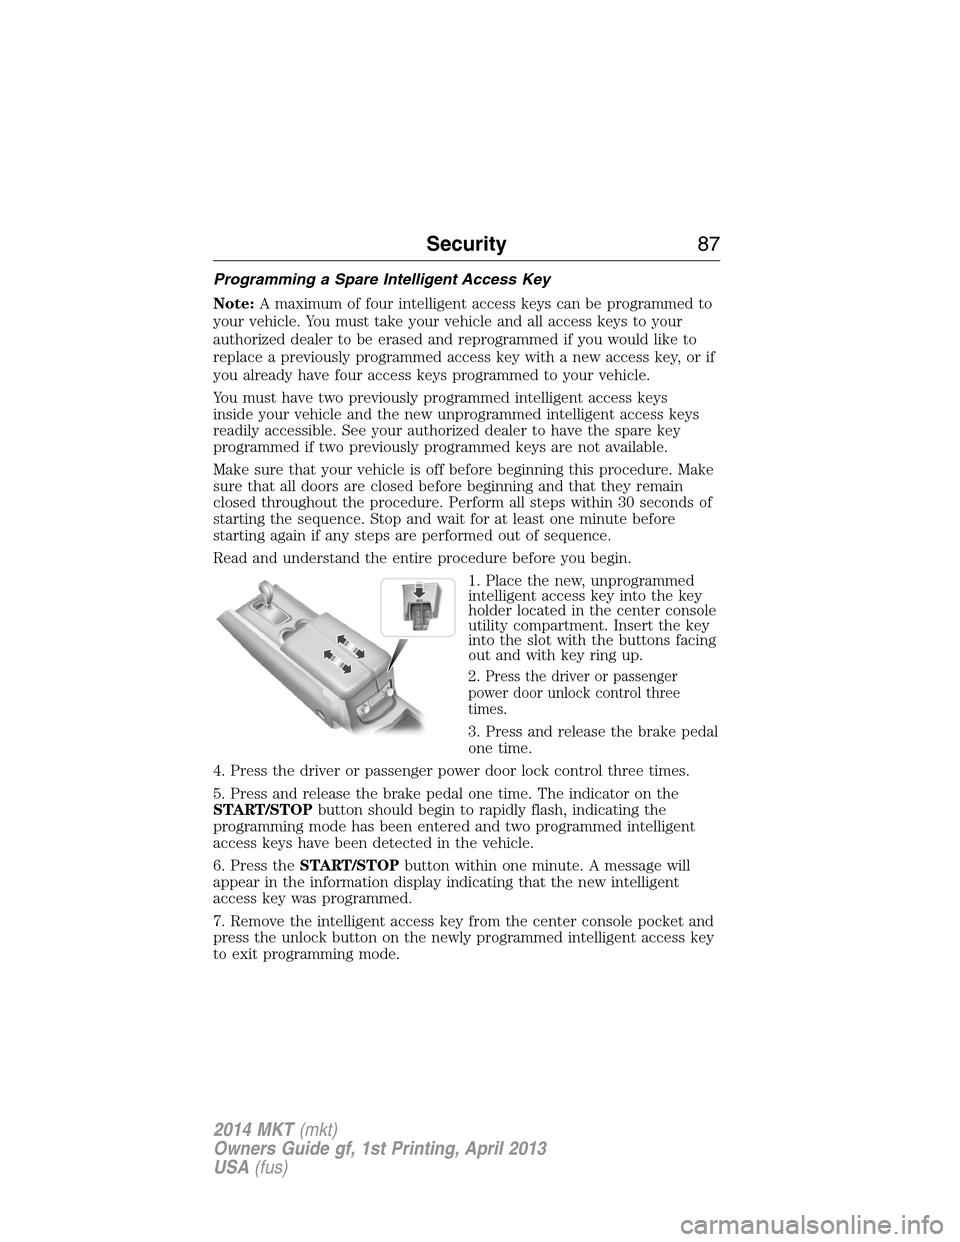
1. Place the new, unprogrammed
intelligent access key into the key
holder located in the center console
utility compartment. Insert the key
into the slot with the buttons facing
out and with key ring up.
2.
Press the driver or passenger
power door unlock control three
times.
3. Press and release the brake pedal
one time.
4. Press the driver or passenger power door lock control three times.
5. Press and release the brake pedal one time. The indicator on the
START/STOPbutton should begin to rapidly flash, indicating the
programming mode has been entered and two programmed intelligent
access keys have been detected in the vehicle.
6. Press theSTART/STOPbutton within one minute. A message will
appear in the information display indicating that the new intelligent
access key was programmed.
7. Remove the intelligent access key from the center console pocket and
press the unlock button on the newly programmed intelligent access key
to exit programming mode.
Security87
2014 MKT(mkt)
Owners Guide gf, 1st Printing, April 2013
USA(fus)
Page 94 of 498
ADJUSTABLE PEDALS (IF EQUIPPED)
WARNING:Never adjust the accelerator and brake pedal with
feet on the pedals while the vehicle is moving.
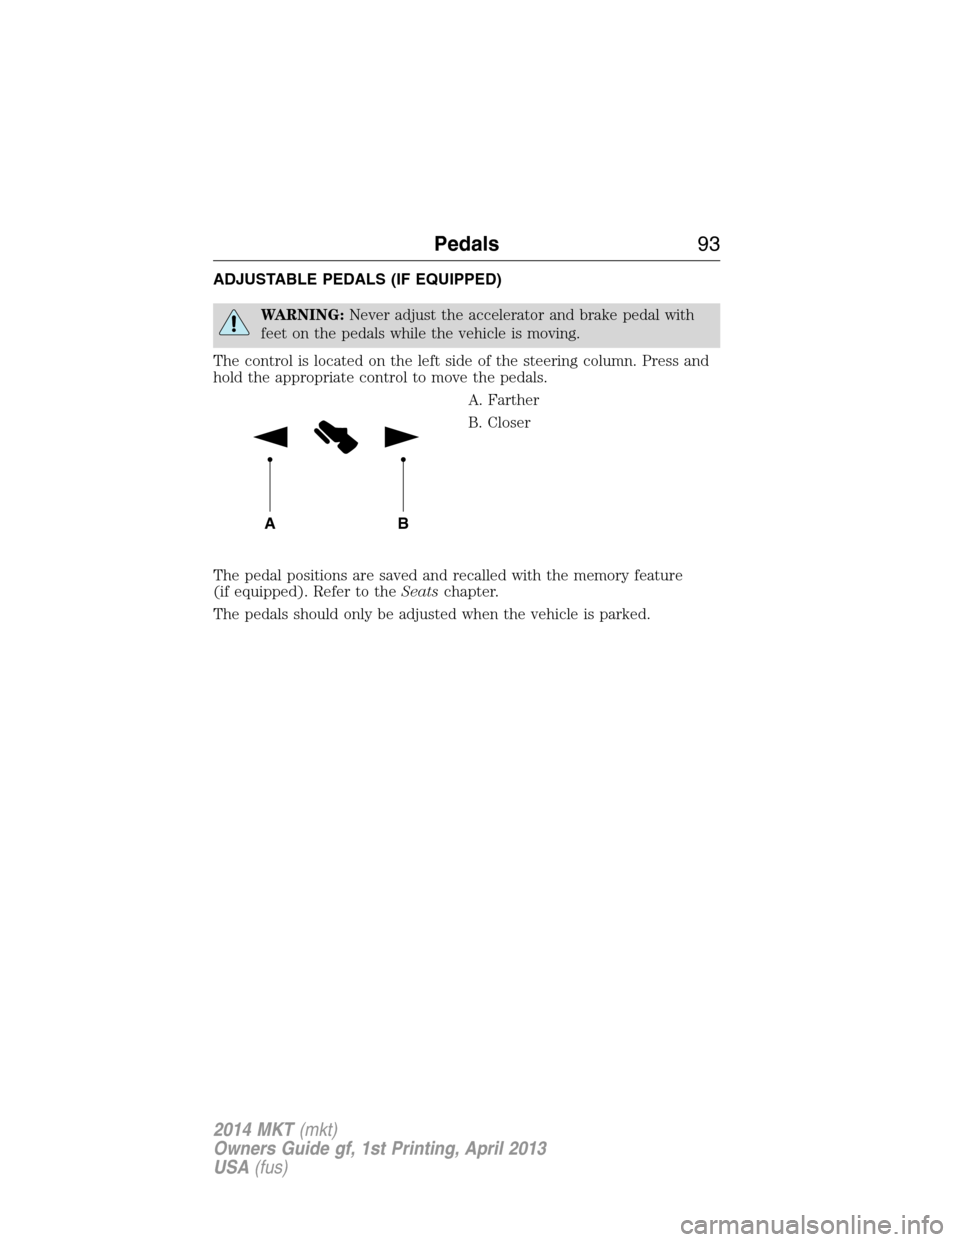
The control is located on the left side of the steering column. Press and
hold the appropriate control to move the pedals.
A. Farther
B. Closer
The pedal positions are saved and recalled with the memory feature
(if equipped). Refer to theSeatschapter.
The pedals should only be adjusted when the vehicle is parked.
AB
Pedals93
2014 MKT(mkt)
Owners Guide gf, 1st Printing, April 2013
USA(fus)