lights LINCOLN MKT 2019 User Guide
[x] Cancel search | Manufacturer: LINCOLN, Model Year: 2019, Model line: MKT, Model: LINCOLN MKT 2019Pages: 575, PDF Size: 4.66 MB
Page 160 of 575

Refrigerator: Briefly press and hold COOL.The indicator light on the cool side of theswitch illuminates and the indicator light onthe freeze side glows when the refrigeratoris active. The temperature cools toapproximately 41°F (5°C). Briefly press andhold COOL again to switch off therefrigerator. Briefly press and hold FREEZEto change to freezer mode.
Freezer: Briefly press and hold FREEZE. Bothindicator lights illuminate when the freezeris active. The temperature cools toapproximately 23°F (-5°C). Press FREEZEagain to switch off the freezer. Press COOLto change to refrigerator mode.
This feature turns off when you switch thevehicle off. It turns back on to the last modewhen you restart the vehicle.
Cleaning and Maintenance
Note:Condensation on the inside walls ofthe refrigerator is normal under certainconditions.
This feature is maintenance free, but you canclean the inside of the unit and the coverwith a mild soap and water solution.
OVERHEAD CONSOLE
Press near the rear edge of the door to openit.
157
MKT (TP4) , enUSA, Edition date: 201803, Second-Printing
Storage CompartmentsE211654 E75193
Page 190 of 575

GENERAL INFORMATION
Note: Occasional brake noise is normal. Ifa metal-to-metal, continuous grinding orcontinuous squeal sound is present, thebrake linings may be worn-out. Have thesystem checked by an authorized dealer. Ifyour vehicle has continuous vibration orshudder in the steering wheel while braking,have it checked by an authorized dealer.
Note:Brake dust may accumulate on thewheels, even under normal drivingconditions. Some dust is inevitable as thebrakes wear and does not contribute tobrake noise. See Cleaning the Wheels(page 310).
Note:Depending on applicable laws andregulations in the country for which yourvehicle was originally built, your brake lampsmay flash during heavy braking. Followingthis, your hazard lights may also flash whenyour vehicle comes to a stop.
See Warning Lamps andIndicators (page 101).
Wet brakes result in reduced brakingefficiency. Gently press the brake pedal afew times when driving from a car wash orstanding water to dry the brakes.
Brake Over Accelerator
In the event the accelerator pedal becomesstuck or entrapped, apply steady and firmpressure to the brake pedal to slow thevehicle and reduce engine power. If youexperience this condition, apply the brakesand bring your vehicle to a safe stop. Movethe transmission to park (P), switch theengine off and apply the parking brake.Inspect the accelerator pedal for anyinterference. If none are found and thecondition persists, have your vehicle towedto the nearest authorized dealer.
Brake Assist
Brake assist detects when you rapidly brakeby measuring the rate at which you press thebrake pedal. It provides maximum brakingefficiency as long as you press the pedal. Itcan also reduce stopping distances in criticalsituations.
Anti-lock Brake System
This system helps you maintain steeringcontrol during emergency stops by keepingthe brakes from locking.
If it illuminates when you aredriving, this indicates amalfunction. Your vehiclecontinues to have normal braking withoutthe anti-lock brake system function. Haveyour vehicle checked as soon as possible.
It also momentarily illuminates when youswitch the ignition on to confirm the lamp isfunctional. If it does not illuminate when youswitch the ignition on, or begins to flash atany time, have the system checked by anauthorized dealer.
187
MKT (TP4) , enUSA, Edition date: 201803, Second-Printing
BrakesE270480
Page 192 of 575

PRINCIPLE OF OPERATION
The traction control system helps avoid drivewheel spin and loss of traction.
If your vehicle begins to slide, the systemapplies the brakes to individual wheels and,when needed, reduces engine power at thesame time. If the wheels spin whenaccelerating on slippery or loose surfaces,the system reduces engine power in orderto increase traction.
USING TRACTION CONTROL
WARNING: The stability and tractioncontrol light illuminates steadily if thesystem detects a failure. Make sure youdid not manually disable the tractioncontrol system using the informationdisplay controls or the switch. If the stabilitycontrol and traction control light is still
illuminating steadily, have the systemserviced by an authorized dealerimmediately. Operating your vehicle withthe traction control disabled could lead toan increased risk of loss of vehicle control,vehicle rollover, personal injury and death.
The system automatically turns on each timeyou switch the ignition on.
If your vehicle is stuck in mud or snow,switching traction control off may bebeneficial as this allows the wheels to spin.
Note:When you switch traction control off,stability control remains fully active.
Switching the System Off
When you switch the system off or on, amessage appears in the information displayshowing system status.
You can switch the system off by either usingthe information display controls or the switch.
Using the Information Display Controls
You can switch this feature off or on in theinformation display. See General Information(page 105).
Using a Switch (If Equipped)
Use the traction control switch on theinstrument panel to switch the system off oron.
System Indicator Lights and Messages
The stability and traction controllight:
•Temporarily illuminates on enginestart-up.
•Flashes when a driving conditionactivates either of the systems.
•Illuminates if a problem occurs in eitherof the systems.
The stability and traction controloff light temporarily illuminates onengine start-up and stays on whenyou switch the traction control system off.
189
MKT (TP4) , enUSA, Edition date: 201803, Second-Printing
Traction ControlE138639 E130458
Page 212 of 575

Detection issues can occur:
With vehicles that edge into yourlane that can only be detectedonce they have moved fully intoyour lane.
A
With motorcyclists that may bedetected late, or not at all.B
With vehicles in front of you whengoing into and coming out of abend. The detection beam doesnot follow sharp curves in the road.
C
In these cases, the system may brake late orunexpectedly. You should stay alert and takeaction when necessary.
If something hits the front end of your vehicleor damage occurs, the radar-sensing zonemay change. This could cause missed orfalse vehicle detection.
System Not Available
Conditions that can cause the system todeactivate or prevent the system fromactivating when requested include:
•A blocked sensor.
•High brake temperature.
•A failure in the system or a relatedsystem.
Blocked Sensor
A message displays if something obstructsthe radar signals from the sensor. Thesensor is in the lower grille. The systemcannot detect a vehicle ahead and does notfunction when something blocks the sensor.
Note:You cannot see the sensor. It is behinda fascia panel.
Keep the front of your vehicle free of dirt,metal badges or objects. Vehicle frontprotectors and aftermarket lights may alsoblock the sensor.
209
MKT (TP4) , enUSA, Edition date: 201803, Second-Printing
Cruise ControlE145632
Page 223 of 575

Note:When a vehicle passes quickly throughthe blind spot zone, typically fewer than twoseconds, the system does not trigger.
Using the System
The Blind Spot Information System turns onwhen you start the engine and you drive yourvehicle forward above 3 mph (5 km/h).
For automatic transmissions, the Blind SpotInformation System remains on while thetransmission is in drive (D). If shifted intoreverse (R) or park (P) the Blind SpotInformation System turns off. Once shiftedback into drive (D), the Blind Spot InformationSystem turns back on when you drive yourvehicle above 3 mph (5 km/h).
For manual transmissions, the Blind SpotInformation System is on for all gears exceptthe reverse (R).
Note:The Blind Spot Information Systemdoes not function in reverse (R) or park (P).
System Lights and Messages
The Blind Spot Information Systemilluminates an amber alert indicator in theoutside mirror on the side of your vehicle theapproaching vehicle is coming from.
The alert indicator dims when the systemdetects nighttime darkness.
System Sensor Blockage
The system uses radar sensors that arelocated behind the bumper fascia on eachside of your vehicle. Any dirt, mud and snowin front of the sensors and/or driving in heavyrain can cause system degradation. Also,other types of obstructions in front of thesensor can cause system degradation. Thisis referred to as a ‘blocked’ condition.
Note:Do not apply bumper stickers and/orrepair compound to these areas, this cancause degraded system performance.
220
MKT (TP4) , enUSA, Edition date: 201803, Second-Printing
Driving AidsE142442 E205199
Page 227 of 575

System Lights, Messages and AudibleAlerts
The Cross Traffic Alert illuminates an amberalert indicator in the outside mirror on theside of your vehicle the approaching vehicleis coming from. Cross Traffic Alert alsosounds an audible alert and a messageappears in the information display indicatinga vehicle is coming from the right or left.Cross Traffic Alert works with the reversesensing system that sounds its own seriesof tones. See Rear Parking Aid (page 192).
The system uses radar sensors that arelocated behind the bumper fascia on eachside of your vehicle. Do not allow mud, snowor bumper stickers to obstruct these areas,this can cause degraded systemperformance. See Blind Spot InformationSystem (page 219). If the Blind SpotInformation System is blocked, Cross TrafficAlert is also blocked. A correspondingmessage appears in the information displayas soon as you shift the transmission intoreverse (R).
System Limitations
Cross Traffic Alert has its limitations;situations such as severe weather conditionsor debris build-up on the sensor area maylimit vehicle detection.
The system detects approaching vehiclesfrom up to 45 ft (14 m) away, thoughcoverage decreases when the sensors areblocked. Reversing slowly helps increase thecoverage area and effectiveness.
The following are other situations that maylimit the Cross Traffic Alert performance:
•Stationary or slow moving vehicles.
•Pedestrians or objects in the roadway.
•Oncoming vehicles in the same lame.
•Severe weather conditions.
•Debris build-up near or around thesensor(s).
•Small distance to the vehicle ahead.
•Adjacently parking vehicles or objectsobstructing the sensors.
•Approaching vehicles passing at speedsgreater than 15 mph (24 km/h).
•Driving in reverse faster than 3 mph(5 km/h).
•Backing out of an angled parking spot.
224
MKT (TP4) , enUSA, Edition date: 201803, Second-Printing
Driving AidsE142442 E205199
Page 243 of 575
.
•Consult your local motor vehicle laws fortowing a")
ESSENTIAL TOWING CHECKS
Follow these guidelines for safe towing:
•Do not tow a trailer until you drive yourvehicle at least 1,000 mi (1,600 km).
•Consult your local motor vehicle laws fortowing a trailer.
•See the instructions included with towingaccessories for the proper installationand adjustment specifications.
•Service your vehicle more frequently ifyou tow a trailer. See ScheduledMaintenance (page 479).
•If you use a rental trailer, follow theinstructions the rental agency gives you.
You can find information on loadspecification terms found on the tire labeland Safety Compliance label as well asinstructions on calculating your vehicle's loadin the Load Carrying chapter. See Load Limit(page 232).
Remember to account for the trailer tongueweight as part of your vehicle load whencalculating the total vehicle weight.
Trailer Towing Connector (Vehicleswith a Trailer Towing Package and7–Pin Connector)
When attaching the trailer wiring connectorto your vehicle, only use a proper fittingconnector that works with the vehicle andtrailer functions. Some seven-positionconnectors may have the SAE J2863 logo,which confirms that it is the proper wiringconnector and works correctly with yourvehicle.
FunctionColor
Left turn signal and stop lampYellow
Ground (-)White
Electric brakesBlue
Right turn signal and stop lampGreen
Battery (+)Orange
Running lightsBrown
Reverse lightsGrey
Hitches
Do not use a hitch that either clamps ontothe bumper or attaches to the axle.
240
MKT (TP4) , enUSA, Edition date: 201803, Second-Printing
TowingE211391
Page 245 of 575
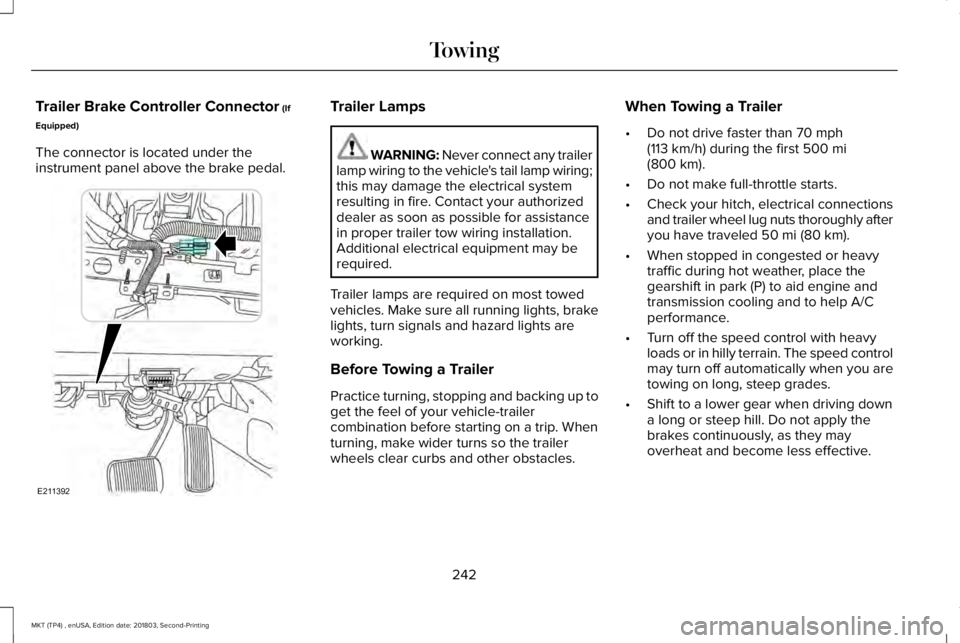
Trailer Brake Controller Connector (If
Equipped)
The connector is located under theinstrument panel above the brake pedal.
Trailer Lamps
WARNING: Never connect any trailerlamp wiring to the vehicle's tail lamp wiring;this may damage the electrical systemresulting in fire. Contact your authorizeddealer as soon as possible for assistancein proper trailer tow wiring installation.Additional electrical equipment may berequired.
Trailer lamps are required on most towedvehicles. Make sure all running lights, brakelights, turn signals and hazard lights areworking.
Before Towing a Trailer
Practice turning, stopping and backing up toget the feel of your vehicle-trailercombination before starting on a trip. Whenturning, make wider turns so the trailerwheels clear curbs and other obstacles.
When Towing a Trailer
•Do not drive faster than 70 mph(113 km/h) during the first 500 mi(800 km).
•Do not make full-throttle starts.
•Check your hitch, electrical connectionsand trailer wheel lug nuts thoroughly afteryou have traveled 50 mi (80 km).
•When stopped in congested or heavytraffic during hot weather, place thegearshift in park (P) to aid engine andtransmission cooling and to help A/Cperformance.
•Turn off the speed control with heavyloads or in hilly terrain. The speed controlmay turn off automatically when you aretowing on long, steep grades.
•Shift to a lower gear when driving downa long or steep hill. Do not apply thebrakes continuously, as they mayoverheat and become less effective.
242
MKT (TP4) , enUSA, Edition date: 201803, Second-Printing
TowingE211392
Page 249 of 575

Before driving through standing water, checkthe depth. Never drive through water that ishigher than the bottom of the front rockerarea of your vehicle.
When driving through standing water, drivevery slowly and do not stop your vehicle. Your brake performance and traction maybe limited. After driving through water andas soon as it is safe to do so:
•Lightly press the brake pedal to dry thebrakes and to check that they work.
•Check that the horn works.
•Check that the exterior lights work.
•Turn the steering wheel to check that thesteering power assist works.
FLOOR MATS
WARNING: Use a floor mat designedto fit the footwell of your vehicle that doesnot obstruct the pedal area. Failure tofollow this instruction could result in theloss of control of your vehicle, personalinjury or death.
WARNING: Pedals that cannot movefreely can cause loss of vehicle control andincrease the risk of serious personal injury.
WARNING: Secure the floor mat toboth retention devices so that it cannot slipout of position and interfere with thepedals. Failure to follow this instructioncould result in the loss of control of yourvehicle, personal injury or death.
WARNING: Do not place additionalfloor mats or any other covering on top ofthe original floor mats. This could result inthe floor mat interfering with the operationof the pedals. Failure to follow thisinstruction could result in the loss ofcontrol of your vehicle, personal injury ordeath.
WARNING: Always make sure thatobjects cannot fall into the driver foot wellwhile your vehicle is moving. Objects thatare loose can become trapped under thepedals causing a loss of vehicle control.
246
MKT (TP4) , enUSA, Edition date: 201803, Second-Printing
Driving HintsE259345 E142666
Page 415 of 575
.
B
Defrost: A pop")
Driver temperature: Touch up ordown to adjust the temperature.A
Heated steering wheel: Touch theheated steering wheel icon toswitch the heated steering wheelon and off (if equipped).
B
Defrost: A pop up appears on thescreen to display the defrostoptions.
C
MAX Defrost: Touch the button tomaximize defrosting. Outside airflows through the windshield vents,the fan automatically adjusts to thehighest speed and the temperaturedial returns to the full heat position.You can use this setting to defogor clear a thin covering of ice fromthe windshield. The heated rearwindow also automatically turns onwhen you select MAX Defrost.
Defrost: Touch to clear thewindshield of fog and thin ice.Touch again to return to theprevious airflow selection. Whenon, defrost provides outside air toreduce window fogging anddistributes air through thewindshield defroster vents anddemister vents.
Note: To prevent window fogging,you cannot select recirculated airwhen Defrost is on.
Heated rear window: Turns theheated rear window on and off.See the Heated Windows andMirrors chapter in your ownermanual.
AUTO: Touch the button to switchon automatic operation. Select thedesired temperature using thetemperature control. The systemadjusts fan speed, air distribution,air conditioning operation, andselects outside air or recirculatedair to heat or cool the vehicle inorder to maintain the desiredtemperature.
D
Power: Touch the button to switchthe system on and off. Switchingoff the climate control systemprevents outside air from enteringthe vehicle.
E
DUAL: This button lights up whenthe passenger controls are active.To switch the dual zone operationoff and link the passengertemperature to the drivertemperature, touch the DUALbutton to switch it off.
F
Passenger temperature: Touch upor down to adjust the temperature.G
412
MKT (TP4) , enUSA, Edition date: 201803, Second-Printing
SYNC™ 3