warning light LINCOLN MKT 2019 Service Manual
[x] Cancel search | Manufacturer: LINCOLN, Model Year: 2019, Model line: MKT, Model: LINCOLN MKT 2019Pages: 575, PDF Size: 4.66 MB
Page 214 of 575

Switching to Normal Cruise Control
WARNING: Normal cruise control willnot brake when your vehicle isapproaching slower vehicles. Always beaware of which mode you have selectedand apply the brakes when necessary.
The cruise control indicator lightreplaces the adaptive cruisecontrol indicator light if you selectnormal cruise control. The gap setting doesnot display, and the system does not respondto lead vehicles. Automatic braking remainsactive to maintain set speed.
You can change from adaptive cruise controlto normal cruise control through theinformation display.
211
MKT (TP4) , enUSA, Edition date: 201803, Second-Printing
Cruise ControlE71340
Page 217 of 575
, the alertness level will change togrey for a short time and the informat")
Note:If the camera sensor cannot track theroad lane markings or if your vehicle speeddrops below approximately 40 mph(64 km/h), the alertness level will change togrey for a short time and the informationdisplay will inform you that the system isunavailable.
Resetting the System
You can reset the system by either:
•Switching the ignition off and on.
•Stopping the vehicle and then openingand closing the driver’s door.
LANE KEEPING SYSTEM (If Equipped)
WARNING: You are responsible forcontrolling your vehicle at all times. Thesystem is designed to be an aid and doesnot relieve you of your responsibility todrive with due care and attention. Failureto follow this instruction could result in theloss of control of your vehicle, personalinjury or death.
WARNING: Always drive with duecare and attention when using andoperating the controls and features on yourvehicle.
WARNING: In cold and severeweather conditions the system may notfunction. Rain, snow and spray can all limitsensor performance.
WARNING: The system will notoperate if the sensor cannot track the roadlane markings.
WARNING: The sensor mayincorrectly track lane markings as otherstructures or objects. This can result in afalse or missed warning.
WARNING: Large contrasts in outsidelighting can limit sensor performance.
WARNING: The system may notoperate properly if the sensor is blocked.Keep the windshield free from obstruction.
WARNING: If damage occurs in theimmediate area surrounding the sensor,have your vehicle checked as soon aspossible.
WARNING: The system may notcorrectly operate if your vehicle is fittedwith a suspension kit not approved by us.
Note:The system works above 40 mph(64 km/h).
Note:The system works as long as thecamera can detect one lane marking.
Note:When aid or alert and aid modes areselected and the system detects no steeringactivity for a short period, the system alertsyou to put your hands on the steering wheel.The system may detect a light grip or touchon the steering wheel as hands off driving.
Note:The system may not function with ablocked camera, or a damaged or dirtywindshield.
214
MKT (TP4) , enUSA, Edition date: 201803, Second-Printing
Driving Aids
Page 221 of 575
 when I can see the lane markings on the road?
Your vehicle stays too close to the lane markings.
Driving at high speeds in curves.
The last al")
Why is the feature not available (line markings are gray) when I can see the lane markings on the road?
Your vehicle stays too close to the lane markings.
Driving at high speeds in curves.
The last alert warning or aid intervention occurred a short time ago.
Ambiguous lane markings, for example in construction zones.
Rapid transition from light to dark, or from dark to light.
Sudden offset in lane markings.
ABS or AdvanceTrac™ is active.
There is a camera blockage due to dirt, grime, fog, frost or water on the windshield.
You are driving too close to the vehicle in front of you.
Transitioning between no lane markings to lane markings or vice versa.
There is standing water on the road.
Faint lane markings, for example partial yellow lane markings on concrete roads.
Lane width is too narrow or too wide.
The camera has not been calibrated after a windshield replacement.
Driving on tight roads or on uneven roads.
218
MKT (TP4) , enUSA, Edition date: 201803, Second-Printing
Driving Aids
Page 230 of 575
.
This system is designed to alert the driver ofcertain collision risks. A radar detects if yourvehicle is rapidly")
Note:The collision warning system is activeat speeds above approximately 5 mph(8 km/h).
This system is designed to alert the driver ofcertain collision risks. A radar detects if yourvehicle is rapidly approaching anothervehicle traveling in the same direction asyours.
If it is, a red warning light illuminates and anaudible warning chime sounds.
The brake support system assists the driverin reducing the collision speed by chargingthe brakes. If the risk of collision furtherincreases after the warning light illuminates,the brake support prepares the brake systemfor rapid braking. This may be apparent tothe driver. The system does not automaticallyactivate the brakes but, if the brake pedal ispressed, full force braking is applied even ifthe brake pedal is lightly pressed.
Using the Collision Warning System
WARNING: The collision warningsystem’s brake support can only helpreduce the speed at which a collisionoccurs if the driver applies the vehicle’sbrakes. The brake pedal must be pressedjust like any typical braking situation.
The warning system sensitivity can beadjusted to one of three possible settings byusing the information display control. SeeGeneral Information (page 105).
Note:If collision warnings are perceived asbeing too frequent or disturbing then thewarning sensitivity can be reduced, thoughthe manufacturer recommends using thehighest sensitivity setting where possible.Setting lower sensitivity would lead to fewerand later system warnings. See GeneralInformation (page 105).
Blocked Sensors
227
MKT (TP4) , enUSA, Edition date: 201803, Second-Printing
Driving AidsE156130 E156131 E145632
Page 234 of 575

Pull the strap at the front of the cargo areato open the storage compartment.
CARGO NETS (If Equipped)
WARNING: This net is not designedto restrain objects durin")
REAR UNDER FLOOR STORAGE (If
Equipped)
Pull the strap at the front of the cargo areato open the storage compartment.
CARGO NETS (If Equipped)
WARNING: This net is not designedto restrain objects during a collision orheavy braking.
The cargo net secures lightweight objectsin the cargo area. Attach the net to theprovided anchors. Do not put more than50 lb (22 kg) in the net.
LUGGAGE COVERS (If Equipped)
WARNING: Make sure that the postsare properly latched in mounting features.The cover may cause injury in a suddenstop or accident if it is not securelyinstalled.
WARNING: Do not place any objectson the cargo area shade. They mayobstruct your vision or strike occupants ofyour vehicle in a sudden stop or crash.
Use the cargo shade to cover items in thecargo area of your vehicle.
Insert the ends of the cargo shade into themounting features located behind the rearseat on the rear trim panels to install thecargo shade.
To operate the cargo shade:
231
MKT (TP4) , enUSA, Edition date: 201803, Second-Printing
Load CarryingE210725 E210726 E142447
Page 240 of 575

TOWING A TRAILER
WARNING: Do not exceed theGVWR or the GAWR specified on thecertification label.
WARNING: Towing trailersbeyond the maximum recommendedgross trailer weight exceeds the limitof your vehicle and could result inengine damage, transmission damage,structural damage, loss of vehiclecontrol, vehicle rollover and personalinjury.
Note:Your vehicle may have electricalitems, such as fuses or relays, relatedto towing. See Fuses (page 262).
Your vehicle's load capacity designationis by weight, not by volume, so youcannot necessarily use all availablespace when loading a vehicle or trailer.
Towing a trailer places an extra load onyour vehicle's engine, transmission, axle,brakes, tires and suspension. Inspectthese components periodically during,and after, any towing operation.
Load Placement
To help minimize how trailer movementaffects your vehicle when driving:
•Load the heaviest items closest tothe trailer floor.
•Load the heaviest items centeredbetween the left and right side trailertires.
•Load the heaviest items above thetrailer axles or just slightly forwardtoward the trailer tongue. Do notallow the final trailer tongue weightto go above or below 10-15% of theloaded trailer weight.
•Select a ball mount with the correctrise or drop. When both the loadedvehicle and trailer are connected, thetrailer frame should be level, orslightly angled down toward yourvehicle, when viewed from the side.
When driving with a trailer or payload, aslight takeoff vibration or shudder maybe present due to the increased payloadweight. Additional information regardingproper trailer loading and setting yourvehicle up for towing is located in theLoad Carrying chapter. See Load Limit(page 232).
You can also find information in the RV& Trailer Towing Guide available at yourauthorized dealer, or online.
237
MKT (TP4) , enUSA, Edition date: 201803, Second-Printing
Towing
Page 245 of 575
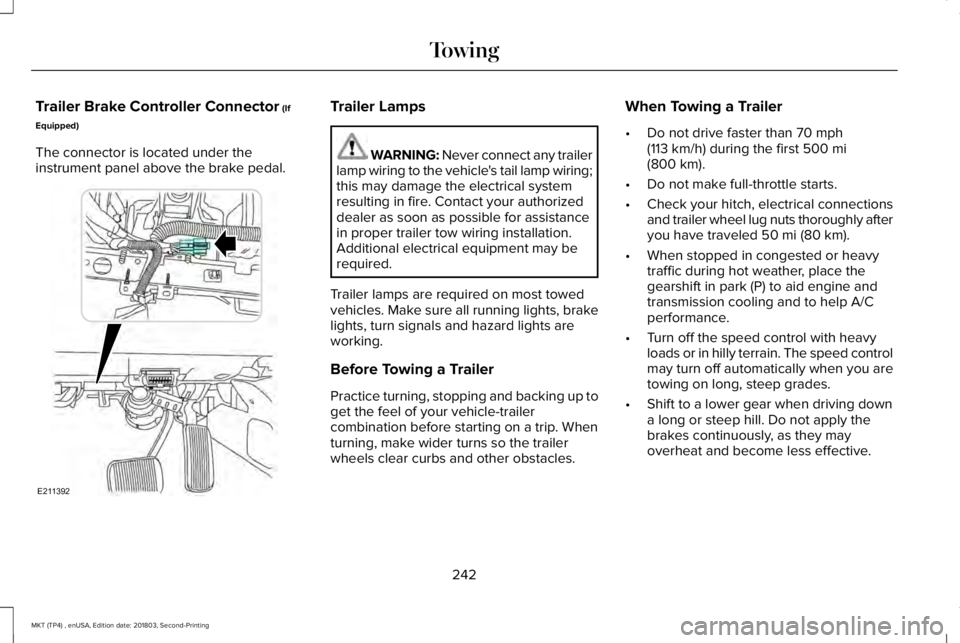
Trailer Brake Controller Connector (If
Equipped)
The connector is located under theinstrument panel above the brake pedal.
Trailer Lamps
WARNING: Never connect any trailerlamp wiring to the vehicle's tail lamp wiring;this may damage the electrical systemresulting in fire. Contact your authorizeddealer as soon as possible for assistancein proper trailer tow wiring installation.Additional electrical equipment may berequired.
Trailer lamps are required on most towedvehicles. Make sure all running lights, brakelights, turn signals and hazard lights areworking.
Before Towing a Trailer
Practice turning, stopping and backing up toget the feel of your vehicle-trailercombination before starting on a trip. Whenturning, make wider turns so the trailerwheels clear curbs and other obstacles.
When Towing a Trailer
•Do not drive faster than 70 mph(113 km/h) during the first 500 mi(800 km).
•Do not make full-throttle starts.
•Check your hitch, electrical connectionsand trailer wheel lug nuts thoroughly afteryou have traveled 50 mi (80 km).
•When stopped in congested or heavytraffic during hot weather, place thegearshift in park (P) to aid engine andtransmission cooling and to help A/Cperformance.
•Turn off the speed control with heavyloads or in hilly terrain. The speed controlmay turn off automatically when you aretowing on long, steep grades.
•Shift to a lower gear when driving downa long or steep hill. Do not apply thebrakes continuously, as they mayoverheat and become less effective.
242
MKT (TP4) , enUSA, Edition date: 201803, Second-Printing
TowingE211392
Page 248 of 575
. During thistime, your vehicle may exhibit some unusualdriving characteristics.
Avoid driving too fast during the first 1,00")
BREAKING-IN
You need to break in new tires forapproximately 300 mi (480 km). During thistime, your vehicle may exhibit some unusualdriving characteristics.
Avoid driving too fast during the first 1,000 mi(1,600 km). Vary your speed frequently andchange up through the gears early. Do notlabor the engine.
Do not tow during the first 1,000 mi(1,600 km).
ECONOMICAL DRIVING
Fuel economy is affected by several thingssuch as how you drive, the conditions youdrive under and how you maintain yourvehicle.
There are some things to keep in mind thatmay improve your fuel economy:
•Accelerate and slow down in a smooth,moderate fashion.
•Drive at steady speeds.
•Anticipate stops; slowing down mayeliminate the need to stop.
•Combine errands and minimizestop-and-go driving (When runningerrands, go to the furthest destinationfirst and then work your way back home).
•Close the windows for high-speeddriving.
•Drive at reasonable speeds.
•Keep the tires properly inflated and useonly the recommended size.
•Use the recommended engine oil.
•Perform all regularly scheduledmaintenance.
There are also some things you may want toavoid doing because they reduce your fueleconomy:
•Avoid sudden or hard accelerations.
•Avoid revving the engine before turningoff the car.
•Avoid long idle periods.
•Do not warm up your vehicle on coldmornings.
•Reduce the use of air conditioning andheat.
•Avoid using speed control in hilly terrain.
•Do not rest your foot on the brake pedalwhile driving.
•Avoid carrying unnecessary weight.
•Avoid adding particular accessories toyour vehicle (e.g. bug deflectors,rollbars/light bars, running boards, skiracks).
•Avoid driving with the wheels out ofalignment.
DRIVING THROUGH WATER
WARNING: Do not drive throughflowing or deep water as you may losecontrol of your vehicle.
Note:Driving through standing water cancause vehicle damage.
Note:Engine damage can occur if waterenters the air filter.
245
MKT (TP4) , enUSA, Edition date: 201803, Second-Printing
Driving Hints
Page 249 of 575

Before driving through standing water, checkthe depth. Never drive through water that ishigher than the bottom of the front rockerarea of your vehicle.
When driving through standing water, drivevery slowly and do not stop your vehicle. Your brake performance and traction maybe limited. After driving through water andas soon as it is safe to do so:
•Lightly press the brake pedal to dry thebrakes and to check that they work.
•Check that the horn works.
•Check that the exterior lights work.
•Turn the steering wheel to check that thesteering power assist works.
FLOOR MATS
WARNING: Use a floor mat designedto fit the footwell of your vehicle that doesnot obstruct the pedal area. Failure tofollow this instruction could result in theloss of control of your vehicle, personalinjury or death.
WARNING: Pedals that cannot movefreely can cause loss of vehicle control andincrease the risk of serious personal injury.
WARNING: Secure the floor mat toboth retention devices so that it cannot slipout of position and interfere with thepedals. Failure to follow this instructioncould result in the loss of control of yourvehicle, personal injury or death.
WARNING: Do not place additionalfloor mats or any other covering on top ofthe original floor mats. This could result inthe floor mat interfering with the operationof the pedals. Failure to follow thisinstruction could result in the loss ofcontrol of your vehicle, personal injury ordeath.
WARNING: Always make sure thatobjects cannot fall into the driver foot wellwhile your vehicle is moving. Objects thatare loose can become trapped under thepedals causing a loss of vehicle control.
246
MKT (TP4) , enUSA, Edition date: 201803, Second-Printing
Driving HintsE259345 E142666
Page 253 of 575

1. Press START/STOP to switch off yourvehicle.
2.Press the brake pedal and START/STOPto switch on your vehicle.
3. Remove your foot from the brake pedaland press START/STOP to switch offyour vehicle.
4. You can attempt to start the vehicle bypressing the brake pedal andSTART/STOP, or press START/STOPwithout pressing the brake pedal.
JUMP STARTING THE VEHICLE
WARNING: Batteries normallyproduce explosive gases which can causepersonal injury. Therefore, do not allowflames, sparks or lighted substances tocome near the battery. When working nearthe battery, always shield your face andprotect your eyes. Always provide correctventilation.
WARNING: Keep batteries out ofreach of children. Batteries contain sulfuricacid. Avoid contact with skin, eyes orclothing. Shield your eyes when workingnear the battery to protect against possiblesplashing of acid solution. In case of acidcontact with skin or eyes, flush immediatelywith water for a minimum of 15 minutes andget prompt medical attention. If acid isswallowed, call a physician immediately.
WARNING: Use only adequatelysized cables with insulated clamps.
Preparing Your Vehicle
Do not attempt to push-start your automatictransmission vehicle.
Note:Attempting to push-start a vehicle withan automatic transmission may causetransmission damage.
Note:Use only a 12-volt supply to start yourvehicle.
Note:Do not disconnect the battery of thedisabled vehicle as this could damage thevehicle electrical system.
Park the booster vehicle close to the hoodof the disabled vehicle, making sure the twovehicles do not touch.
Connecting the Jumper Cables
WARNING: Do not attach the cablesto fuel lines, engine rocker covers, theintake manifold or electrical componentsas grounding points. Stay clear of movingparts. To avoid reverse polarityconnections, make sure that you correctlyidentify the positive (+) and negative (-)terminals on both the disabled and boostervehicles before connecting the cables.
WARNING: Do not attach the end ofthe positive cable to the studs or L-shapedeyelet located above the positive (+)terminal of your vehicle’s battery. Highcurrent may flow through and causedamage to the fuses.
250
MKT (TP4) , enUSA, Edition date: 201803, Second-Printing
Roadside Emergencies