stop start LINCOLN MKX 2007 User Guide
[x] Cancel search | Manufacturer: LINCOLN, Model Year: 2007, Model line: MKX, Model: LINCOLN MKX 2007Pages: 320, PDF Size: 2.72 MB
Page 237 of 320
Note:With extended use, the flasher may run down your battery.
FUEL PUMP SHUT-OFF SWITCH
This device stops the electric fuel pump from sending fuel to the engine
when your vehicle has had a substantial jolt.
After an accident, if the engine cranks but does not start, this switch
may have been activated.
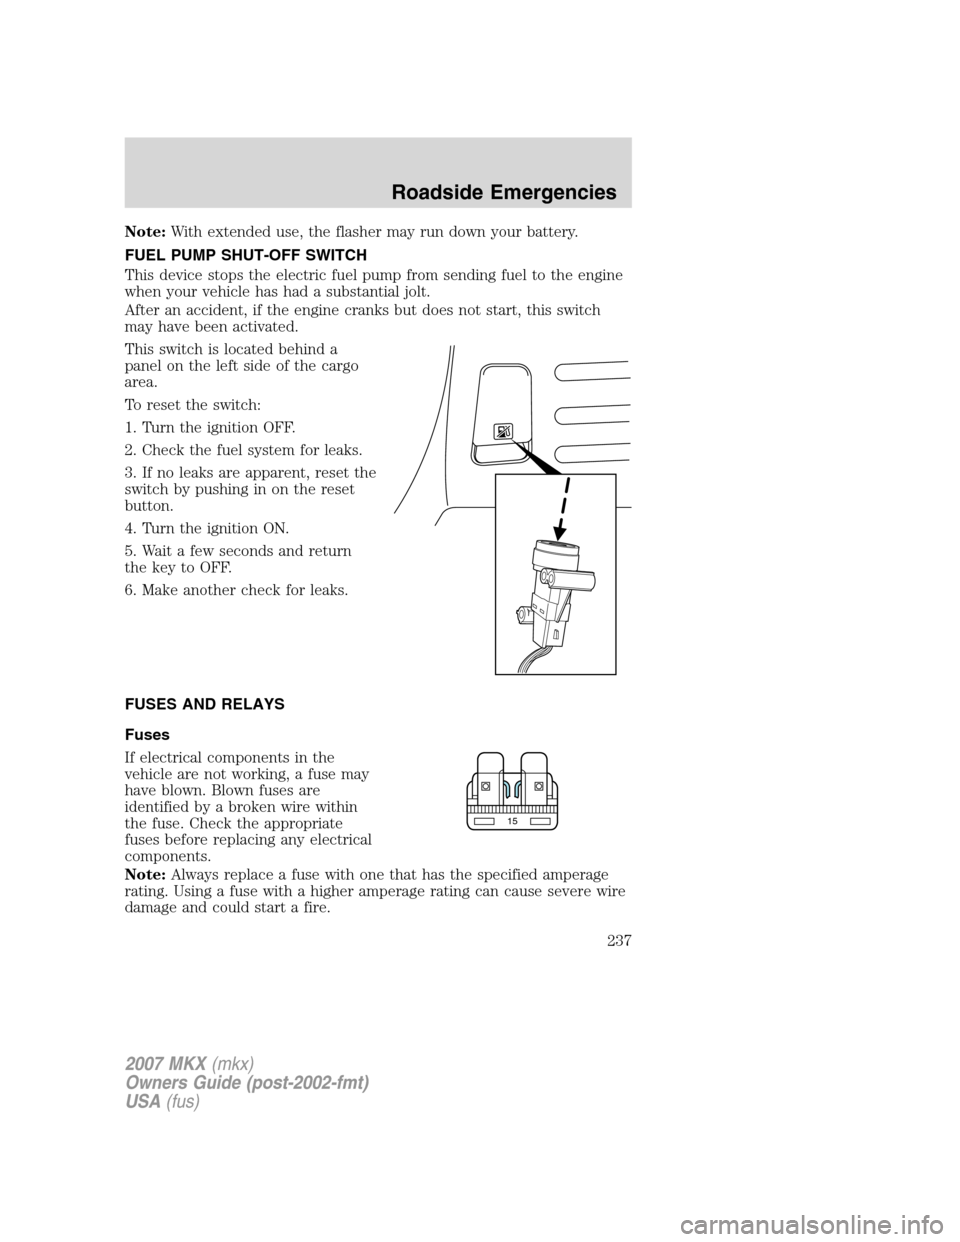
This switch is located behind a
panel on the left side of the cargo
area.
To reset the switch:
1. Turn the ignition OFF.
2. Check the fuel system for leaks.
3. If no leaks are apparent, reset the
switch by pushing in on the reset
button.
4. Turn the ignition ON.
5. Wait a few seconds and return
the key to OFF.
6. Make another check for leaks.
FUSES AND RELAYS
Fuses
If electrical components in the
vehicle are not working, a fuse may
have blown. Blown fuses are
identified by a broken wire within
the fuse. Check the appropriate
fuses before replacing any electrical
components.
Note:Always replace a fuse with one that has the specified amperage
rating. Using a fuse with a higher amperage rating can cause severe wire
damage and could start a fire.
15
2007 MKX(mkx)
Owners Guide (post-2002-fmt)
USA(fus)
Roadside Emergencies
237
Page 243 of 320
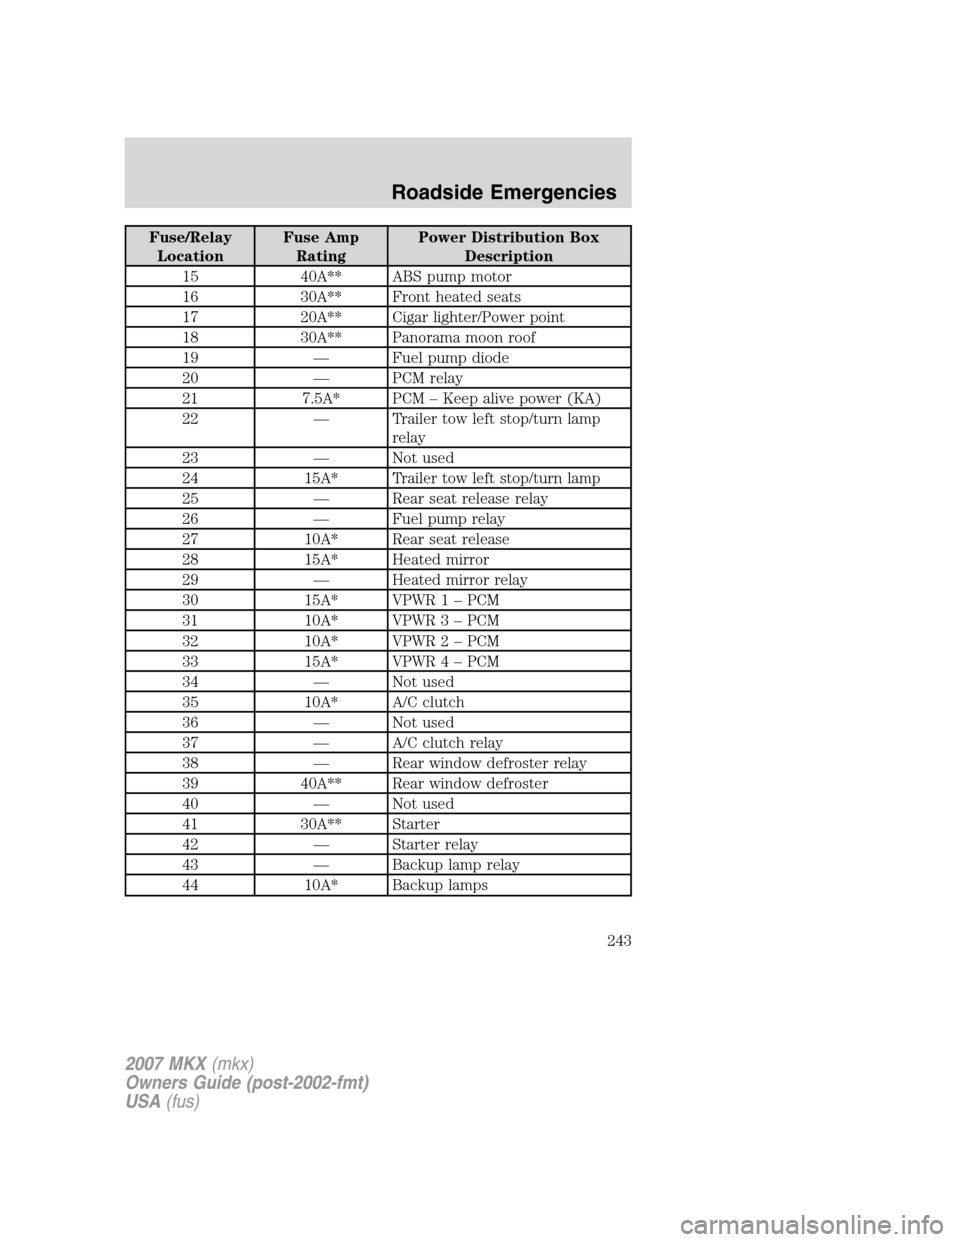
Fuse/Relay
LocationFuse Amp
RatingPower Distribution Box
Description
15 40A** ABS pump motor
16 30A** Front heated seats
17 20A** Cigar lighter/Power point
18 30A** Panorama moon roof
19 — Fuel pump diode
20 — PCM relay
21 7.5A* PCM – Keep alive power (KA)
22 — Trailer tow left stop/turn lamp
relay
23 — Not used
24 15A* Trailer tow left stop/turn lamp
25 — Rear seat release relay
26 — Fuel pump relay
27 10A* Rear seat release
28 15A* Heated mirror
29 — Heated mirror relay
30 15A* VPWR1–PCM
31 10A* VPWR3–PCM
32 10A* VPWR2–PCM
33 15A* VPWR4–PCM
34 — Not used
35 10A* A/C clutch
36 — Not used
37 — A/C clutch relay
38 — Rear window defroster relay
39 40A** Rear window defroster
40 — Not used
41 30A** Starter
42 — Starter relay
43 — Backup lamp relay
44 10A* Backup lamps
2007 MKX(mkx)
Owners Guide (post-2002-fmt)
USA(fus)
Roadside Emergencies
243
Page 244 of 320
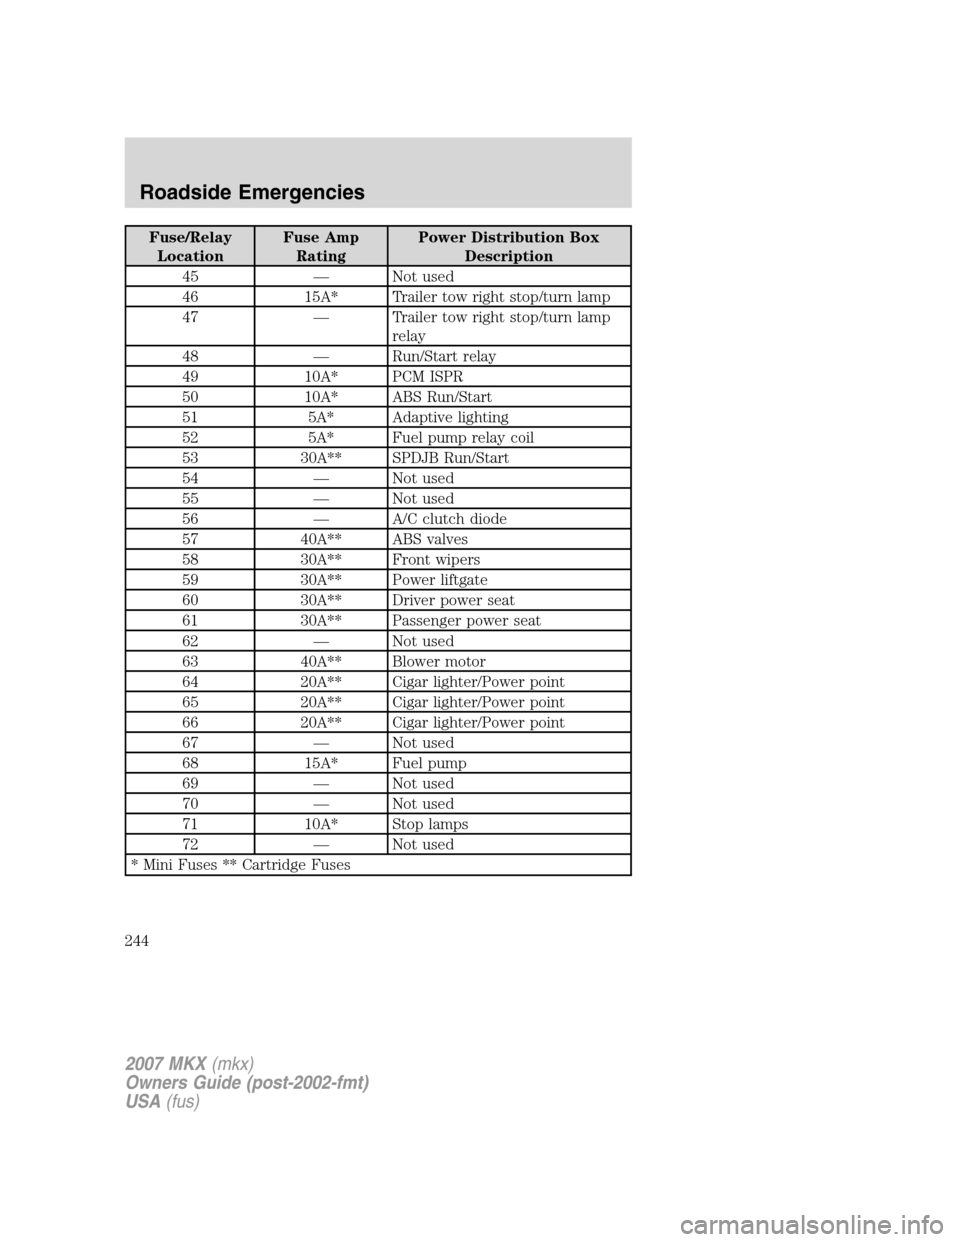
Fuse/Relay
LocationFuse Amp
RatingPower Distribution Box
Description
45 — Not used
46 15A* Trailer tow right stop/turn lamp
47 — Trailer tow right stop/turn lamp
relay
48 — Run/Start relay
49 10A* PCM ISPR
50 10A* ABS Run/Start
51 5A* Adaptive lighting
52 5A* Fuel pump relay coil
53 30A** SPDJB Run/Start
54 — Not used
55 — Not used
56 — A/C clutch diode
57 40A** ABS valves
58 30A** Front wipers
59 30A** Power liftgate
60 30A** Driver power seat
61 30A** Passenger power seat
62 — Not used
63 40A** Blower motor
64 20A** Cigar lighter/Power point
65 20A** Cigar lighter/Power point
66 20A** Cigar lighter/Power point
67 — Not used
68 15A* Fuel pump
69 — Not used
70 — Not used
71 10A* Stop lamps
72 — Not used
* Mini Fuses ** Cartridge Fuses
2007 MKX(mkx)
Owners Guide (post-2002-fmt)
USA(fus)
Roadside Emergencies
244
Page 282 of 320
Keep batteries out of reach of children. Batteries contain sulfuric
acid. Avoid contact with skin, eyes or clothing. Shield your eyes
when working near the battery to protect against possible splashing of
acid solution. In case of acid contact with skin or eyes, flush
immediately with water for a minimum of 15 minutes and get prompt
medical attention. If acid is swallowed, call a physician immediately.
Battery posts, terminals and related accessories contain lead and
lead compounds.Wash hands after handling.
Because your vehicle’s engine is electronically controlled by a computer,
some control conditions are maintained by power from the battery. When
the battery is disconnected or a new battery is installed, the engine must
relearn its idle and fuel trim strategy for optimum driveability and
performance. To begin this process:
1. With the vehicle at a complete stop, set the parking brake.
2. Put the gearshift in P (Park), turn off all accessories and start the
engine.
3. Run the engine until it reaches normal operating temperature.
4. Allow the engine to idle for at least one minute.
5. Turn the A/C on and allow the engine to idle for at least one minute.
6. Release the parking brake. With your foot on the brake pedal and with
the A/C on, put the vehicle in D (Drive) and allow the engine to idle for
at least one minute.
7. Drive the vehicle to complete the relearning process.
•The vehicle may need to be driven 10 miles (16 km) or more to
relearn the idle and fuel trim strategy.
•If you do not allow the engine to relearn its idle trim, the idle
quality of your vehicle may be adversely affected until the idle
trim is eventually relearned.
If the battery has been disconnected or a new battery has been installed,
the clock and radio settings must be reset once the battery is
reconnected.
2007 MKX(mkx)
Owners Guide (post-2002-fmt)
USA(fus)
Maintenance and Specifications
282
Page 291 of 320
Fuel Filler Cap
Your fuel tank filler cap has an indexed design with a 1/4 turn on/off
feature.
When fueling your vehicle:
1. Turn the engine off.
2. Carefully turn the filler cap counterclockwise 1/4 turn until it stops.
3. Pull to remove the cap from the fuel filler pipe.
4. To install the cap, align the tabs on the cap with the notches on the
filler pipe.
5. Turn the filler cap clockwise 1/4 of a turn until at least a few clicks are
heard.
If the
symbol comes on and stays on after you start the engine, the
fuel filler cap may not be properly installed. Turn off the engine, remove
the fuel filler cap, align the cap properly and reinstall it. The
lamp
will not reset immediately. Upon restarting the vehicle, it may take a few
driving cycles (mileage accumulation) to clear the symbol.
Continued driving with this lamp
illuminated may cause the
lamp to activate.
If you must replace the fuel filler cap, replace it with a fuel filler
cap that is designed for your vehicle. The customer warranty may
be void for any damage to the fuel tank or fuel system if the
correct genuine Ford or Motorcraft fuel filler cap is not used.
The fuel system may be under pressure. If the fuel filler cap is
venting vapor or if you hear a hissing sound, wait until it stops
before completely removing the fuel filler cap. Otherwise, fuel may
spray out and injure you or others.
If you do not use the proper fuel filler cap, excessive vacuum in
the fuel tank may damage the fuel system or cause the fuel cap
to disengage in a collision, which may result in possible personal injury.
Choosing the right fuel
Use only UNLEADED fuel or UNLEADED fuel blended with a maximum
of 10% ethanol. Your vehicle was not designed to run on E85 fuels that
are blended with a maximum of 85% ethanol. The use of leaded fuel is
2007 MKX(mkx)
Owners Guide (post-2002-fmt)
USA(fus)
Maintenance and Specifications
291
Page 299 of 320
The OBD-II system is designed to check the emission control system
during normal driving. A complete check may take several days. If the
vehicle is not ready for I/M testing, the following driving cycle consisting
of mixed city and highway driving may be performed:
15 minutes of steady driving on an expressway/highway followed by 20
minutes of stop-and-go driving with at least four 30-second idle periods.
Allow the vehicle to sit for at least eight hours without starting the
engine. Then, start the engine and complete the above driving cycle. The
engine must warm up to its normal operating temperature. Once started,
do not turn off the engine until the above driving cycle is complete. If
the vehicle is still not ready for I/M testing, the above driving cycle will
have to be repeated.
POWER STEERING FLUID
Check the power steering fluid. Refer to thescheduled maintenance
informationfor the service interval schedules.
1. Start the engine and let it run
until it reaches normal operating
temperature (the engine coolant
temperature gauge indicator will be
near the center of the normal area
between H and C).
2. While the engine idles, turn the
steering wheel left and right several
times.
3. Turn the engine off.
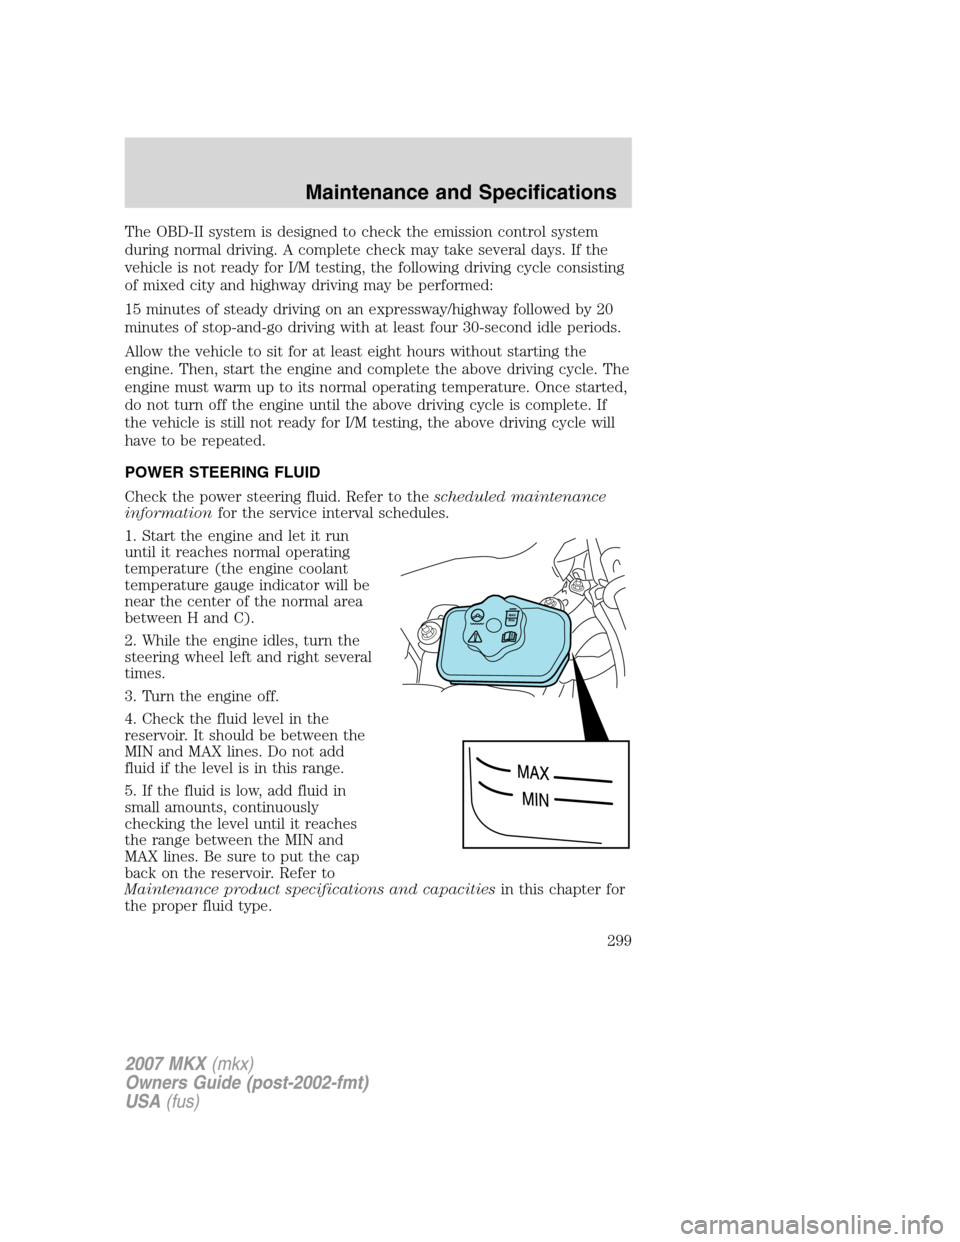
4. Check the fluid level in the
reservoir. It should be between the
MIN and MAX lines. Do not add
fluid if the level is in this range.
5. If the fluid is low, add fluid in
small amounts, continuously
checking the level until it reaches
the range between the MIN and
MAX lines. Be sure to put the cap
back on the reservoir. Refer to
Maintenance product specifications and capacitiesin this chapter for
the proper fluid type.
2007 MKX(mkx)
Owners Guide (post-2002-fmt)
USA(fus)
Maintenance and Specifications
299