LINCOLN MKX 2009 Owners Manual
Manufacturer: LINCOLN, Model Year: 2009, Model line: MKX, Model: LINCOLN MKX 2009Pages: 307, PDF Size: 2.18 MB
Page 221 of 307
and/or personal injury. Use all available road surface to return the
vehicle to a safe direction of travel.
•In the event of an emergency stop, avoid skidding the tires and do not
attempt any sharp steering wheel movements.
•If the vehicle goes from one type of surface to another (i.e., from
concrete to gravel) there will be a change in the way the vehicle
responds to a maneuver (steering, acceleration or braking). Again,
avoid these abrupt inputs.
AWD Systems (if equipped)
With AWD, the vehicle uses all four wheels to power the vehicle. This
increases traction, enabling you to drive over terrain and road conditions
that a conventional two-wheel drive vehicle cannot.
Sand
When driving over sand, try to keep all four wheels on the most solid
area of the trail. Avoid reducing the tire pressures but shift to a lower
gear and drive steadily through the terrain. Apply the accelerator slowly
and avoid spinning the wheels.
Do not drive your AWD vehicle in deep sand for an extended period of
time. This will cause the AWD system to overheat. If the rear tires stop
spinning while the front tires spin in deep sand, turn off the vehicle and
allow the AWD system to cool down for a minimum of 15 minutes. After
the system has cooled down, normal AWD function will return. When
driving at slow speeds in deep sand under high outside temperatures,
use L (Low) gear when possible. L (Low) gear operation will maximize
the engine and transmission cooling capability.
Under severe operating conditions, the A/C may cycle on and off to
protect overheating of the engine.
Avoid excessive speed because vehicle momentum can work against you
and cause the vehicle to become stuck to the point that assistance may
be required from another vehicle. Remember, you may be able to back
out the way you came if you proceed with caution.
Mud and water
If you must drive through high water, drive slowly. Traction or brake
capability may be limited.
When driving through water, determine the depth; avoid water higher
than the bottom of the wheel rims (for cars) or the bottom of the hubs
(for trucks) (if possible) and proceed slowly. If the ignition system gets
wet, the vehicle may stall.
2009 MKX(mkx)
Owners Guide, 1st Printing
USA(fus)
Driving
221
Page 222 of 307
Once through water, always try the brakes. Wet brakes do not stop the
vehicle as effectively as dry brakes. Drying can be improved by moving
your vehicle slowly while applying light pressure on the brake pedal.
Be cautious of sudden changes in vehicle speed or direction when you
are driving in mud. Even AWD vehicles can lose traction in slick mud. As
when you are driving over sand, apply the accelerator slowly and avoid
spinning your wheels. If the vehicle does slide, steer in the direction of
the slide until you regain control of the vehicle.
After driving through mud, clean off residue stuck to rotating driveshafts
and tires. Excess mud stuck on tires and rotating driveshafts causes an
imbalance that could damage drive components.
Driving through deep water may damage the transmission.
If the front or rear axle is submerged in water, the axle lubricant and
PTU (Power Transfer Unit) lubricant should be checked and changed if
necessary.
“Tread Lightly” is an educational
program designed to increase public
awareness of land-use regulations
and responsibilities in our nations
wilderness areas. Ford Motor
Company joins the U.S. Forest Service and the Bureau of Land
Management in encouraging you to help preserve our national forest and
other public and private lands by “treading lightly.”
Driving on hilly or sloping terrain
Although natural obstacles may make it necessary to travel diagonally up
or down a hill or steep incline, you should always try to drive straight up
or straight down.Avoid driving crosswise or turning on steep
slopes or hills.A danger lies in losing traction, slipping sideways and
possibly rolling over. Whenever driving on a hill, determine beforehand
the route you will use. Do not drive over the crest of a hill without
seeing what conditions are on the other side. Do not drive in reverse
over a hill without the aid of an observer.
When climbing a steep slope or hill, start in a lower gear rather than
downshifting to a lower gear from a higher gear once the ascent has
started. This reduces strain on the engine and the possibility of stalling.
If you do stall out, do not try to turnaround because you might roll over.
It is better to back down to a safe location.
Apply just enough power to the wheels to climb the hill. Too much
power will cause the tires to slip, spin or lose traction, resulting in loss of
vehicle control.
2009 MKX(mkx)
Owners Guide, 1st Printing
USA(fus)
Driving
222
Page 223 of 307
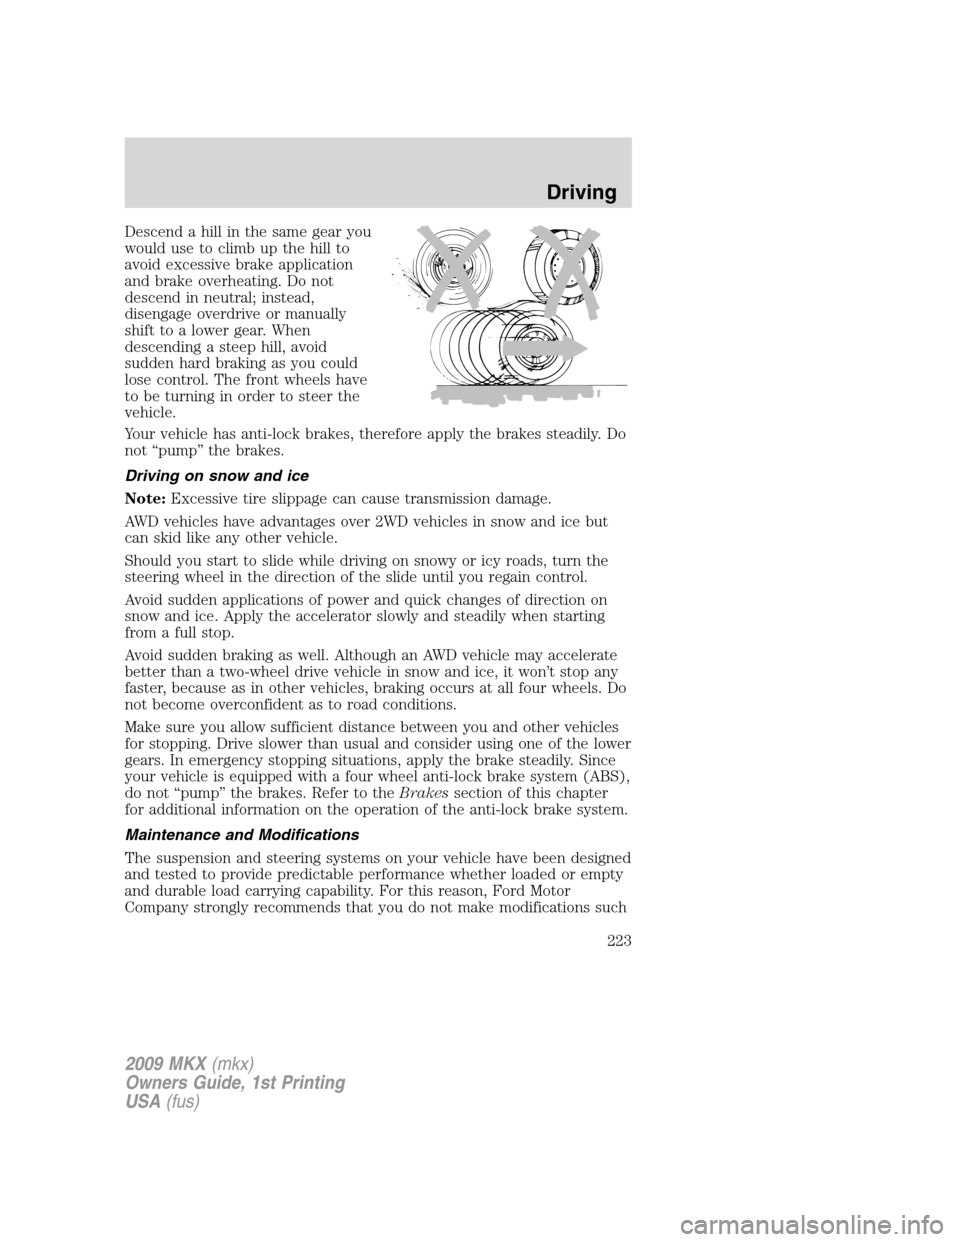
Descend a hill in the same gear you
would use to climb up the hill to
avoid excessive brake application
and brake overheating. Do not
descend in neutral; instead,
disengage overdrive or manually
shift to a lower gear. When
descending a steep hill, avoid
sudden hard braking as you could
lose control. The front wheels have
to be turning in order to steer the
vehicle.
Your vehicle has anti-lock brakes, therefore apply the brakes steadily. Do
not “pump” the brakes.
Driving on snow and ice
Note:Excessive tire slippage can cause transmission damage.
AWD vehicles have advantages over 2WD vehicles in snow and ice but
can skid like any other vehicle.
Should you start to slide while driving on snowy or icy roads, turn the
steering wheel in the direction of the slide until you regain control.
Avoid sudden applications of power and quick changes of direction on
snow and ice. Apply the accelerator slowly and steadily when starting
from a full stop.
Avoid sudden braking as well. Although an AWD vehicle may accelerate
better than a two-wheel drive vehicle in snow and ice, it won’t stop any
faster, because as in other vehicles, braking occurs at all four wheels. Do
not become overconfident as to road conditions.
Make sure you allow sufficient distance between you and other vehicles
for stopping. Drive slower than usual and consider using one of the lower
gears. In emergency stopping situations, apply the brake steadily. Since
your vehicle is equipped with a four wheel anti-lock brake system (ABS),
do not “pump” the brakes. Refer to theBrakessection of this chapter
for additional information on the operation of the anti-lock brake system.
Maintenance and Modifications
The suspension and steering systems on your vehicle have been designed
and tested to provide predictable performance whether loaded or empty
and durable load carrying capability. For this reason, Ford Motor
Company strongly recommends that you do not make modifications such
2009 MKX(mkx)
Owners Guide, 1st Printing
USA(fus)
Driving
223
Page 224 of 307
as adding or removing parts (such as lift kits or stabilizer bars) or by
using replacement parts not equivalent to the original factory equipment.
Any modifications to a vehicle that raise the center of gravity can make
it more likely the vehicle will rollover as a result of a loss of control.
Ford Motor Company recommends that caution be used with any vehicle
equipped with a high load or device (such as ladder or luggage racks).
Failure to maintain your vehicle properly may void the warranty, increase
your repair cost, reduce vehicle performance and operational capabilities
and adversely affect driver and passenger safety. Frequent inspection of
vehicle chassis components is recommended if the vehicle is subjected to
off-highway usage.
DRIVING THROUGH WATER
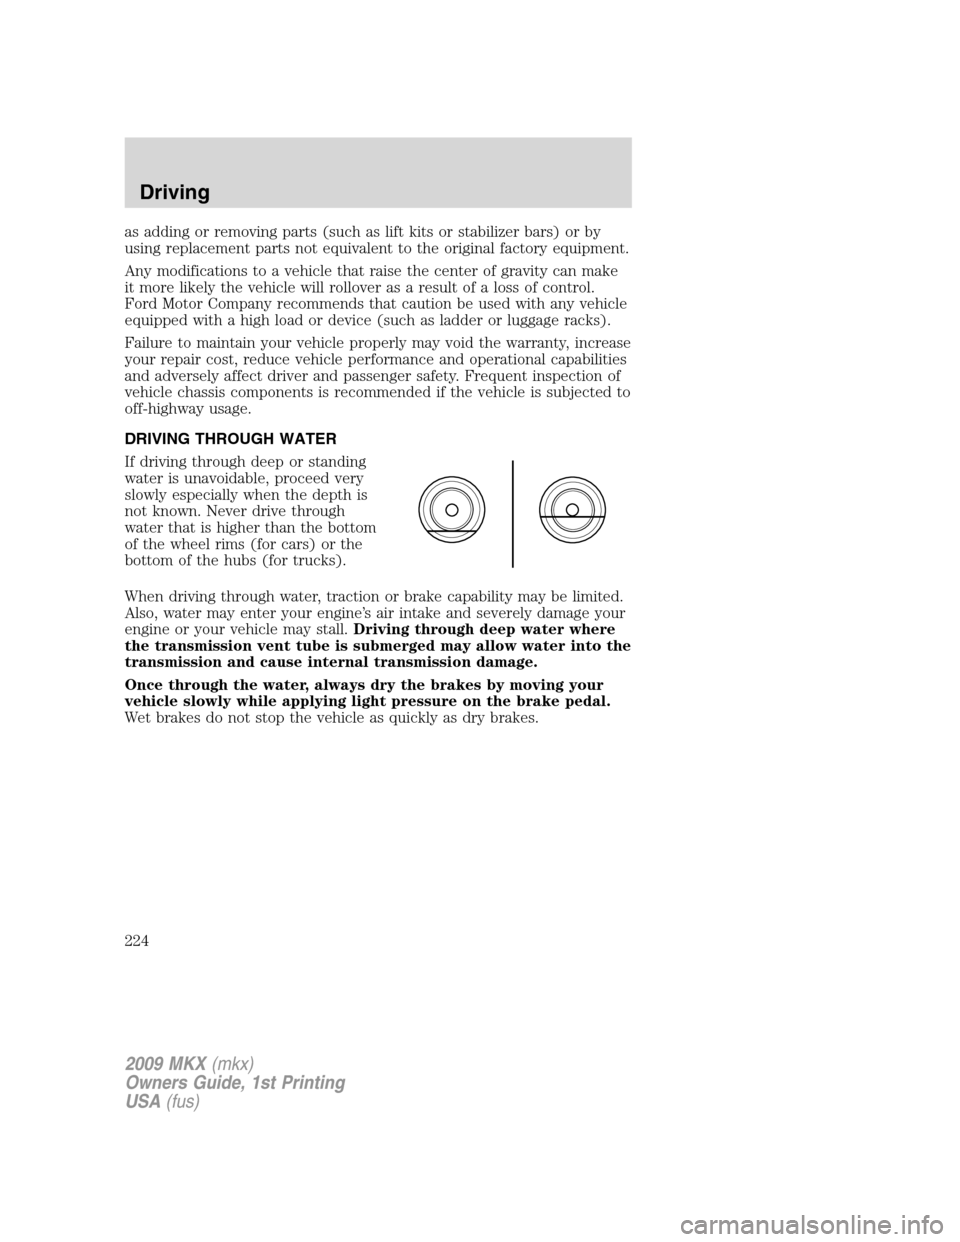
If driving through deep or standing
water is unavoidable, proceed very
slowly especially when the depth is
not known. Never drive through
water that is higher than the bottom
of the wheel rims (for cars) or the
bottom of the hubs (for trucks).
When driving through water, traction or brake capability may be limited.
Also, water may enter your engine’s air intake and severely damage your
engine or your vehicle may stall.Driving through deep water where
the transmission vent tube is submerged may allow water into the
transmission and cause internal transmission damage.
Once through the water, always dry the brakes by moving your
vehicle slowly while applying light pressure on the brake pedal.
Wet brakes do not stop the vehicle as quickly as dry brakes.
2009 MKX(mkx)
Owners Guide, 1st Printing
USA(fus)
Driving
224
Page 225 of 307
ROADSIDE ASSISTANCE
Getting roadside assistance
To fully assist you should you have a vehicle concern, Ford Motor
Company offers a complimentary roadside assistance program. This
program is separate from the New Vehicle Limited Warranty. The service
is available:
•24–hours, seven days a week
•for the coverage period listed on the Roadside Assistance Card
included in your Owner Guide portfolio.
Roadside assistance will cover:
•a flat tire change with a good spare (except vehicles that have been
supplied with a tire inflation kit)
•battery jump start
•lock-out assistance (key replacement cost is the customer’s
responsibility)
•fuel delivery – Independent Service Contractors, if not prohibited by
state, local or municipal law shall deliver up to 2.0 gallons (7.5L) of
gasoline or 5 gallons (18.9L) of diesel fuel to a disabled vehicle. Fuel
delivery service is limited to two no-charge occurrences within a
12-month period.
•winch out – available within 100 feet (30.5 meters) of a paved or
county maintained road, no recoveries.
•towing – Ford/Mercury/Lincoln eligible vehicle towed to an authorized
dealer within 35 miles (56.3 km) of the disablement location or to the
nearest authorized dealer. If a member requests to be towed to an
authorized dealer more than 35 miles (56.3 km) from the disablement
location, the member shall be responsible for any mileage costs in
excess of 35 miles (56.3 km).
Trailers shall be covered up to $200 if the disabled eligible vehicle
requires service at the nearest authorized dealer. If the trailer is disabled,
but the towing vehicle is operational, the trailer does not qualify for any
roadside services.
Canadian customers refer to your Customer Information Guide
for information on:
•coverage period
•exact fuel amounts
2009 MKX(mkx)
Owners Guide, 1st Printing
USA(fus)
Roadside Emergencies
225
Page 226 of 307
•towing of your disabled vehicle
•emergency travel expense reimbursement
•travel planning benefits
In Canada, for uninterrupted Roadside Assistance coverage, you may
purchase extended coverage prior to your Basic Warranty’s Roadside
Assistance expiring. For more information and enrollment, contact
1–877–294–2582 or visit our website at www.ford.ca.
Using roadside assistance
Complete the roadside assistance identification card and place it in your
wallet for quick reference. In the United States, this card is found in the
Owner Guide portfolio in the glove compartment. In Canada, the card is
found in theCustomer Information Guidein the glove compartment.
U.S. Ford, Mercury and Lincoln vehicle customers who require Roadside
Assistance, call 1-800-241-3673.
Canadian customers who require roadside assistance, call
1-800-665-2006.
If you need to arrange roadside assistance for yourself, Ford Motor
Company will reimburse a reasonable amount for towing to the nearest
dealership within 35 miles. To obtain reimbursement information, U.S.
Ford, Mercury and Lincoln vehicle customers call 1-800-241-3673.
Customers will be asked to submit their original receipts.
Canadian customers who need to obtain reimbursement information, call
1–800–665–2006.
HAZARD FLASHER CONTROL
The hazard flasher control is located
on the instrument panel by the
radio. The hazard flashers will
operate when the ignition is in any
position or if the key is not in the
ignition.
Push in the flasher control and all front and rear direction signals will
flash. Press the flasher control again to turn them off. Use it when your
vehicle is disabled and is creating a safety hazard for other motorists.
Note:With extended use, the flasher may run down your battery.
FUEL PUMP SHUT-OFF SWITCH
This device stops the electric fuel pump from sending fuel to the engine
when your vehicle has had a substantial jolt.
2009 MKX(mkx)
Owners Guide, 1st Printing
USA(fus)
Roadside Emergencies
226
Page 227 of 307
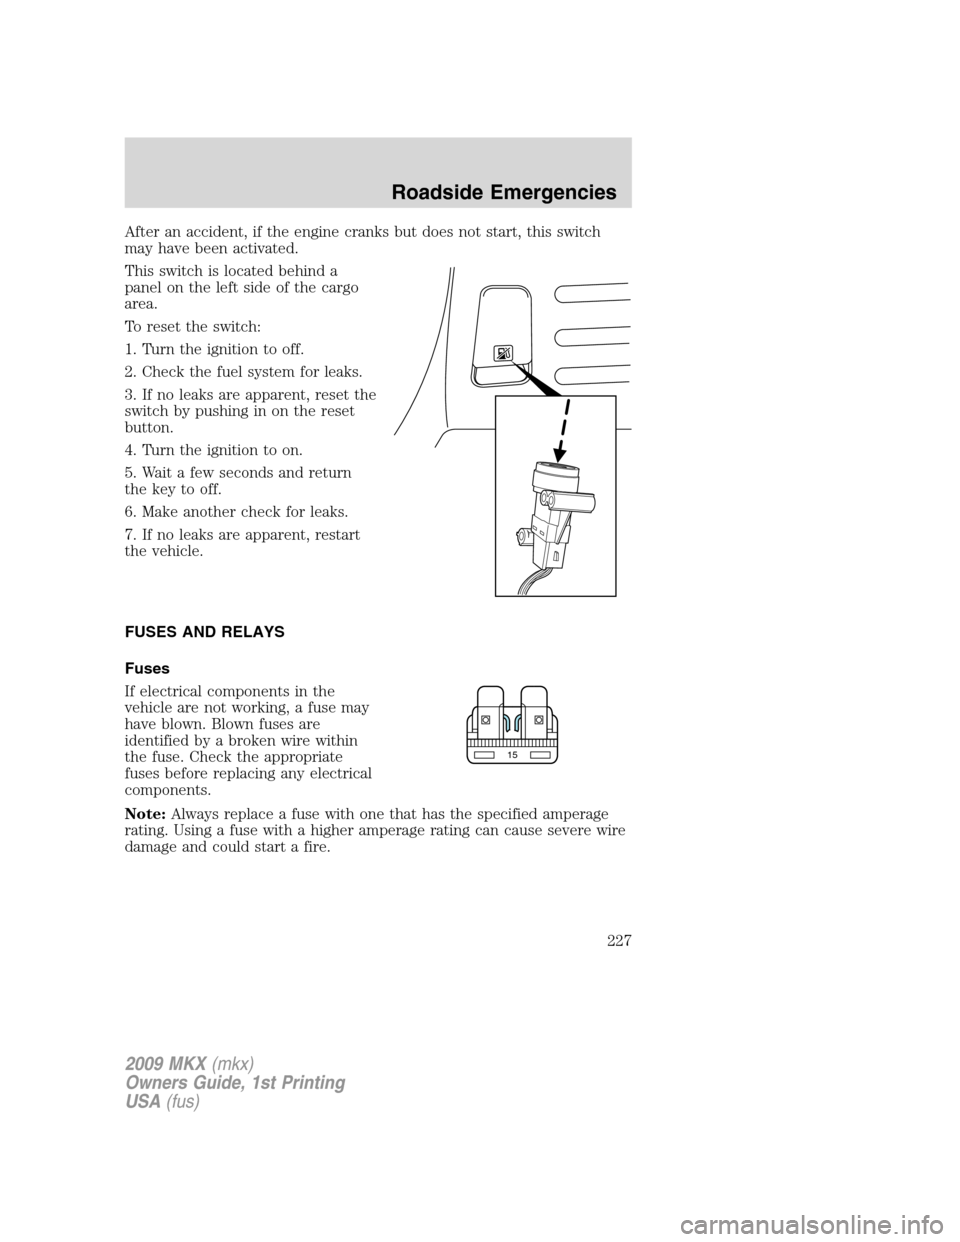
After an accident, if the engine cranks but does not start, this switch
may have been activated.
This switch is located behind a
panel on the left side of the cargo
area.
To reset the switch:
1. Turn the ignition to off.
2. Check the fuel system for leaks.
3. If no leaks are apparent, reset the
switch by pushing in on the reset
button.
4. Turn the ignition to on.
5. Wait a few seconds and return
the key to off.
6. Make another check for leaks.
7. If no leaks are apparent, restart
the vehicle.
FUSES AND RELAYS
Fuses
If electrical components in the
vehicle are not working, a fuse may
have blown. Blown fuses are
identified by a broken wire within
the fuse. Check the appropriate
fuses before replacing any electrical
components.
Note:Always replace a fuse with one that has the specified amperage
rating. Using a fuse with a higher amperage rating can cause severe wire
damage and could start a fire.
15
2009 MKX(mkx)
Owners Guide, 1st Printing
USA(fus)
Roadside Emergencies
227
Page 228 of 307
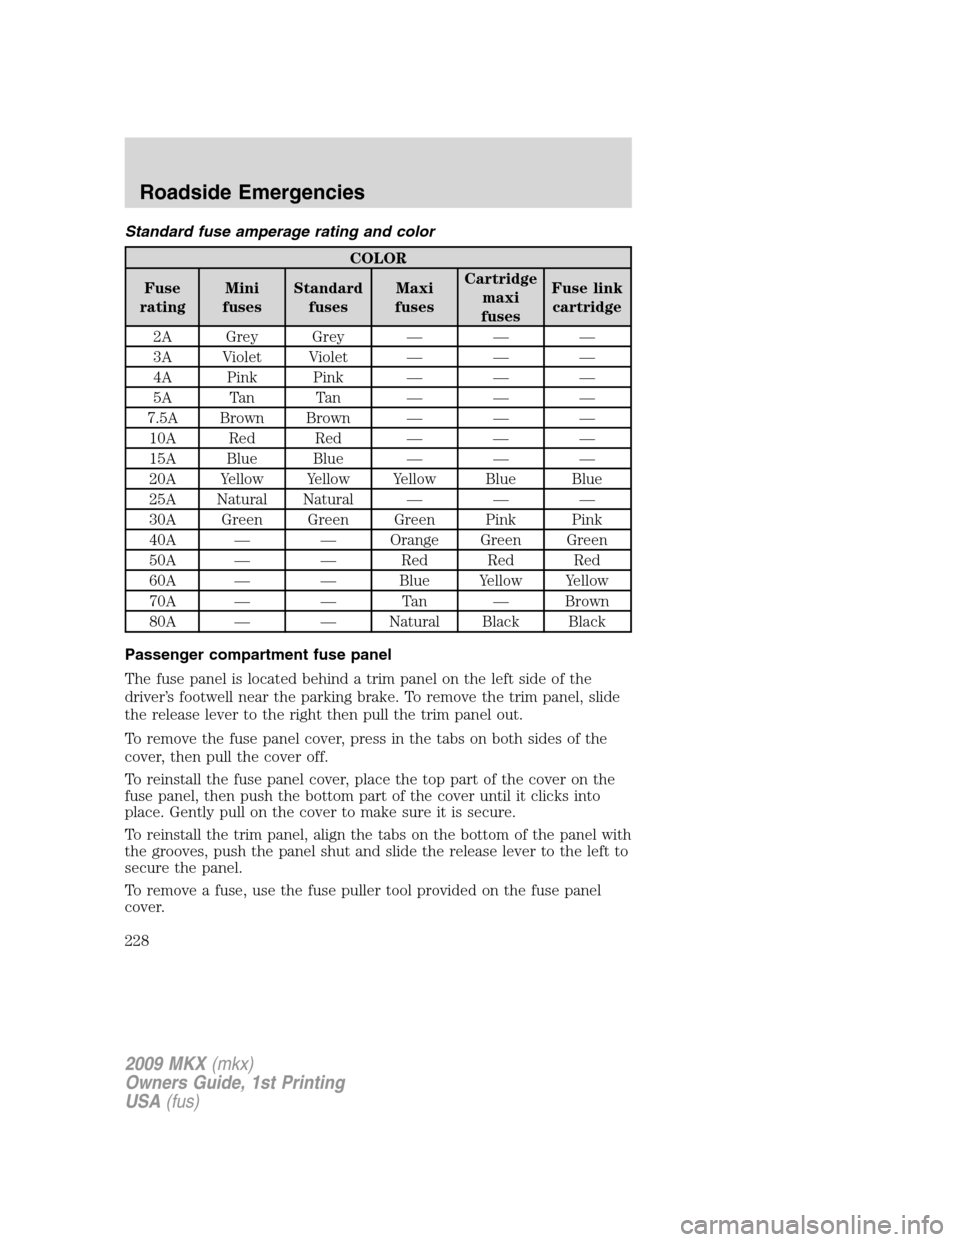
Standard fuse amperage rating and color
COLOR
Fuse
ratingMini
fusesStandard
fusesMaxi
fusesCartridge
maxi
fusesFuse link
cartridge
2A Grey Grey — — —
3A Violet Violet — — —
4A Pink Pink — — —
5A Tan Tan — — —
7.5A Brown Brown — — —
10A Red Red — — —
15A Blue Blue — — —
20A Yellow Yellow Yellow Blue Blue
25A Natural Natural — — —
30A Green Green Green Pink Pink
40A — — Orange Green Green
50A — — Red Red Red
60A — — Blue Yellow Yellow
70A — — Tan — Brown
80A — — Natural Black Black
Passenger compartment fuse panel
The fuse panel is located behind a trim panel on the left side of the
driver’s footwell near the parking brake. To remove the trim panel, slide
the release lever to the right then pull the trim panel out.
To remove the fuse panel cover, press in the tabs on both sides of the
cover, then pull the cover off.
To reinstall the fuse panel cover, place the top part of the cover on the
fuse panel, then push the bottom part of the cover until it clicks into
place. Gently pull on the cover to make sure it is secure.
To reinstall the trim panel, align the tabs on the bottom of the panel with
the grooves, push the panel shut and slide the release lever to the left to
secure the panel.
To remove a fuse, use the fuse puller tool provided on the fuse panel
cover.
2009 MKX(mkx)
Owners Guide, 1st Printing
USA(fus)
Roadside Emergencies
228
Page 229 of 307
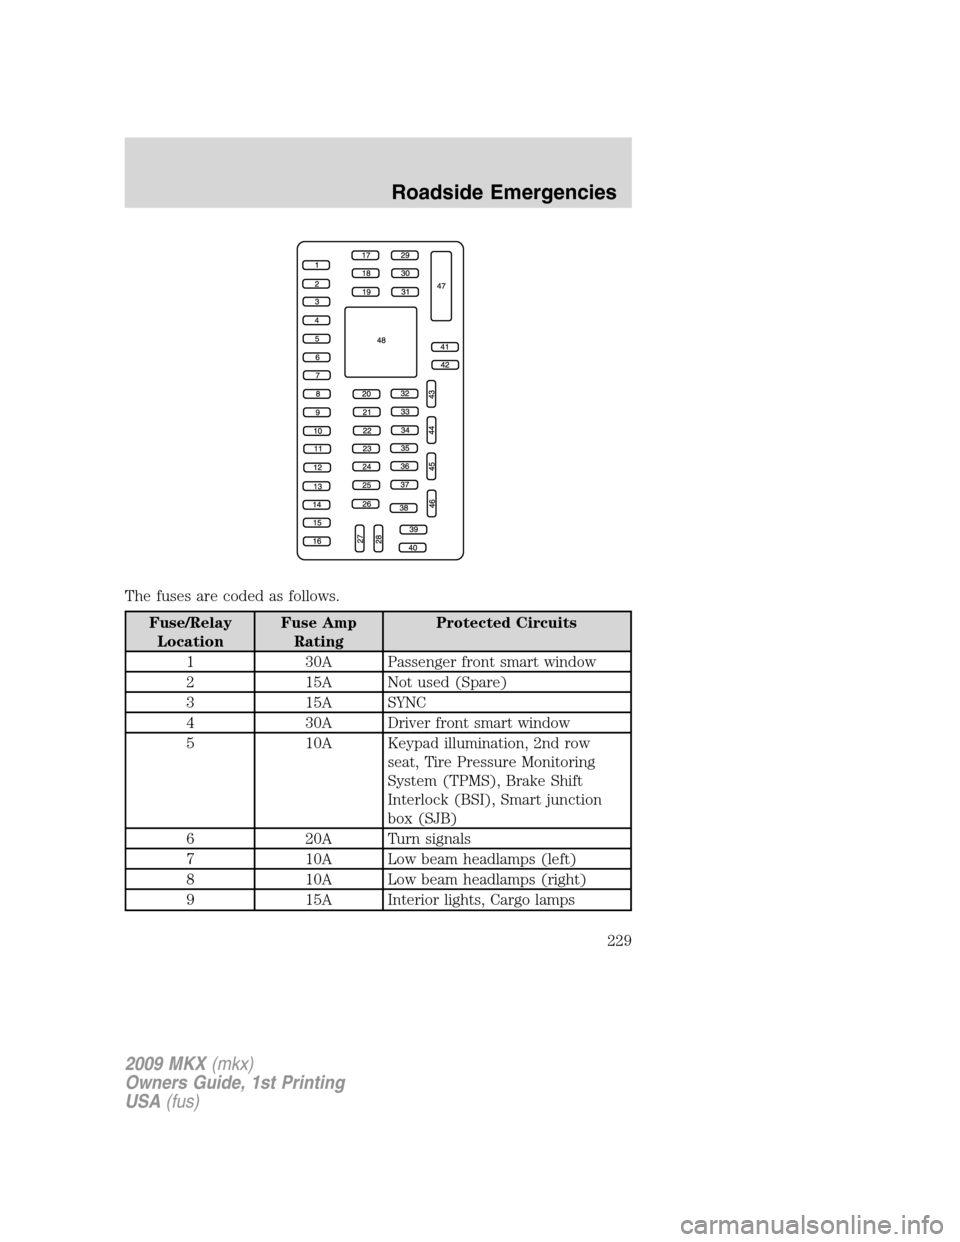
The fuses are coded as follows.
Fuse/Relay
LocationFuse Amp
RatingProtected Circuits
1 30A Passenger front smart window
2 15A Not used (Spare)
3 15A SYNC
4 30A Driver front smart window
5 10A Keypad illumination, 2nd row
seat, Tire Pressure Monitoring
System (TPMS), Brake Shift
Interlock (BSI), Smart junction
box (SJB)
6 20A Turn signals
7 10A Low beam headlamps (left)
8 10A Low beam headlamps (right)
9 15A Interior lights, Cargo lamps
2009 MKX(mkx)
Owners Guide, 1st Printing
USA(fus)
Roadside Emergencies
229
Page 230 of 307
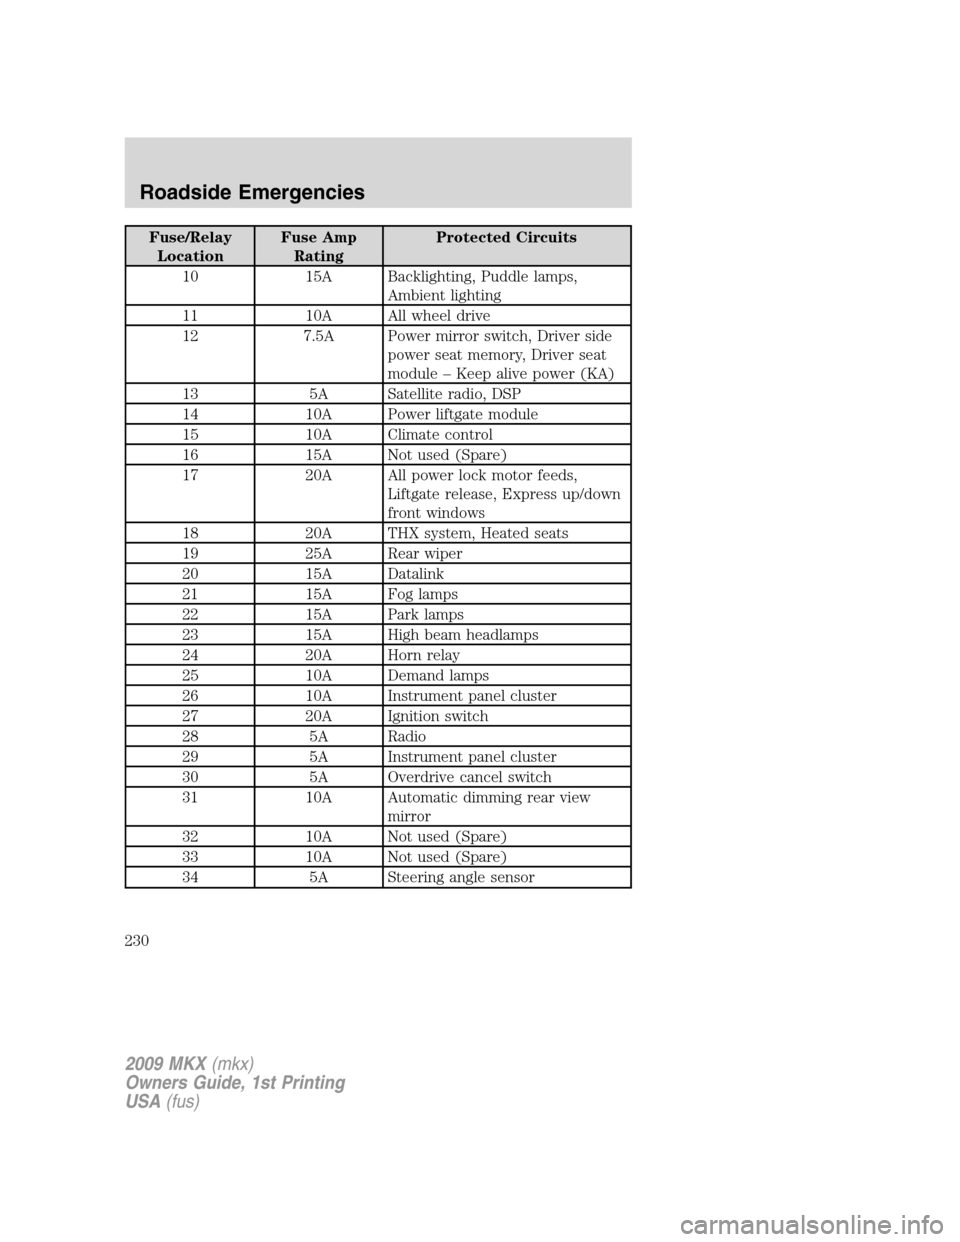
Fuse/Relay
LocationFuse Amp
RatingProtected Circuits
10 15A Backlighting, Puddle lamps,
Ambient lighting
11 10A All wheel drive
12 7.5A Power mirror switch, Driver side
power seat memory, Driver seat
module – Keep alive power (KA)
13 5A Satellite radio, DSP
14 10A Power liftgate module
15 10A Climate control
16 15A Not used (Spare)
17 20A All power lock motor feeds,
Liftgate release, Express up/down
front windows
18 20A THX system, Heated seats
19 25A Rear wiper
20 15A Datalink
21 15A Fog lamps
22 15A Park lamps
23 15A High beam headlamps
24 20A Horn relay
25 10A Demand lamps
26 10A Instrument panel cluster
27 20A Ignition switch
28 5A Radio
29 5A Instrument panel cluster
30 5A Overdrive cancel switch
31 10A Automatic dimming rear view
mirror
32 10A Not used (Spare)
33 10A Not used (Spare)
34 5A Steering angle sensor
2009 MKX(mkx)
Owners Guide, 1st Printing
USA(fus)
Roadside Emergencies
230