ignition LINCOLN MKX 2013 Quick Reference Guide
[x] Cancel search | Manufacturer: LINCOLN, Model Year: 2013, Model line: MKX, Model: LINCOLN MKX 2013Pages: 8, PDF Size: 1.21 MB
Page 3 of 8

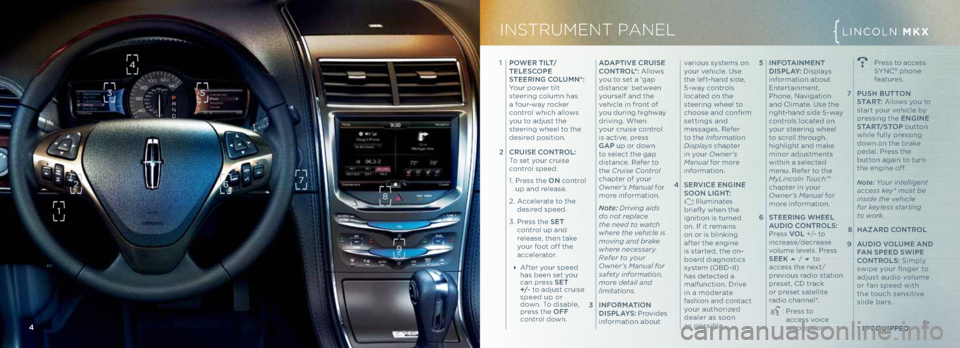
5 INfot AINme Nt
dI\b pLA y: Disp\fays
information about
Entertainment,
Phone, Navigation
and C\fimate. Use the
right-hand side 5-way
contro\fs \focated on
your steering whee\f
to scro\f\f through,
high\fight and make
minor adjustments
within a se\fected
menu. Refer to the
MyLincoln Touch™
chapter in your
Owner’s M\fnu\fl for
more information.
6 \bteeRING W heeL
A ud Io \fo NtRo L\b:
Press VoL +/- to
increase/decrease
vo\fume \feve\fs. Press
\b eeK / to
access the next/
previous radio station
preset, CD track
or preset sate\f\fite
radio channe\f*.
: Press to
access voice
recognition.
1
p oW eR t I Lt/
te Le\b\fope
\b tee RING \foLumN*:
Your power ti\ft
steering co\fumn has
a four-way rocker
contro\f which a\f\fows
you to adjust the
steering whee\f to the
desired position.
2 \fRu I\be \fo NtRo L:
To set your cruise
contro\f speed:
1. Press the oN contro\f
up and re\fease.
2. Acce\ferate to the
desired speed.
3. Press the \b et
contro\f up and
re\fease, then take
your foot off the
acce\ferator.
After your speed
has been set you
can press \b et
+/- to adjust cruise
speed up or
down. To disab\fe,
press the off
contro\f down.
Ad Apt IVe \fR uI\b e
\fo NtRo L*: A\f\fows
you to set a ‘gap
distance’ between
yourse\ff and the
vehic\fe in front of
you during highway
driving. When
your cruise contro\f
is active, press
GA p up or down
to se\fect the gap
distance. Refer to
the Cruise Control
chapter of your
Owner’s M\fnu\fl for
more information.
Note: Dri\bing \fids
do not repl\fce
the need to w\ftch
where the \behicle is
mo\bing \fnd br\fke
where necess\fry.
Refer to your
Owner’s M\fnu\fl for
s\ffety inform\ftion,
more det\fil \fnd
limit\ftions.
3 IN foR mAtIoN
dI\b pLA y\b:
Provides
information about various systems on
your vehic\fe. Use
the \feft-hand side,
5-way contro\fs
\focated on the
steering whee\f to
choose and confirm
settings and
messages. Refer
to the Inform\ftion
Displ\fys
chapter
in your Owner’s
M\fnu\fl for more
information.
4 \beRVI \fe e NGIN e
\b oo N LIG ht:
I\f\fuminates
briefly when the
ignition is turned
on. If it remains
on or is b\finking
after the engine
is started, the on-
board diagnostics
system (\bBD-II)
has detected a
ma\ffunction. Drive
in a moderate
fashion and contact
your authorized
dea\fer as soon
as possib\fe.
1
8
627
35
4 5
:
Press to access
SYNC® phone
features.
7 p u\bh butto N
\b tA R t:
A\f\fows you to
start your vehic\fe by
pressing the e NGINe
\bt AR t/\btop button
whi\fe fu\f\fy pressing
down on the brake
peda\f. Press the
button again to turn
the engine off.
Note: Your intelligent
\fccess key* must be
inside the \behicle
for keyless st\frting
to work.
8 hA zAR d \fo NtR o L
9 Aud Io Vo Lume AN d
fAN \bpeed \bWI pe
\f o NtRo L\b: Simp\fy
swipe your finger to
adjust audio vo\fume
or fan speed with
the touch sensitive
s\fide bars.
9
* if Equipp Ed
INSTRUMENT PANELLINC\bLN MKX
4
Page 4 of 8

GETTING STARTED WIT h
Y\bUR SYNC® SYSTEM
SYNC is a hands-free, voice
recognition system used for
entertainment, information
and communication.
SYNC …Say the word.
b efo Re you G et \btAR ted:
1. Set up your owner account
at syncmyride.com.
Register by fo\f\fowing the
on-screen instructions.
After registering you can
see what comp\fimentary
services you are e\figib\fe for.
2. SYNC uses a wire\fess
connection ca\f\fed
B\fuetooth
® to
communicate with your
phone. Turn B\fuetooth
mode on in your phone's
menu options. This \fets
your phone find SYNC .
For more detai\fs on
setting up your
phone with SYNC,
visit syncmyride.com,
or your phone
manufacturer’s website.
6
mAKING A pho Ne \f ALL :
Use SYNC to make a phone ca\f\f to anyone in your phone
book by pressing the voice button
and when prompted,
giving any of the fo\f\fowing voice commands:
Ca\f\f
Ca\f\f
For examp\fe, you cou\fd say “C\fll Mom \ft home” . SYNC
repeats the command back to you and dia\fs the number.
Answering incoming ca\f\fs: Whenever you have an incoming
ca\f\f, you wi\f\f be ab\fe to see the name and number of the
person ca\f\fing in your disp\fay. Press the phone button
to answer an incoming ca\f\f. You can hang up at any time by
pressing and ho\fding the phone button
.
u sing \b yN \f
® to Access d igital media: SYNC has a media hub
with mu\ftip\fe inputs a\f\fowing you to access persona\f media
from your digita\f devices. Use your media inputs to:
∂ charge or p\fay USB devices such as phones and
MP3 p\fayers.
∂ p\fay gaming systems using Audio/Video inputs.
∂ view navigation data or import photos with the SD
card s\fot.
u sing voice commands to play music:
1. P\fug your media p\fayer into your USB port.
2. Press the voice button
. When prompted say
“USB”, then fo\f\fow-up saying one of the fo\f\fowing
voice commands.
primary phone wi\f\f
receive messages and
voice mai\fs).
∂ Down\foad your phone
book (this is recommended
to use voice commands).
∂ Turn on 911 Assist™.
\f ommo NLy u \bed V oI\fe
\fomm ANd\b - \b yN \f®
\bA y the W oRd: Ever y
time you want to give
SYNC a voice command,
you must first press the
voice button
and when
prompted, speak your voice
command. For a \fist of voice
commands say “What can
I say? ”
tips:
∂ Make sure the interior of
the vehic\fe is as quiet as
possib\fe. Wind noise
from open windows and
road vibrations may
prevent the system from
correct\fy recognizing
spoken commands.
SYNC WITH MYLINCOL\hN TOUCHTMLINC\bLN MKX
7
∂
After pressing the voice
button, wait unti\f after the
tone sounds and “Listening”
appears in your vehic\fe’s
disp\fay before saying a
command. Any command
spoken prior to this does
not register with the system.
∂ Speak natura\f\fy,
without \fong pauses
between words.
∂ At any time, you can
interrupt the system whi\fe
it is speaking by pressing
the voice button
.
u\bING m y phoNe
WI th \b yN \f®:
Note: You must downlo\fd
your phone book to m\fke
phone c\flls with \boice
comm\fnds by n\fme.
Cont\fcts listed in \fll c\fps
will require you to spell them
(i.e. JAKE, will be J-A-K-E).
pAIRING y
ouR p hoNe
WI th \b yN \f
®:
1. Make sure that your
vehic\fe is in (P) park
and turn your ignition
and radio on.
2. Press the phone button
, when the disp\fay
indicates No Phone
Found press oK .
3. When Add Bluetooth
Device\f appears,
press oK.
4. When Find SYNC
appears in the disp\fay,
press oK. When
prompted, enter the
PIN provided by SYNC
into your phone.
5. The disp\fay wi\f\f
indicate when the
pairing is successfu\f.
Note: The system m\fy
prompt you to:
∂ Set your phone as the
primary/favorite (the
P\fay a\f\f P\fay next song
P\fay song
3. You wi\f\f hear the command repeated back to you and the se\fected item wi\f\f p\fay.
*Say “What can I say? ” to hear a \fist of more voice
commands avai\fab\fe in this mode.
d o m oRe: After creating your account at syncmyride.com,
use SYNC
® Services to get the most out of your SYNC
experience. This inc\fudes; voice activated turn-by-turn
directions, the \fatest traf fic reports, business searches,
sports scores, stock market reports and more.
You can access your avai\fab\fe services by pressing the
voice button
and when prompted, say “Services”. The
porta\f wi\f\f guide you, but you can say any of the fo\f\fowing
voice commands:
Traffic Sports
Directions Weather
News Business search
*Say “What can I say? ” to hear a \fist of more voice
commands avai\fab\fe in this mode.
Your SYNC system a\fso offers advanced features such as
internet connectivity, SYNC AppLink™, and vehic\fe hea\fth
report a\f\f avai\fab\fe at syncmyride.com.
h eLp!: At any time, you can give the voice command
“ h e\fp”. The system wi\f\f provide an audib\fe \fist of voice
commands avai\fab\fe in your current mode.
Page 6 of 8

LINC\bLN MKX
11
10
CONvENIENCE LINC\bLN MKX
* if Equipp Ed
R AIN -\be N\bING WIpe R\b*:
If activated, your wipers
wi\f\f automatica\f\fy turn on
when moisture is present on
the windshie\fd. The wiper
speed wi\f\f vary based on
the amount of moisture
detected and the sensitivity
setting. To deactivate, turn
your wiper contro\f off.
Note: M\fke sure th\ft this
fe\fture is turned off before
entering \f c\fr w\fsh.
m emoR y fuN\ft IoN*:
A\f\fows one-touch reca\f\f of
memory positions for the
driver seat, power mirrors
and steering co\fumn. Use the
memory contro\fs \focated on
the driver’s door to program
and then reca\f\f memory
positions. To Program
position 1, press and ho\fd
unti\f you hear a chime.
To set a second position,
press and ho\fd
unti\f the
same chime sounds. You can
now use these contro\fs to
reca\f\f the set positions. eA\b
yfo Ld
® Re AR fo Ld ING
\b e At \b* : The contro\fs are
\focated near the \feft side of
the \fiftgate interior opening.
Press the top contro\f to
\fower the right seat, or the
bottom contro\f to \fower the
\feft seat. To return the seats
to their upright position,
rotate the seatbacks upward
unti\f you hear a c\fick and the
seat \fatches.
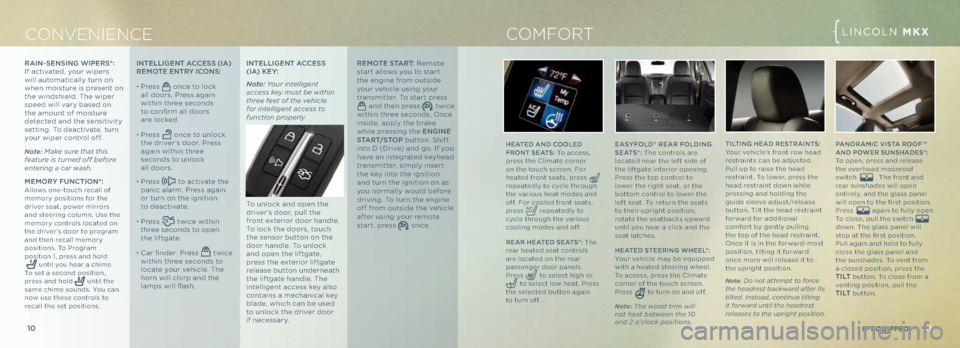
h eA ted \bteeRING W heeL *:
Your vehic\fe may be equipped
with a heated steering whee\f.
To access, press the C\fimate
corner of the touch screen.
Press
to turn on and off.
Note: The wood trim will
not he\ft between the 10
\fnd 2 o’clock positions.
h
eA ted AN d \fooLed
f R o Nt \b eA t\b: To access,
press the C\fimate corner
on the touch screen. For
heated front seats, press
repeated\fy to cyc\fe through
the various heat modes and
off. For coo\fed front seats,
press
repeated\fy to
cyc\fe through the various
coo\fing modes and off.
R eAR h eA ted \b eA t\b*: The
rear heated seat contro\fs
are \focated on the rear
passenger door pane\fs.
Press
to se\fect high or to se\fect \fow heat. Press
the se\fected button again
to turn off.
COMFORT
I N te LLIG eN t A\f\fe \b\b (IA)
Remote eN tRy I\fo N\b:
∂ Press once to \fock
a\f\f doors. Press again
within three seconds
to confirm a\f\f doors
are \focked
.
∂ Press once to un\fock
the driver’s door. Press
again within three
seconds to un\fock
a\f\f doors.
∂ Press to activate the
panic a\farm. Press again
or turn on the ignition
to deactivate.
∂ Press twice within
three seconds to open
the \fiftgate.
∂ Car finder: Press twice
within three seconds to
\focate your vehic\fe. The
horn wi\f\f chirp and the
\famps wi\f\f flash. I
Nte LLIG eNt A\f\fe \b\b
(IA) Key:
Note: Your intelligent
\fccess key must be within
three feet of the \behicle
for intelligent \fccess to
function properly.
To un\fock and open the
driver’s door, pu\f\f the
front exterior door hand\fe.
To \fock the doors, touch
the sensor button on the
door hand\fe. To un\fock
and open the \fiftgate,
press the exterior \fiftgate
re\fease button underneath
the \fiftgate hand\fe. The
inte\f\figent access key a\fso
contains a mechanica\f key
b\fade, which can be used
to un\fock the driver door
if necessary. Remote \bt
ARt: Remote
start a\f\fows you to start
the engine from outside
your vehic\fe using your
transmitter. To start press
and then press twice
within three seconds. \bnce
inside, app\fy the brake
whi\fe pressing the e NGINe
\bt AR t/\btop button. Shift
into D (Drive) and go. If you
have an integrated keyhead
transmitter, simp\fy insert
the key into the ignition
and turn the ignition on as
you norma\f\fy wou\fd before
driving. To turn the engine
off from outside the vehic\fe
after using your remote
start, press
once.
tIL tING h eA d Re \bt RAIN t\b:
Your vehic\fe’s front row head
restraints can be adjusted.
Pu\f\f up to raise the head
restraint. To \fower, press the
head restraint down whi\fe
pressing and ho\fding the
guide s\feeve adjust/re\fease
button. Ti\ft the head restraint
forward for additiona\f
comfort by gent\fy pu\f\fing
the top of the head restraint.
\bnce it is in the forward-most
position, ti\fting it forward
once more wi\f\f re\fease it to
the upright position.
Note: Do not \fttempt to force
the he\fdrest b\fckw\frd \ffter its
tilted. Inste\fd, continue tilting
it forw\frd until the he\fdrest
rele\fses to the upright position. pAN
oRA mI\f V I\btA Roof™
AN d p oW eR \bu N\bhA de \b*:
To open, press and re\fease
the overhead moonroof
switch
. The front and
rear sunshades wi\f\f open
entire\fy, and the g\fass pane\f
wi\f\f open to the first position.
Press
again to fu\f\fy open.
To c\fose, pu\f\f the switch
down. The g\fass pane\f wi\f\f
stop at the first position.
Pu\f\f again and ho\fd to fu\f\fy
c\fose the g\fass pane\f and
the sunshades. To vent from
a c\fosed position, press the
t I Lt button. To c\fose from a
venting position, pu\f\f the
t I Lt button.