Flat tow LINCOLN MKX 2016 Owners Manual
[x] Cancel search | Manufacturer: LINCOLN, Model Year: 2016, Model line: MKX, Model: LINCOLN MKX 2016Pages: 563, PDF Size: 4.96 MB
Page 24 of 563
the child is added to the child restraint.
It also helps to achieve the proper
snugness of the child seat to your
vehicle. Sometimes, a slight lean toward
the buckle will provide extra help to
remove remaining slack from the belt.
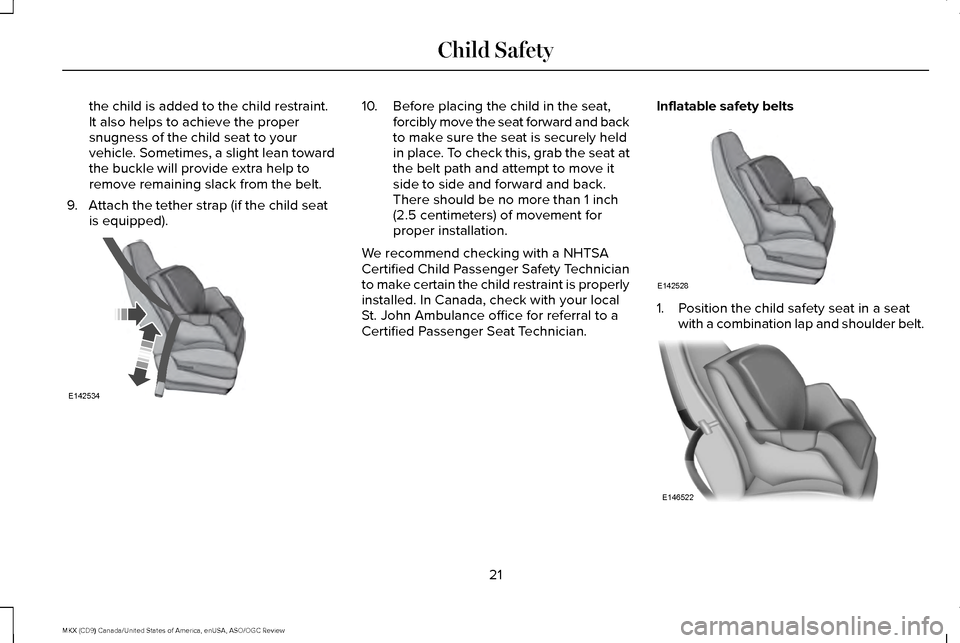
9. Attach the tether strap (if the child seat is equipped). 10. Before placing the child in the seat,
forcibly move the seat forward and back
to make sure the seat is securely held
in place. To check this, grab the seat at
the belt path and attempt to move it
side to side and forward and back.
There should be no more than 1 inch
(2.5 centimeters) of movement for
proper installation.
We recommend checking with a NHTSA
Certified Child Passenger Safety Technician
to make certain the child restraint is properly
installed. In Canada, check with your local
St. John Ambulance office for referral to a
Certified Passenger Seat Technician. Inflatable safety belts 1. Position the child safety seat in a seat
with a combination lap and shoulder belt. 21
MKX (CD9) Canada/United States of America, enUSA, ASO/OGC Review Child SafetyE142534 E142528 E146522
Page 26 of 563
Note:
The lock-off device on some child
restraints may not accommodate the
shoulder portion of the inflatable safety belt.
Follow all instructions provided by the
manufacturer of the child restraint regarding
the necessary and proper use of the lock-off
device. In some instances, these devices
have been provided only for use in vehicles
with safety belt systems that would otherwise
require a locking clip.
6. Allow the belt to retract to remove slack.
The belt will click as it retracts to indicate
it is in the automatic locking mode.
7. Try to pull the belt out of the retractor to
make sure the retractor is in the
automatic locking mode (you should not
be able to pull more belt out). If the
retractor is not locked, unbuckle the belt
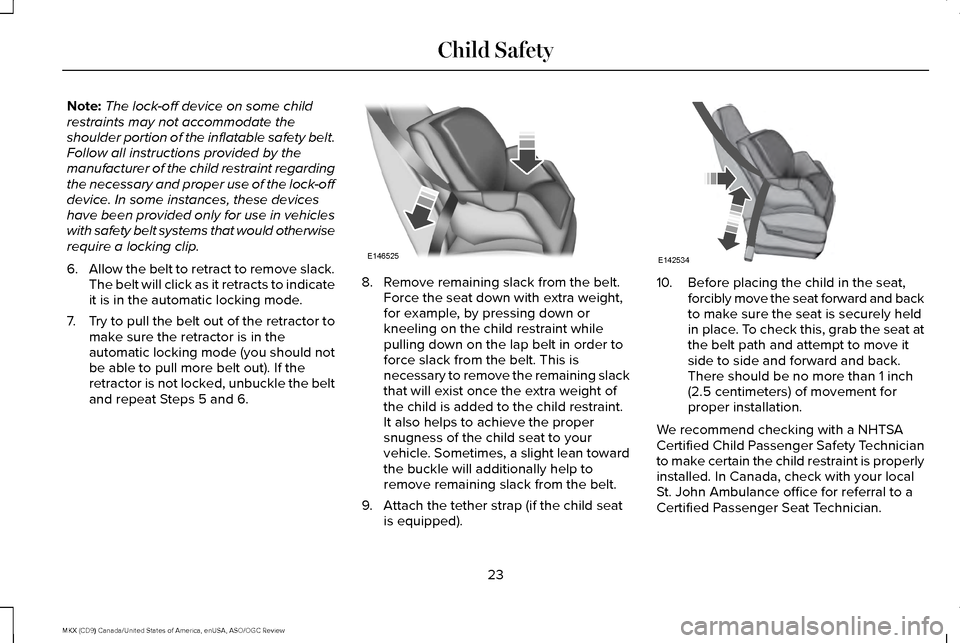
and repeat Steps 5 and 6. 8. Remove remaining slack from the belt.
Force the seat down with extra weight,
for example, by pressing down or
kneeling on the child restraint while
pulling down on the lap belt in order to
force slack from the belt. This is
necessary to remove the remaining slack
that will exist once the extra weight of
the child is added to the child restraint.
It also helps to achieve the proper
snugness of the child seat to your
vehicle. Sometimes, a slight lean toward
the buckle will additionally help to
remove remaining slack from the belt.
9. Attach the tether strap (if the child seat is equipped). 10. Before placing the child in the seat,
forcibly move the seat forward and back
to make sure the seat is securely held
in place. To check this, grab the seat at
the belt path and attempt to move it
side to side and forward and back.
There should be no more than 1 inch
(2.5 centimeters) of movement for
proper installation.
We recommend checking with a NHTSA
Certified Child Passenger Safety Technician
to make certain the child restraint is properly
installed. In Canada, check with your local
St. John Ambulance office for referral to a
Certified Passenger Seat Technician.
23
MKX (CD9) Canada/United States of America, enUSA, ASO/OGC Review Child SafetyE146525 E142534
Page 55 of 563
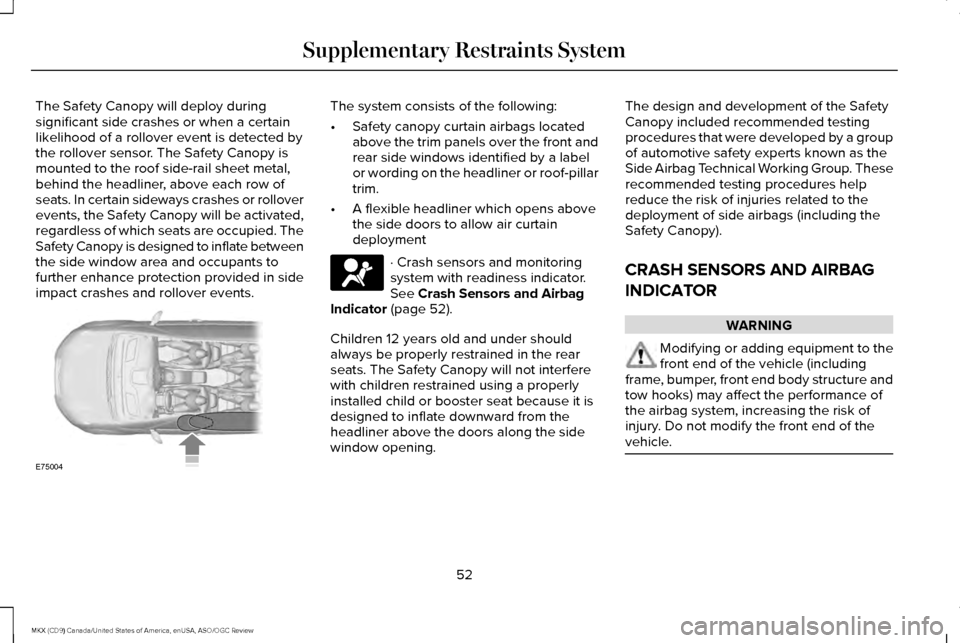
The Safety Canopy will deploy during
significant side crashes or when a certain
likelihood of a rollover event is detected by
the rollover sensor. The Safety Canopy is
mounted to the roof side-rail sheet metal,
behind the headliner, above each row of
seats. In certain sideways crashes or rollover
events, the Safety Canopy will be activated,
regardless of which seats are occupied. The
Safety Canopy is designed to inflate between
the side window area and occupants to
further enhance protection provided in side
impact crashes and rollover events. The system consists of the following:
•
Safety canopy curtain airbags located
above the trim panels over the front and
rear side windows identified by a label
or wording on the headliner or roof-pillar
trim.
• A flexible headliner which opens above
the side doors to allow air curtain
deployment · Crash sensors and monitoring
system with readiness indicator.
See Crash Sensors and Airbag
Indicator (page 52).
Children 12 years old and under should
always be properly restrained in the rear
seats. The Safety Canopy will not interfere
with children restrained using a properly
installed child or booster seat because it is
designed to inflate downward from the
headliner above the doors along the side
window opening. The design and development of the Safety
Canopy included recommended testing
procedures that were developed by a group
of automotive safety experts known as the
Side Airbag Technical Working Group. These
recommended testing procedures help
reduce the risk of injuries related to the
deployment of side airbags (including the
Safety Canopy).
CRASH SENSORS AND AIRBAG
INDICATOR
WARNING
Modifying or adding equipment to the
front end of the vehicle (including
frame, bumper, front end body structure and
tow hooks) may affect the performance of
the airbag system, increasing the risk of
injury. Do not modify the front end of the
vehicle. 52
MKX (CD9) Canada/United States of America, enUSA, ASO/OGC Review Supplementary Restraints SystemE75004
Page 182 of 563
Calculating Fuel Economy
Do not measure fuel economy during the
first 1000 miles (1600 kilometers) of driving
(this is your engine
’s break-in period); a more
accurate measurement is obtained after
2000 miles - 3000 miles (3200 kilometers -
4800 kilometers). Also, fuel expense,
frequency of fill ups or fuel gauge readings
are not accurate ways to measure fuel
economy.
1. Fill the fuel tank completely and record the initial odometer reading.
2. Each time you fill the tank, record the amount of fuel added.
3. After at least 3 to 5 tank fill ups, fill the fuel tank and record the current
odometer reading.
4. Subtract your initial odometer reading from the current odometer reading.
5. Calculate fuel economy by dividing miles
traveled by gallons used (For Metric:
Multiply liters used by 100, then divide
by kilometers traveled). Keep a record for at least 1 month and record
the type of driving (city or highway). This
provides an accurate estimate of the
vehicle
’s fuel economy under current driving
conditions. Additionally, keeping records
during summer and winter show how
temperature impacts fuel economy. In
general, lower temperatures mean lower fuel
economy.
Conditions
• Heavily loading a vehicle or towing a
trailer may reduce fuel economy at any
speed.
• Carrying unnecessary weight may reduce
fuel economy (approximately 1 mpg [0.4
km/L] is lost for every 400 pounds [180
kilograms] of weight carried).
• Adding certain accessories to your
vehicle (for example bug deflectors,
rollbars/light bars, running boards, ski
racks) may reduce fuel economy.
• Using fuel blended with alcohol may
lower fuel economy. •
Fuel economy may decrease with lower
temperatures during the first 8–10 miles
(12–16 kilometers) of driving.
• Driving on flat terrain offers improved fuel
economy as compared to driving on hilly
terrain.
• Transmissions give their best fuel
economy when operated in the top cruise
gear and with steady pressure on the gas
pedal.
• Close windows for high speed driving.
EMISSION CONTROL SYSTEM WARNINGS
Do not park, idle, or drive your vehicle
in dry grass or other dry ground cover.
The emission system heats up the engine
compartment and exhaust system, which can
start a fire. Exhaust leaks may result in entry of
harmful and potentially lethal fumes
into the passenger compartment. If you smell
exhaust fumes inside your vehicle, have your
dealer inspect your vehicle immediately. Do
not drive if you smell exhaust fumes. 179
MKX (CD9) Canada/United States of America, enUSA, ASO/OGC Review Fuel and Refueling
Page 213 of 563
Note:
The Blind Spot Information System
does not detect traffic alongside or behind
your vehicle during a park assist maneuver.
The system may not correctly operate in any
of the following conditions:
• You use a spare tire or a tire significantly
worn more than the other tires.
• You use a unauthorized tire size.
• You try to park on a tight curve.
• Something passes between the front
bumper and the parking space (a
pedestrian or cyclist).
• The edge of the neighboring parked
vehicle is high off the ground (for
example, a bus, tow truck or flatbed
truck).
• The weather conditions are poor (heavy
rain, snow, fog, etc). Note:
Keep the sensors, located on the
bumper or fascia, free from snow, ice and
large accumulations of dirt. Covered sensors
can affect the system's accuracy. Do not
clean the sensors with sharp objects.
Note: The sensors may not detect objects
with surfaces that absorb ultrasonic waves
or cause ultrasonic interference (motorcycle
exhaust, truck air brakes or horns).
Do not use the system if:
• You have attached a foreign object (bike
rack or trailer) to the front or rear of your
vehicle or close to the sensors.
• You have attached an overhanging
object (surfboard) to the roof. •
A foreign object damages or obstructs
the front or rear bumper or side sensors.
• The correct tire size is not in use on your
vehicle (for example, a mini-spare tire).
Using Active Park Assist - Parallel Parking Press the button located on the
center console near the gearshift
lever or the right side of the center
stack once.
When driving at a speed less than 22 mph
(35 km/h) the system automatically scans
both sides of your vehicle for an available
parking space. The system displays a
message and a corresponding graphic to
indicate it is searching for a parking space.
Use the direction indicator to select
searching either to the left-hand side or
right-hand side of your vehicle.
210
MKX (CD9) Canada/United States of America, enUSA, ASO/OGC Review Parking AidsE146186
Page 217 of 563
When you think your vehicle is properly
parked, or you hear a solid tone from the
parking aid (accompanied by a display
message and a chime), bring your vehicle to
a complete stop.
When automatic steering is complete, the
system displays a message and a tone
sounds, indicating that the active park assist
process is finished. You are responsible for
checking the parking job and making any
necessary corrections before leaving your
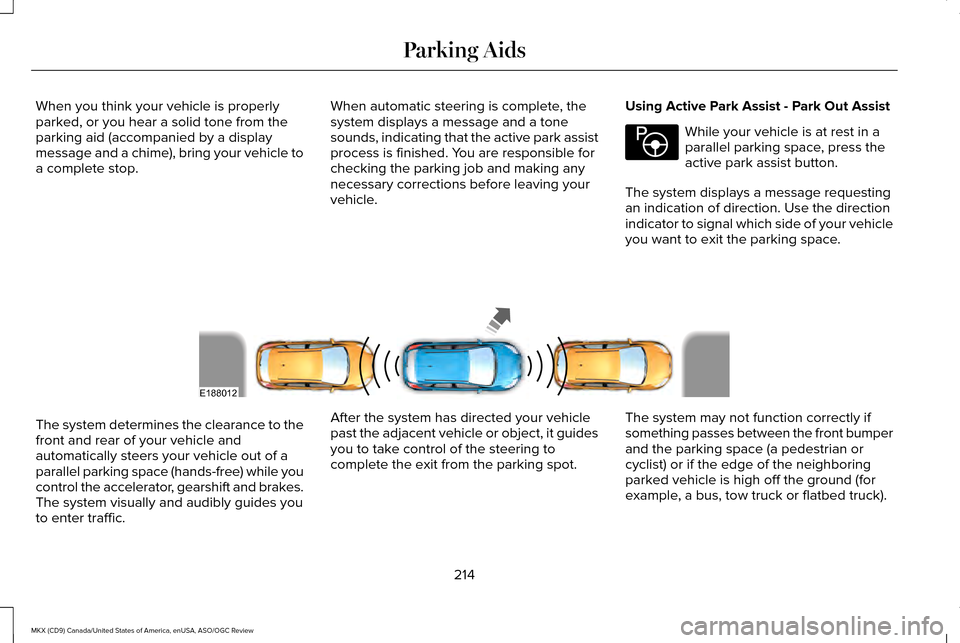
vehicle.Using Active Park Assist - Park Out Assist While your vehicle is at rest in a
parallel parking space, press the
active park assist button.
The system displays a message requesting
an indication of direction. Use the direction
indicator to signal which side of your vehicle
you want to exit the parking space. The system determines the clearance to the
front and rear of your vehicle and
automatically steers your vehicle out of a
parallel parking space (hands-free) while you
control the accelerator, gearshift and brakes.
The system visually and audibly guides you
to enter traffic.
After the system has directed your vehicle
past the adjacent vehicle or object, it guides
you to take control of the steering to
complete the exit from the parking spot.
The system may not function correctly if
something passes between the front bumper
and the parking space (a pedestrian or
cyclist) or if the edge of the neighboring
parked vehicle is high off the ground (for
example, a bus, tow truck or flatbed truck).
214
MKX (CD9) Canada/United States of America, enUSA, ASO/OGC Review Parking AidsE146186 E188012
Page 239 of 563
Why is the feature not available (line markings are gray) when I can s\
ee the lane markings on the road?
Camera blockage due to dirt, grime, fog, frost or water on the windshield
Driving too close to the vehicle in front of you
Transitioning between no lane markings to lane markings or vice versa
Standing water on the road
Faint lane markings (partial yellow lane markings on concrete roads)
Lane width too narrow or too wide
Camera not calibrated after a windshield replacement
Driving on tight roads or on uneven roads Why does the vehicle not come back toward the middle of the lane, as expected, in the Aid or Aid + Alert mode?
High cross winds
Large road crown
Rough roads, grooves, shoulder drop-offs
Heavy uneven loading of the vehicle or improper tire inflation pressure
If the tires have been exchanged (including snow tires), or the suspension has been modified
236
MKX (CD9) Canada/United States of America, enUSA, ASO/OGC Review Driving Aids
Page 269 of 563
Any time the rear axle submerges in water,
replace the rear axle lubricant. Water may
contaminate the rear axle lubricant, which is
not a normal maintenance inspection item
unless there is a possibility of a leak or other
axle repair is required.
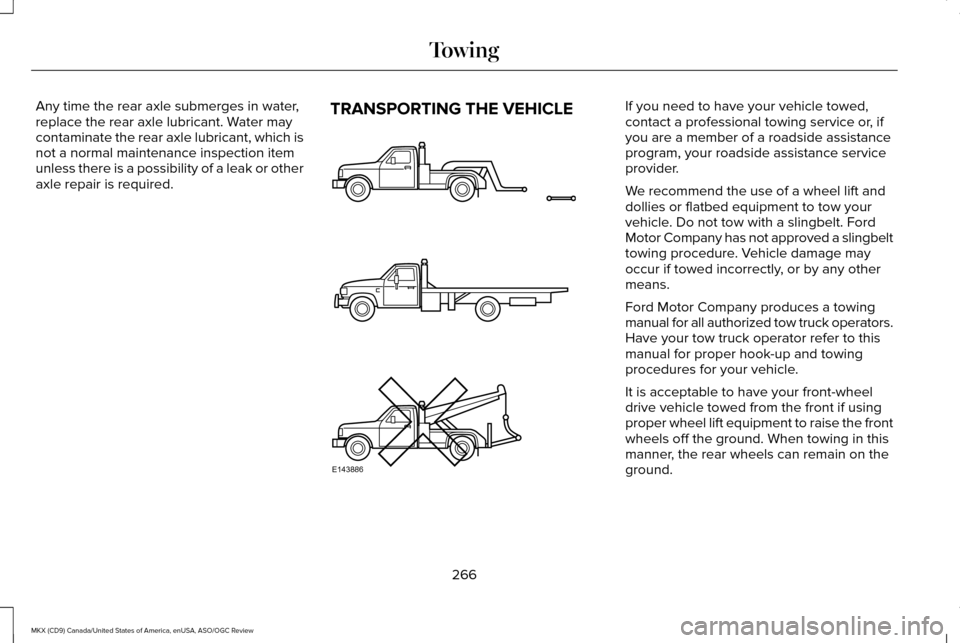
TRANSPORTING THE VEHICLE If you need to have your vehicle towed,
contact a professional towing service or, if
you are a member of a roadside assistance
program, your roadside assistance service
provider.
We recommend the use of a wheel lift and
dollies or flatbed equipment to tow your
vehicle. Do not tow with a slingbelt. Ford
Motor Company has not approved a slingbelt
towing procedure. Vehicle damage may
occur if towed incorrectly, or by any other
means.
Ford Motor Company produces a towing
manual for all authorized tow truck operators.
Have your tow truck operator refer to this
manual for proper hook-up and towing
procedures for your vehicle.
It is acceptable to have your front-wheel
drive vehicle towed from the front if using
proper wheel lift equipment to raise the front
wheels off the ground. When towing in this
manner, the rear wheels can remain on the
ground.
266
MKX (CD9) Canada/United States of America, enUSA, ASO/OGC Review TowingE143886
Page 270 of 563
Front-wheel drive vehicles must have the
front wheels placed on a tow dolly when
towing your vehicle from the rear using
wheel lift equipment. This prevents damage
to the transmission.
Towing an all-wheel drive vehicle requires
that all wheels be off the ground, such as
using a wheel lift and dollies or flatbed
equipment. This prevents damage to the
transmission, all-wheel drive system and
vehicle.
TOWING THE VEHICLE ON FOUR
WHEELS
Emergency Towing
You can flat-tow (all wheels on the ground,
regardless of the powertrain/transmission
configuration) your disabled vehicle (without
access to wheel dollies, car-hauling trailer,
or flatbed transport vehicle) under the
following conditions:
•
Your vehicle is facing forward so you tow
it in a forward direction.
• You place the transmission in position N.
If you cannot place the transmission in
position
N, you may need to override it.
See Transmission (page 182).
• Maximum speed is 35 mph (56 km/h).
• Maximum distance is 50 miles (80
kilometers).
Recreational Towing
Note: Put your climate control system in
recirculated air mode to prevent exhaust
fumes from entering the vehicle.
See
Climate Control (page 140). Follow these guidelines if you have a need
for recreational (RV) towing. An example of
recreational towing would be towing your
vehicle behind a motorhome. These
guidelines are to make sure you do not
damage the transmission during towing.
You can tow your vehicle with all four wheels
on the ground using the Neutral Tow feature,
or with all four wheels off the ground using
a vehicle transport trailer. If you are using a
vehicle transport trailer, follow the instruction
specified by the equipment provider.
Neutral Tow
If you tow your vehicle with all four wheels
on the ground:
•
Tow only in the forward direction.
• Release the parking brake.
Enter Neutral Tow mode by doing the
following:
1. Put the ignition in accessory mode by pressing the engine START button
without pressing the brake pedal.
267
MKX (CD9) Canada/United States of America, enUSA, ASO/OGC Review Towing
Page 272 of 563
BREAKING-IN
You need to break in new tires for
approximately 300 miles (480 kilometers).
During this time, your vehicle may exhibit
some unusual driving characteristics.
Avoid driving too fast during the first 1000
miles (1600 kilometers). Vary your speed
frequently and change up through the gears
early. Do not labor the engine.
Do not tow during the first 1000 miles (1600
kilometers).
REDUCED ENGINE PERFORMANCE
WARNING
Continued operation will increase the
engine temperature and cause the
engine to shut down completely. If the engine coolant temperature gauge
needle moves to the upper limit position, the
engine is overheating. See Gauges (page
107). You must only drive your vehicle for a short
distance if the engine overheats. The
distance you can travel depends on ambient
temperature, vehicle load and terrain. The
engine will continue to operate with limited
power for a short time.
If the engine temperature continues to rise,
the fuel supply to the engine will reduce. The
air conditioning will switch off and the engine
cooling fan will operate continually.
1. Reduce your speed gradually and stop
your vehicle as soon as it is safe to do
so.
2. Switch the engine off immediately to prevent severe engine damage.
3. Wait for the engine to cool down.
4. Check the coolant level.
See Engine
Coolant Check (page 309).
5. Have your vehicle checked by an authorized dealer as soon as possible. ECONOMICAL DRIVING
Fuel economy is affected by several things
such as how you drive, the conditions you
drive under and how you maintain your
vehicle.
There are some things to keep in mind that
may improve your fuel economy:
•
Accelerate and slow down in a smooth,
moderate fashion.
• Drive at steady speeds.
• Anticipate stops; slowing down may
eliminate the need to stop.
• Combine errands and minimize
stop-and-go driving.
•When running errands, go to the
furthest destination first and then
work your way back home.
• Close the windows for high-speed
driving.
• Drive at reasonable speeds. (Traveling
at 65 mph/105 kph uses about 15% less
fuel than traveling at 75 mph/121 kph).
• Keep the tires properly inflated and use
only the recommended size.
269
MKX (CD9) Canada/United States of America, enUSA, ASO/OGC Review Driving Hints