Hood LINCOLN MKX 2016 Owners Manual
[x] Cancel search | Manufacturer: LINCOLN, Model Year: 2016, Model line: MKX, Model: LINCOLN MKX 2016Pages: 563, PDF Size: 4.96 MB
Page 7 of 563
Driving Aids
Driver Alert......................................................231
Lane Keeping System.................................232
Blind Spot Information System..................237
Steering..........................................................242
Pre-Collision Assist......................................243
Drive Control
.................................................246
Load Carrying
Rear Under Floor Storage..........................249
Cargo Nets
.....................................................249
Luggage Covers
...........................................250
Roof Racks and Load Carriers
...................251
Load Limit........................................................251
Towing
Towing a Trailer
..............................................261
Trailer Sway Control
....................................262
Recommended Towing Weights..............262
Essential Towing Checks ............................
264
Transporting the Vehicle............................266
Towing the Vehicle on Four Wheels........267 Driving Hints
Breaking-In....................................................269
Reduced Engine Performance..................269
Economical Driving
......................................269
Driving Through Water................................270
Floor Mats
........................................................271
Roadside Emergencies
Roadside Assistance
...................................272
Hazard Warning Flashers...........................273
Fuel Shutoff
....................................................273
Jump Starting the Vehicle..........................274
Post-Crash Alert System
.............................276
Customer Assistance
Getting the Services You Need
.................277
In California (U.S. Only)...............................278
The Better Business Bureau (BBB) Auto Line Program (U.S. Only)
........................279
Utilizing the Mediation/Arbitration Program (Canada Only)
...........................................280
Getting Assistance Outside the U.S. and Canada.......................................................280 Ordering Additional Owner's
Literature....................................................282
Reporting Safety Defects (U.S. Only)
......282
Reporting Safety Defects (Canada Only)............................................................283
Fuses
Fuse Specification Chart
............................284
Changing a Fuse...........................................301
Maintenance
General Information.....................................302
Opening and Closing the Hood...............302
Under Hood Overview -
2.7L
EcoBoost™..................................................304
Under Hood Overview - 3.7L....................306
Engine Oil Dipstick - 2.7L EcoBoost™......307
Engine Oil Dipstick -
3.7L...........................308
Engine Oil Check.........................................308
Oil Change Indicator Reset.......................309
Engine Coolant Check................................309
Automatic Transmission Fluid Check.......313
Brake Fluid Check
.........................................315
Washer Fluid Check......................................315
4
MKX (CD9) Canada/United States of America, enUSA, ASO/OGC Review Table of Contents
Page 33 of 563
WARNINGS
Never let a passenger hold a child on
his or her lap while your vehicle is
moving. The passenger cannot protect the
child from injury in a crash, which may result
in serious injury or death. Never use pillows, books, or towels to
boost a child. They can slide around
and increase the likelihood of injury or death
in a crash. WARNINGS
Always restrain an unoccupied child
seat or booster seat. These objects
may become projectiles in a crash or sudden
stop, which may increase the risk of serious
injury. WARNINGS
Never place, or allow a child to place,
the shoulder belt under a child's arm
or behind the back because it reduces the
protection for the upper part of the body and
may increase the risk of injury or death in a
crash. To avoid risk of injury, do not leave
children or pets unattended in your
vehicle. 30
MKX (CD9) Canada/United States of America, enUSA, ASO/OGC Review Child Safety
Page 55 of 563
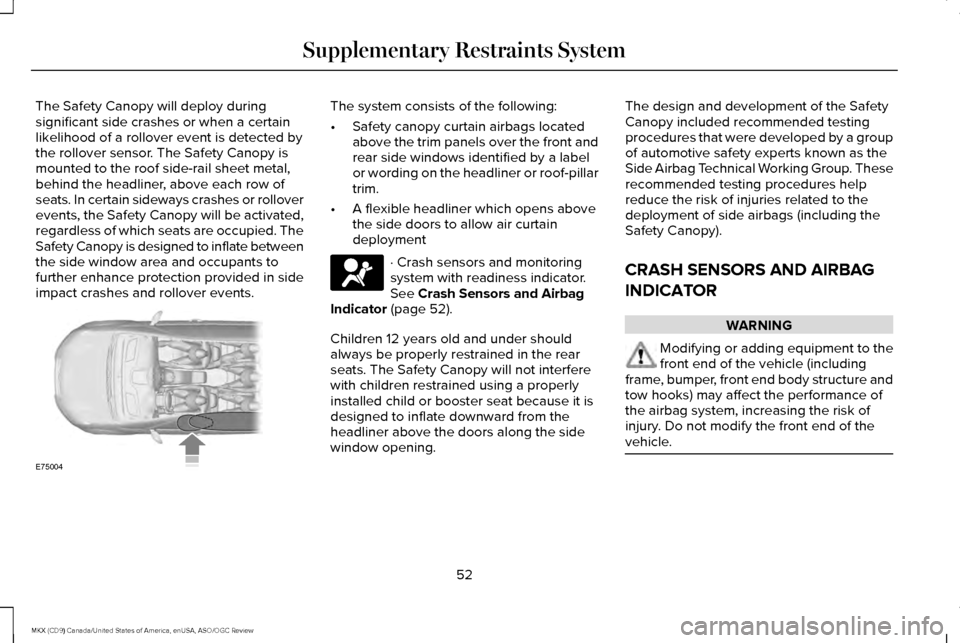
The Safety Canopy will deploy during
significant side crashes or when a certain
likelihood of a rollover event is detected by
the rollover sensor. The Safety Canopy is
mounted to the roof side-rail sheet metal,
behind the headliner, above each row of
seats. In certain sideways crashes or rollover
events, the Safety Canopy will be activated,
regardless of which seats are occupied. The
Safety Canopy is designed to inflate between
the side window area and occupants to
further enhance protection provided in side
impact crashes and rollover events. The system consists of the following:
•
Safety canopy curtain airbags located
above the trim panels over the front and
rear side windows identified by a label
or wording on the headliner or roof-pillar
trim.
• A flexible headliner which opens above
the side doors to allow air curtain
deployment · Crash sensors and monitoring
system with readiness indicator.
See Crash Sensors and Airbag
Indicator (page 52).
Children 12 years old and under should
always be properly restrained in the rear
seats. The Safety Canopy will not interfere
with children restrained using a properly
installed child or booster seat because it is
designed to inflate downward from the
headliner above the doors along the side
window opening. The design and development of the Safety
Canopy included recommended testing
procedures that were developed by a group
of automotive safety experts known as the
Side Airbag Technical Working Group. These
recommended testing procedures help
reduce the risk of injuries related to the
deployment of side airbags (including the
Safety Canopy).
CRASH SENSORS AND AIRBAG
INDICATOR
WARNING
Modifying or adding equipment to the
front end of the vehicle (including
frame, bumper, front end body structure and
tow hooks) may affect the performance of
the airbag system, increasing the risk of
injury. Do not modify the front end of the
vehicle. 52
MKX (CD9) Canada/United States of America, enUSA, ASO/OGC Review Supplementary Restraints SystemE75004
Page 56 of 563
Your vehicle has a collection of crash and
occupant sensors which provide information
to the restraints control module. The
restraints control module deploys (activates)
the front safety belt pretensioners, driver
airbag, passenger airbag, knee airbag(s), seat
mounted side airbags, the Safety Canopy
and optional rear inflatable safety belts.
Based on the type of crash (frontal impact or
side impact), the restraints control module
will deploy the appropriate safety devices.
The restraints control module also monitors
the readiness of the above safety devices
plus the crash and occupant sensors. The
readiness of the safety system is indicated
by a warning indicator light in the instrument
cluster or by a backup tone if the warning
light is not working. Routine maintenance of
the airbag is not required.
A difficulty with the system is indicated by
one or more of the following:
The readiness light will not
illuminate immediately after the
ignition is turned on. •
The readiness light will either flash or
stay lit.
• A series of five beeps will be heard. The
tone pattern will repeat periodically until
the problem, the light or both are
repaired.
If any of these things happen, even
intermittently, have the supplemental
restraint system serviced at an authorized
dealer immediately. Unless serviced, the
system may not function properly in the
event of a crash.
The safety belt pretensioners and the front
airbag supplemental restraint system are
designed to activate when the vehicle
sustains frontal deceleration sufficient to
cause the restraints control module to deploy
a safety device. The fact that the safety belt pretensioners or
front airbags did not activate for both front
seat occupants in a crash does not mean
that something is wrong with the system.
Rather, it means the restraints control module
determined the accident conditions (crash
severity, belt usage) were not appropriate to
activate these safety devices.
•
The design of the front airbags is to
activate only in frontal and near-frontal
crashes (not rollovers, side impacts or
rear impacts) unless the crash causes
sufficient frontal deceleration.
• The design of the safety belt
pretensioners and optional rear inflatable
safety belts is to activate in frontal,
near-frontal and side crashes, and in
rollovers.
• The knee airbag(s) may deploy based on
crash severity and occupant conditions.
• The design of the Safety Canopy is to
inflate in certain side impact crashes or
rollover events. The Safety Canopy may
activate in other types of crashes if the
vehicle experiences sufficient sideways
motion or deformation, or a certain
likelihood of rollover.
53
MKX (CD9) Canada/United States of America, enUSA, ASO/OGC Review Supplementary Restraints System
Page 61 of 563
Vehicles with automatic climate control can
be configured to operate when the vehicle
is remote started. See Automatic Climate
Control (page 140).
Many states and provinces have restrictions
for the use of remote start. Check your local
and state or provincial laws for specific
requirements regarding remote start
systems.
The remote start system will not work if:
• The ignition is on.
• The alarm system is triggered.
• You switch off the feature in the
information display.
See General
Information (page 114).
• The hood is open.
• The transmission is not in
P.
• The vehicle battery voltage is too low.
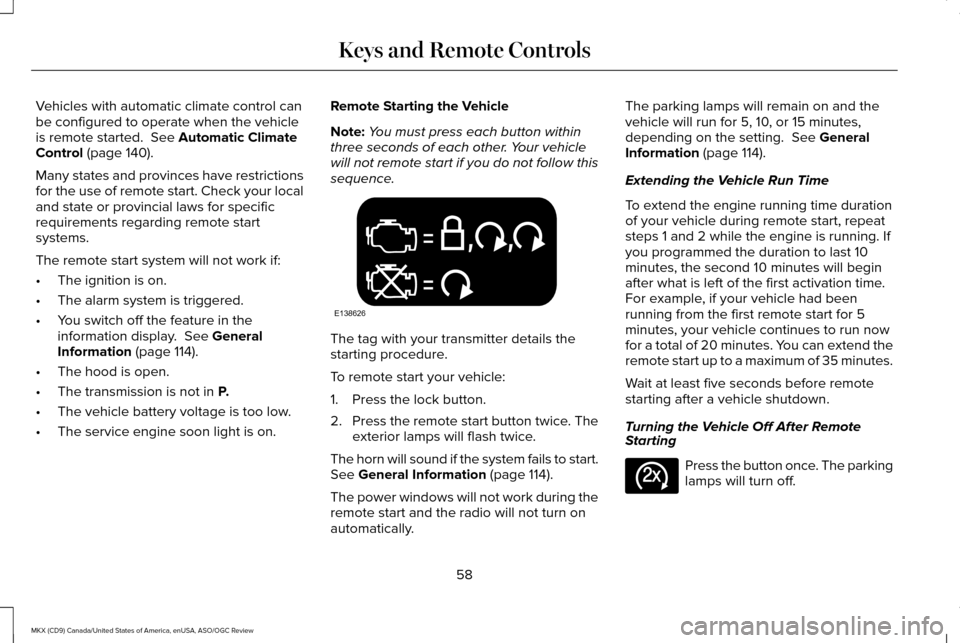
• The service engine soon light is on. Remote Starting the Vehicle
Note:
You must press each button within
three seconds of each other. Your vehicle
will not remote start if you do not follow this
sequence. The tag with your transmitter details the
starting procedure.
To remote start your vehicle:
1. Press the lock button.
2.
Press the remote start button twice. The
exterior lamps will flash twice.
The horn will sound if the system fails to start.
See
General Information (page 114).
The power windows will not work during the
remote start and the radio will not turn on
automatically. The parking lamps will remain on and the
vehicle will run for 5, 10, or 15 minutes,
depending on the setting.
See General
Information (page 114).
Extending the Vehicle Run Time
To extend the engine running time duration
of your vehicle during remote start, repeat
steps 1 and 2 while the engine is running. If
you programmed the duration to last 10
minutes, the second 10 minutes will begin
after what is left of the first activation time.
For example, if your vehicle had been
running from the first remote start for 5
minutes, your vehicle continues to run now
for a total of 20 minutes. You can extend the
remote start up to a maximum of 35 minutes.
Wait at least five seconds before remote
starting after a vehicle shutdown.
Turning the Vehicle Off After Remote
Starting Press the button once. The parking
lamps will turn off.
58
MKX (CD9) Canada/United States of America, enUSA, ASO/OGC Review Keys and Remote ControlsE138626 E138625
Page 71 of 563
unlock button once. The unlocking mode
applies to the remote control, keyless entry
keypad and intelligent access. You can also
change between the unlocking modes using
the information display. See Information
Displays (page 114).
Reprogramming the Unlocking Function
Note: When you press the unlock button,
either all the doors are unlocked or only the
driver door is unlocked. Pressing the unlock
button again unlocks all the doors.
Press and hold the unlock and lock buttons
on the remote control simultaneously for at
least four seconds with the ignition off. The
direction indicators flash twice to confirm the
change.
To return to the original unlocking function,
repeat the process.
Locking the Doors Press the button to lock all doors.
The direction indicators will flash. Press the button again within three seconds
to confirm that all the doors are closed. The
doors will lock again, the horn will sound and
the direction indicators will flash if all the
doors and the liftgate are closed.
Note:
If the system does not function, use
the key blade to lock and unlock your
vehicle.
Mislock
If any door or the liftgate is open, or if the
hood is open on vehicles with an anti-theft
alarm or remote start, the horn sounds twice
and the direction indicators do not flash. You
can switch this feature on or off in the
information display.
See Information
Displays (page 114).
Opening the Liftgate Press twice within three seconds
to open the liftgate.Locking and Unlocking the Doors with
the Key Blade
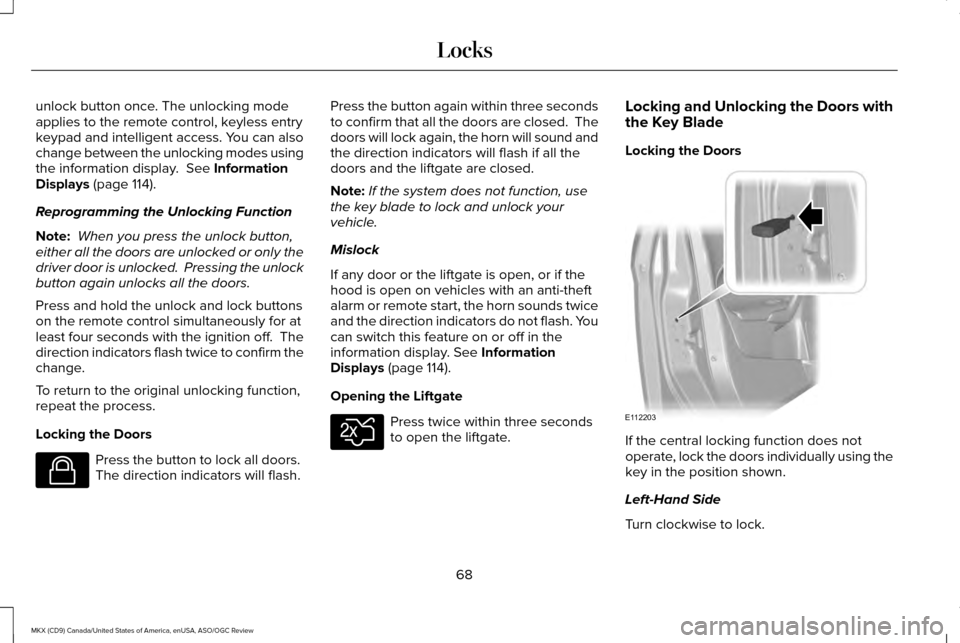
Locking the Doors
If the central locking function does not
operate, lock the doors individually using the
key in the position shown.
Left-Hand Side
Turn clockwise to lock.
68
MKX (CD9) Canada/United States of America, enUSA, ASO/OGC Review LocksE138623 E138630 E112203
Page 84 of 563
Make sure that the ignition is switched off
before beginning this procedure. Make sure
that you close all the doors before beginning
and that they remain closed throughout the
procedure. Carry out all steps within 30
seconds of starting the sequence. Stop and
wait for at least one minute before starting
again if you carry out any steps out of
sequence.
Read and understand the entire procedure
before you begin.
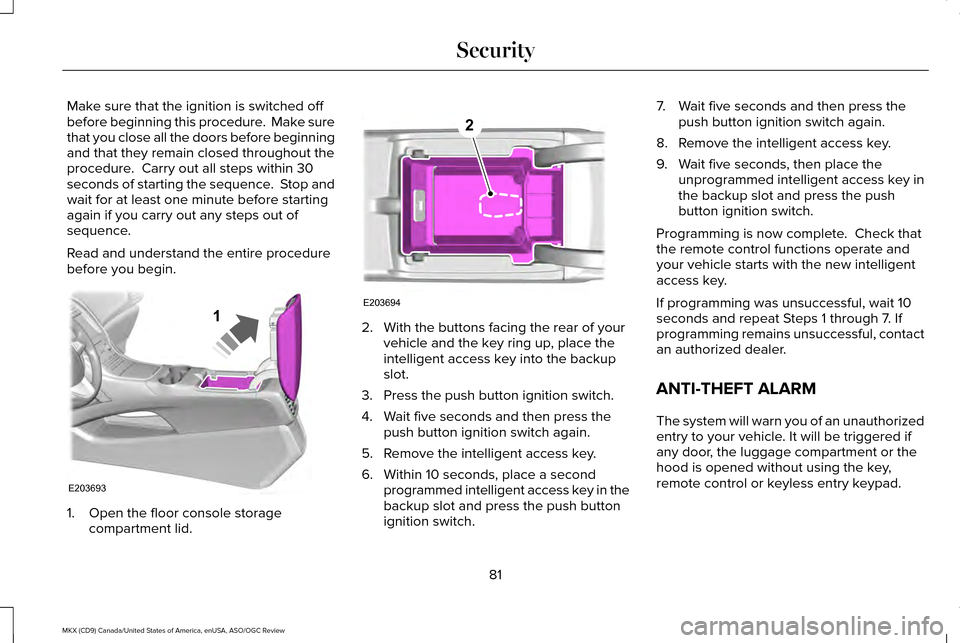
1. Open the floor console storage
compartment lid. 2. With the buttons facing the rear of your
vehicle and the key ring up, place the
intelligent access key into the backup
slot.
3. Press the push button ignition switch.
4. Wait five seconds and then press the push button ignition switch again.
5. Remove the intelligent access key.
6. Within 10 seconds, place a second programmed intelligent access key in the
backup slot and press the push button
ignition switch. 7. Wait five seconds and then press the
push button ignition switch again.
8. Remove the intelligent access key.
9. Wait five seconds, then place the unprogrammed intelligent access key in
the backup slot and press the push
button ignition switch.
Programming is now complete. Check that
the remote control functions operate and
your vehicle starts with the new intelligent
access key.
If programming was unsuccessful, wait 10
seconds and repeat Steps 1 through 7. If
programming remains unsuccessful, contact
an authorized dealer.
ANTI-THEFT ALARM
The system will warn you of an unauthorized
entry to your vehicle. It will be triggered if
any door, the luggage compartment or the
hood is opened without using the key,
remote control or keyless entry keypad.
81
MKX (CD9) Canada/United States of America, enUSA, ASO/OGC Review SecurityE203693
1 E203694
2
Page 114 of 563
Engine Oil
If it illuminates with the engine
running or when you are driving,
this indicates a malfunction. Stop
your vehicle as soon as it is safe to do so
and switch the engine off. Check the engine
oil level. See Engine Oil Check (page 308).
Note: Do not resume your journey if it
illuminates despite the level being correct.
Have the system checked by an authorized
dealer immediately.
Fasten Safety Belt It illuminates and a chime sounds
to remind you to fasten your safety
belt. See Safety Belt Minder
(page 40).
Front Airbag If it fails to illuminate when you
start your vehicle, continues to
flash or remains on, it indicates a
malfunction. Have the system checked by
an authorized dealer. Heads Up Display
(If Equipped) A red beam of lights illuminates on
the windshield in certain instances
when using adaptive cruise control
and/or the collision warning system. It also
illuminates momentarily when you start your
vehicle to make sure the display works.
High Beam It illuminates when you switch the
high beam headlamps on. It flashes
when you use the headlamp
flasher.
Hood Ajar Displays when the ignition is on
and the hood is not completely
closed.
Liftgate Ajar Illuminates when the liftgate is not
completely closed.Low Beam Malfunction Warning It will illuminate when there is a
malfunction with the low beam
headlamp bulb.
Low Fuel Level It illuminates when the fuel level is
low or the fuel tank is nearly
empty. Refuel as soon as possible.
Low Tire Pressure Warning It illuminates when your tire
pressure is low. If the lamp remains
on with the engine running or
when driving, check your tire pressure as
soon as possible.
It also illuminates momentarily when you
switch the ignition on to confirm the lamp is
functional. If it does not illuminate when you
switch the ignition on, or begins to flash at
any time, have the system checked by an
authorized dealer.
111
MKX (CD9) Canada/United States of America, enUSA, ASO/OGC Review Instrument Cluster E156133 E159324 E162453 E181350
Page 131 of 563
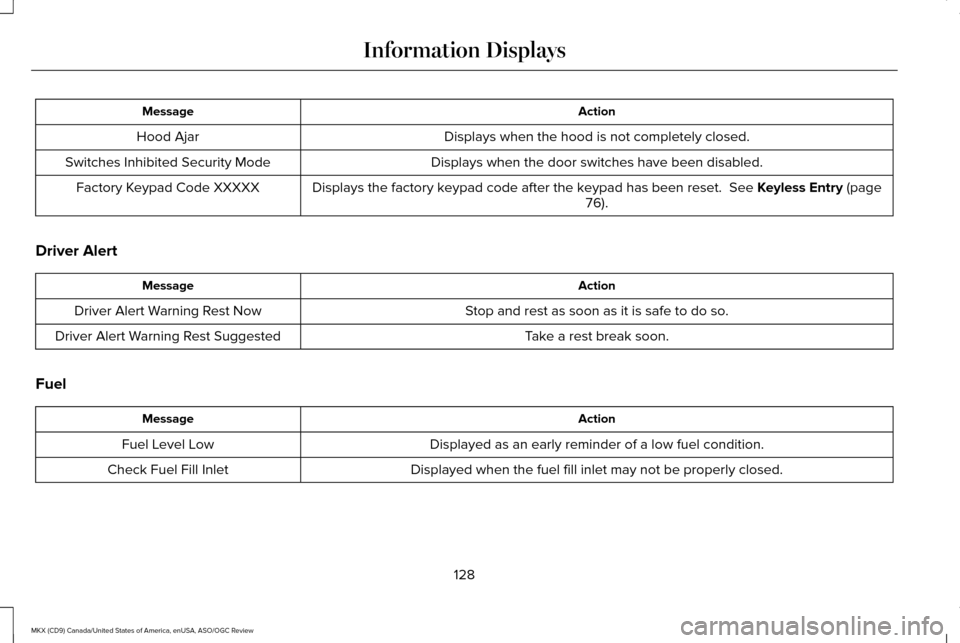
Action
Message
Displays when the hood is not completely closed.
Hood Ajar
Displays when the door switches have been disabled.
Switches Inhibited Security Mode
Displays the factory keypad code after the keypad has been reset. See Keyless Entry (page
76).
Factory Keypad Code XXXXX
Driver Alert Action
Message
Stop and rest as soon as it is safe to do so.
Driver Alert Warning Rest Now
Take a rest break soon.
Driver Alert Warning Rest Suggested
Fuel Action
Message
Displayed as an early reminder of a low fuel condition.
Fuel Level Low
Displayed when the fuel fill inlet may not be properly closed.
Check Fuel Fill Inlet
128
MKX (CD9) Canada/United States of America, enUSA, ASO/OGC Review Information Displays
Page 278 of 563
Park the booster vehicle close to the hood
of the disabled vehicle, making sure the two
vehicles do not touch.
Connecting the Jumper Cables
WARNINGS
Do not attach the cables to fuel lines,
engine rocker covers, the intake
manifold or electrical components as
grounding points. Stay clear of moving parts.
To avoid reverse polarity connections, make
sure that you correctly identify the positive
(+) and negative (-) terminals on both the
disabled and booster vehicles before
connecting the cables. Do not attach the end of the positive
cable to the studs or L-shaped eyelet
located above the positive (+) terminal of
your vehicle ’s battery. High current may flow
through and cause damage to the fuses. Do not connect the end of the second
cable to the negative (-) terminal of the
battery to be jumped. A spark may cause an
explosion of the gases that surround the
battery. Note:
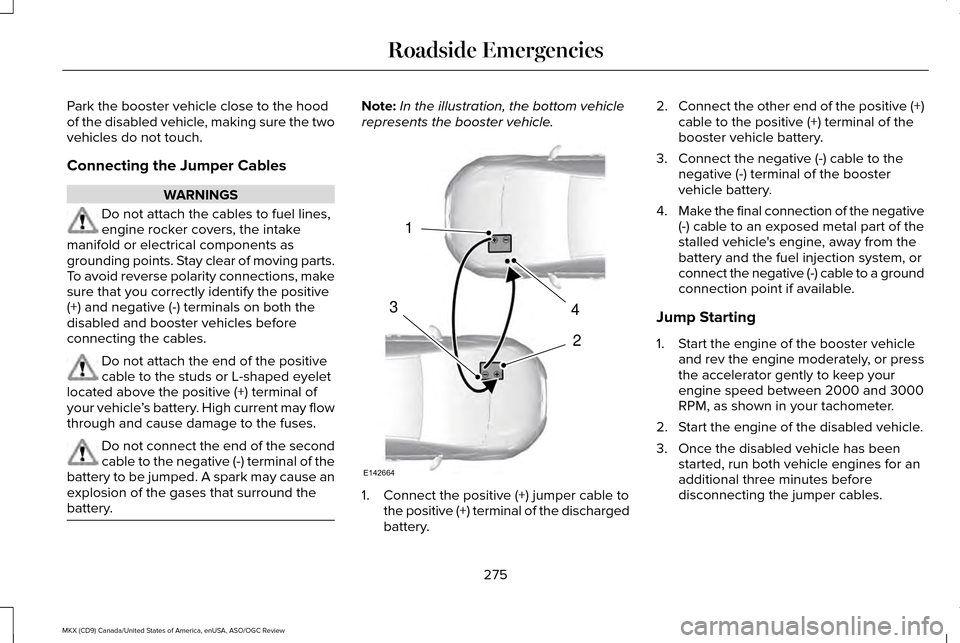
In the illustration, the bottom vehicle
represents the booster vehicle. 1. Connect the positive (+) jumper cable to
the positive (+) terminal of the discharged
battery. 2.
Connect the other end of the positive (+)
cable to the positive (+) terminal of the
booster vehicle battery.
3. Connect the negative (-) cable to the negative (-) terminal of the booster
vehicle battery.
4. Make the final connection of the negative
(-) cable to an exposed metal part of the
stalled vehicle's engine, away from the
battery and the fuel injection system, or
connect the negative (-) cable to a ground
connection point if available.
Jump Starting
1. Start the engine of the booster vehicle and rev the engine moderately, or press
the accelerator gently to keep your
engine speed between 2000 and 3000
RPM, as shown in your tachometer.
2. Start the engine of the disabled vehicle.
3. Once the disabled vehicle has been started, run both vehicle engines for an
additional three minutes before
disconnecting the jumper cables.
275
MKX (CD9) Canada/United States of America, enUSA, ASO/OGC Review Roadside Emergencies4
2
1
3
E142664