Driver side door LINCOLN MKX 2017 User Guide
[x] Cancel search | Manufacturer: LINCOLN, Model Year: 2017, Model line: MKX, Model: LINCOLN MKX 2017Pages: 587, PDF Size: 5.4 MB
Page 237 of 587
System Warnings
Note:
The system will not issue warnings
below approximately 40 mph (64 km/h).
The warning system has two stages. At first,
the system issues a temporary warning that
you need to take a rest. This message will
only appear for a short time. If the system
detects further reduction in driving alertness,
it may issue another warning that will remain
in the information display for a longer time.
You can press OK on the steering wheel
control to clear the warning.
System Display
When active the system will run automatically
in the background and only issue a warning
if required. You can view the status at any
time using the information display.
See
General Information (page 114).
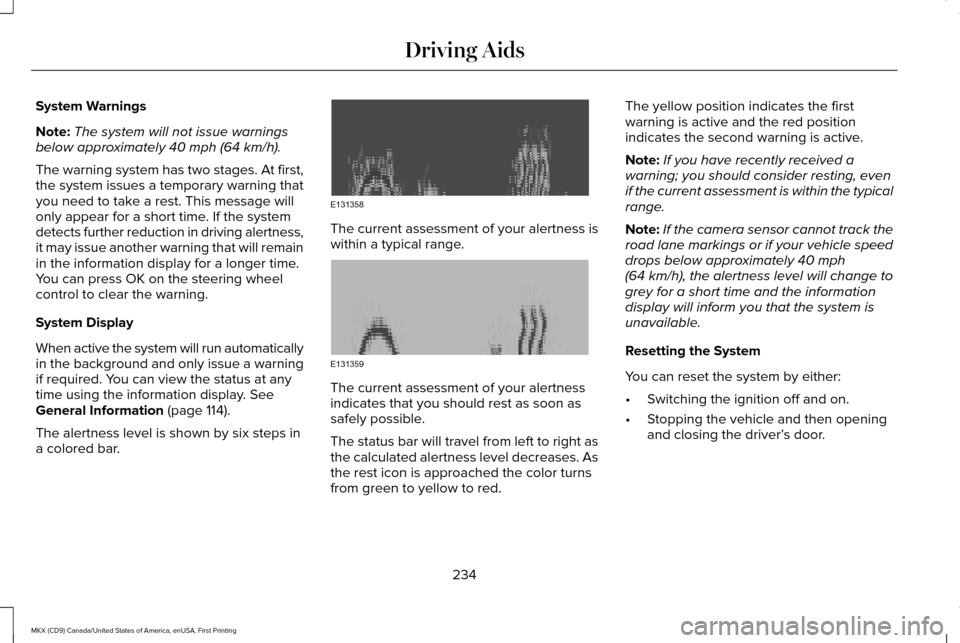
The alertness level is shown by six steps in
a colored bar. The current assessment of your alertness is
within a typical range.
The current assessment of your alertness
indicates that you should rest as soon as
safely possible.
The status bar will travel from left to right as
the calculated alertness level decreases. As
the rest icon is approached the color turns
from green to yellow to red.The yellow position indicates the first
warning is active and the red position
indicates the second warning is active.
Note:
If you have recently received a
warning; you should consider resting, even
if the current assessment is within the typical
range.
Note: If the camera sensor cannot track the
road lane markings or if your vehicle speed
drops below approximately
40 mph
(64 km/h), the alertness level will change to
grey for a short time and the information
display will inform you that the system is
unavailable.
Resetting the System
You can reset the system by either:
• Switching the ignition off and on.
• Stopping the vehicle and then opening
and closing the driver’ s door.
234
MKX (CD9) Canada/United States of America, enUSA, First Printing Driving AidsE131358 E131359
Page 260 of 587
Payload
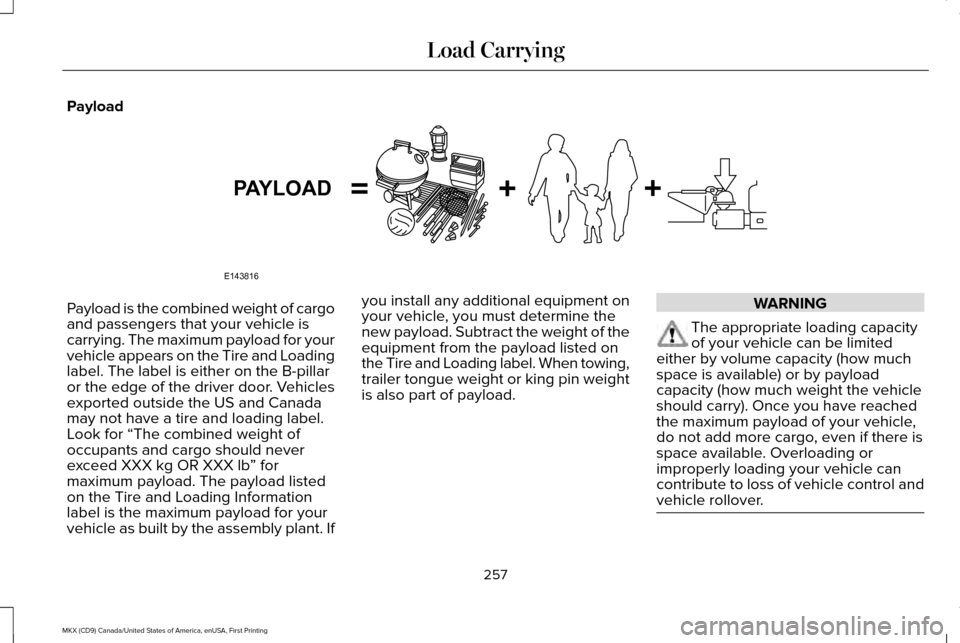
Payload is the combined weight of cargo
and passengers that your vehicle is
carrying. The maximum payload for your
vehicle appears on the Tire and Loading
label. The label is either on the B-pillar
or the edge of the driver door. Vehicles
exported outside the US and Canada
may not have a tire and loading label.
Look for “The combined weight of
occupants and cargo should never
exceed XXX kg OR XXX lb
” for
maximum payload. The payload listed
on the Tire and Loading Information
label is the maximum payload for your
vehicle as built by the assembly plant. If you install any additional equipment on
your vehicle, you must determine the
new payload. Subtract the weight of the
equipment from the payload listed on
the Tire and Loading label. When towing,
trailer tongue weight or king pin weight
is also part of payload. WARNING
The appropriate loading capacity
of your vehicle can be limited
either by volume capacity (how much
space is available) or by payload
capacity (how much weight the vehicle
should carry). Once you have reached
the maximum payload of your vehicle,
do not add more cargo, even if there is
space available. Overloading or
improperly loading your vehicle can
contribute to loss of vehicle control and
vehicle rollover. 257
MKX (CD9) Canada/United States of America, enUSA, First Printing Load CarryingE143816PAYLOAD
Page 304 of 587
Protected components
Fuse amp rating
Fuse or relay number
Driver door lock indicator.
Driver lock switch illumination.
Front passenger door (window, mirror).
30A 1
26
Front passenger door module.
Front passenger lock indicator.
Front passenger switch illumination (window, lock).
Moonroof.
30A 1
27
Amplifier.
20A 1
28
Rear driver side door smart window.
30A 1
29
Rear passenger side door smart window.
30A 1
30
Not used (spare).
15A 1
31
Voice control (SYNC).
10A 1
32
Radio transceiver module.
Radio.
20A 1
33
Run-start bus (fuse 19, 20, 21, 22, 35, 36, 37, circuit breaker
38).
30A 1
34
301
MKX (CD9) Canada/United States of America, enUSA, First Printing Fuses
Page 350 of 587
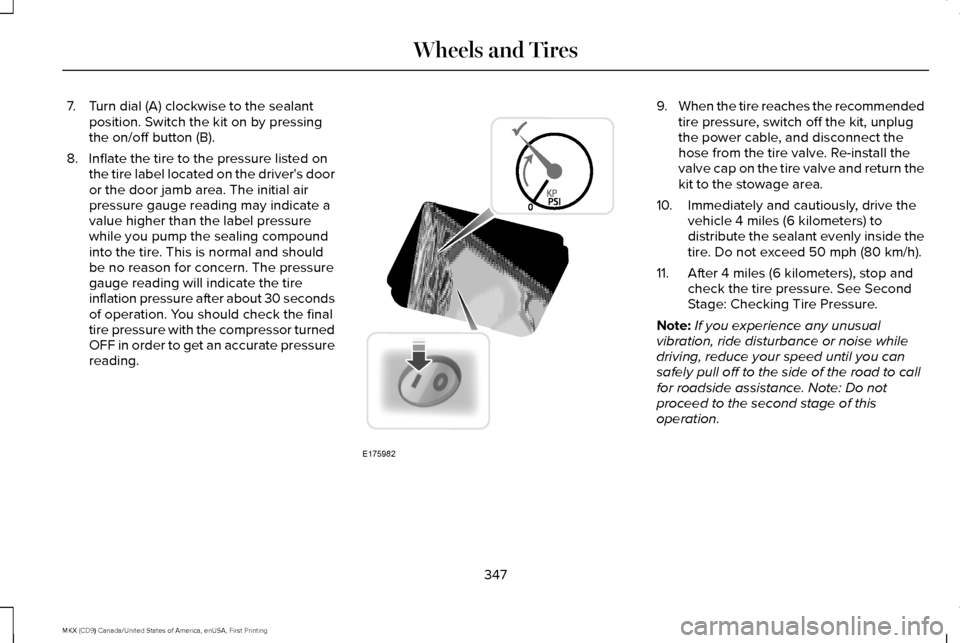
7. Turn dial (A) clockwise to the sealant
position. Switch the kit on by pressing
the on/off button (B).
8. Inflate the tire to the pressure listed on the tire label located on the driver's door
or the door jamb area. The initial air
pressure gauge reading may indicate a
value higher than the label pressure
while you pump the sealing compound
into the tire. This is normal and should
be no reason for concern. The pressure
gauge reading will indicate the tire
inflation pressure after about 30 seconds
of operation. You should check the final
tire pressure with the compressor turned
OFF in order to get an accurate pressure
reading. 9.
When the tire reaches the recommended
tire pressure, switch off the kit, unplug
the power cable, and disconnect the
hose from the tire valve. Re-install the
valve cap on the tire valve and return the
kit to the stowage area.
10. Immediately and cautiously, drive the vehicle 4 miles (6 kilometers) to
distribute the sealant evenly inside the
tire. Do not exceed 50 mph (80 km/h).
11. After 4 miles (6 kilometers), stop and check the tire pressure. See Second
Stage: Checking Tire Pressure.
Note: If you experience any unusual
vibration, ride disturbance or noise while
driving, reduce your speed until you can
safely pull off to the side of the road to call
for roadside assistance. Note: Do not
proceed to the second stage of this
operation.
347
MKX (CD9) Canada/United States of America, enUSA, First Printing Wheels and TiresE175982
Page 357 of 587
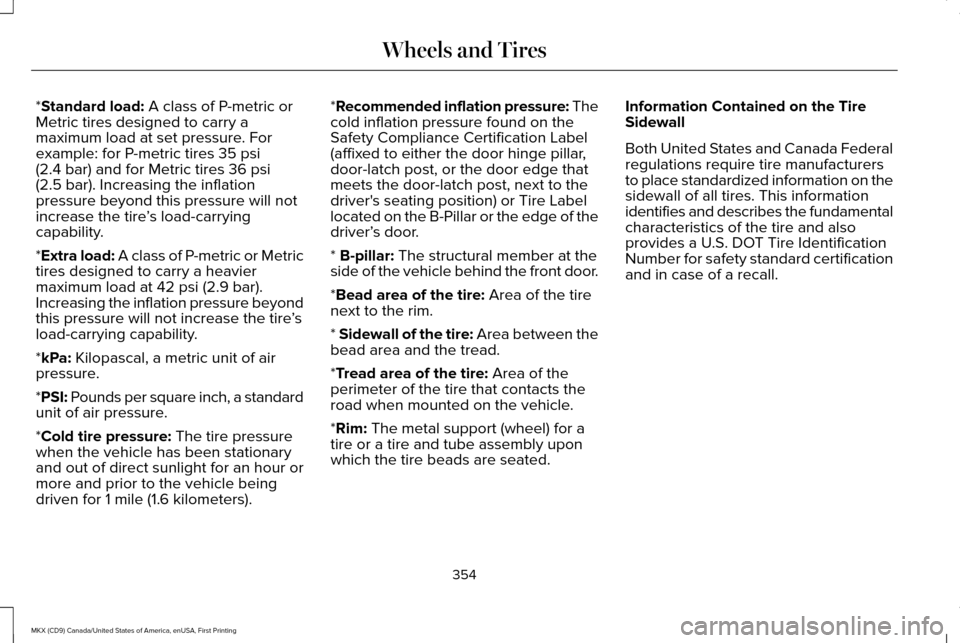
*Standard load: A class of P-metric or
Metric tires designed to carry a
maximum load at set pressure. For
example: for P-metric tires
35 psi
(2.4 bar) and for Metric tires 36 psi
(2.5 bar). Increasing the inflation
pressure beyond this pressure will not
increase the tire ’s load-carrying
capability.
*
Extra load: A class of P-metric or Metric
tires designed to carry a heavier
maximum load at
42 psi (2.9 bar).
Increasing the inflation pressure beyond
this pressure will not increase the tire ’s
load-carrying capability.
*
kPa: Kilopascal, a metric unit of air
pressure.
*PSI: Pounds per square inch, a standard
unit of air pressure.
*
Cold tire pressure: The tire pressure
when the vehicle has been stationary
and out of direct sunlight for an hour or
more and prior to the vehicle being
driven for 1 mile (1.6 kilometers). *
Recommended inflation pressure: The
cold inflation pressure found on the
Safety Compliance Certification Label
(affixed to either the door hinge pillar,
door-latch post, or the door edge that
meets the door-latch post, next to the
driver's seating position) or Tire Label
located on the B-Pillar or the edge of the
driver’ s door.
*
B-pillar: The structural member at the
side of the vehicle behind the front door.
*
Bead area of the tire: Area of the tire
next to the rim.
*
Sidewall of the tire: Area between the
bead area and the tread.
*
Tread area of the tire: Area of the
perimeter of the tire that contacts the
road when mounted on the vehicle.
*
Rim: The metal support (wheel) for a
tire or a tire and tube assembly upon
which the tire beads are seated. Information Contained on the Tire
Sidewall
Both United States and Canada Federal
regulations require tire manufacturers
to place standardized information on the
sidewall of all tires. This information
identifies and describes the fundamental
characteristics of the tire and also
provides a U.S. DOT Tire Identification
Number for safety standard certification
and in case of a recall.
354
MKX (CD9) Canada/United States of America, enUSA, First Printing Wheels and Tires
Page 360 of 587
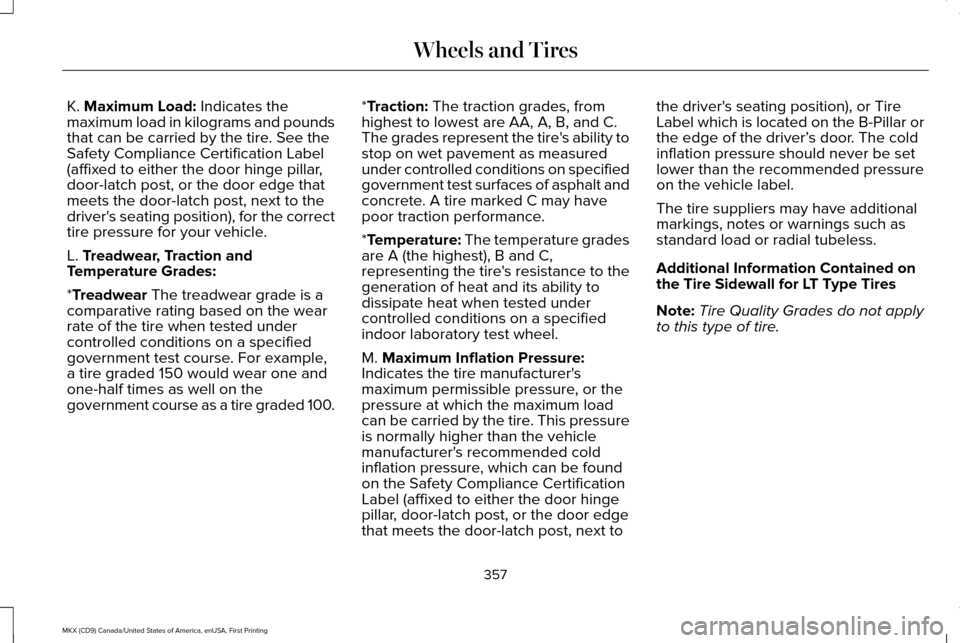
K. Maximum Load: Indicates the
maximum load in kilograms and pounds
that can be carried by the tire. See the
Safety Compliance Certification Label
(affixed to either the door hinge pillar,
door-latch post, or the door edge that
meets the door-latch post, next to the
driver's seating position), for the correct
tire pressure for your vehicle.
L.
Treadwear, Traction and
Temperature Grades:
*
Treadwear The treadwear grade is a
comparative rating based on the wear
rate of the tire when tested under
controlled conditions on a specified
government test course. For example,
a tire graded 150 would wear one and
one-half times as well on the
government course as a tire graded 100. *
Traction: The traction grades, from
highest to lowest are AA, A, B, and C.
The grades represent the tire's ability to
stop on wet pavement as measured
under controlled conditions on specified
government test surfaces of asphalt and
concrete. A tire marked C may have
poor traction performance.
*
Temperature: The temperature grades
are A (the highest), B and C,
representing the tire's resistance to the
generation of heat and its ability to
dissipate heat when tested under
controlled conditions on a specified
indoor laboratory test wheel.
M.
Maximum Inflation Pressure:
Indicates the tire manufacturer's
maximum permissible pressure, or the
pressure at which the maximum load
can be carried by the tire. This pressure
is normally higher than the vehicle
manufacturer's recommended cold
inflation pressure, which can be found
on the Safety Compliance Certification
Label (affixed to either the door hinge
pillar, door-latch post, or the door edge
that meets the door-latch post, next to the driver's seating position), or Tire
Label which is located on the B-Pillar or
the edge of the driver’
s door. The cold
inflation pressure should never be set
lower than the recommended pressure
on the vehicle label.
The tire suppliers may have additional
markings, notes or warnings such as
standard load or radial tubeless.
Additional Information Contained on
the Tire Sidewall for LT Type Tires
Note: Tire Quality Grades do not apply
to this type of tire.
357
MKX (CD9) Canada/United States of America, enUSA, First Printing Wheels and Tires
Page 362 of 587
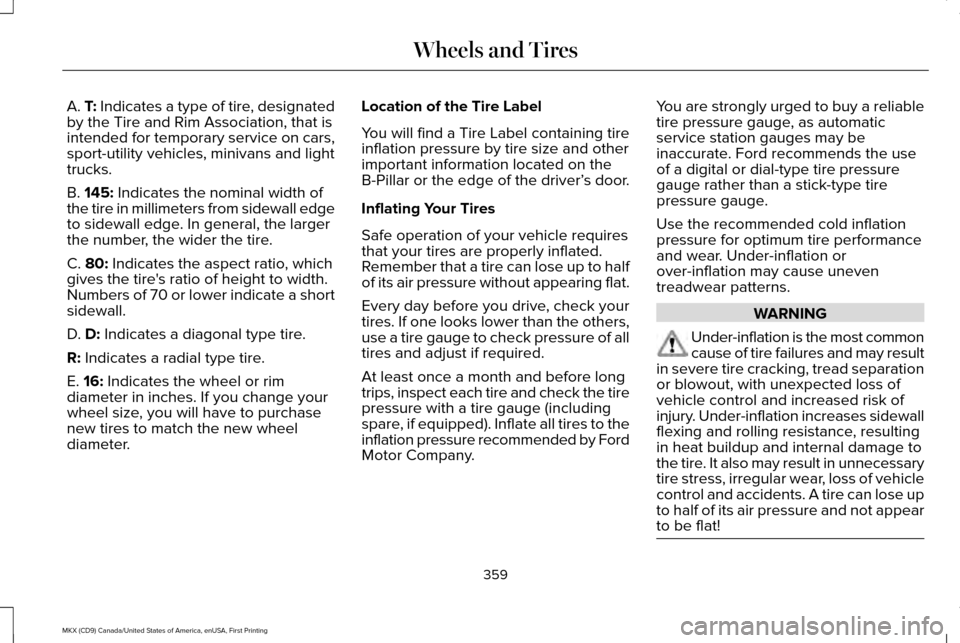
A. T: Indicates a type of tire, designated
by the Tire and Rim Association, that is
intended for temporary service on cars,
sport-utility vehicles, minivans and light
trucks.
B.
145: Indicates the nominal width of
the tire in millimeters from sidewall edge
to sidewall edge. In general, the larger
the number, the wider the tire.
C.
80: Indicates the aspect ratio, which
gives the tire's ratio of height to width.
Numbers of 70 or lower indicate a short
sidewall.
D.
D: Indicates a diagonal type tire.
R:
Indicates a radial type tire.
E.
16: Indicates the wheel or rim
diameter in inches. If you change your
wheel size, you will have to purchase
new tires to match the new wheel
diameter. Location of the Tire Label
You will find a Tire Label containing tire
inflation pressure by tire size and other
important information located on the
B-Pillar or the edge of the driver’
s door.
Inflating Your Tires
Safe operation of your vehicle requires
that your tires are properly inflated.
Remember that a tire can lose up to half
of its air pressure without appearing flat.
Every day before you drive, check your
tires. If one looks lower than the others,
use a tire gauge to check pressure of all
tires and adjust if required.
At least once a month and before long
trips, inspect each tire and check the tire
pressure with a tire gauge (including
spare, if equipped). Inflate all tires to the
inflation pressure recommended by Ford
Motor Company. You are strongly urged to buy a reliable
tire pressure gauge, as automatic
service station gauges may be
inaccurate. Ford recommends the use
of a digital or dial-type tire pressure
gauge rather than a stick-type tire
pressure gauge.
Use the recommended cold inflation
pressure for optimum tire performance
and wear. Under-inflation or
over-inflation may cause uneven
treadwear patterns.
WARNING
Under-inflation is the most common
cause of tire failures and may result
in severe tire cracking, tread separation
or blowout, with unexpected loss of
vehicle control and increased risk of
injury. Under-inflation increases sidewall
flexing and rolling resistance, resulting
in heat buildup and internal damage to
the tire. It also may result in unnecessary
tire stress, irregular wear, loss of vehicle
control and accidents. A tire can lose up
to half of its air pressure and not appear
to be flat! 359
MKX (CD9) Canada/United States of America, enUSA, First Printing Wheels and Tires
Page 363 of 587
Always inflate your tires to the Ford
recommended inflation pressure even
if it is less than the maximum inflation
pressure information found on the tire.
The Ford recommended tire inflation
pressure is found on the Safety
Compliance Certification Label (affixed
to either the door hinge pillar, door-latch
post, or the door edge that meets the
door-latch post, next to the driver's
seating position), or Tire Label which is
located on the B-Pillar or the edge of the
driver’
s door. Failure to follow the tire
pressure recommendations can cause
uneven treadwear patterns and
adversely affect the way your vehicle
handles.
Maximum Inflation Pressure is the tire
manufacturer's maximum permissible
pressure and the pressure at which the
maximum load can be carried by the tire.
This pressure is normally higher than the
manufacturer’ s recommended cold
inflation pressure, which can be found
on the Safety Compliance Certification
Label (affixed to either the door hinge
pillar, door-latch post, or the door edge that meets the door-latch post, next to
the driver's seating position), or Tire
Label which is located on the B-Pillar or
the edge of the driver’
s door. The cold
inflation pressure should never be set
lower than the recommended pressure
on the Safety Compliance Certification
Label or Tire Label.
When weather temperature changes
occur, tire inflation pressures also
change. A 10°F (6°C) temperature drop
can cause a corresponding drop of 1 psi
(7 kPa)
in inflation pressure. Check your
tire pressures frequently and adjust
them to the proper pressure which can
be found on the Safety Compliance
Certification Label or Tire Label.
To check the pressure in your tire(s):
1. Make sure the tires are cool, meaning
they are not hot from driving even a
mile. Note:
If you are checking tire pressure
when the tire is hot, (for example, driven
more than 1 mile [1.6 kilometers], never
bleed or reduce air pressure. The tires
are hot from driving and it is normal for
pressures to increase above
recommended cold pressures. A hot tire
at or below recommended cold inflation
pressure could be significantly
under-inflated.
Note: If you have to drive a distance to
get air for your tire(s), check and record
the tire pressure first and add the
appropriate air pressure when you get
to the pump. It is normal for tires to heat
up and the air pressure inside to go up
as you drive.
2. Remove the cap from the valve on
one tire, then firmly press the tire gauge
onto the valve and measure the
pressure.
3. Add enough air to reach the
recommended air pressure.
360
MKX (CD9) Canada/United States of America, enUSA, First Printing Wheels and Tires
Page 365 of 587
Damage
Periodically inspect the tire treads and
sidewalls for damage (such as bulges in
the tread or sidewalls, cracks in the
tread groove and separation in the tread
or sidewall). If damage is observed or
suspected have the tire inspected by a
tire professional. Tires can be damaged
during off-road use, so inspection after
off-road use is also recommended.
Age
WARNING
Tires degrade over time depending
on many factors such as weather,
storage conditions, and conditions of
use (load, speed, inflation pressure) the
tires experience throughout their lives.
You should replace your spare tire when
you replace the road tires or after six
years due to aging even if it has not
been used. U.S. DOT Tire Identification Number
Both United States and Canada Federal
regulations require tire manufacturers
to place standardized information on the
sidewall of all tires. This information
identifies and describes the fundamental
characteristics of the tire and also
provides a U.S. DOT Tire Identification
Number for safety standard certification
and in case of a recall.
This begins with the letters DOT and
indicates that the tire meets all federal
standards. The next two numbers or
letters are the plant code designating
where it was manufactured, the next two
are the tire size code and the last four
numbers represent the week and year
the tire was built. For example, the
numbers 317 mean the 31st week of
1997. After 2000 the numbers go to four
digits. For example, 2501 means the
25th week of 2001. The numbers in
between are identification codes used
for traceability. This information is used
to contact customers if a tire defect
requires a recall.
Tire Replacement Requirements
Your vehicle is equipped with tires
designed to provide a safe ride and
handling capability.
WARNINGS
Only use replacement tires and
wheels that are the same size, load
index, speed rating and type (such as
P-metric versus LT-metric or all-season
versus all-terrain) as those originally
provided by Ford. The recommended
tire and wheel size may be found on
either the Safety Compliance
Certification Label (affixed to either the
door hinge pillar, door-latch post, or the
door edge that meets the door-latch
post, next to the driver's seating
position), or the Tire Label which is
located on the B-Pillar or edge of the
driver's door. If this information is not
found on these labels, then you should
contact your authorized dealer as soon
362
MKX (CD9) Canada/United States of America, enUSA, First Printing Wheels and Tires
Page 369 of 587
USING SNOW CHAINS
WARNING
Snow tires must be the same size, load
index, and speed rating as those
originally provided by Ford. Use of any tire
or wheel not recommended by Ford can
affect the safety and performance of your
vehicle, which could result in an increased
risk of loss of vehicle control, vehicle rollover,
personal injury, and death. Additionally, the
use of non-recommended tires and wheels
could cause steering, suspension, axle,
transfer case, or power transfer unit failure.
It is also strongly advised to follow the Ford
recommended tire inflation pressure found
on the Safety Compliance Certification Label
(affixed to either the door hinge pillar,
door-latch post, or the door edge that meets
the door-latch post, next to the driver’ s
seating position), or Tire Label which is
located on the B-Pillar or the edge of the
driver door. Failure to follow the tire pressure
recommendations can cause uneven
treadwear patterns and adversely affect the
way your vehicle handles. The tires on your vehicle may have
all-weather treads to provide traction in rain
and snow. However, in some climates you
may need to use snow chains.
Your vehicle may not be compatible with
snow chain or cable usage with the
factory-fitted wheels and tires. Only certain
chains or snow cables have been approved
by Ford as safe for use on your vehicle with
the following wheel and tire combination(s):
18x8.0 wheels with 235/60R18 tires. You
should only install chains or cables sized at
10 mm or less in dimension as measured on
the sidewall of your tire. Not all S-class snow
chains meet these restrictions. Chains of this
size restriction will include a tensioning
device. The chains should be mounted in
pairs on the front tires only. If you need to
use chains, it is recommended that steel
wheels (of the same size and specification)
be used, as chains may chip aluminum
wheels.
Follow these guidelines when using traction
devices:
•
If possible, avoid fully loading your
vehicle
• Purchase chains or cables from a
manufacturer that clearly labels body to
tire dimension restrictions.
• When driving with snow chains or cables,
do not exceed 30 mph (48 km/h) or the
maximum speed recommended by the
chain manufacturer; whichever is less.
• Drive cautiously. If you hear the chains
or cables rub or bang against the vehicle,
stop and retighten them. If this does not
work, remove the chains or cables and
prevent vehicle damage.
• Remove the chains or cables when they
are no longer needed. Do not use the
chains or cables on dry roads.
• If a temporary spare tire is mounted on
your vehicle, do not use snow chains on
the axle with the temporary spare tire.
If you have any questions regarding snow
tires or snow chains, please contact your
authorized dealer.
366
MKX (CD9) Canada/United States of America, enUSA, First Printing Wheels and Tires