headlamp LINCOLN MKX 2017 User Guide
[x] Cancel search | Manufacturer: LINCOLN, Model Year: 2017, Model line: MKX, Model: LINCOLN MKX 2017Pages: 587, PDF Size: 5.4 MB
Page 114 of 587
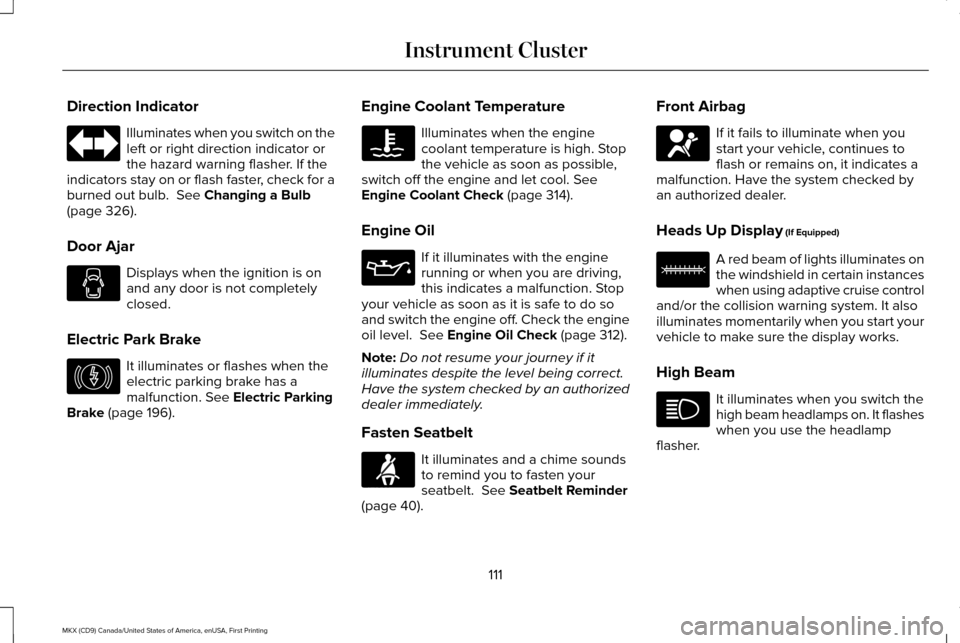
Direction Indicator
Illuminates when you switch on the
left or right direction indicator or
the hazard warning flasher. If the
indicators stay on or flash faster, check for a
burned out bulb. See Changing a Bulb
(page 326).
Door Ajar Displays when the ignition is on
and any door is not completely
closed.
Electric Park Brake It illuminates or flashes when the
electric parking brake has a
malfunction.
See Electric Parking
Brake (page 196). Engine Coolant Temperature Illuminates when the engine
coolant temperature is high. Stop
the vehicle as soon as possible,
switch off the engine and let cool.
See
Engine Coolant Check (page 314).
Engine Oil If it illuminates with the engine
running or when you are driving,
this indicates a malfunction. Stop
your vehicle as soon as it is safe to do so
and switch the engine off. Check the engine
oil level.
See Engine Oil Check (page 312).
Note: Do not resume your journey if it
illuminates despite the level being correct.
Have the system checked by an authorized
dealer immediately.
Fasten Seatbelt It illuminates and a chime sounds
to remind you to fasten your
seatbelt.
See Seatbelt Reminder
(page 40). Front Airbag If it fails to illuminate when you
start your vehicle, continues to
flash or remains on, it indicates a
malfunction. Have the system checked by
an authorized dealer.
Heads Up Display
(If Equipped) A red beam of lights illuminates on
the windshield in certain instances
when using adaptive cruise control
and/or the collision warning system. It also
illuminates momentarily when you start your
vehicle to make sure the display works.
High Beam It illuminates when you switch the
high beam headlamps on. It flashes
when you use the headlamp
flasher.
111
MKX (CD9) Canada/United States of America, enUSA, First Printing Instrument Cluster E146190 E71880 E67017 E156133
Page 115 of 587
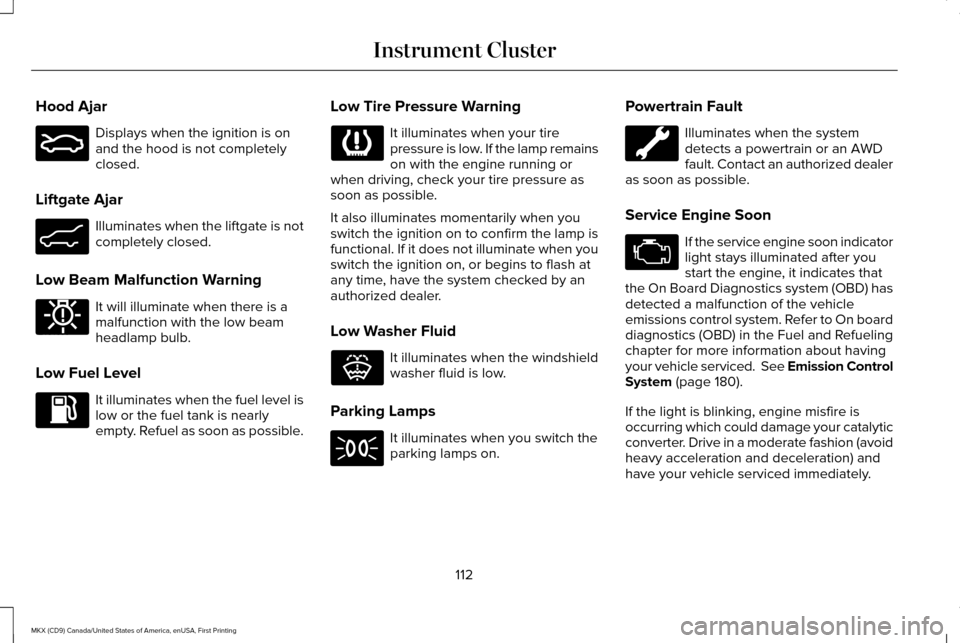
Hood Ajar
Displays when the ignition is on
and the hood is not completely
closed.
Liftgate Ajar Illuminates when the liftgate is not
completely closed.
Low Beam Malfunction Warning It will illuminate when there is a
malfunction with the low beam
headlamp bulb.
Low Fuel Level It illuminates when the fuel level is
low or the fuel tank is nearly
empty. Refuel as soon as possible. Low Tire Pressure Warning It illuminates when your tire
pressure is low. If the lamp remains
on with the engine running or
when driving, check your tire pressure as
soon as possible.
It also illuminates momentarily when you
switch the ignition on to confirm the lamp is
functional. If it does not illuminate when you
switch the ignition on, or begins to flash at
any time, have the system checked by an
authorized dealer.
Low Washer Fluid It illuminates when the windshield
washer fluid is low.
Parking Lamps It illuminates when you switch the
parking lamps on.Powertrain Fault Illuminates when the system
detects a powertrain or an AWD
fault. Contact an authorized dealer
as soon as possible.
Service Engine Soon If the service engine soon indicator
light stays illuminated after you
start the engine, it indicates that
the On Board Diagnostics system (OBD) has
detected a malfunction of the vehicle
emissions control system. Refer to On board
diagnostics (OBD) in the Fuel and Refueling
chapter for more information about having
your vehicle serviced. See Emission Control
System (page 180).
If the light is blinking, engine misfire is
occurring which could damage your catalytic
converter. Drive in a moderate fashion (avoid
heavy acceleration and deceleration) and
have your vehicle serviced immediately.
112
MKX (CD9) Canada/United States of America, enUSA, First Printing Instrument ClusterE159324 E162453 E181350 E132353
Page 116 of 587
WARNING
Under engine misfire conditions,
excessive exhaust temperatures could
damage the catalytic converter, the fuel
system, interior floor coverings or other
vehicle components, possibly causing a fire.
Have your vehicle serviced immediately. The service engine soon indicator light
illuminates when you first switch the ignition
on before engine start to check the bulb and
to indicate whether the vehicle is ready for
Inspection/Maintenance (I/M) testing.
Normally, the service engine soon light stays
on until you crank the engine, then turns
itself off if no malfunctions are present.
However, if after 15 seconds the service
engine soon light blinks eight times, it means
that the vehicle is not ready for I/M testing.
See Emission Control System (page 180).
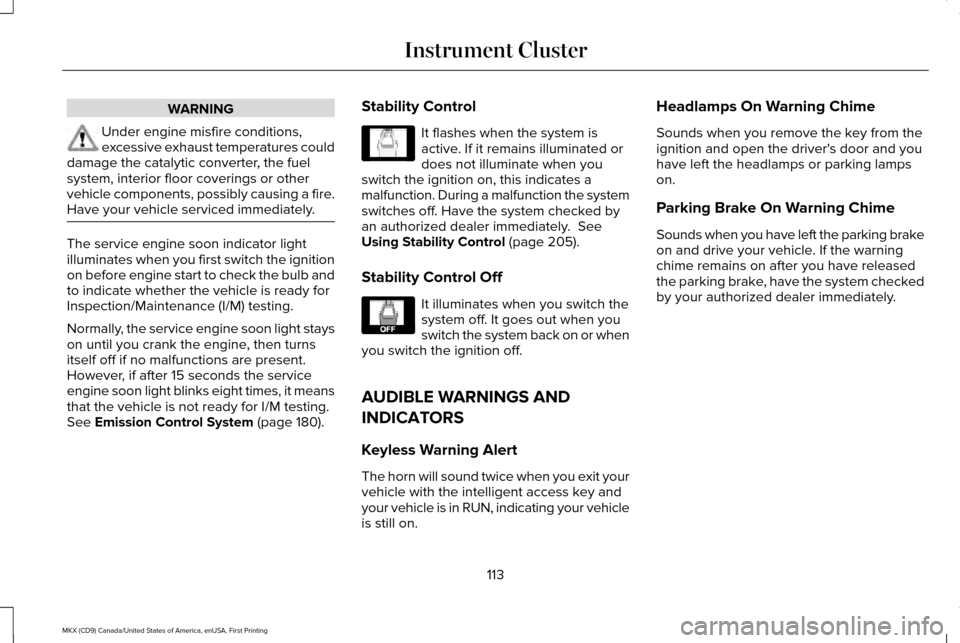
Stability Control It flashes when the system is
active. If it remains illuminated or
does not illuminate when you
switch the ignition on, this indicates a
malfunction. During a malfunction the system
switches off. Have the system checked by
an authorized dealer immediately.
See
Using Stability Control (page 205).
Stability Control Off It illuminates when you switch the
system off. It goes out when you
switch the system back on or when
you switch the ignition off.
AUDIBLE WARNINGS AND
INDICATORS
Keyless Warning Alert
The horn will sound twice when you exit your
vehicle with the intelligent access key and
your vehicle is in RUN, indicating your vehicle
is still on. Headlamps On Warning Chime
Sounds when you remove the key from the
ignition and open the driver's door and you
have left the headlamps or parking lamps
on.
Parking Brake On Warning Chime
Sounds when you have left the parking brake
on and drive your vehicle. If the warning
chime remains on after you have released
the parking brake, have the system checked
by your authorized dealer immediately.
113
MKX (CD9) Canada/United States of America, enUSA, First Printing Instrument ClusterE138639 E130458
Page 121 of 587
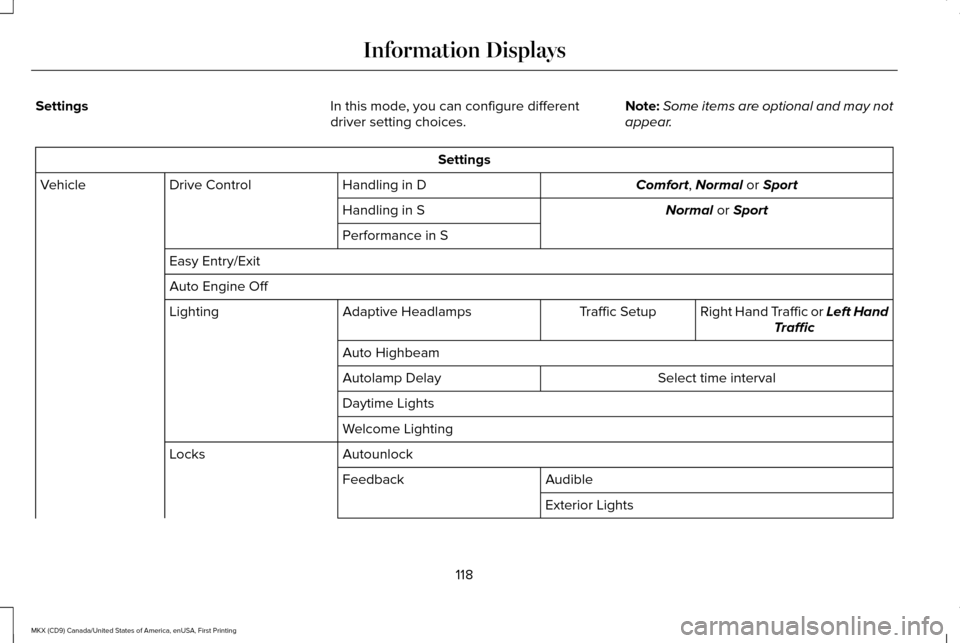
Settings
In this mode, you can configure different
driver setting choices.Note:
Some items are optional and may not
appear. Settings
Comfort, Normal or Sport
Handling in D
Drive Control
Vehicle
Normal
or Sport
Handling in S
Performance in S
Easy Entry/Exit
Auto Engine Off Right Hand Traffic or
Left Hand
Traffic
Traffic Setup
Adaptive Headlamps
Lighting
Auto Highbeam Select time interval
Autolamp Delay
Daytime Lights
Welcome Lighting
Autounlock
Locks
Audible
Feedback
Exterior Lights
118
MKX (CD9) Canada/United States of America, enUSA, First Printing Information Displays
Page 171 of 587
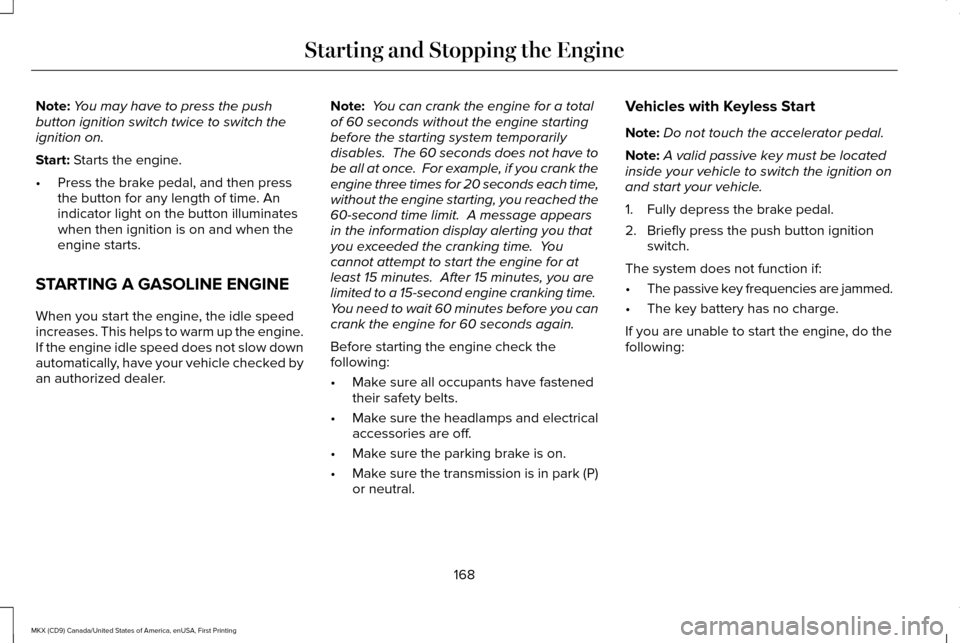
Note:
You may have to press the push
button ignition switch twice to switch the
ignition on.
Start: Starts the engine.
• Press the brake pedal, and then press
the button for any length of time. An
indicator light on the button illuminates
when then ignition is on and when the
engine starts.
STARTING A GASOLINE ENGINE
When you start the engine, the idle speed
increases. This helps to warm up the engine.
If the engine idle speed does not slow down
automatically, have your vehicle checked by
an authorized dealer. Note:
You can crank the engine for a total
of 60 seconds without the engine starting
before the starting system temporarily
disables. The 60 seconds does not have to
be all at once. For example, if you crank the
engine three times for 20 seconds each time,
without the engine starting, you reached the
60-second time limit. A message appears
in the information display alerting you that
you exceeded the cranking time. You
cannot attempt to start the engine for at
least 15 minutes. After 15 minutes, you are
limited to a 15-second engine cranking time.
You need to wait 60 minutes before you can
crank the engine for 60 seconds again.
Before starting the engine check the
following:
• Make sure all occupants have fastened
their safety belts.
• Make sure the headlamps and electrical
accessories are off.
• Make sure the parking brake is on.
• Make sure the transmission is in park (P)
or neutral. Vehicles with Keyless Start
Note:
Do not touch the accelerator pedal.
Note: A valid passive key must be located
inside your vehicle to switch the ignition on
and start your vehicle.
1. Fully depress the brake pedal.
2. Briefly press the push button ignition switch.
The system does not function if:
• The passive key frequencies are jammed.
• The key battery has no charge.
If you are unable to start the engine, do the
following:
168
MKX (CD9) Canada/United States of America, enUSA, First Printing Starting and Stopping the Engine
Page 240 of 587
•
Low
• Normal
• High
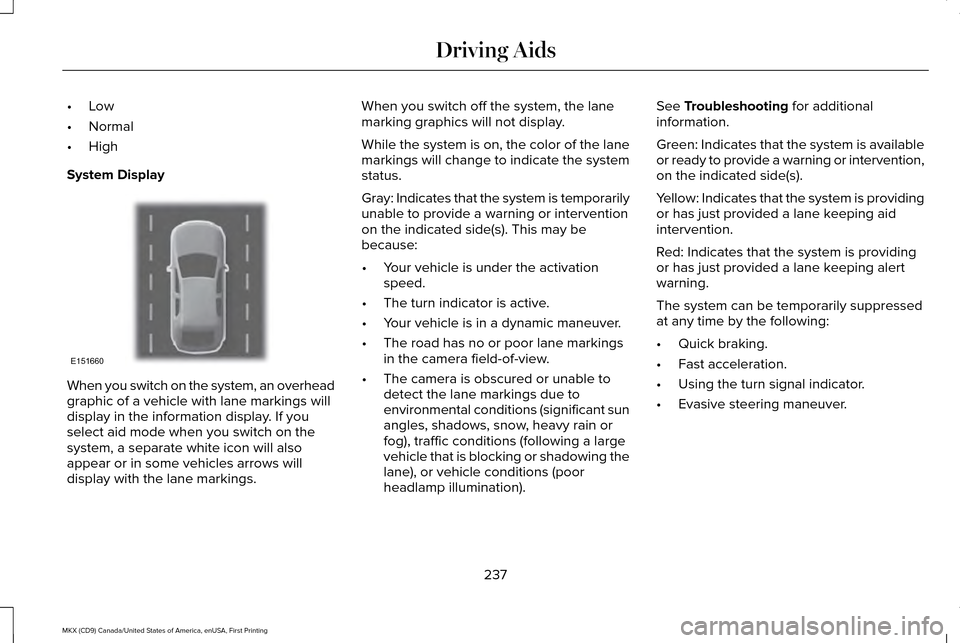
System Display When you switch on the system, an overhead
graphic of a vehicle with lane markings will
display in the information display. If you
select aid mode when you switch on the
system, a separate white icon will also
appear or in some vehicles arrows will
display with the lane markings. When you switch off the system, the lane
marking graphics will not display.
While the system is on, the color of the lane
markings will change to indicate the system
status.
Gray: Indicates that the system is temporarily
unable to provide a warning or intervention
on the indicated side(s). This may be
because:
•
Your vehicle is under the activation
speed.
• The turn indicator is active.
• Your vehicle is in a dynamic maneuver.
• The road has no or poor lane markings
in the camera field-of-view.
• The camera is obscured or unable to
detect the lane markings due to
environmental conditions (significant sun
angles, shadows, snow, heavy rain or
fog), traffic conditions (following a large
vehicle that is blocking or shadowing the
lane), or vehicle conditions (poor
headlamp illumination). See Troubleshooting for additional
information.
Green: Indicates that the system is available
or ready to provide a warning or intervention,
on the indicated side(s).
Yellow: Indicates that the system is providing
or has just provided a lane keeping aid
intervention.
Red: Indicates that the system is providing
or has just provided a lane keeping alert
warning.
The system can be temporarily suppressed
at any time by the following:
• Quick braking.
• Fast acceleration.
• Using the turn signal indicator.
• Evasive steering maneuver.
237
MKX (CD9) Canada/United States of America, enUSA, First Printing Driving AidsE151660
Page 292 of 587
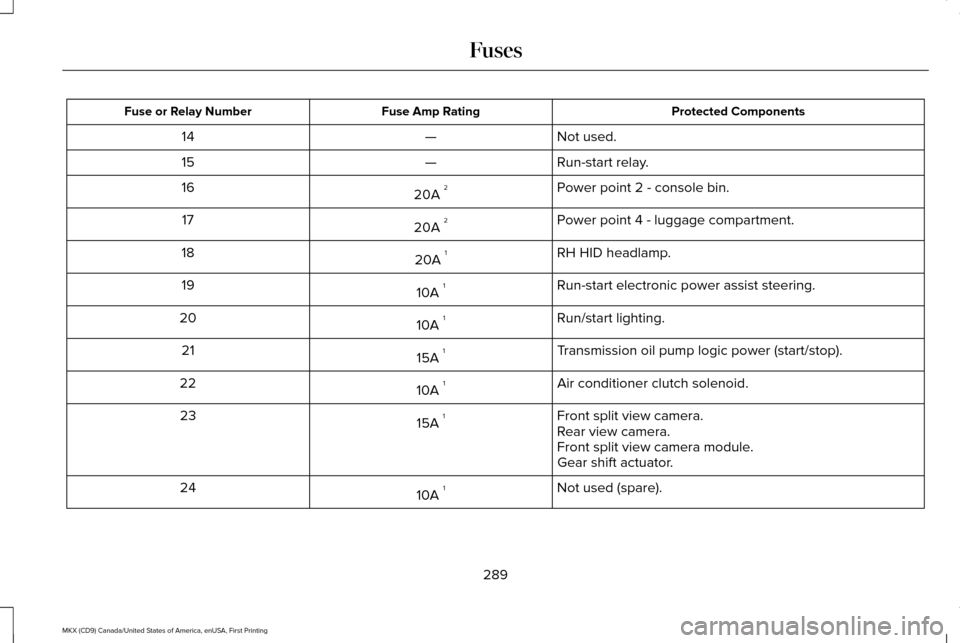
Protected Components
Fuse Amp Rating
Fuse or Relay Number
Not used.
—
14
Run-start relay.
—
15
Power point 2 - console bin.
20A 2
16
Power point 4 - luggage compartment.
20A 2
17
RH HID headlamp.
20A 1
18
Run-start electronic power assist steering.
10A 1
19
Run/start lighting.
10A 1
20
Transmission oil pump logic power (start/stop).
15A 1
21
Air conditioner clutch solenoid.
10A 1
22
Front split view camera.
15A 1
23
Rear view camera.
Front split view camera module.
Gear shift actuator.
Not used (spare).
10A 1
24
289
MKX (CD9) Canada/United States of America, enUSA, First Printing Fuses
Page 294 of 587
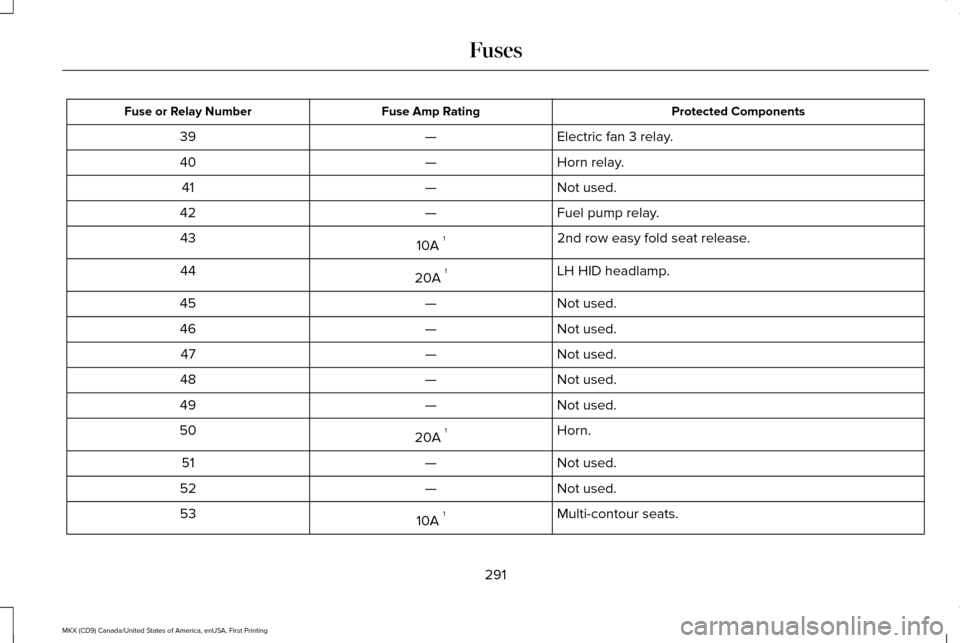
Protected Components
Fuse Amp Rating
Fuse or Relay Number
Electric fan 3 relay.
—
39
Horn relay.
—
40
Not used.
—
41
Fuel pump relay.
—
42
2nd row easy fold seat release.
10A 1
43
LH HID headlamp.
20A 1
44
Not used.
—
45
Not used.
—
46
Not used.
—
47
Not used.
—
48
Not used.
—
49
Horn.
20A 1
50
Not used.
—
51
Not used.
—
52
Multi-contour seats.
10A 1
53
291
MKX (CD9) Canada/United States of America, enUSA, First Printing Fuses
Page 298 of 587
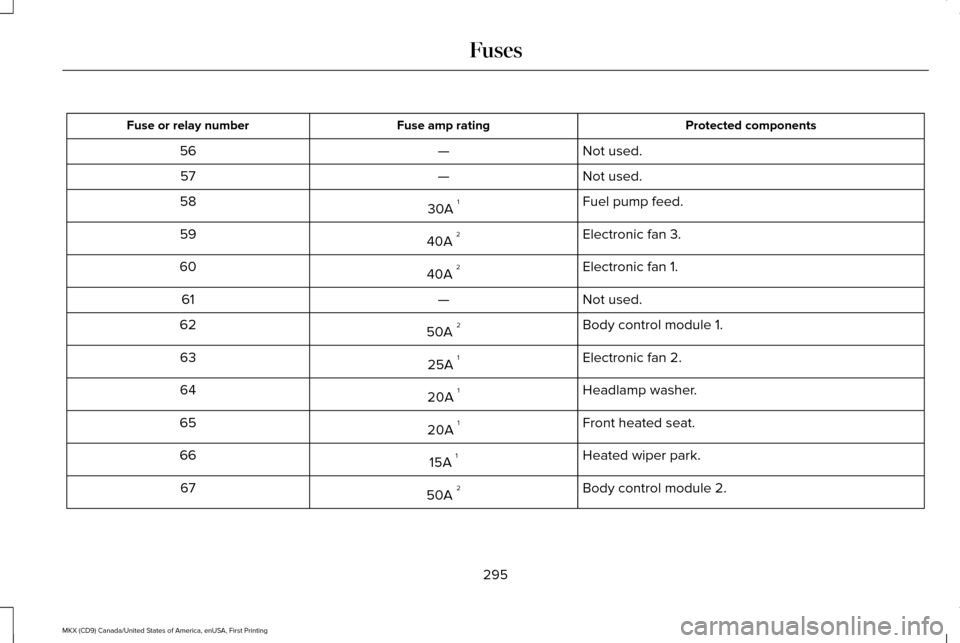
Protected components
Fuse amp rating
Fuse or relay number
Not used.
—
56
Not used.
—
57
Fuel pump feed.
30A 1
58
Electronic fan 3.
40A 2
59
Electronic fan 1.
40A 2
60
Not used.
—
61
Body control module 1.
50A 2
62
Electronic fan 2.
25A 1
63
Headlamp washer.
20A 1
64
Front heated seat.
20A 1
65
Heated wiper park.
15A 1
66
Body control module 2.
50A 2
67
295
MKX (CD9) Canada/United States of America, enUSA, First Printing Fuses
Page 328 of 587
2. Remove the wiper blade.
3. Install in the reverse order.
Note:
Make sure that the wiper blade locks
into place.
Note: Make sure the rear window is clean
before using a new wiper blade. See
Vehicle Care (page 331). ADJUSTING THE HEADLAMPS
Vertical Aim Adjustment
The headlamps on your vehicle are properly
aimed at the assembly plant. If your vehicle
has been involved in a crash, have the aim
of the headlamp beam checked by an
authorized dealer.
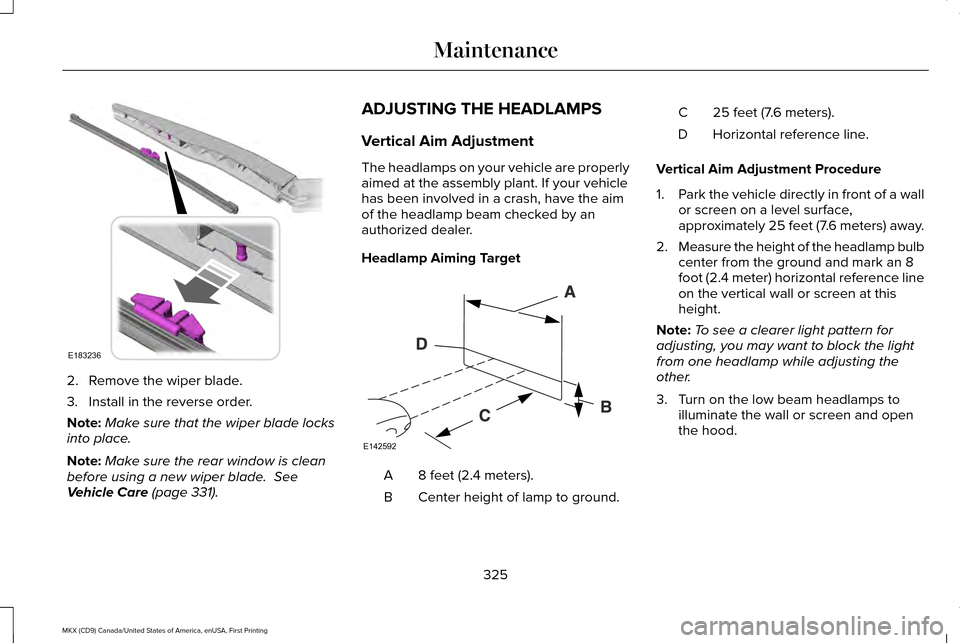
Headlamp Aiming Target
8 feet (2.4 meters).
A
Center height of lamp to ground.
B 25 feet (7.6 meters).
C
Horizontal reference line.
D
Vertical Aim Adjustment Procedure
1. Park the vehicle directly in front of a wall
or screen on a level surface,
approximately 25 feet (7.6 meters) away.
2. Measure the height of the headlamp bulb
center from the ground and mark an 8
foot (2.4 meter) horizontal reference line
on the vertical wall or screen at this
height.
Note: To see a clearer light pattern for
adjusting, you may want to block the light
from one headlamp while adjusting the
other.
3. Turn on the low beam headlamps to illuminate the wall or screen and open
the hood.
325
MKX (CD9) Canada/United States of America, enUSA, First Printing MaintenanceE183236 E142592