Outside Temp LINCOLN MKZ 2016 Owners Manual
[x] Cancel search | Manufacturer: LINCOLN, Model Year: 2016, Model line: MKZ, Model: LINCOLN MKZ 2016Pages: 544, PDF Size: 5.77 MB
Page 139 of 544
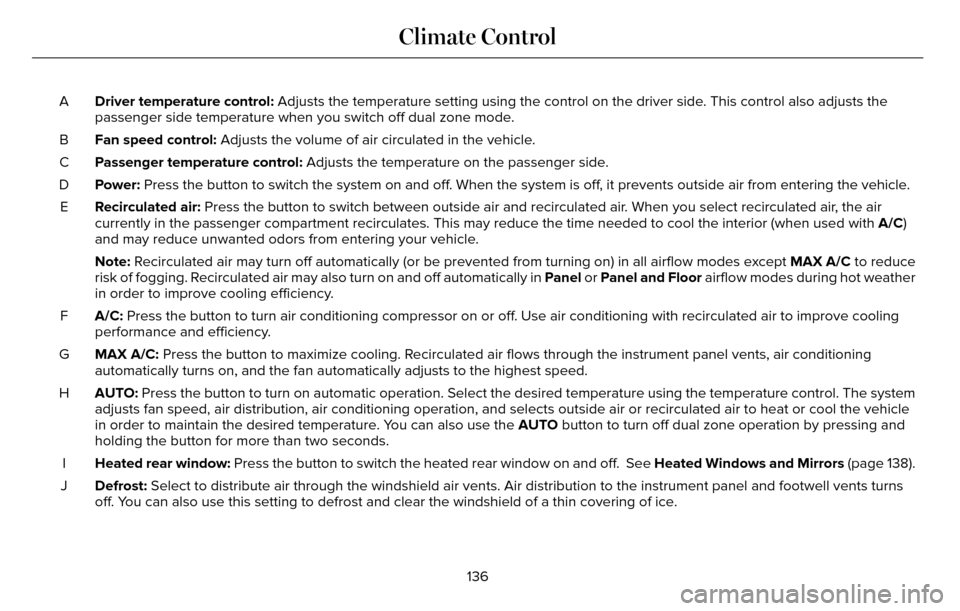
Driver temperature control: Adjusts the temperature setting using the control on the driver side. This control also adjusts the
passenger side temperature when you switch off dual zone mode.
A
Fan speed control: Adjusts the volume of air circulated in the vehicle.
B
Passenger temperature control: Adjusts the temperature on the passenger side.
C
Power: Press the button to switch the system on and off. When the system is off, it prevents outside air from entering the vehicle.
D
Recirculated air: Press the button to switch between outside air and recirculated air. When you select recirculated air, the air
currently in the passenger compartment recirculates. This may reduce the\
time needed to cool the interior (when used with A/C)
and may reduce unwanted odors from entering your vehicle.
E
Note: Recirculated air may turn off automatically (or be prevented from turnin\
g on) in all airflow modes except MAX A/C to reduce
risk of fogging. Recirculated air may also turn on and off automatically in Panel or Panel and Floor airflow modes during hot weather
in order to improve cooling efficiency.
A/C: Press the button to turn air conditioning compressor on or off. Use air conditioning with recirculated air to improve cooling
performance and efficiency.
F
MAX A/C: Press the button to maximize cooling. Recirculated air flows through the instrument panel vents, air conditioni\
ng
automatically turns on, and the fan automatically adjusts to the highest\
speed.
G
AUTO: Press the button to turn on automatic operation. Select the desired tem\
perature using the temperature control. The system
adjusts fan speed, air distribution, air conditioning operation, and sel\
ects outside air or recirculated air to heat or cool the vehicle
in order to maintain the desired temperature. You can also use the AUTO button to turn off dual zone operation by pressing and
holding the button for more than two seconds.
H
Heated rear window: Press the button to switch the heated rear window on and off. See Heated Windows and Mirrors (page 138).
I
Defrost: Select to distribute air through the windshield air vents. Air distribu\
tion to the instrument panel and footwell vents turns
off. You can also use this setting to defrost and clear the windshield of a th\
in covering of ice.
J
136
Climate Control
Page 140 of 544
HINTS ON CONTROLLING THE
INTERIOR CLIMATE
General Hints
Note:Prolonged use of recirculated air may
cause the windows to fog up.
Note: You may feel a small amount of air
from the footwell air vents regardless of the
air distribution setting.
Note: To reduce humidity build-up inside
your vehicle, do not drive with the system
switched off or with recirculated air always
switched on.
Note: Do not place objects under the front
seats as this may interfere with the airflow
to the rear seats.
Note: Remove any snow, ice or leaves from
the air intake area at the base of the
windshield.
Note: To improve the time to reach a
comfortable temperature in hot weather,
drive with the windows open until you feel
cold air through the air vents. Automatic Climate Control
Note:
Adjusting the settings when your
vehicle interior is extremely hot or cold is not
necessary. The system automatically adjusts
to heat or cool the cabin to your selected
temperature as quickly as possible. For the
system to function efficiently, the instrument
panel and side air vents should be fully
open.
Note: If you select AUTO during cold outside
temperatures, the system directs airflow to
the windshield and side window vents. In
addition, the fan may run at a slower speed
until the engine warms up.
Note: If you select AUTO during hot outside
temperatures, or when the inside of the
vehicle is hot, the system automatically uses
recirculated air to maximize interior cooling.
When the interior reaches the selected
temperature, the system automatically
switches to using outside air.
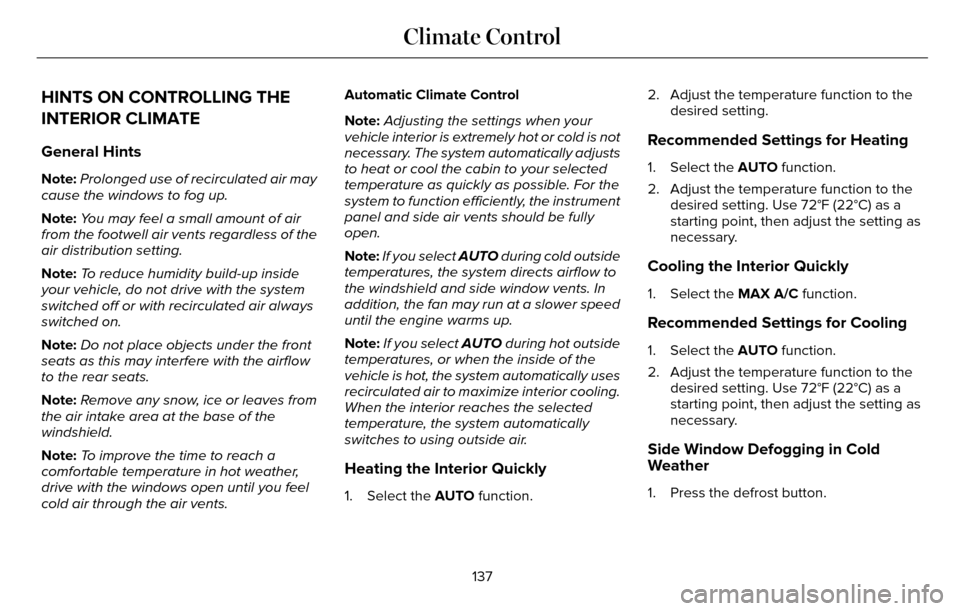
Heating the Interior Quickly
1. Select the AUTO function. 2. Adjust the temperature function to the
desired setting.
Recommended Settings for Heating
1. Select the AUTO function.
2. Adjust the temperature function to thedesired setting. Use 72°F (22°C) as a
starting point, then adjust the setting as
necessary.
Cooling the Interior Quickly
1. Select the MAX A/C function.
Recommended Settings for Cooling
1. Select the AUTO function.
2. Adjust the temperature function to thedesired setting. Use 72°F (22°C) as a
starting point, then adjust the setting as
necessary.
Side Window Defogging in Cold
Weather
1. Press the defrost button.
137
Climate Control
Page 167 of 544
• You can reset the timer by interactingwith your vehicle (such as pressing the
brake pedal or accelerator pedal).
• You can temporarily switch off the shutdown feature any time the ignition is
on (for the current ignition cycle only).
Use the information display to do so. See
Information Displays (page 109).
• During the countdown before engine shutdown, you are prompted to press OK
or RESET (depending on your type of
information display) to temporarily switch
the feature off (for the current ignition
cycle only).
Stopping the Engine When Your
Vehicle is Stationary
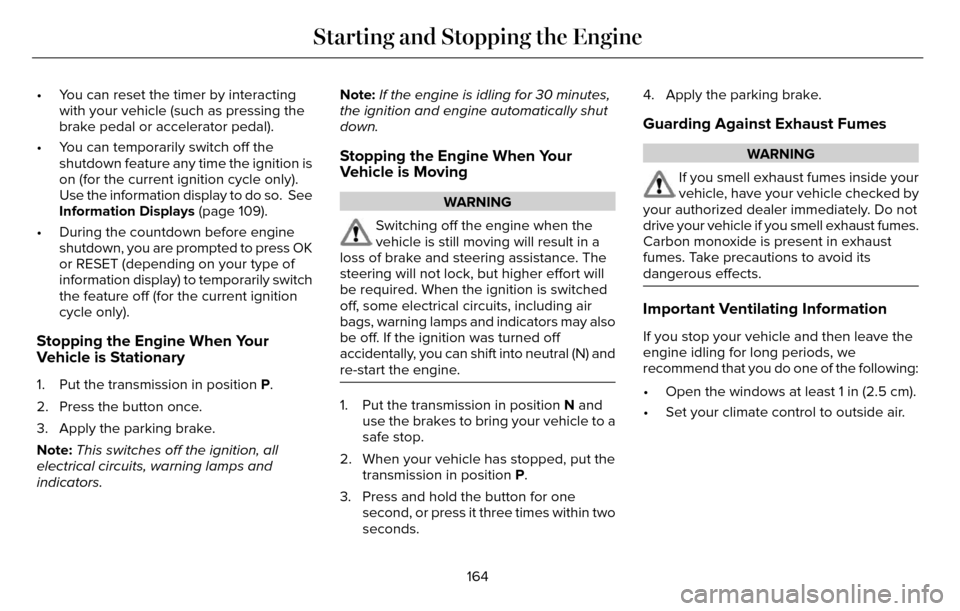
1. Put the transmission in position P.
2. Press the button once.
3. Apply the parking brake.
Note: This switches off the ignition, all
electrical circuits, warning lamps and
indicators. Note:
If the engine is idling for 30 minutes,
the ignition and engine automatically shut
down.
Stopping the Engine When Your
Vehicle is Moving
WARNING
Switching off the engine when the
vehicle is still moving will result in a
loss of brake and steering assistance. The
steering will not lock, but higher effort will
be required. When the ignition is switched
off, some electrical circuits, including air
bags, warning lamps and indicators may also
be off. If the ignition was turned off
accidentally, you can shift into neutral (N) and
re-start the engine.
1. Put the transmission in position N and use the brakes to bring your vehicle to a
safe stop.
2. When your vehicle has stopped, put the transmission in position P.
3. Press and hold the button for one second, or press it three times within two
seconds. 4. Apply the parking brake.
Guarding Against Exhaust Fumes
WARNING
If you smell exhaust fumes inside your
vehicle, have your vehicle checked by
your authorized dealer immediately. Do not
drive your vehicle if you smell exhaust fumes.
Carbon monoxide is present in exhaust
fumes. Take precautions to avoid its
dangerous effects.
Important Ventilating Information
If you stop your vehicle and then leave the
engine idling for long periods, we
recommend that you do one of the following:
• Open the windows at least 1 in (2.5 cm).
• Set your climate control to outside air.
164
Starting and Stopping the Engine
Page 221 of 544
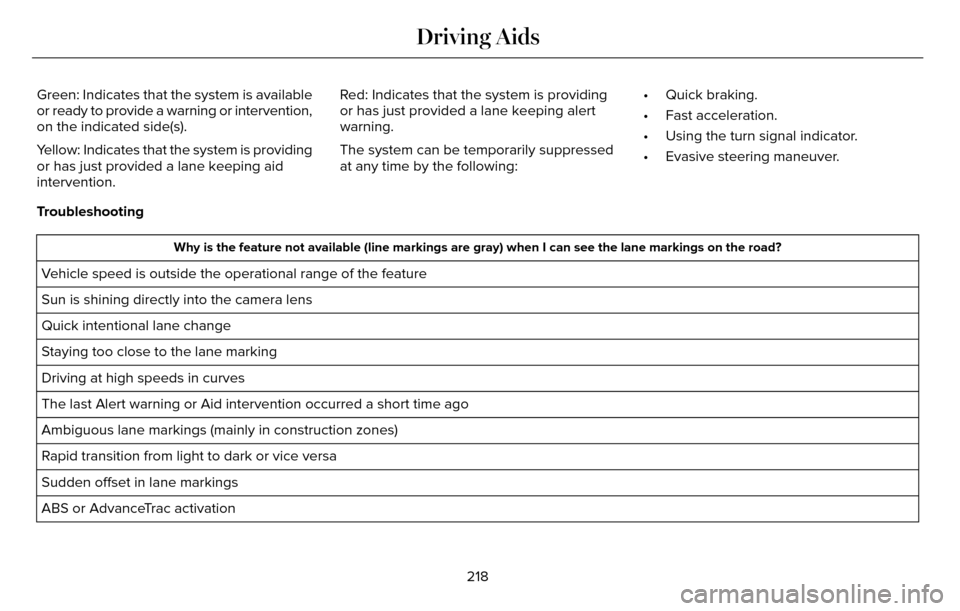
Green: Indicates that the system is available
or ready to provide a warning or intervention,
on the indicated side(s).
Yellow: Indicates that the system is providing
or has just provided a lane keeping aid
intervention.Red: Indicates that the system is providing
or has just provided a lane keeping alert
warning.
The system can be temporarily suppressed
at any time by the following:
• Quick braking.
• Fast acceleration.
• Using the turn signal indicator.
• Evasive steering maneuver.
Troubleshooting
Why is the feature not available (line markings are gray) when I can s\
ee the lane markings on the road?
Vehicle speed is outside the operational range of the feature
Sun is shining directly into the camera lens
Quick intentional lane change
Staying too close to the lane marking
Driving at high speeds in curves
The last Alert warning or Aid intervention occurred a short time ago
Ambiguous lane markings (mainly in construction zones)
Rapid transition from light to dark or vice versa
Sudden offset in lane markings
ABS or AdvanceTrac activation
218
Driving Aids
Page 228 of 544
There may be certain instances when either
the BLIS or cross traffic alert systems
illuminate the alert indicator with no vehicle
in the coverage zone; this is known as a false
alert. Some amount of false alerts are normal;
they are temporary and self-correct.
System Errors
If either system senses a problem with the
left or right sensor, the BLIS telltale will
illuminate and a message will appear in the
information display.
All other system faults will only be displayed
by a message in the information display.
Switching the Systems Off and On
One or both systems can be switched off
temporarily by using the information display
control. See (page 109). When the BLIS is
switched off, you will not receive alerts and
a telltale illuminates in the information
display. The yellow alert indicator in the
outside mirror will also flash twice.Note:
The CTA system always switches on
whenever the ignition is switched on.
However, the BLIS system will remember the
last selected on or off setting.
One or both systems cannot be switched off
when MyKey is used. See Principle of
Operation (page 60).
One or both systems can also be switched
off permanently at your authorized dealer.
Once switched off, switching it back on must
also be done at your authorized dealer.STEERING
Electric Power Steering
WARNING
The electric power steering system has
diagnostic checks that continuously
monitor the system. If a fault is detected, a
message displays in the information display.
Stop your vehicle as soon as it is safe to do
so. Switch the ignition off. After at least 10
seconds, switch the ignition on and watch
the information display for a steering system
warning message. If a steering system
warning message returns, have the system
checked by an authorized dealer.
Your vehicle has an electric power steering
system. There is no fluid reservoir. No
maintenance is required.
If your vehicle loses electrical power while
you are driving, electric power steering
assistance is lost. The steering system still
operates and you can steer your vehicle
manually. Manually steering your vehicle
requires more effort.
225
Driving Aids
Page 294 of 544
If you drive in extremely hot climates:
• It may be necessary to have anauthorized dealer decrease the coolant
concentration to 40%.
• A coolant concentration of 40% provides improved overheat protection. Engine
coolant concentrations below 40%
decrease the freeze and corrosion
protection characteristics of the engine
coolant and may cause engine damage.
Vehicles driven year-round in non-extreme
climates should use prediluted engine
coolant for optimum cooling system and
engine protection.
What You Should Know About Fail-Safe
Cooling
If the engine coolant supply is depleted, this
feature allows the vehicle to be driven
temporarily before incremental component
damage is incurred. The fail-safe distance
depends on outside temperatures, vehicle
load and terrain. How Fail-Safe Cooling Works
If the engine begins to overheat, the engine
coolant temperature gauge moves to the red
(hot) area and:
A high engine temperature
message appears in the
information display.
The service engine soon indicator
appears in the information display.
If the engine reaches a preset
over-temperature condition, the engine
automatically switches to alternating cylinder
operation. Each disabled cylinder acts as an
air pump and cools the engine.
If this occurs, your vehicle still operates.
However:
• The engine power becomes limited.
• The air conditioning system becomes disabled.
Continued operation increases the engine
temperature and the engine completely
shuts down, causing steering and braking
effort to increase. Once the engine temperature cools, the
engine can be re-started. Take your vehicle
to an authorized dealer as soon as possible
to minimize engine damage.
When Fail-Safe Mode Is Activated
WARNINGS
Fail-safe mode is for use during
emergencies only. Operate your
vehicle in fail-safe mode only as long as
necessary to bring your vehicle to rest in a
safe location and seek immediate repairs.
When in fail-safe mode, your vehicle will have
limited power, will not be able to maintain
high-speed operation, and may completely
shut down without warning, potentially losing
engine power, power steering assist, and
power brake assist, which may increase the
possibility of a crash resulting in serious
injury.
Never remove the coolant reservoir
cap while the engine is running or hot.
291
Maintenance
Page 299 of 544
Do not use supplemental transmission fluid
additives, treatments or cleaning agents. The
use of these materials may affect
transmission operation and result in damage
to internal transmission components.
Reinstall the air filter assembly. After the fluid
level has been checked and adjusted as
necessary, do the following:
1. Shut the engine off.
2. Loosen the clamp holding the air filterassembly to the rubber hose.
3. Rotate the air filter assembly 90 degrees clockwise without disconnecting the
sensor.
4. Seat the air filter assembly back into the grommets by pushing down on the air
filter assembly.
5. Tighten the clamp.
6. Install and tighten two bolts that attach air filter assembly to the front of the
vehicle.
7. Install the bolt cover (if equipped).
8. Reinstall the harness retaining clip into the front of the air filter assembly.BRAKE FLUID CHECK
Fluid levels between the MIN and MAX lines
are within the normal operating range; there
is no need to add fluid. If the fluid levels are
outside of the normal operating range, the
performance of the system could be
compromised; seek service from your
authorized dealer immediately.
WASHER FLUID CHECK
WARNING
If you operate your vehicle in
temperatures below 40°F (5°C), use
washer fluid with antifreeze protection.
Failure to use washer fluid with antifreeze
protection in cold weather could result in
impaired windshield vision and increase the
risk of injury or accident.
Note: The front and rear washer systems
are supplied from the same reservoir. Add fluid to fill the reservoir if the level is low.
Only use a washer fluid that meets Ford
specifications. See Capacities and
Specifications (page 353).
State or local regulations on volatile organic
compounds may restrict the use of methanol,
a common windshield washer antifreeze
additive. Washer fluids containing
non-methanol antifreeze agents should be
used only if they provide cold weather
protection without damaging the vehicle’s
paint finish, wiper blades or washer system.
FUEL FILTER
Your vehicle is equipped with a lifetime fuel
filter that is integrated with the fuel tank.
Regular maintenance or replacement is not
needed.
296
Maintenance
Page 315 of 544
• Clean the wheels weekly usingMotorcraft Wheel and Tire Cleaner. Apply
using manufacturer's instructions.
• Use a sponge to remove heavy deposits of dirt and brake dust accumulation.
• Rinse thoroughly with a strong stream of water when you have completed the
cleaning process.
• To remove tar and grease, use Motorcraft Bug and Tar Remover.
VEHICLE STORAGE
If you plan on storing your vehicle for 30
days or more, read the following
maintenance recommendations to make sure
your vehicle stays in good operating
condition.
We engineer and test all motor vehicles and
their components for reliable, regular driving.
Under various conditions, long-term storage
may lead to degraded engine performance
or failure unless you use specific precautions
to preserve engine components.
General
• Store all vehicles in a dry, ventilatedplace.
• Protect from sunlight, if possible.
• If vehicles are stored outside, they require regular maintenance to protect
against rust and damage.
Body
• Wash your vehicle thoroughly to removedirt, grease, oil, tar or mud from exterior
surfaces, rear-wheel housing and the
underside of front fenders.
• Periodically wash your vehicle if it is stored in exposed locations.
• Touch-up exposed or primed metal to prevent rust.
• Cover chrome and stainless steel parts with a thick coat of auto wax to prevent
discoloration. Re-wax as necessary when
you wash your vehicle.
• Lubricate all hood, door and luggage compartment hinges and latches with a
light grade oil. • Cover interior trim to prevent fading.
• Keep all rubber parts free from oil and
solvents.
Engine
• Change the engine oil and filter prior tostorage because used engine oil contains
contaminates which may cause engine
damage.
• Start the engine every 15 days for a minimum of 15 minutes. Run at fast idle
with the climate controls set to defrost
until the engine reaches normal
operating temperature.
• With your foot on the brake, shift through all the gears while the engine is running.
• We recommend that you change the engine oil before you use your vehicle
again.
Fuel system
• Fill the fuel tank with high-quality fueluntil the first automatic shutoff of the fuel
pump nozzle.
312
Vehicle Care
Page 349 of 544
When Inflating Your Tires
When putting air into your tires (such as at a
gas station or in your garage), the tire
pressure monitoring system may not respond
immediately to the air added to your tires.
It may take up to two minutes of driving over
20 mph (32 km/h) for the light to turn off after
you have filled your tires to the
recommended inflation pressure
How Temperature Affects Your Tire
Pressure
The tire pressure monitoring system monitors
tire pressure in each pneumatic tire. While
driving in a normal manner, a typical
passenger tire inflation pressure may
increase about 2 to 4 psi (14 to 28 kPa) from
a cold start situation. If the vehicle is
stationary overnight with the outside
temperature significantly lower than the
daytime temperature, the tire pressure may
decrease about 3 psi (21 kPa) for a drop of
30°F (17°C) in ambient temperature. This
lower pressure value may be detected by
the tire pressure monitoring system as being
significantly lower than the recommendedinflation pressure and activate the system
warning light for low tire pressure. If the low
tire pressure warning light is on, visually
check each tire to verify that no tire is flat. If
one or more tires are flat, repair as
necessary. Check the air pressure in the road
tires. If any tire is under-inflated, carefully
drive the vehicle to the nearest location
where air can be added to the tires. Inflate
all the tires to the recommended inflation
pressure.
CHANGING A ROAD WHEEL
WARNINGS
The use of tire sealant may damage
your tire pressure monitoring system
and should only be used in roadside
emergencies. If you must use a sealant, the
Ford Tire Mobility Kit sealant should be used.
The tire pressure monitoring system sensor
and valve stem on the wheel must be
replaced by an authorized dealer after use
of the sealant.
WARNINGS
If the tire pressure monitor sensor
becomes damaged, it will no longer
function. See Tire Pressure Monitoring
System (page 342).
Note: The tire pressure monitoring system
indicator light will illuminate when the spare
tire is in use. To restore the full function of
the monitoring system, all road wheels
equipped with tire pressure monitoring
sensors must be mounted on the vehicle.
If you get a flat tire while driving, do not apply
the brake heavily. Instead, gradually
decrease your speed. Hold the steering
wheel firmly and slowly move to a safe place
on the side of the road.
Have a flat serviced by an authorized dealer
in order to prevent damage to the tire
pressure monitoring system sensors. See
Tire Pressure Monitoring System (page 342).
Replace the spare tire with a road tire as
soon as possible. During repairing or
replacing of the flat tire, have an authorized
dealer inspect the tire pressure monitoring
system sensor for damage.
346
Wheels and Tires
Page 388 of 544
To make adjustments using the touchscreen, select:
Action and Description
Menu Item
Press the settings icon.
Settings
Press the + or - to adjust the time.
Clock
From this screen, you can also make other adjustments such as 12-hour or\
24-hour mode, activate
GPS time synchronization and have the system automatically update new ti\
me zones.
You can also switch the outside air temperature display off and on. It ap\
pears at the top center
of the touchscreen, next to the time and date.
Note: You cannot manually set the date. Your vehicle’s GPS does this for you.
Note: If the battery has been disconnected, your vehicle needs to acquire a GP\
S signal to update the clock. Once your vehicle acquires the
signal, it may take a few minutes for the update to display the correct \
time.
Display
E142607
You can adjust the display using
the touchscreen or the voice
button on the steering wheel
controls.
385
MyLincoln Touch™