glove box LINCOLN MKZ 2016 Owners Manual
[x] Cancel search | Manufacturer: LINCOLN, Model Year: 2016, Model line: MKZ, Model: LINCOLN MKZ 2016Pages: 544, PDF Size: 5.77 MB
Page 76 of 544

Note:If you enter your entry code too fast
on the keypad, the unlock function may not
work. Re-enter your entry code more slowly.
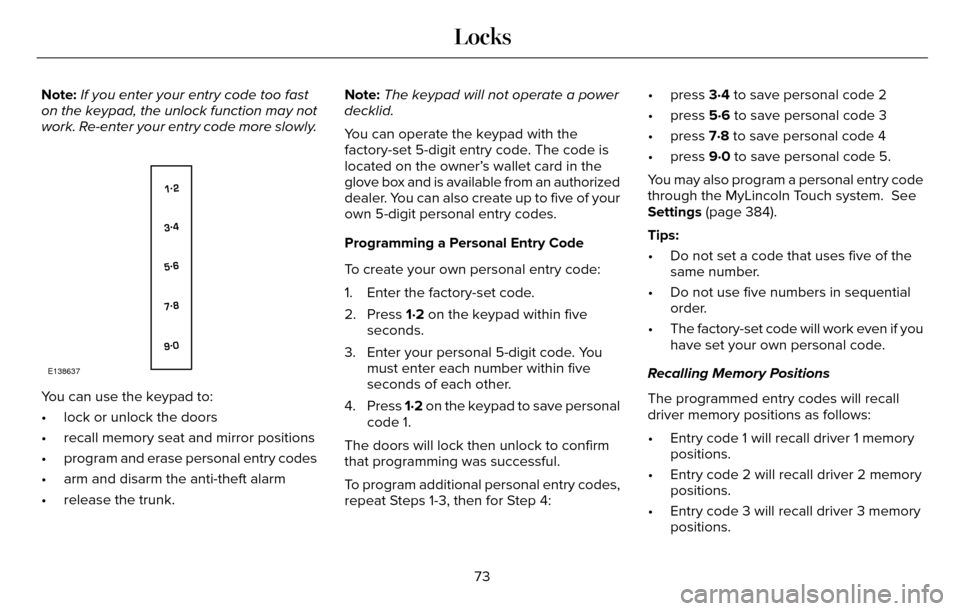
E138637
You can use the keypad to:
• lock or unlock the doors
• recall memory seat and mirror positions
• program and erase personal entry codes
• arm and disarm the anti-theft alarm
• release the trunk. Note:
The keypad will not operate a power
decklid.
You can operate the keypad with the
factory-set 5-digit entry code. The code is
located on the owner’s wallet card in the
glove box and is available from an authorized
dealer. You can also create up to five of your
own 5-digit personal entry codes.
Programming a Personal Entry Code
To create your own personal entry code:
1. Enter the factory-set code.
2. Press 1·2 on the keypad within five seconds.
3. Enter your personal 5-digit code. You must enter each number within five
seconds of each other.
4. Press 1·2 on the keypad to save personal
code 1.
The doors will lock then unlock to confirm
that programming was successful.
To program additional personal entry codes,
repeat Steps 1-3, then for Step 4: • press 3·4 to save personal code 2
• press 5·6 to save personal code 3
• press 7·8 to save personal code 4
• press 9·0 to save personal code 5.
You may also program a personal entry code
through the MyLincoln Touch system. See
Settings (page 384).
Tips:
• Do not set a code that uses five of the
same number.
• Do not use five numbers in sequential order.
• The factory-set code will work even if you have set your own personal code.
Recalling Memory Positions
The programmed entry codes will recall
driver memory positions as follows:
• Entry code 1 will recall driver 1 memory positions.
• Entry code 2 will recall driver 2 memory positions.
• Entry code 3 will recall driver 3 memory positions.
73
Locks
Page 141 of 544

2. Adjust the temperature control to thedesired setting. Use 72°F (22°C) as a
starting point, then adjust the setting as
necessary.
HEATED WINDOWS AND MIRRORS
Heated Rear Window
Note: Make sure the engine is running
before operating the heated windows.
E184884
Press the button to clear the
heated rear window of thin ice and
fog. The heated rear window will
automatically turn off after a short period of
time. Start the engine before you switch the
heated rear window on.
Note: Do not use razor blades or other sharp
objects to clean or remove decals from the
inside of the heated rear window. The
vehicle warranty does not cover damage
caused to the heated rear window grid lines.
Heated Exterior Mirror
When you switch the heated rear window
on, the heated exterior mirrors will
automatically turn on.
Note: Do not remove ice from the mirrors
with a scraper or adjust the mirror glass
when it is frozen in place.
Note: Do not clean the mirror housing or
glass with harsh abrasives, fuel or other
petroleum-based cleaning products.
CABIN AIR FILTER
Your vehicle is equipped with a cabin air
filter, which gives you and your passengers
the following benefits:
• It improves your driving comfort by reducing particle concentration.
• It improves the interior compartment cleanliness.
• It protects the climate control components from particle deposits.
You can locate the cabin air filter behind the
glove box. Note:
Make sure you have a cabin air filter
installed at all times. This prevents foreign
objects from entering the system. Running
the system without a filter in place could
result in degradation or damage to the
system.
Replace the filter at regular intervals. See
Scheduled Maintenance (page 480).
For additional cabin air filter information, or
to replace the filter, see an authorized dealer.
REMOTE START
The remote start feature allows you to
pre-condition the interior of your vehicle. The
climate control system works to achieve
comfort according to your previous settings.
Note: You cannot adjust the system during
remote start operation. You cannot switch
on the displays or indicators during remote
start.
138
Climate Control
Page 279 of 544

Protected components
Fuse amp rating
Fuse or relay number
Lighting (ambient, glove box, vanity, dome, trunk).
10A11
Memory seats, Lumbar, Power mirror.
7.5A
12
Driver door unlock.
20A
13
Not used (spare).
5A
14
Subwoofer amplifier.
20A
15
Heated seat relay coil.
10A
26
Not used (spare).
10A
27
Not used (spare).
10A
28
Not used (spare).
10A
29
Power trunk logic.
5A
210
Keypad.
Cellphone passport module.
276
Fuses
Page 319 of 544

What to do when a Tire Is Punctured
A tire puncture within the tire tread area can
be repaired in two stages with the kit.
• In the first stage, the tire will be reinflatedwith a sealing compound and air. After
the tire has been reinflated, you will need
to drive the vehicle a short distance 4 mi
(6 km) to distribute the sealant in the tire.
• In the second stage, you will need to check the tire pressure and adjust, if
necessary, to the vehicle tire inflation
pressure.
First Stage: Reinflating the Tire with
Sealing Compound and Air
WARNINGS
Do not stand directly over the kit while
inflating the tire. If you notice any
unusual bulges or deformations in the tire
sidewall during inflation, stop and call
roadside assistance.
If the tire does not inflate to the
recommended tire pressure within 15
minutes, stop and call roadside assistance.
Preparation: Park the vehicle in a safe, level
and secure area, away from moving traffic.
Turn the hazard lights on. Apply the parking
brake and turn the engine off. Inspect the
flat tire for visible damage.
Sealant compound contains latex. To avoid
any allergic reactions, use the non-latex
gloves located in the accessory box on the
underside of the kit housing.
Do not remove any foreign object that has
pierced the tire. If a puncture is located in
the tire sidewall, stop and call roadside
assistance.
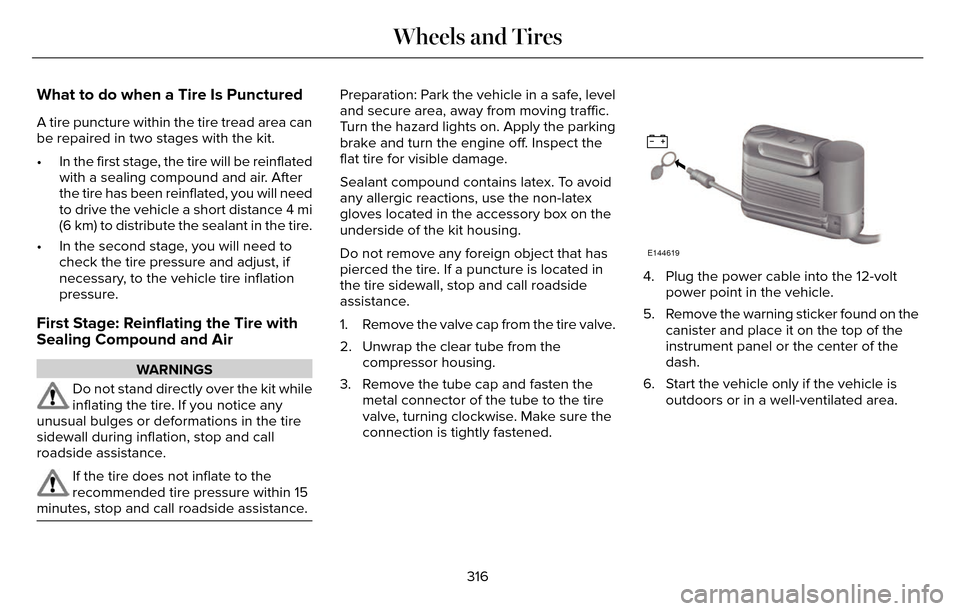
1. Remove the valve cap from the tire valve.
2. Unwrap the clear tube from the compressor housing.
3. Remove the tube cap and fasten the metal connector of the tube to the tire
valve, turning clockwise. Make sure the
connection is tightly fastened.
E144619
4. Plug the power cable into the 12-voltpower point in the vehicle.
5. Remove the warning sticker found on the canister and place it on the top of the
instrument panel or the center of the
dash.
6. Start the vehicle only if the vehicle is outdoors or in a well-ventilated area.
316
Wheels and Tires