brake fluid LINCOLN MKZ 2018 Owners Manual
[x] Cancel search | Manufacturer: LINCOLN, Model Year: 2018, Model line: MKZ, Model: LINCOLN MKZ 2018Pages: 595, PDF Size: 5.06 MB
Page 7 of 595

Lane Keeping System.................................233
Blind Spot Information System.................238
Cross Traffic Alert.........................................240
Steering...........................................................244
Pre-Collision Assist......................................245
Drive Control.................................................249
Load Carrying
Load Limit........................................................251
Towing
Towing a Trailer............................................256
Recommended Towing Weights...............257
Essential Towing Checks...........................259
Towing the Vehicle on Four Wheels........261
Driving Hints
Breaking-In.....................................................263
Economical Driving......................................263
Driving Through Water...............................263
Floor Mats......................................................264
Roadside Emergencies
Roadside Assistance...................................266
Hazard Flashers............................................267
Fuel Shutoff....................................................267
Jump Starting the Vehicle..........................268
Post-Crash Alert System..............................271
Transporting the Vehicle.............................271
Towing Points................................................272
Customer Assistance
Getting the Services You Need................274
In California (U.S. Only)...............................275
The Better Business Bureau (BBB) AutoLine Program (U.S. Only)........................276
Utilizing the Mediation/Arbitration Program(Canada Only)............................................277
Getting Assistance Outside the U.S. andCanada........................................................278
Ordering Additional Owner'sLiterature....................................................280
Reporting Safety Defects (U.S. Only)......280
Reporting Safety Defects (CanadaOnly).............................................................281
Fuses
Fuse Specification Chart............................282
Changing a Fuse..........................................299
Maintenance
General Information.....................................302
Opening and Closing the Hood...............302
Under Hood Overview - 2.0L....................304
Under Hood Overview - 3.0L....................306
Engine Oil Dipstick - 2.0L...........................308
Engine Oil Dipstick - 3.0L...........................308
Engine Oil Check.........................................308
Oil Change Indicator Reset.......................309
Engine Coolant Check.................................310
Automatic Transmission Fluid Check.......314
Brake Fluid Check.........................................318
Washer Fluid Check......................................319
Fuel Filter.........................................................319
Changing the 12V Battery...........................319
Checking the Wiper Blades........................321
Changing the Wiper Blades.......................321
Adjusting the Headlamps..........................322
Changing a Bulb...........................................323
4
MKZ (CC9) Canada/United States of America, enUSA, Edition date: 201706, First Printing
Table of Contents
Page 11 of 595
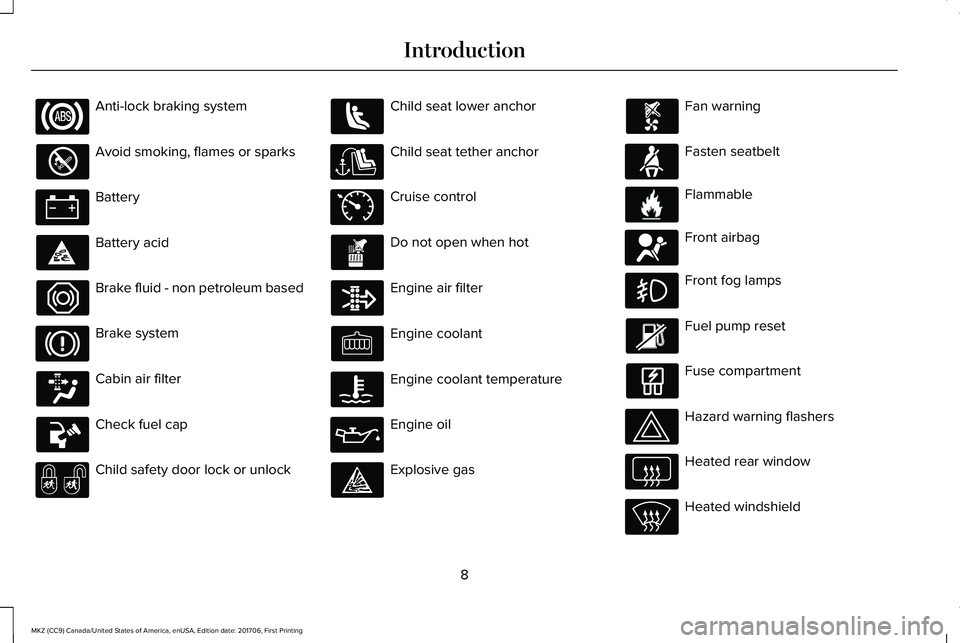
Anti-lock braking system
Avoid smoking, flames or sparks
Battery
Battery acid
Brake fluid - non petroleum based
Brake system
Cabin air filter
Check fuel cap
Child safety door lock or unlock
Child seat lower anchor
Child seat tether anchor
Cruise control
Do not open when hot
Engine air filter
Engine coolant
Engine coolant temperature
Engine oil
Explosive gas
Fan warning
Fasten seatbelt
Flammable
Front airbag
Front fog lamps
Fuel pump reset
Fuse compartment
Hazard warning flashers
Heated rear window
Heated windshield
8
MKZ (CC9) Canada/United States of America, enUSA, Edition date: 201706, First Printing
Introduction E71340 E71880 E231160 E67017
Page 12 of 595
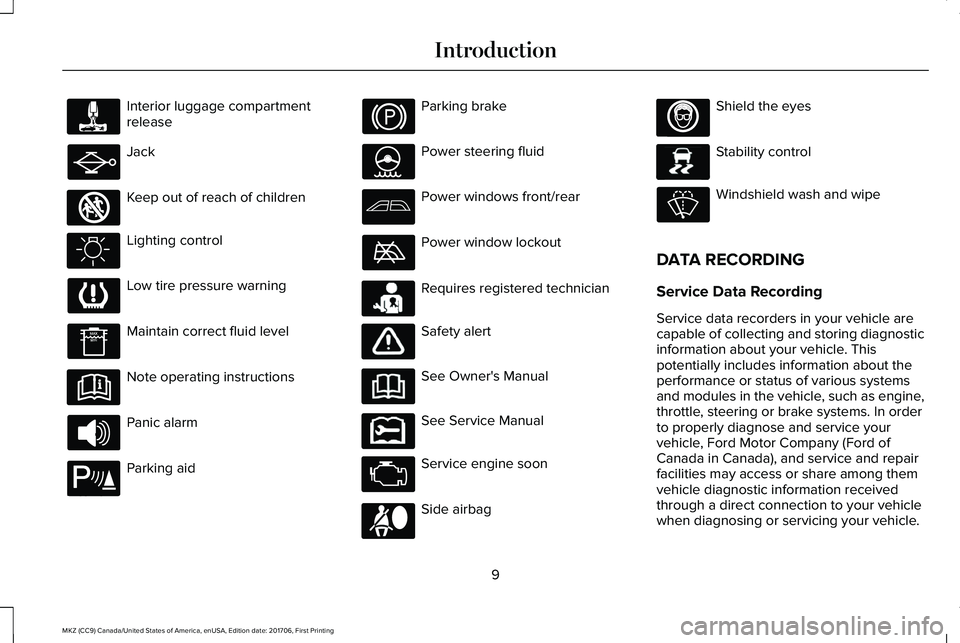
Interior luggage compartmentrelease
Jack
Keep out of reach of children
Lighting control
Low tire pressure warning
Maintain correct fluid level
Note operating instructions
Panic alarm
Parking aid
Parking brake
Power steering fluid
Power windows front/rear
Power window lockout
Requires registered technician
Safety alert
See Owner's Manual
See Service Manual
Service engine soon
Side airbag
Shield the eyes
Stability control
Windshield wash and wipe
DATA RECORDING
Service Data Recording
Service data recorders in your vehicle arecapable of collecting and storing diagnosticinformation about your vehicle. Thispotentially includes information about theperformance or status of various systemsand modules in the vehicle, such as engine,throttle, steering or brake systems. In orderto properly diagnose and service yourvehicle, Ford Motor Company (Ford ofCanada in Canada), and service and repairfacilities may access or share among themvehicle diagnostic information receivedthrough a direct connection to your vehiclewhen diagnosing or servicing your vehicle.
9
MKZ (CC9) Canada/United States of America, enUSA, Edition date: 201706, First Printing
Introduction E161353 E139213 E231159 E231158 E167012 E138639
Page 110 of 595
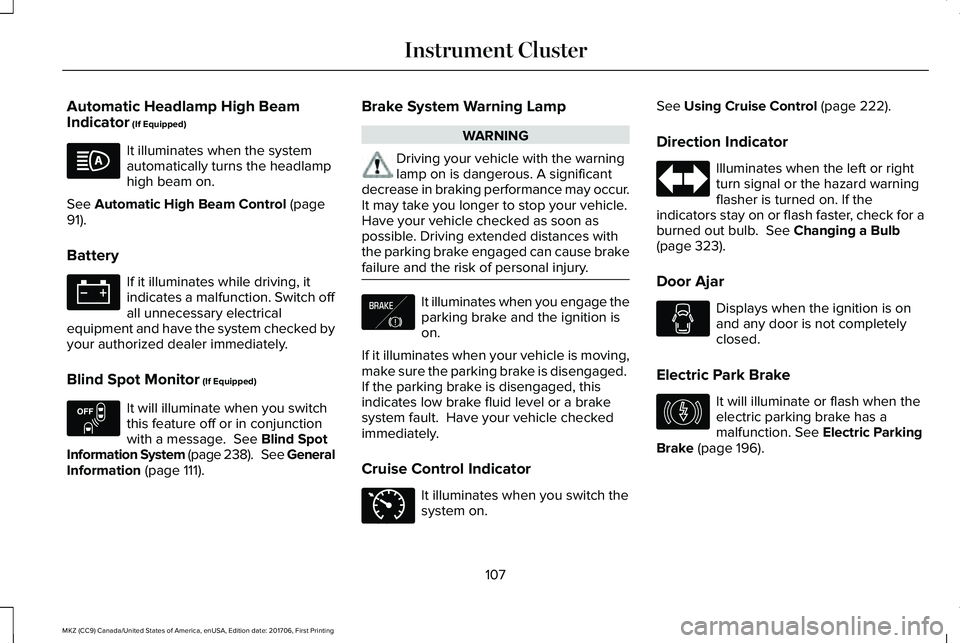
Automatic Headlamp High BeamIndicator (If Equipped)
It illuminates when the systemautomatically turns the headlamphigh beam on.
See Automatic High Beam Control (page91).
Battery
If it illuminates while driving, itindicates a malfunction. Switch offall unnecessary electricalequipment and have the system checked byyour authorized dealer immediately.
Blind Spot Monitor (If Equipped)
It will illuminate when you switchthis feature off or in conjunctionwith a message. See Blind SpotInformation System (page 238). See GeneralInformation (page 111).
Brake System Warning Lamp
WARNING
Driving your vehicle with the warninglamp on is dangerous. A significantdecrease in braking performance may occur.It may take you longer to stop your vehicle.Have your vehicle checked as soon aspossible. Driving extended distances withthe parking brake engaged can cause brakefailure and the risk of personal injury.
It illuminates when you engage theparking brake and the ignition ison.
If it illuminates when your vehicle is moving,make sure the parking brake is disengaged. If the parking brake is disengaged, thisindicates low brake fluid level or a brakesystem fault. Have your vehicle checkedimmediately.
Cruise Control Indicator
It illuminates when you switch thesystem on.
See Using Cruise Control (page 222).
Direction Indicator
Illuminates when the left or rightturn signal or the hazard warningflasher is turned on. If theindicators stay on or flash faster, check for aburned out bulb. See Changing a Bulb(page 323).
Door Ajar
Displays when the ignition is onand any door is not completelyclosed.
Electric Park Brake
It will illuminate or flash when theelectric parking brake has amalfunction. See Electric ParkingBrake (page 196).
107
MKZ (CC9) Canada/United States of America, enUSA, Edition date: 201706, First Printing
Instrument Cluster E151262 E138644 E71340 E146190
Page 130 of 595
Maintenance
ActionMessage
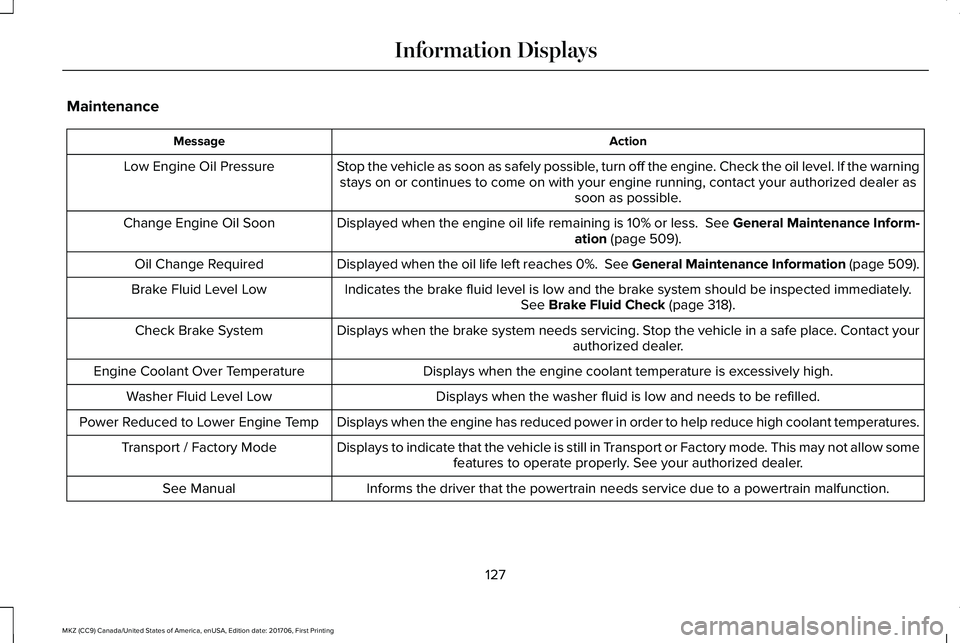
Stop the vehicle as soon as safely possible, turn off the engine. Check the oil level. If the warningstays on or continues to come on with your engine running, contact your authorized dealer assoon as possible.
Low Engine Oil Pressure
Displayed when the engine oil life remaining is 10% or less. See General Maintenance Inform-ation (page 509).Change Engine Oil Soon
Displayed when the oil life left reaches 0%. See General Maintenance Information (page 509).Oil Change Required
Indicates the brake fluid level is low and the brake system should be inspected immediately.See Brake Fluid Check (page 318).Brake Fluid Level Low
Displays when the brake system needs servicing. Stop the vehicle in a safe place. Contact yourauthorized dealer.Check Brake System
Displays when the engine coolant temperature is excessively high.Engine Coolant Over Temperature
Displays when the washer fluid is low and needs to be refilled.Washer Fluid Level Low
Displays when the engine has reduced power in order to help reduce high coolant temperatures.Power Reduced to Lower Engine Temp
Displays to indicate that the vehicle is still in Transport or Factory mode. This may not allow somefeatures to operate properly. See your authorized dealer.Transport / Factory Mode
Informs the driver that the powertrain needs service due to a powertrain malfunction.See Manual
127
MKZ (CC9) Canada/United States of America, enUSA, Edition date: 201706, First Printing
Information Displays
Page 305 of 595
GENERAL INFORMATION
Have your vehicle serviced regularly to helpmaintain its roadworthiness and resale value.There is a large network of authorizeddealers that are there to help you with theirprofessional servicing expertise. We believethat their specially trained technicians arebest qualified to service your vehicle properlyand expertly. They are supported by a widerange of highly specialized tools developedspecifically for servicing your vehicle.
If your vehicle requires professional service,an authorized dealer can provide thenecessary parts and service. Check yourwarranty information to find out which partsand services are covered.
Use only recommended fuels, lubricants,fluids and service parts conforming tospecifications. Motorcraft® parts aredesigned and built to provide the bestperformance in your vehicle.
Precautions
•Do not work on a hot engine.
•Make sure that nothing gets caught inmoving parts.
•Do not work on a vehicle with the enginerunning in an enclosed space, unless youare sure you have enough ventilation.
•Keep all open flames and other burningmaterial (such as cigarettes) away fromthe battery and all fuel related parts.
Working with the Engine Off
1. Set the parking brake and shift to park(P).
2. Switch off the engine.
3. Block the wheels.
Working with the Engine On
WARNING
To reduce the risk of vehicle damageand/or personal burn injuries, do notstart your engine with the air cleanerremoved and do not remove it while theengine is running.
1. Set the parking brake and shift to park(P).
2. Block the wheels.
OPENING AND CLOSING THE
HOOD
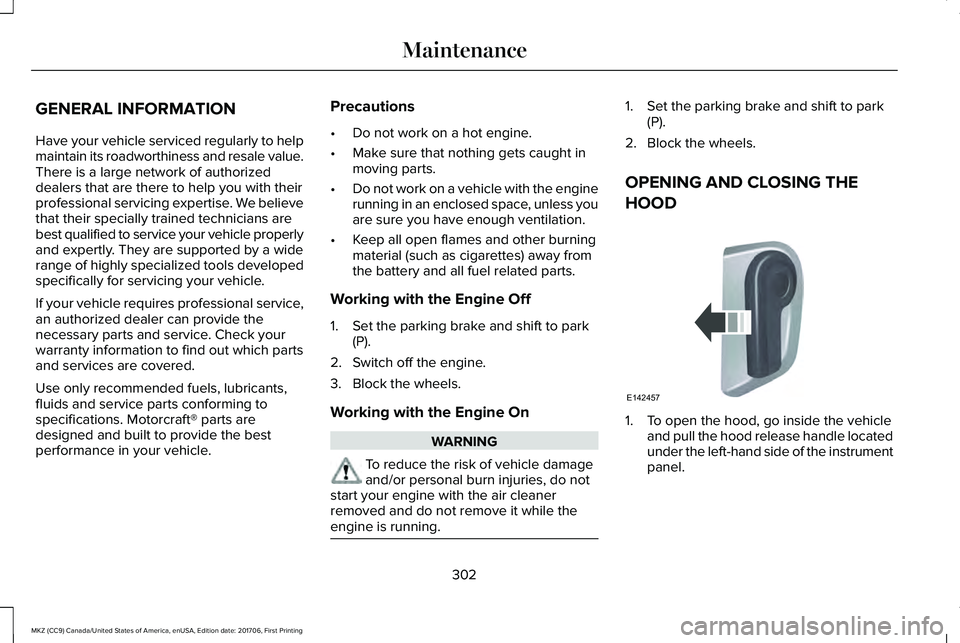
1. To open the hood, go inside the vehicleand pull the hood release handle locatedunder the left-hand side of the instrumentpanel.
302
MKZ (CC9) Canada/United States of America, enUSA, Edition date: 201706, First Printing
MaintenanceE142457
Page 308 of 595
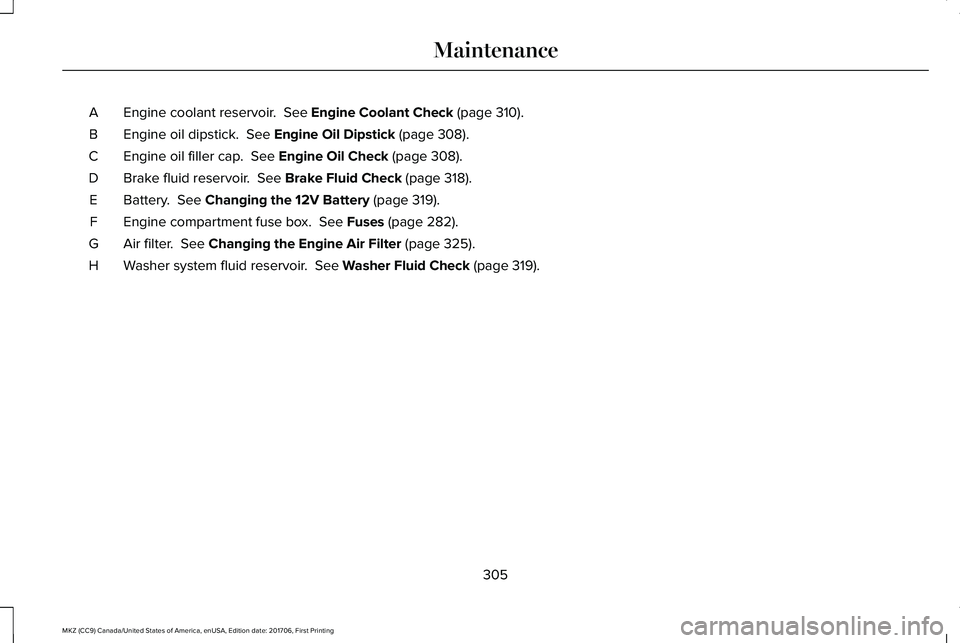
Engine coolant reservoir. See Engine Coolant Check (page 310).A
Engine oil dipstick. See Engine Oil Dipstick (page 308).B
Engine oil filler cap. See Engine Oil Check (page 308).C
Brake fluid reservoir. See Brake Fluid Check (page 318).D
Battery. See Changing the 12V Battery (page 319).E
Engine compartment fuse box. See Fuses (page 282).F
Air filter. See Changing the Engine Air Filter (page 325).G
Washer system fluid reservoir. See Washer Fluid Check (page 319).H
305
MKZ (CC9) Canada/United States of America, enUSA, Edition date: 201706, First Printing
Maintenance
Page 310 of 595
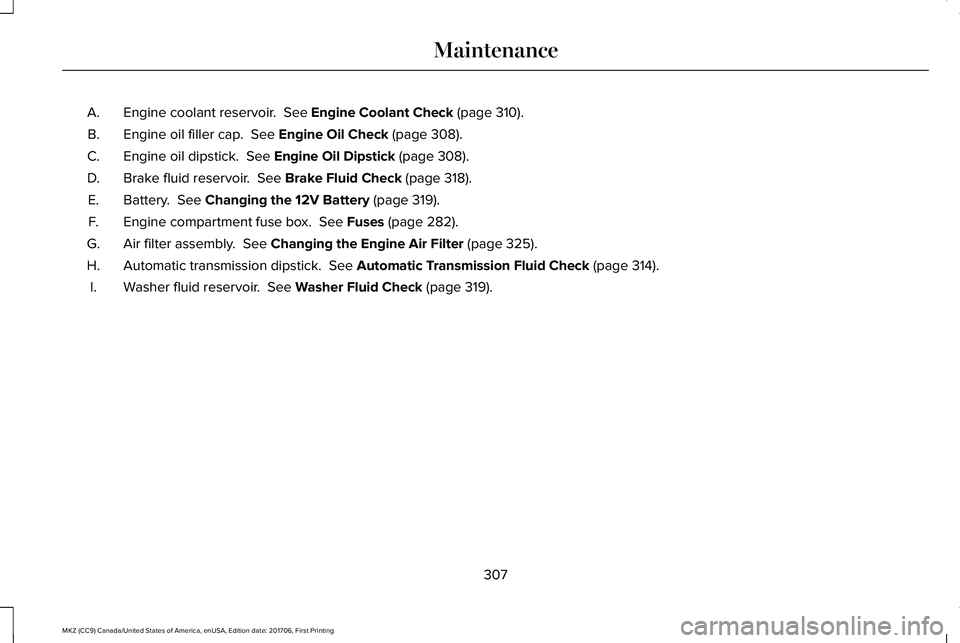
Engine coolant reservoir. See Engine Coolant Check (page 310).A.
Engine oil filler cap. See Engine Oil Check (page 308).B.
Engine oil dipstick. See Engine Oil Dipstick (page 308).C.
Brake fluid reservoir. See Brake Fluid Check (page 318).D.
Battery. See Changing the 12V Battery (page 319).E.
Engine compartment fuse box. See Fuses (page 282).F.
Air filter assembly. See Changing the Engine Air Filter (page 325).G.
Automatic transmission dipstick. See Automatic Transmission Fluid Check (page 314).H.
Washer fluid reservoir. See Washer Fluid Check (page 319).I.
307
MKZ (CC9) Canada/United States of America, enUSA, Edition date: 201706, First Printing
Maintenance
Page 318 of 595
6F50/6F55 Transmission (If Equipped)
WARNINGS
The dipstick cap and surroundingcomponents may be hot; gloves arerecommended.
Use gloves when moving the air filterassembly. Components will be hot.
Note:Automatic transmission fluid expandswhen warmed. To obtain an accurate fluidcheck, drive the vehicle until it is warmed up(approximately 20 miles [30 kilometers]). Ifyour vehicle has been operated for anextended period at high speeds, in city trafficduring hot weather or pulling a trailer, thevehicle should be turned off until normaloperating temperatures are reached to allowthe fluid to cool before checking. Dependingon vehicle use, cooling times could take upto 30 minutes or longer.
Refer to your scheduled maintenanceinformation for scheduled intervals for fluidchecks and changes. Your transmission doesnot consume fluid. However, the fluid levelshould be checked if the transmission is notworking properly. For example, if thetransmission slips or shifts slowly or if younotice some sign of fluid leakage.
1.Drive the vehicle 20 miles (30 kilometers)or until it reaches normal operatingtemperature
2. Park the vehicle on a level surface andengage the parking brake.
3.With the parking brake engaged and yourfoot on the brake pedal, start the engineand move the gearshift lever through allof the gear ranges. Allow a minimum of10 seconds for each gear to engage.
4. Put the gearshift lever in P (Park) andleave the engine running.
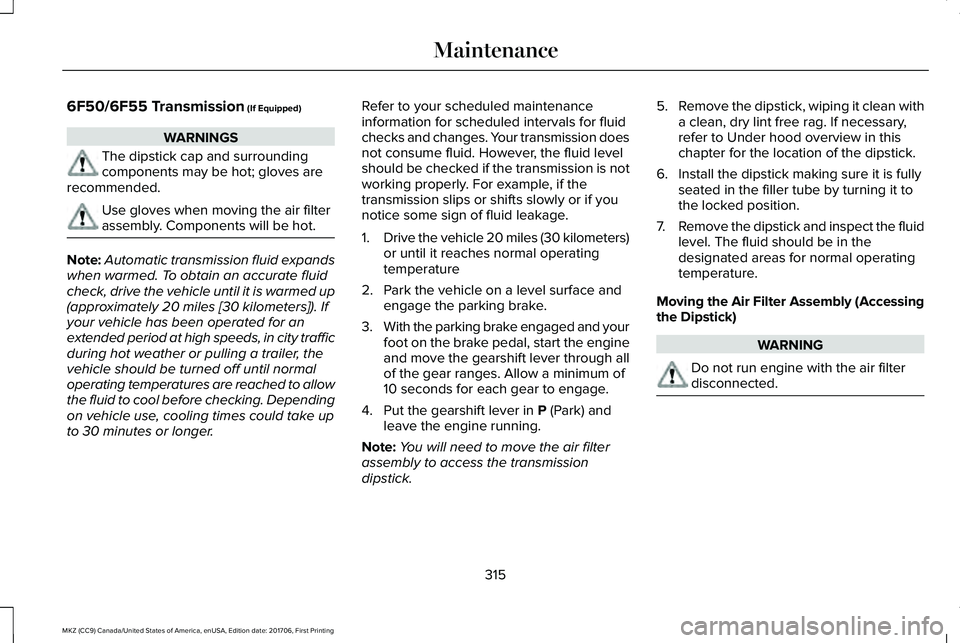
Note:You will need to move the air filterassembly to access the transmissiondipstick.
5.Remove the dipstick, wiping it clean witha clean, dry lint free rag. If necessary,refer to Under hood overview in thischapter for the location of the dipstick.
6. Install the dipstick making sure it is fullyseated in the filler tube by turning it tothe locked position.
7.Remove the dipstick and inspect the fluidlevel. The fluid should be in thedesignated areas for normal operatingtemperature.
Moving the Air Filter Assembly (Accessingthe Dipstick)
WARNING
Do not run engine with the air filterdisconnected.
315
MKZ (CC9) Canada/United States of America, enUSA, Edition date: 201706, First Printing
Maintenance
Page 321 of 595
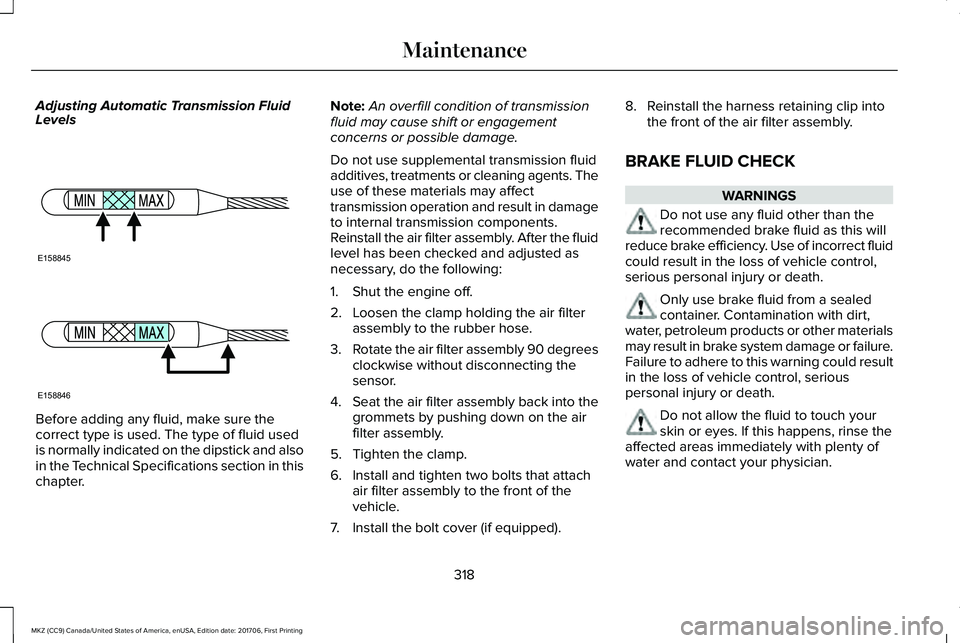
Adjusting Automatic Transmission FluidLevels
Before adding any fluid, make sure thecorrect type is used. The type of fluid usedis normally indicated on the dipstick and alsoin the Technical Specifications section in thischapter.
Note:An overfill condition of transmissionfluid may cause shift or engagementconcerns or possible damage.
Do not use supplemental transmission fluidadditives, treatments or cleaning agents. Theuse of these materials may affecttransmission operation and result in damageto internal transmission components.Reinstall the air filter assembly. After the fluidlevel has been checked and adjusted asnecessary, do the following:
1. Shut the engine off.
2. Loosen the clamp holding the air filterassembly to the rubber hose.
3.Rotate the air filter assembly 90 degreesclockwise without disconnecting thesensor.
4.Seat the air filter assembly back into thegrommets by pushing down on the airfilter assembly.
5. Tighten the clamp.
6. Install and tighten two bolts that attachair filter assembly to the front of thevehicle.
7. Install the bolt cover (if equipped).
8. Reinstall the harness retaining clip intothe front of the air filter assembly.
BRAKE FLUID CHECK
WARNINGS
Do not use any fluid other than therecommended brake fluid as this willreduce brake efficiency. Use of incorrect fluidcould result in the loss of vehicle control,serious personal injury or death.
Only use brake fluid from a sealedcontainer. Contamination with dirt,water, petroleum products or other materialsmay result in brake system damage or failure.Failure to adhere to this warning could resultin the loss of vehicle control, seriouspersonal injury or death.
Do not allow the fluid to touch yourskin or eyes. If this happens, rinse theaffected areas immediately with plenty ofwater and contact your physician.
318
MKZ (CC9) Canada/United States of America, enUSA, Edition date: 201706, First Printing
MaintenanceE158845 E158846