fuse LINCOLN MKZ 2019 Owners Manual
[x] Cancel search | Manufacturer: LINCOLN, Model Year: 2019, Model line: MKZ, Model: LINCOLN MKZ 2019Pages: 595, PDF Size: 4.95 MB
Page 7 of 595
Using Cruise Control...................................217
Using Adaptive Cruise Control.................218
Driving Aids
Driver Alert....................................................227
Lane Keeping System................................229
Blind Spot Information System................234
Cross Traffic Alert........................................236
Steering.........................................................240
Pre-Collision Assist......................................241
Drive Control................................................246
Load Carrying
Load Limit......................................................248
Towing
Towing a Trailer............................................253
Recommended Towing Weights.............254
Essential Towing Checks..........................255
Towing the Vehicle on Four Wheels......257
Driving Hints
Breaking-In...................................................259
Economical Driving.....................................259
Driving Through Water..............................259
Floor Mats.....................................................260
Roadside Emergencies
Roadside Assistance..................................262
Hazard Flashers..........................................263
Fuel Shutoff..................................................263
Jump Starting the Vehicle.........................264
Post-Crash Alert System...........................266
Transporting the Vehicle...........................267
Towing Points...............................................268
Customer Assistance
Getting the Services You Need...............269
In California (U.S. Only)..............................270
The Better Business Bureau (BBB) AutoLine Program (U.S. Only)........................271
Utilizing the Mediation/Arbitration Program(Canada Only)..........................................272
Getting Assistance Outside the U.S. andCanada.......................................................273
Ordering Additional Owner's Literature......................................................................275
Reporting Safety Defects (U.S. Only)......275
Reporting Safety Defects (Canada Only)......................................................................276
Fuses
Fuse Specification Chart............................277
Changing a Fuse.........................................294
Maintenance
General Information....................................297
Opening and Closing the Hood..............297
Under Hood Overview - 2.0L...................298
Under Hood Overview - 3.0L...................300
Engine Oil Dipstick - 2.0L.........................302
Engine Oil Dipstick - 3.0L..........................302
Engine Oil Check........................................302
Oil Change Indicator Reset......................303
Engine Coolant Check...............................304
Automatic Transmission Fluid Check......308
Brake Fluid Check........................................313
Washer Fluid Check.....................................313
Fuel Filter........................................................313
Changing the 12V Battery..........................314
4
MKZ (CC9) Canada/United States of America, enUSA, Edition date: 201805, First-Printing
Table of Contents
Page 11 of 595
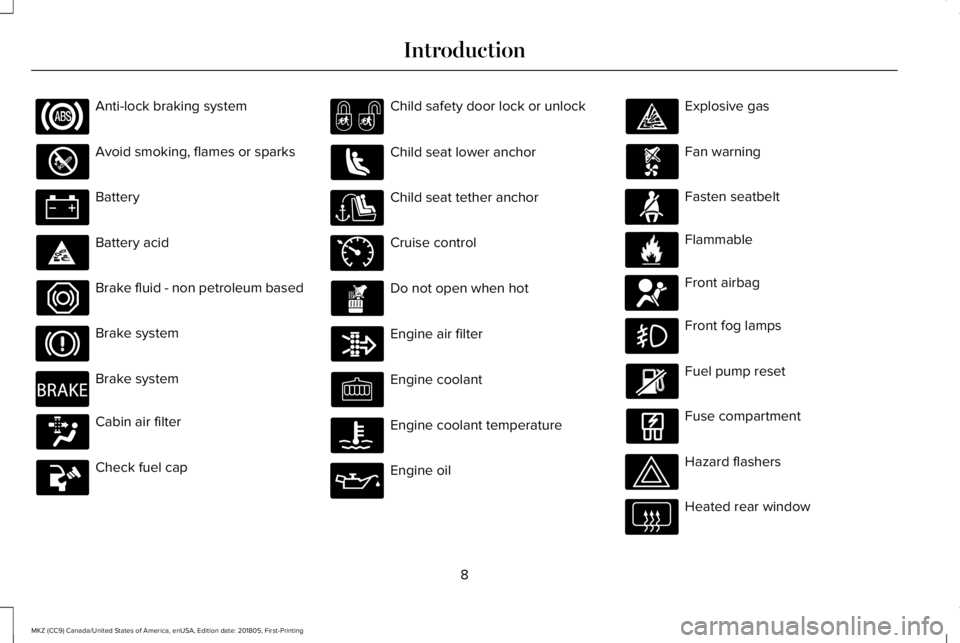
Anti-lock braking system
Avoid smoking, flames or sparks
Battery
Battery acid
Brake fluid - non petroleum based
Brake system
Brake system
Cabin air filter
Check fuel cap
Child safety door lock or unlock
Child seat lower anchor
Child seat tether anchor
Cruise control
Do not open when hot
Engine air filter
Engine coolant
Engine coolant temperature
Engine oil
Explosive gas
Fan warning
Fasten seatbelt
Flammable
Front airbag
Front fog lamps
Fuel pump reset
Fuse compartment
Hazard flashers
Heated rear window
8
MKZ (CC9) Canada/United States of America, enUSA, Edition date: 201805, First-Printing
Introduction E270480 E71340 E71880 E231160 E67017
Page 161 of 595
12 Volt DC Power Point
WARNING: Do not plug optionalelectrical accessories into the cigar lightersocket. Incorrect use of the cigar lighter cancause damage not covered by the vehiclewarranty, and can result in fire or seriousinjury.
Note:When you switch the ignition on, youcan use the socket to power 12 voltappliances with a maximum current ratingof 15 amps.
If the power supply does not work after youswitch the ignition off, switch the ignition on.Note:Do not hang any accessory from theaccessory plug.
Note:Do not use the power point over thevehicle capacity of 12 volt DC 180 watts ora fuse may blow.
Note:Always keep the power point capsclosed when not in use.
Do not insert objects other than an accessoryplug into the power point. This damages thepower point and may blow the fuse.
Run the vehicle for full capacity use of thepower point.
To prevent the battery from running out ofcharge:
•Do not use the power point longer thannecessary when the vehicle is notrunning.
•Do not leave devices plugged inovernight or when you park your vehiclefor extended periods.
Locations
Power points may be in the followinglocations:
•On the front of the center console.
•Inside the center console.
•On the rear of the center console.
110 Volt AC Power Point
WARNING: Do not keep electricaldevices plugged in the power pointwhenever the device is not in use. Do notuse any extension cord with the 110 volt ACpower point, since it will defeat the safetyprotection design. Doing so may cause thepower point to overload due to poweringmultiple devices that can reach beyond the150 watt load limit and could result in fire orserious injury.
Note:The power point turns off when youswitch the ignition off, or when the batteryvoltage drops below 11 volts.
You can use the power point for electricdevices that require up to 150 watts. It is onthe rear of the center console.
158
MKZ (CC9) Canada/United States of America, enUSA, Edition date: 201805, First-Printing
Auxiliary Power Points
Page 172 of 595
WARNING: Do not try to pry open orpush open the capless fuel system withforeign objects. This could damage the fuelsystem and its seal and cause injury to youor others.
WARNING: Do not dispose of fuel inthe household refuse or the public sewagesystem. Use an authorized waste disposalfacility.
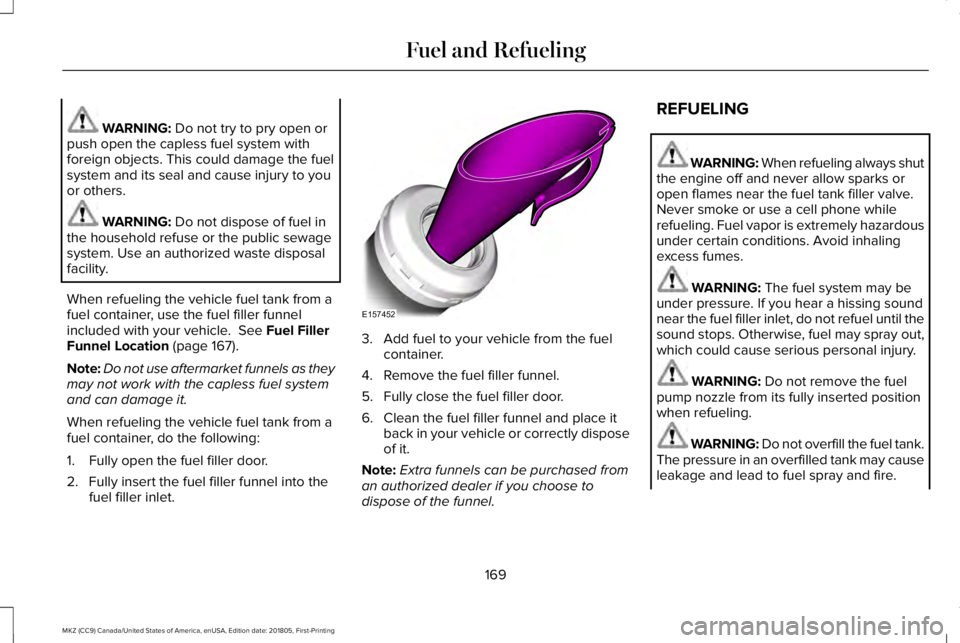
When refueling the vehicle fuel tank from afuel container, use the fuel filler funnelincluded with your vehicle. See Fuel FillerFunnel Location (page 167).
Note:Do not use aftermarket funnels as theymay not work with the capless fuel systemand can damage it.
When refueling the vehicle fuel tank from afuel container, do the following:
1. Fully open the fuel filler door.
2. Fully insert the fuel filler funnel into thefuel filler inlet.
3. Add fuel to your vehicle from the fuelcontainer.
4. Remove the fuel filler funnel.
5. Fully close the fuel filler door.
6. Clean the fuel filler funnel and place itback in your vehicle or correctly disposeof it.
Note:Extra funnels can be purchased froman authorized dealer if you choose todispose of the funnel.
REFUELING
WARNING: When refueling always shutthe engine off and never allow sparks oropen flames near the fuel tank filler valve.Never smoke or use a cell phone whilerefueling. Fuel vapor is extremely hazardousunder certain conditions. Avoid inhalingexcess fumes.
WARNING: The fuel system may beunder pressure. If you hear a hissing soundnear the fuel filler inlet, do not refuel until thesound stops. Otherwise, fuel may spray out,which could cause serious personal injury.
WARNING: Do not remove the fuelpump nozzle from its fully inserted positionwhen refueling.
WARNING: Do not overfill the fuel tank.The pressure in an overfilled tank may causeleakage and lead to fuel spray and fire.
169
MKZ (CC9) Canada/United States of America, enUSA, Edition date: 201805, First-Printing
Fuel and RefuelingE157452
Page 256 of 595
TOWING A TRAILER
WARNING: Do not exceed theGVWR or the GAWR specified on thecertification label.
WARNING: Towing trailers beyondthe maximum recommended grosstrailer weight exceeds the limit of yourvehicle and could result in enginedamage, transmission damage,structural damage, loss of vehiclecontrol, vehicle rollover and personalinjury.
Note:There may be electrical itemssuch as fuses or relays that can affecttrailer towing operation. See Fuses(page 277).
The load capacity of your vehicle isdesignated by weight not volume. Youmay not necessarily be able to use allavailable space when loading yourvehicle or trailer.
Towing a trailer places extra load on theengine, transmission, axle, brakes, tires,and suspension. Inspect thesecomponents before, during and aftertowing.
Load Placement
To help minimize how trailer movementaffects the vehicle when driving:
•Load the heaviest items closest tothe trailer floor.
•Load the heaviest items in the centerof the left and right side trailer tires.
•Load the heaviest items above thetrailer axles or just slightly forwardtoward the trailer tongue. Do notallow the final trailer tongue weightto go above or below 10-15% of theloaded trailer weight.
•Select a ball mount with the correctrise or drop. When both the loadedvehicle and trailer are connected, thetrailer frame should be level, orslightly angled down toward thevehicle, when viewed from the side.
When driving with a trailer or payload, aslight takeoff vibration or shudder maybe present due to the increased payloadweight. Additional information regardingproper trailer loading and setting yourvehicle up for towing is located in theLoad Carrying chapter. See Load Limit(page 248).
You can also find information in the RV& Trailer Towing Guide available at yourauthorized dealer, or online.
253
MKZ (CC9) Canada/United States of America, enUSA, Edition date: 201805, First-Printing
Towing
Page 267 of 595
1. Press START/STOP to switch off yourvehicle.
2.Press the brake pedal and START/STOPto switch on your vehicle.
3. Remove your foot from the brake pedaland press START/STOP to switch offyour vehicle.
4. You can attempt to start the vehicle bypressing the brake pedal andSTART/STOP, or press START/STOPwithout pressing the brake pedal.
JUMP STARTING THE VEHICLE
WARNING: Batteries normally produceexplosive gases which can cause personalinjury. Therefore, do not allow flames, sparksor lighted substances to come near thebattery. When working near the battery,always shield your face and protect youreyes. Always provide correct ventilation.
WARNING: Keep batteries out of reachof children. Batteries contain sulfuric acid.Avoid contact with skin, eyes or clothing.Shield your eyes when working near thebattery to protect against possible splashingof acid solution. In case of acid contact withskin or eyes, flush immediately with waterfor a minimum of 15 minutes and get promptmedical attention. If acid is swallowed, call aphysician immediately.
WARNING: Use only adequately sizedcables with insulated clamps.
Preparing Your Vehicle
Do not attempt to push-start your automatictransmission vehicle.
Note:Attempting to push-start a vehicle withan automatic transmission may causetransmission damage.
Note:Use only a 12-volt supply to start yourvehicle.
Note:Do not disconnect the battery of thedisabled vehicle as this could damage thevehicle electrical system.
Park the booster vehicle close to the hoodof the disabled vehicle, making sure the twovehicles do not touch.
Connecting the Jumper Cables
WARNING: Do not connect the end ofthe second cable to the negative (-) terminalof the battery to be jumped. A spark maycause an explosion of the gases thatsurround the battery.
WARNING: Do not use fuel lines,engine valve covers, windshield wiper arms,the intake manifold, or hood latch as groundpoints.
Note:Do not attach the end of the positivecable to the studs or L-shaped eyelet locatedabove the positive (+) terminal of yourvehicle’s battery. High current may flowthrough and cause damage to the fuses.
264
MKZ (CC9) Canada/United States of America, enUSA, Edition date: 201805, First-Printing
Roadside Emergencies
Page 280 of 595
FUSE SPECIFICATION CHART
Power Distribution Box
WARNING: Always disconnect the
battery before servicing high current fuses.
WARNING: To reduce risk of electricalshock, always replace the cover to the powerdistribution box before reconnecting thebattery or refilling fluid reservoirs.
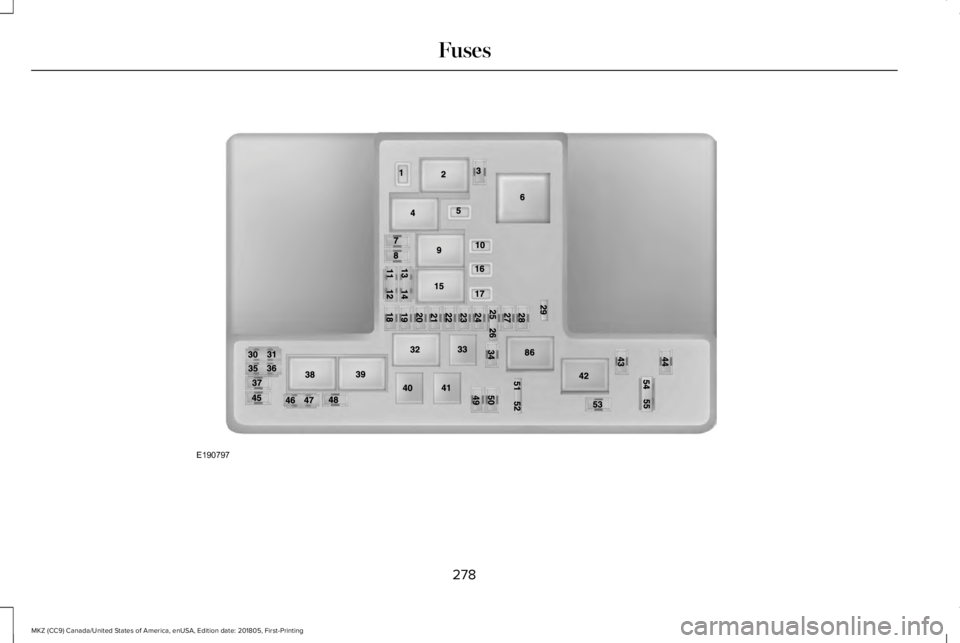
The power distribution box is in the enginecompartment. It has high-current fuses thatprotect your vehicle's main electrical systemsfrom overloads.
If you disconnect and reconnect the battery,you need to reset some features. SeeChanging the 12V Battery (page 314).
277
MKZ (CC9) Canada/United States of America, enUSA, Edition date: 201805, First-Printing
Fuses
Page 281 of 595
278
MKZ (CC9) Canada/United States of America, enUSA, Edition date: 201805, First-Printing
FusesE190797
Page 282 of 595
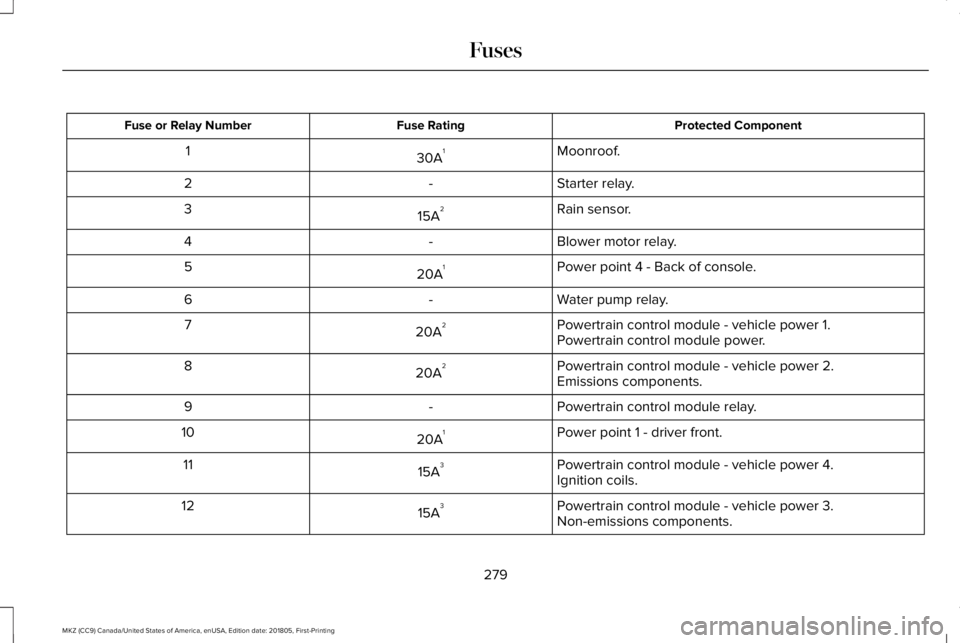
Protected ComponentFuse RatingFuse or Relay Number
Moonroof.30A11
Starter relay.-2
Rain sensor.15A23
Blower motor relay.-4
Power point 4 - Back of console.20A15
Water pump relay.-6
Powertrain control module - vehicle power 1.20A27Powertrain control module power.
Powertrain control module - vehicle power 2.20A28Emissions components.
Powertrain control module relay.-9
Power point 1 - driver front.20A110
Powertrain control module - vehicle power 4.15A311Ignition coils.
Powertrain control module - vehicle power 3.15A312Non-emissions components.
279
MKZ (CC9) Canada/United States of America, enUSA, Edition date: 201805, First-Printing
Fuses
Page 283 of 595
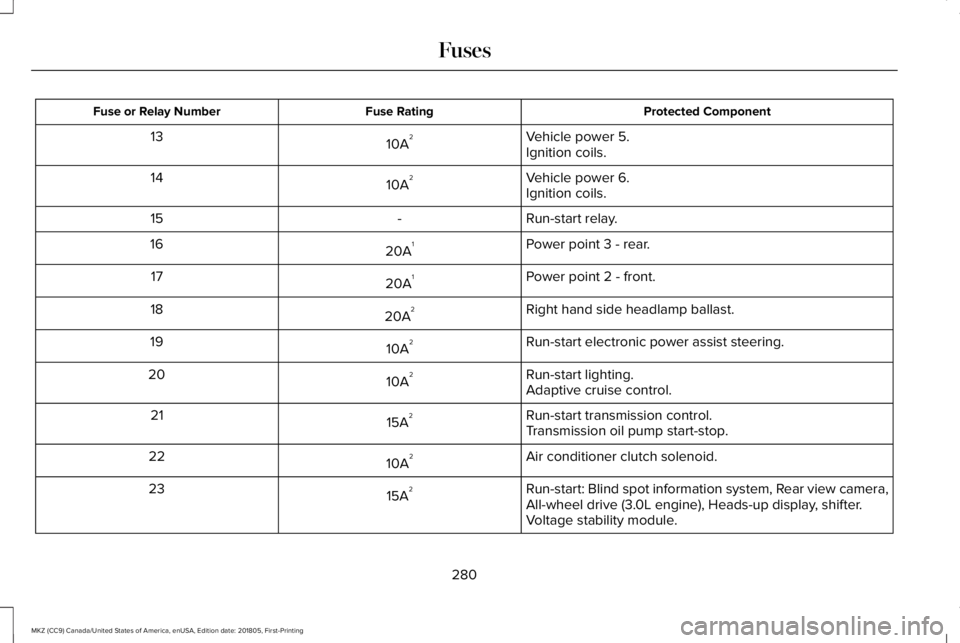
Protected ComponentFuse RatingFuse or Relay Number
Vehicle power 5.10A213Ignition coils.
Vehicle power 6.10A214Ignition coils.
Run-start relay.-15
Power point 3 - rear.20A116
Power point 2 - front.20A117
Right hand side headlamp ballast.20A218
Run-start electronic power assist steering.10A219
Run-start lighting.10A220Adaptive cruise control.
Run-start transmission control.15A221Transmission oil pump start-stop.
Air conditioner clutch solenoid.10A222
Run-start: Blind spot information system, Rear view camera,All-wheel drive (3.0L engine), Heads-up display, shifter.15A223
Voltage stability module.
280
MKZ (CC9) Canada/United States of America, enUSA, Edition date: 201805, First-Printing
Fuses