brake light LINCOLN MKZ HYBRID 2014 Owners Manual
[x] Cancel search | Manufacturer: LINCOLN, Model Year: 2014, Model line: MKZ HYBRID, Model: LINCOLN MKZ HYBRID 2014Pages: 445, PDF Size: 3.8 MB
Page 11 of 445
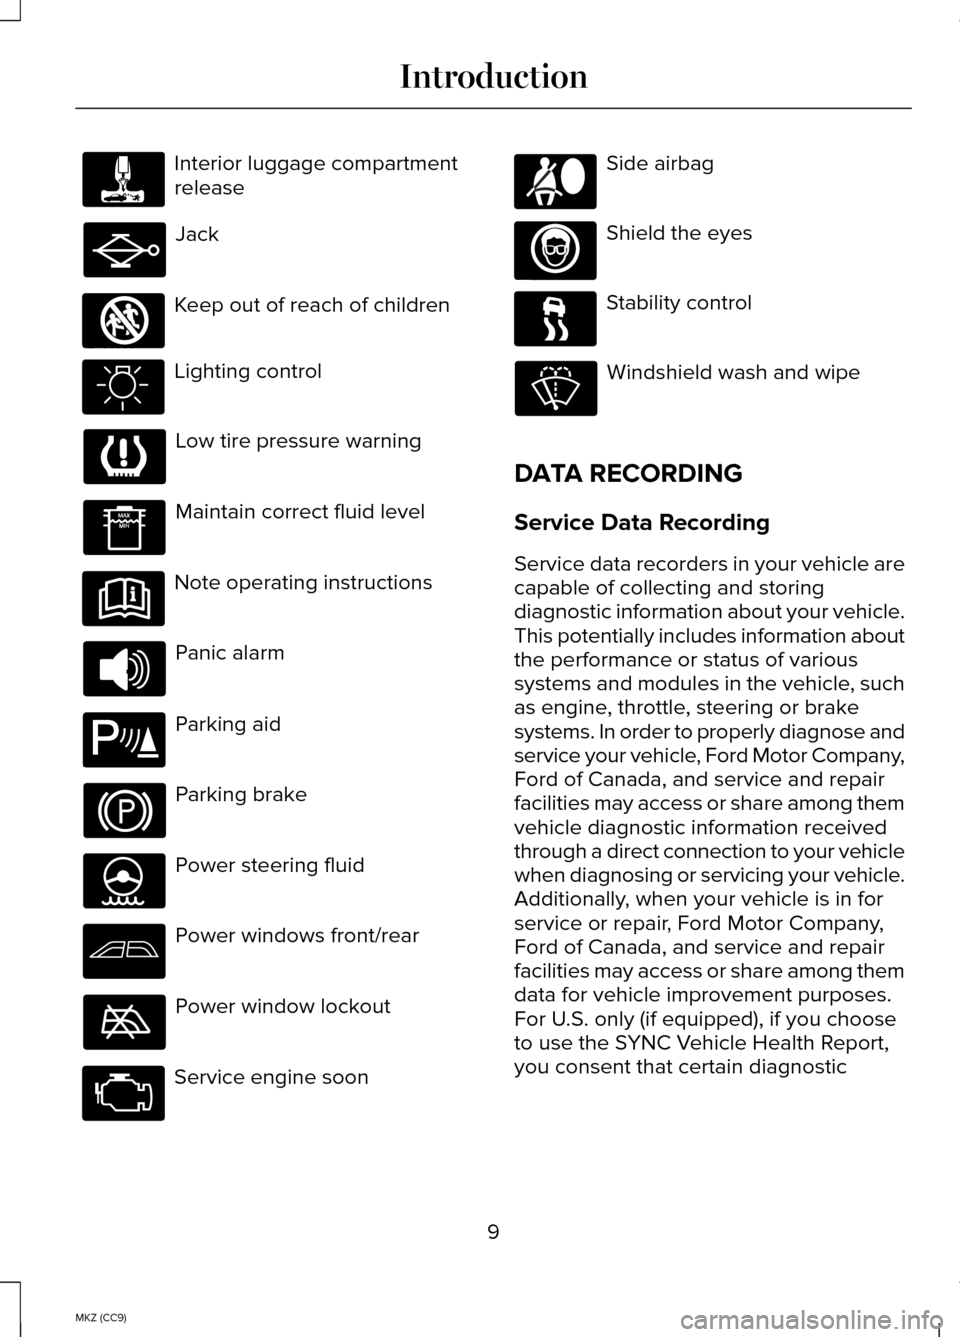
Interior luggage compartment
release
Jack
Keep out of reach of children
Lighting control
Low tire pressure warning
Maintain correct fluid level
Note operating instructions
Panic alarm
Parking aid
Parking brake
Power steering fluid
Power windows front/rear
Power window lockout
Service engine soon Side airbag
Shield the eyes
Stability control
Windshield wash and wipe
DATA RECORDING
Service Data Recording
Service data recorders in your vehicle are
capable of collecting and storing
diagnostic information about your vehicle.
This potentially includes information about
the performance or status of various
systems and modules in the vehicle, such
as engine, throttle, steering or brake
systems. In order to properly diagnose and
service your vehicle, Ford Motor Company,
Ford of Canada, and service and repair
facilities may access or share among them
vehicle diagnostic information received
through a direct connection to your vehicle
when diagnosing or servicing your vehicle.
Additionally, when your vehicle is in for
service or repair, Ford Motor Company,
Ford of Canada, and service and repair
facilities may access or share among them
data for vehicle improvement purposes.
For U.S. only (if equipped), if you choose
to use the SYNC Vehicle Health Report,
you consent that certain diagnostic
9
MKZ (CC9) Introduction E161353 E139213 E167012
Page 38 of 445
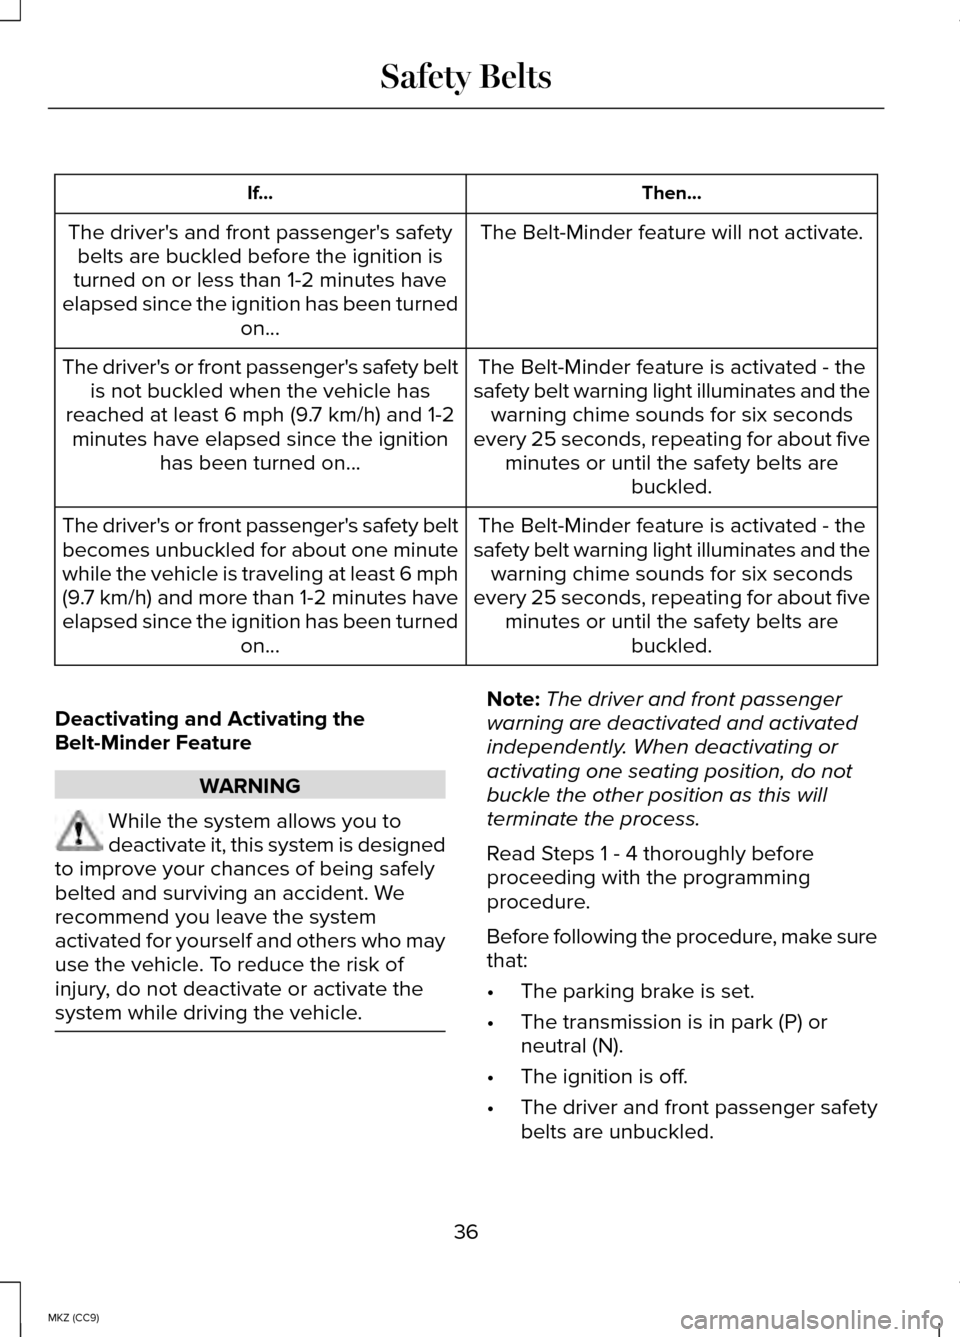
Then...
If...
The Belt-Minder feature will not activate.
The driver's and front passenger's safety
belts are buckled before the ignition is
turned on or less than 1-2 minutes have
elapsed since the ignition has been turned on...
The Belt-Minder feature is activated - the
safety belt warning light illuminates and the warning chime sounds for six seconds
every 25 seconds, repeating for about five minutes or until the safety belts are buckled.
The driver's or front passenger's safety belt
is not buckled when the vehicle has
reached at least 6 mph (9.7 km/h) and 1-2 minutes have elapsed since the ignition has been turned on...
The Belt-Minder feature is activated - the
safety belt warning light illuminates and the warning chime sounds for six seconds
every 25 seconds, repeating for about five minutes or until the safety belts are buckled.
The driver's or front passenger's safety belt
becomes unbuckled for about one minute
while the vehicle is traveling at least 6 mph
(9.7 km/h) and more than 1-2 minutes have
elapsed since the ignition has been turned
on...
Deactivating and Activating the
Belt-Minder Feature WARNING
While the system allows you to
deactivate it, this system is designed
to improve your chances of being safely
belted and surviving an accident. We
recommend you leave the system
activated for yourself and others who may
use the vehicle. To reduce the risk of
injury, do not deactivate or activate the
system while driving the vehicle. Note:
The driver and front passenger
warning are deactivated and activated
independently. When deactivating or
activating one seating position, do not
buckle the other position as this will
terminate the process.
Read Steps 1 - 4 thoroughly before
proceeding with the programming
procedure.
Before following the procedure, make sure
that:
• The parking brake is set.
• The transmission is in park (P) or
neutral (N).
• The ignition is off.
• The driver and front passenger safety
belts are unbuckled.
36
MKZ (CC9) Safety Belts
Page 93 of 445
Charge Assist
The up and down arrows provide
information about the energy going into
and out of the high-voltage battery. The
up arrow above the battery indicates
battery charging such as from regenerative
braking. The down arrow below the battery
indicates battery discharging to provide
power for propulsion or vehicle
accessories.
Regen Display
When stepping on the brake pedal, a
circular arrow symbol appears in the
center of the Battery Gauge when energy
is being recaptured through the
regenerative braking system.
Fuel Gauge:
The fuel gauge will indicate approximately
how much fuel is left in the fuel tank. The
fuel gauge may vary slightly when your
vehicle is moving or on a gradient. The
arrow adjacent to the fuel pump symbol
indicates on which side of the vehicle the
fuel filler door is located.
Brake Coach Display:
The Brake Coach appears after the vehicle
has come to a stop. It coaches you to
brake in a manner which maximizes the
amount of energy returned through the
regenerative braking system. The percent
displayed is an indication of the
regenerative braking efficiency with 100%
representing the maximum amount of
energy recovery.
Trip Summary:
Trip Summary is displayed upon shutting
off your vehicle. The data is calculated
over the last on and off cycle.
•
Distance - The total distance traveled,
distance traveled on battery power
only (EV distance) and Regen distance
are displayed. Regen distance is the
estimated range gained from energy
recaptured through regenerative
braking.
• Fuel Use - The average fuel economy
and total fuel used are displayed.
• Brake Score - The average percentage
of braking energy recaptured and
returned to the high voltage battery
through regenerative braking.
WARNING LAMPS AND
INDICATORS
The following warning lamps and
indicators will alert you to a vehicle
condition that may become serious. Some
lamps light when you start your vehicle to
make sure they work. If any lamps remain
on after starting your vehicle, refer to the
respective system warning lamp for further
information.
Note: Some warning indicators appear in
the information display and function the
same as a warning lamp but do not light
when you start your vehicle.
91
MKZ (CC9) Instrument Cluster
Page 94 of 445
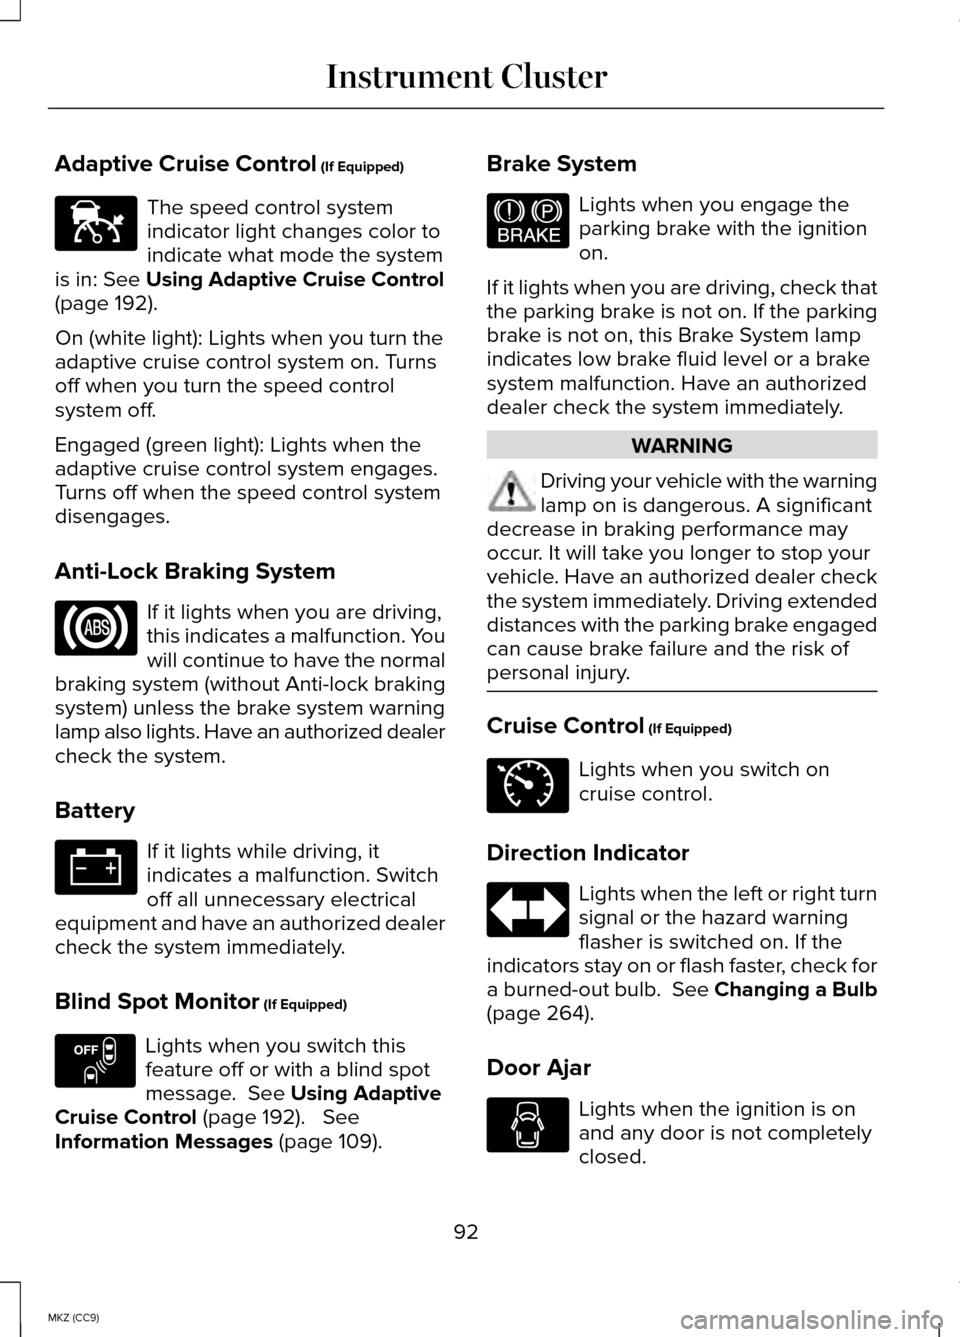
Adaptive Cruise Control (If Equipped)
The speed control system
indicator light changes color to
indicate what mode the system
is in:
See Using Adaptive Cruise Control
(page 192).
On (white light): Lights when you turn the
adaptive cruise control system on. Turns
off when you turn the speed control
system off.
Engaged (green light): Lights when the
adaptive cruise control system engages.
Turns off when the speed control system
disengages.
Anti-Lock Braking System If it lights when you are driving,
this indicates a malfunction. You
will continue to have the normal
braking system (without Anti-lock braking
system) unless the brake system warning
lamp also lights. Have an authorized dealer
check the system.
Battery If it lights while driving, it
indicates a malfunction. Switch
off all unnecessary electrical
equipment and have an authorized dealer
check the system immediately.
Blind Spot Monitor
(If Equipped) Lights when you switch this
feature off or with a blind spot
message.
See Using Adaptive
Cruise Control (page 192). See
Information Messages (page 109). Brake System Lights when you engage the
parking brake with the ignition
on.
If it lights when you are driving, check that
the parking brake is not on. If the parking
brake is not on, this Brake System lamp
indicates low brake fluid level or a brake
system malfunction. Have an authorized
dealer check the system immediately. WARNING
Driving your vehicle with the warning
lamp on is dangerous. A significant
decrease in braking performance may
occur. It will take you longer to stop your
vehicle. Have an authorized dealer check
the system immediately. Driving extended
distances with the parking brake engaged
can cause brake failure and the risk of
personal injury. Cruise Control
(If Equipped)
Lights when you switch on
cruise control.
Direction Indicator Lights when the left or right turn
signal or the hazard warning
flasher is switched on. If the
indicators stay on or flash faster, check for
a burned-out bulb. See Changing a Bulb
(page
264).
Door Ajar Lights when the ignition is on
and any door is not completely
closed.
92
MKZ (CC9) Instrument ClusterE144524 E151262 E144522 E71340
Page 95 of 445
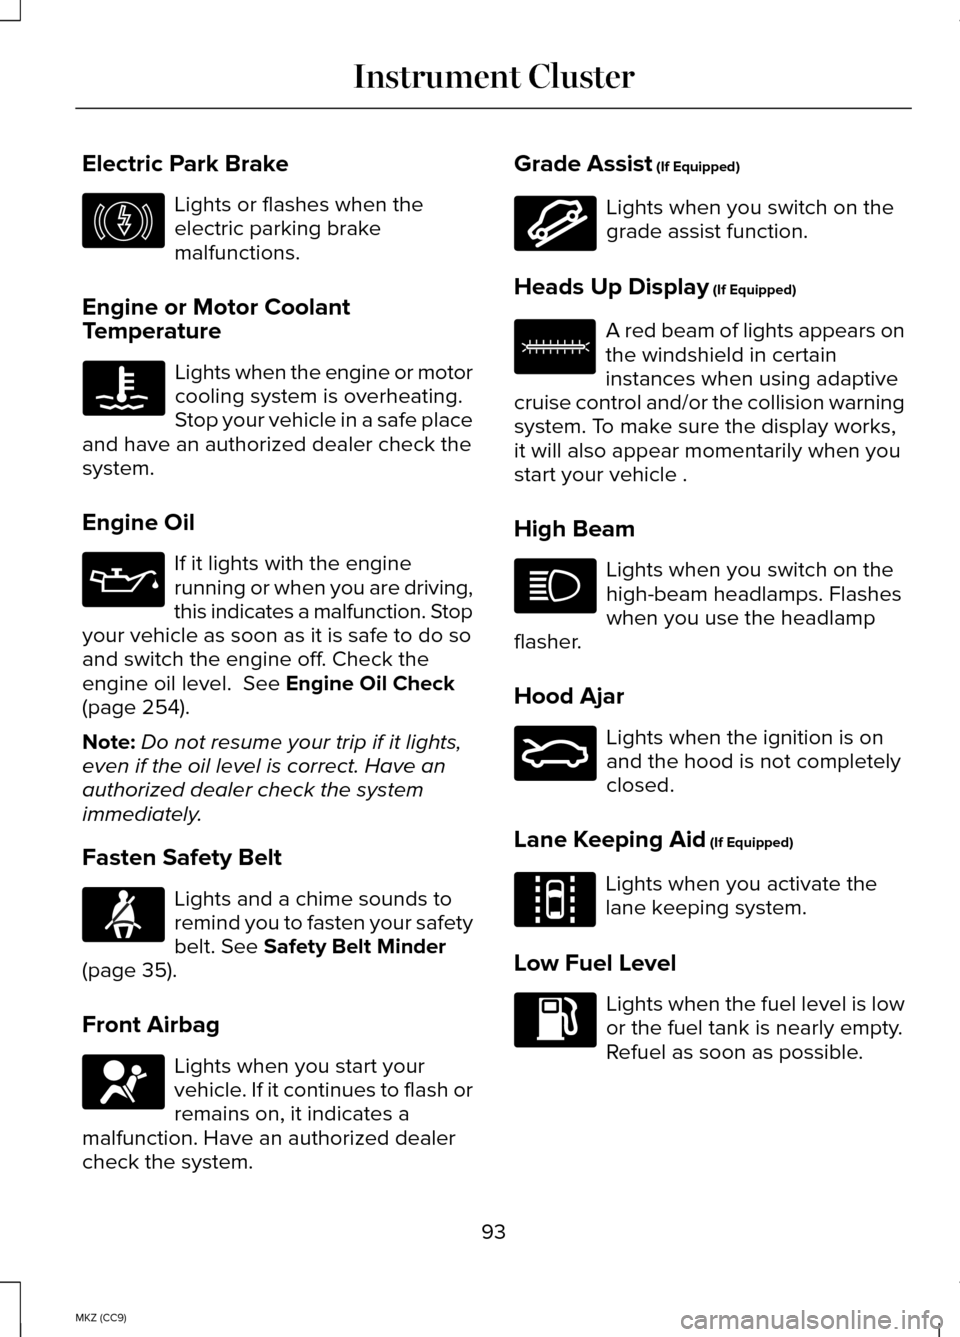
Electric Park Brake
Lights or flashes when the
electric parking brake
malfunctions.
Engine or Motor Coolant
Temperature Lights when the engine or motor
cooling system is overheating.
Stop your vehicle in a safe place
and have an authorized dealer check the
system.
Engine Oil If it lights with the engine
running or when you are driving,
this indicates a malfunction. Stop
your vehicle as soon as it is safe to do so
and switch the engine off. Check the
engine oil level. See Engine Oil Check
(page 254).
Note: Do not resume your trip if it lights,
even if the oil level is correct. Have an
authorized dealer check the system
immediately.
Fasten Safety Belt Lights and a chime sounds to
remind you to fasten your safety
belt.
See Safety Belt Minder
(page 35).
Front Airbag Lights when you start your
vehicle. If it continues to flash or
remains on, it indicates a
malfunction. Have an authorized dealer
check the system. Grade Assist
(If Equipped) Lights when you switch on the
grade assist function.
Heads Up Display
(If Equipped) A red beam of lights appears on
the windshield in certain
instances when using adaptive
cruise control and/or the collision warning
system. To make sure the display works,
it will also appear momentarily when you
start your vehicle .
High Beam Lights when you switch on the
high-beam headlamps. Flashes
when you use the headlamp
flasher.
Hood Ajar Lights when the ignition is on
and the hood is not completely
closed.
Lane Keeping Aid
(If Equipped) Lights when you activate the
lane keeping system.
Low Fuel Level Lights when the fuel level is low
or the fuel tank is nearly empty.
Refuel as soon as possible.
93
MKZ (CC9) Instrument ClusterE146190 E144523 E156133 E159324 E144813
Page 96 of 445
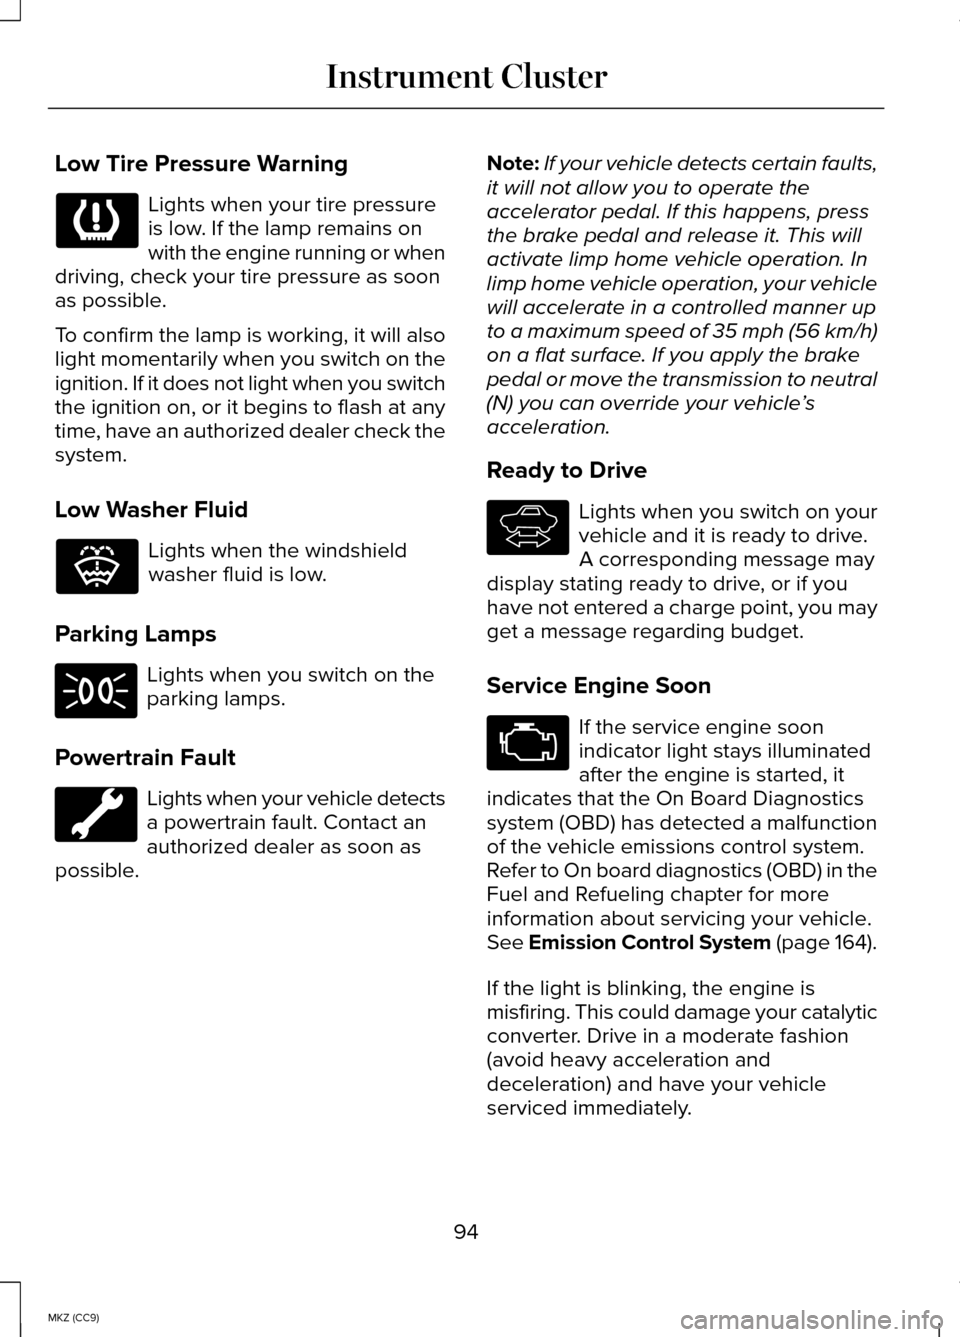
Low Tire Pressure Warning
Lights when your tire pressure
is low. If the lamp remains on
with the engine running or when
driving, check your tire pressure as soon
as possible.
To confirm the lamp is working, it will also
light momentarily when you switch on the
ignition. If it does not light when you switch
the ignition on, or it begins to flash at any
time, have an authorized dealer check the
system.
Low Washer Fluid Lights when the windshield
washer fluid is low.
Parking Lamps Lights when you switch on the
parking lamps.
Powertrain Fault Lights when your vehicle detects
a powertrain fault. Contact an
authorized dealer as soon as
possible. Note:
If your vehicle detects certain faults,
it will not allow you to operate the
accelerator pedal. If this happens, press
the brake pedal and release it. This will
activate limp home vehicle operation. In
limp home vehicle operation, your vehicle
will accelerate in a controlled manner up
to a maximum speed of 35 mph (56 km/h)
on a flat surface. If you apply the brake
pedal or move the transmission to neutral
(N) you can override your vehicle ’s
acceleration.
Ready to Drive Lights when you switch on your
vehicle and it is ready to drive.
A corresponding message may
display stating ready to drive, or if you
have not entered a charge point, you may
get a message regarding budget.
Service Engine Soon If the service engine soon
indicator light stays illuminated
after the engine is started, it
indicates that the On Board Diagnostics
system (OBD) has detected a malfunction
of the vehicle emissions control system.
Refer to On board diagnostics (OBD) in the
Fuel and Refueling chapter for more
information about servicing your vehicle.
See Emission Control System (page 164).
If the light is blinking, the engine is
misfiring. This could damage your catalytic
converter. Drive in a moderate fashion
(avoid heavy acceleration and
deceleration) and have your vehicle
serviced immediately.
94
MKZ (CC9) Instrument Cluster E132353 E144692
Page 150 of 445
The keyless starting system has three
modes:
•
Off: Turns the ignition off.
• Without applying the brake pedal,
press and release the button once
when the ignition is in the on mode,
or when the engine is running but
the vehicle is not moving.
• On:
All electrical circuits are
operational and the warning lamps and
indicators illuminate.
• Without applying the brake pedal,
press and release the button once.
• Start:
Starts the vehicle. The engine
may not start when the vehicle starts.
• Press the brake pedal, and then
press the button for any length of
time. An indicator light on the
button illuminates when then
ignition is on and when the engine
starts.
STARTING A GASOLINE ENGINE
When the engine starts for the first time
on your drive, the idle speed increases,
this helps to warm up the engine. If the
engine idle speed does not slow down
automatically, have your vehicle checked
by an authorized dealer.
Before starting the vehicle, check the
following:
• Make sure all occupants have fastened
their safety belts.
• Make sure the headlamps and
electrical accessories are off.
• Make sure the parking brake is on.
• Put the transmission in
P . Note:
Do not touch the accelerator pedal.
1. Fully press the brake pedal.
2. Press the button.
Note: The green ready indicator
illuminates letting you know that the
vehicle is ready for driving. Since your
vehicle is equipped with a silent key start,
the engine may not start at the time of the
vehicle start.
See Hybrid Electric Vehicle
(page 152).
The system does not function if:
• The key frequencies are jammed.
• The key battery has no charge.
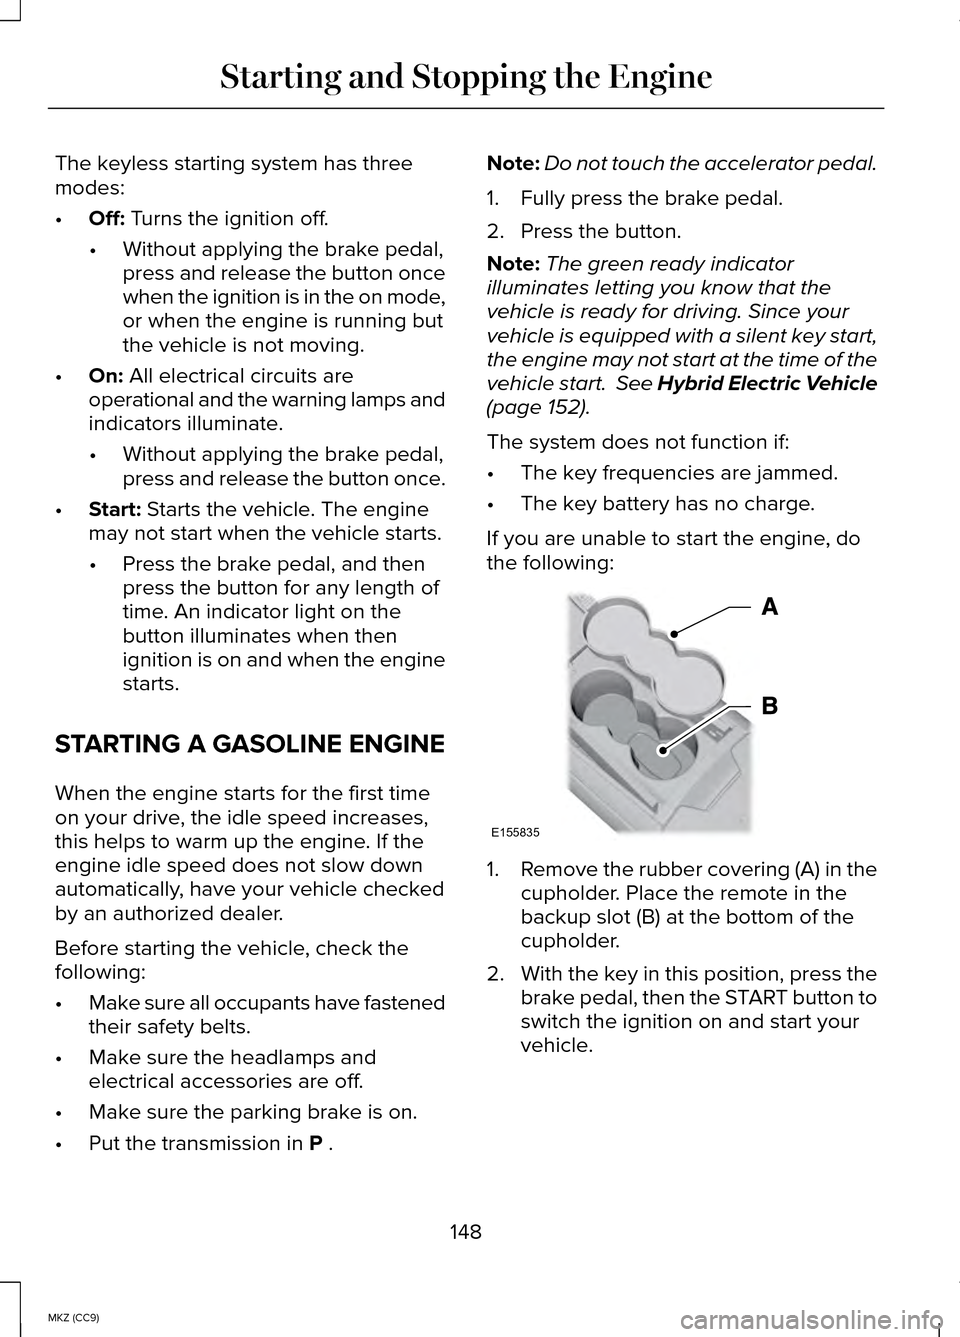
If you are unable to start the engine, do
the following: 1.
Remove the rubber covering (A) in the
cupholder. Place the remote in the
backup slot (B) at the bottom of the
cupholder.
2. With the key in this position, press the
brake pedal, then the START button to
switch the ignition on and start your
vehicle.
148
MKZ (CC9) Starting and Stopping the EngineE155835
Page 155 of 445
Low Gear: Low gear (position L) is
designed to mimic the enhanced engine
braking available in non-hybrid vehicles.
Low gear will produce high engine speeds
to provide necessary engine braking. This
is normal and will not damage your vehicle.
In low gear, the gas engine will remain on
more often than in position
D.
Unique Hybrid Operating Characteristics
Your vehicle behaves differently compared
to a non-hybrid. Here is a description of
the major differences:
Battery:
Your Hybrid is equipped with a
high voltage battery. A cool battery
ensures battery life and provides the best
possible performance. Your hybrid high
voltage battery may periodically
re-condition itself to ensure maximum
efficiency. You may notice slight changes
in driveability during this process, but it is
an important part of your hybrid's high
voltage battery optimization features.
Cabin air cools the high voltage battery by
pulling air through vents in the rear
package tray. Avoid placing objects on the
package tray which could block air flow
through the vents.
If you leave your vehicle inoperative for
over 31 days, it may be necessary to
jumpstart the vehicle.
See Roadside
Emergencies (page 225).
Engine:
The engine speed in your hybrid
is not directly tied to your vehicle speed.
Your vehicle's engine and transmission
are designed to deliver the power you
need at the most efficient engine speed.
During heavy accelerations, your hybrid
may reach high engine speeds (up to
6000 RPM). In prolonged mountainous driving, you
may see the engine tachometer changing
without your input. This is intentional and
maintains the battery charge level. You
may also notice during extended downhill
driving that your engine continues to run
instead of shutting off.
During this engine braking, the engine
stays on, but it is not using any fuel. You
may also hear a slight whine or whistle
when operating your vehicle. This is the
normal operation of the electric generator
in the hybrid system.
During certain events (such as vehicle
servicing) your low voltage 12-volt battery
may become disconnected or disabled.
Once the battery is reconnected and after
driving the vehicle, the engine may
continue to operate for three to five
seconds after the key is turned to off. This
is a normal condition.
Braking:
Your hybrid is equipped with
standard hydraulic braking and
regenerative braking. Regenerative
braking is performed by your transmission
and it captures brake energy and stores
it in your high voltage battery.
Driving to optimize fuel economy
Note: Having your engine running is not
always an indication of inefficiency. In
some cases, it is actually more efficient
than driving in electric mode.
Your fuel economy should improve
throughout your hybrid's break-in period.
As with any vehicle, your driving habits
and accessory usage can significantly
impact your fuel economy. For best results,
keep in mind these tips:
153
MKZ (CC9) Unique Driving Characteristics
Page 172 of 445
AUTOMATIC TRANSMISSION
WARNINGS
Always set the parking brake fully
and make sure the vehicle is in P
(Park). Turn the ignition off whenever you
leave your vehicle. Do not apply the brake pedal and
accelerator pedal simultaneously.
Applying both pedals simultaneously for
more than three seconds will limit engine
rpm, which may result in difficulty
maintaining speed in traffic and could lead
to serious injury. Push Button Shift Transmission
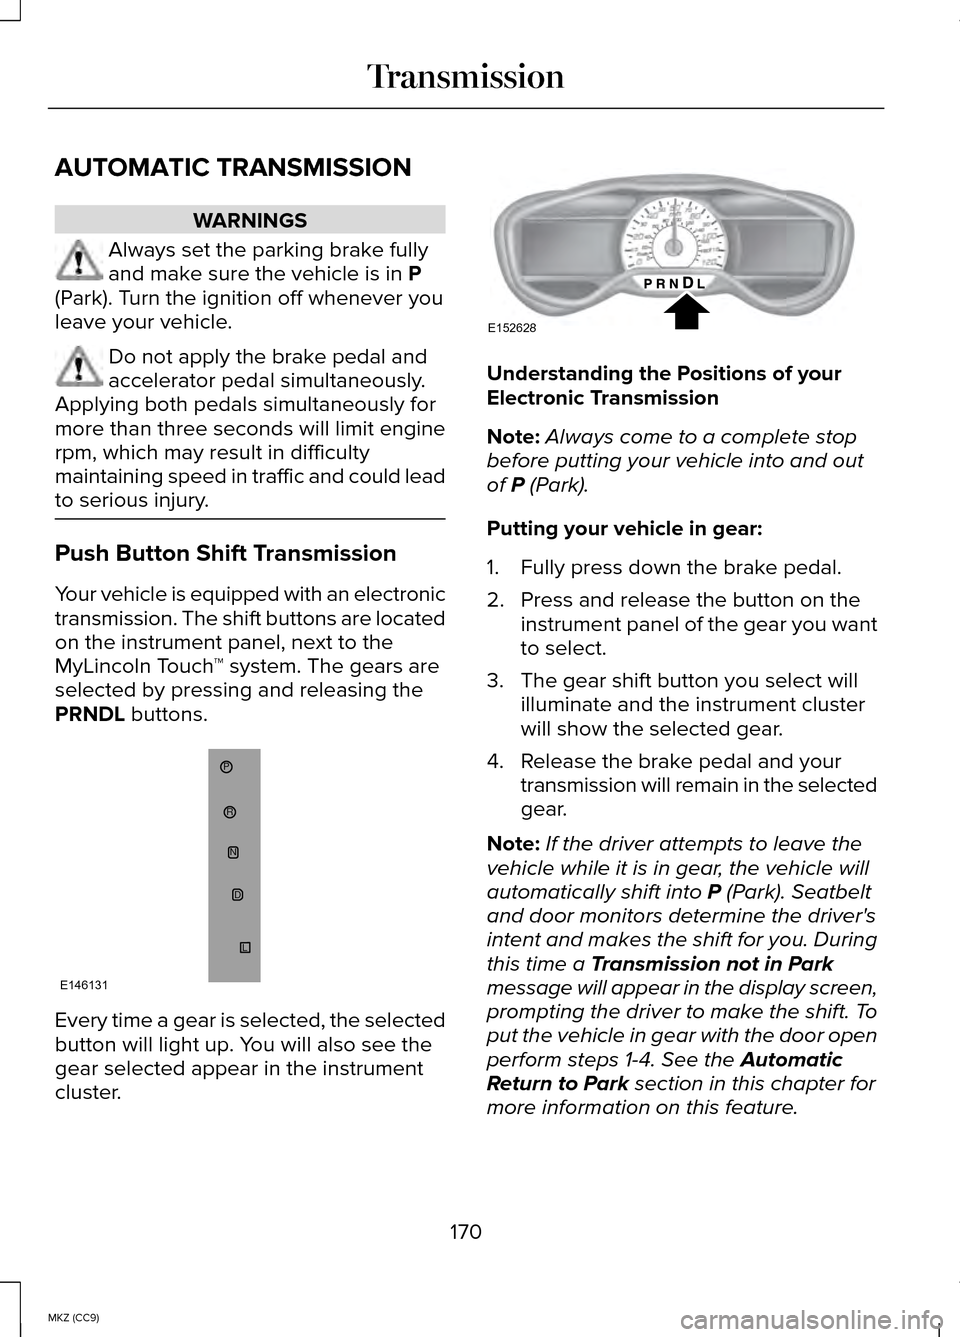
Your vehicle is equipped with an electronic
transmission. The shift buttons are located
on the instrument panel, next to the
MyLincoln Touch
™ system. The gears are
selected by pressing and releasing the
PRNDL
buttons. Every time a gear is selected, the selected
button will light up. You will also see the
gear selected appear in the instrument
cluster. Understanding the Positions of your
Electronic Transmission
Note:
Always come to a complete stop
before putting your vehicle into and out
of
P (Park).
Putting your vehicle in gear:
1. Fully press down the brake pedal.
2. Press and release the button on the instrument panel of the gear you want
to select.
3. The gear shift button you select will illuminate and the instrument cluster
will show the selected gear.
4. Release the brake pedal and your transmission will remain in the selected
gear.
Note: If the driver attempts to leave the
vehicle while it is in gear, the vehicle will
automatically shift into
P (Park). Seatbelt
and door monitors determine the driver's
intent and makes the shift for you. During
this time a
Transmission not in Park
message will appear in the display screen,
prompting the driver to make the shift. To
put the vehicle in gear with the door open
perform steps 1-4. See the
Automatic
Return to Park section in this chapter for
more information on this feature.
170
MKZ (CC9) TransmissionP
RN
D
L
E146131 E152628
Page 175 of 445
Note:
See your authorized dealer as soon
as possible if this procedure is used.
Note: For some markets this feature will
be disabled.
Note: This feature will only function if your
12-volt battery has power.
Use the brake-shift interlock override
procedure to put the vehicle in gear in the
event of an electrical malfunction or if your
vehicle has a dead battery. The brake shift
interlock override button is located inside
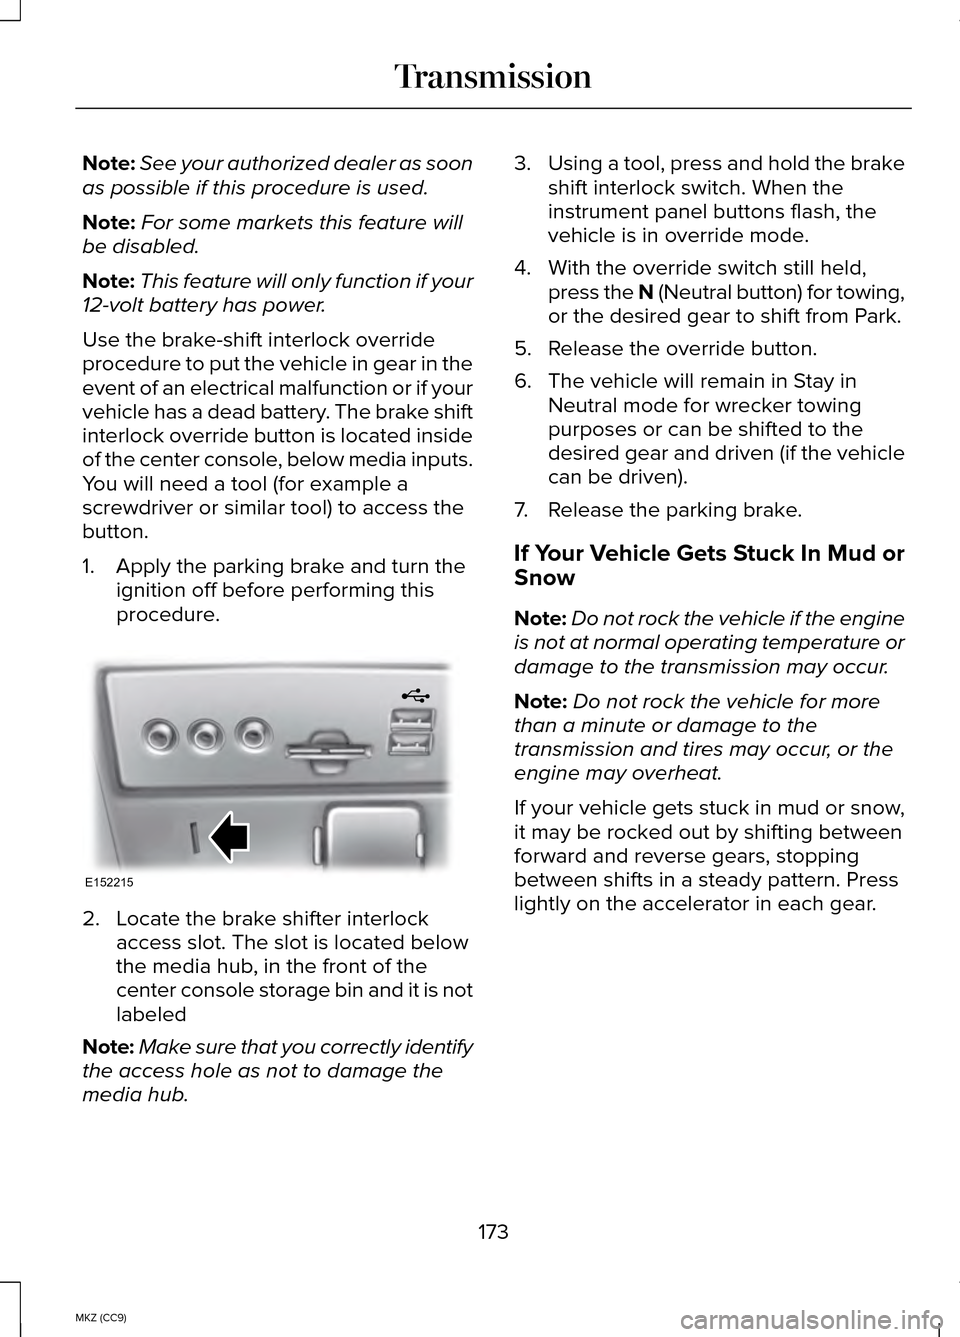
of the center console, below media inputs.
You will need a tool (for example a
screwdriver or similar tool) to access the
button.
1. Apply the parking brake and turn the ignition off before performing this
procedure. 2. Locate the brake shifter interlock
access slot. The slot is located below
the media hub, in the front of the
center console storage bin and it is not
labeled
Note: Make sure that you correctly identify
the access hole as not to damage the
media hub. 3.
Using a tool, press and hold the brake
shift interlock switch. When the
instrument panel buttons flash, the
vehicle is in override mode.
4. With the override switch still held, press the N (Neutral button) for towing,
or the desired gear to shift from Park.
5. Release the override button.
6. The vehicle will remain in Stay in Neutral mode for wrecker towing
purposes or can be shifted to the
desired gear and driven (if the vehicle
can be driven).
7. Release the parking brake.
If Your Vehicle Gets Stuck In Mud or
Snow
Note: Do not rock the vehicle if the engine
is not at normal operating temperature or
damage to the transmission may occur.
Note: Do not rock the vehicle for more
than a minute or damage to the
transmission and tires may occur, or the
engine may overheat.
If your vehicle gets stuck in mud or snow,
it may be rocked out by shifting between
forward and reverse gears, stopping
between shifts in a steady pattern. Press
lightly on the accelerator in each gear.
173
MKZ (CC9) TransmissionE152215