reset LINCOLN NAUTILUS 2020 User Guide
[x] Cancel search | Manufacturer: LINCOLN, Model Year: 2020, Model line: NAUTILUS, Model: LINCOLN NAUTILUS 2020Pages: 596, PDF Size: 5.88 MB
Page 122 of 596
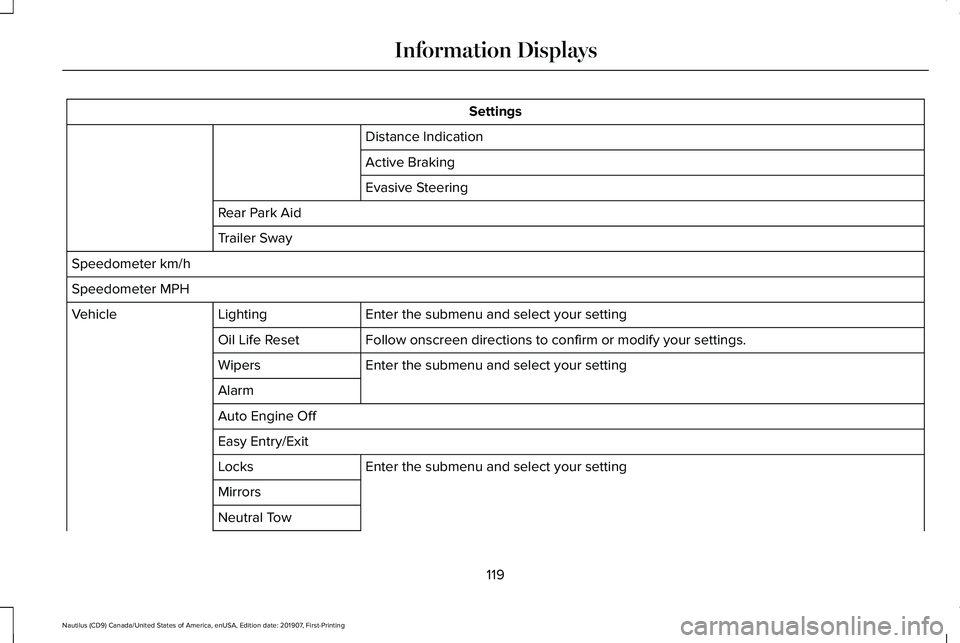
Settings
Distance Indication
Active Braking
Evasive Steering
Rear Park Aid
Trailer Sway
Speedometer km/h
Speedometer MPH Enter the submenu and select your setting
Lighting
Vehicle
Follow onscreen directions to confirm or modify your settings.
Oil Life Reset
Enter the submenu and select your setting
Wipers
Alarm
Auto Engine Off
Easy Entry/Exit
Enter the submenu and select your setting
Locks
Mirrors
Neutral Tow
119
Nautilus (CD9) Canada/United States of America, enUSA, Edition date: 201907, First-Printing Information Displays
Page 125 of 596
Display
Tire Pressure
Language
• Trip 1 - Displays distance traveled, average fuel economy, and time spent for trip. Press and hold OK to reset.
• Trip 2
information is the same as Trip 1.
• Fuel Economy
- Displays instantaneous and average fuel economy.
• Eco Behavior
- Displays information about your Acceleration, Deceleration and speed.\
• Auto StartStop
- Displays engine information.
• Tire Pressure
- Displays a graphic of current vehicle tire pressures.
• Power Distribution
(if equipped) - Displays a graphic of the power distribution between \
the front and rear wheels.
• Seatbelts
- Displays the buckle status for the rear seats.
Phone
See
General Information (page 429).
Audio
See
General Information (page 429).
Navigation
(If Equipped)
See
General Information (page 429). INFORMATION MESSAGES
Note:
Depending on your vehicle options
and instrument cluster type, not all of these
messages may be available and certain
messages may be abbreviated or shortened. 122
Nautilus (CD9) Canada/United States of America, enUSA, Edition date: 201907, First-Printing Information DisplaysE222314
Page 132 of 596
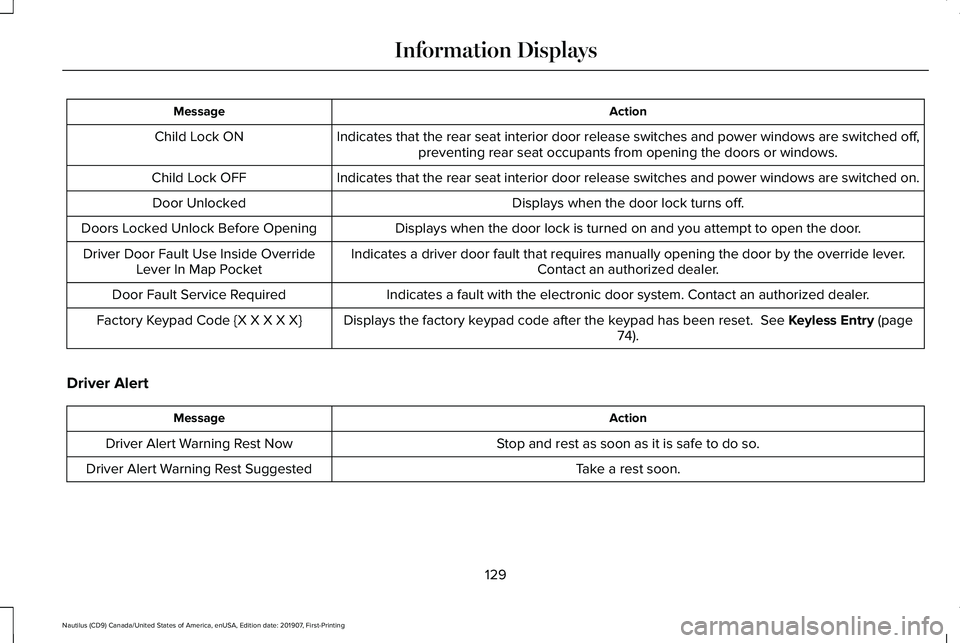
Action
Message
Indicates that the rear seat interior door release switches and power wi\
ndows are switched off,preventing rear seat occupants from opening the doors or windows.
Child Lock ON
Indicates that the rear seat interior door release switches and power wi\
ndows are switched on.
Child Lock OFF
Displays when the door lock turns off.
Door Unlocked
Displays when the door lock is turned on and you attempt to open the doo\
r.
Doors Locked Unlock Before Opening
Indicates a driver door fault that requires manually opening the door by\
the override lever.Contact an authorized dealer.
Driver Door Fault Use Inside Override
Lever In Map Pocket
Indicates a fault with the electronic door system. Contact an authorized\
dealer.
Door Fault Service Required
Displays the factory keypad code after the keypad has been reset. See Keyless Entry (page
74).
Factory Keypad Code {X X X X X}
Driver Alert Action
Message
Stop and rest as soon as it is safe to do so.
Driver Alert Warning Rest Now
Take a rest soon.
Driver Alert Warning Rest Suggested
129
Nautilus (CD9) Canada/United States of America, enUSA, Edition date: 201907, First-Printing Information Displays
Page 152 of 596
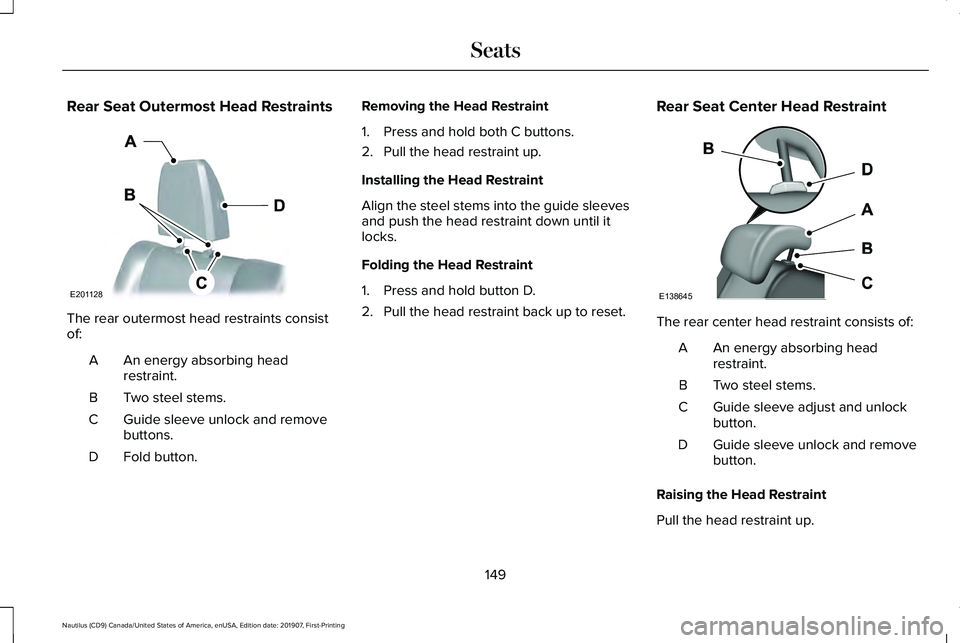
Rear Seat Outermost Head Restraints
The rear outermost head restraints consist
of:
An energy absorbing head
restraint.
A
Two steel stems.
B
Guide sleeve unlock and remove
buttons.
C
Fold button.
D Removing the Head Restraint
1. Press and hold both C buttons.
2. Pull the head restraint up.
Installing the Head Restraint
Align the steel stems into the guide sleeves
and push the head restraint down until it
locks.
Folding the Head Restraint
1. Press and hold button D.
2. Pull the head restraint back up to reset.
Rear Seat Center Head Restraint The rear center head restraint consists of:
An energy absorbing head
restraint.
A
Two steel stems.
B
Guide sleeve adjust and unlock
button.
C
Guide sleeve unlock and remove
button.
D
Raising the Head Restraint
Pull the head restraint up.
149
Nautilus (CD9) Canada/United States of America, enUSA, Edition date: 201907, First-Printing SeatsE201128 E138645
Page 158 of 596
WARNING: Do not use the memory
function when your vehicle is moving.
This feature automatically recalls the position
of the following:
• Driver seat.
• Power mirrors.
• Optional power steering column.
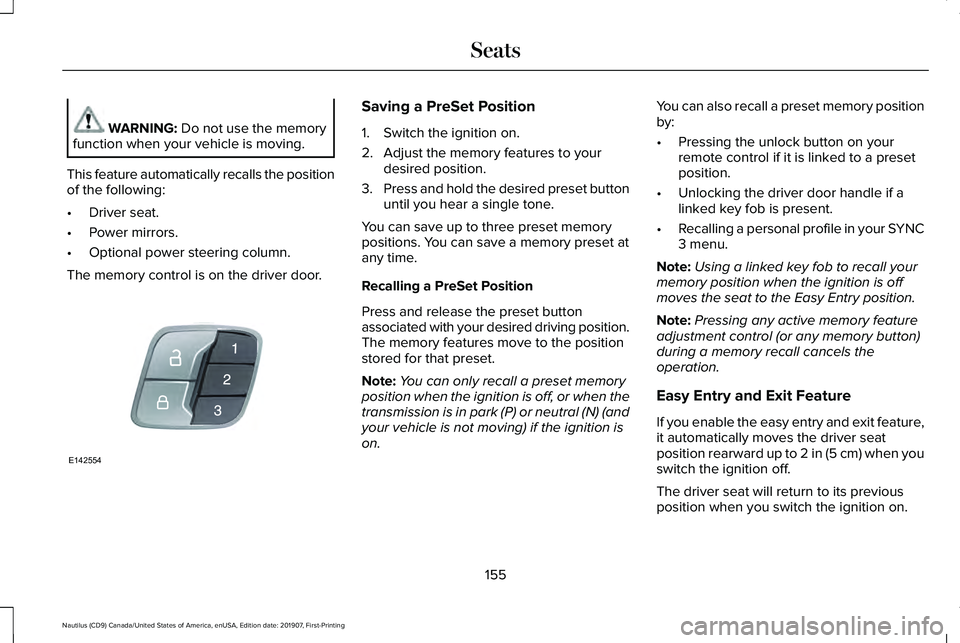
The memory control is on the driver door. Saving a PreSet Position
1. Switch the ignition on.
2. Adjust the memory features to your
desired position.
3. Press and hold the desired preset button
until you hear a single tone.
You can save up to three preset memory
positions. You can save a memory preset at
any time.
Recalling a PreSet Position
Press and release the preset button
associated with your desired driving position.
The memory features move to the position
stored for that preset.
Note: You can only recall a preset memory
position when the ignition is off, or when the
transmission is in park (P) or neutral (N) (and
your vehicle is not moving) if the ignition is
on. You can also recall a preset memory position
by:
•
Pressing the unlock button on your
remote control if it is linked to a preset
position.
• Unlocking the driver door handle if a
linked key fob is present.
• Recalling a personal profile in your SYNC
3 menu.
Note: Using a linked key fob to recall your
memory position when the ignition is off
moves the seat to the Easy Entry position.
Note: Pressing any active memory feature
adjustment control (or any memory button)
during a memory recall cancels the
operation.
Easy Entry and Exit Feature
If you enable the easy entry and exit feature,
it automatically moves the driver seat
position rearward up to
2 in (5 cm) when you
switch the ignition off.
The driver seat will return to its previous
position when you switch the ignition on.
155
Nautilus (CD9) Canada/United States of America, enUSA, Edition date: 201907, First-Printing SeatsE142554
Page 159 of 596
You can enable or disable this feature
through the information display. See
Information Displays (page 116).
Personal Profiles
This feature allows you to create multiple
personal profiles enabling users to
personalize vehicle ’s settings. You can
create one profile for each preset memory
seat button along with a guest profile. You
can recall a profile using SYNC 3 or the
preset button you selected when you created
your profile. You can also link a keyfob to
your profile, which is used to recall it.
Creating a Personal Profile
Use the SYNC display to create a personal
profile.
1. Switch the ignition on and leave the vehicle in park (P).
2. Select the Personal Profiles button under
Settings.
3. Follow the instructions on the display. Linking a Personal Profile to your Remote
Control or Intelligent Access Keyfob
You can save preset memory positions for
up to three remote controls or intelligent
access (IA) keys, by assigning a keyfob to a
personal profile in your SYNC 3.
Use the SYNC display to link a keyfob to a
personal profile.
1. Switch the ignition on and leave the
vehicle in park (P).
2. Select the Personal Profiles button under
Settings.
3. Touch the arrow for the profile you wish to link a keyfob to.
4. Select the Link Keyfob button.
5. Follow the instructions on the display.
Note: If more than one linked remote control
or intelligent access key is in range, the
memory function moves to the settings of
the first key to initiate a memory recall. Note:
The guest profile consists of existing
settings when there is no driver profile
created. After you create a driver profile, the
guest profile serves as an additional driver
profile.
Note: You cannot link a personalized name,
a memory seat button or a keyfob to a guest
profile.
Personal Settings
Personal profiles allow you to personalize
positional settings such as seats and mirrors,
as well as non-positional settings such as
radio, navigation, driver assist and system
settings.
See SYNC™ 3 (page 429). You
cannot change the menu locations and
settings of those personalized features with
personal profiles.
Note: Non-positional settings are saved to
the active driver profile whenever you
change a setting.
Note: You can save positional settings if you
press and hold a memory seat button.
See
Settings (page 471).
156
Nautilus (CD9) Canada/United States of America, enUSA, Edition date: 201907, First-Printing Seats
Page 160 of 596
Recalling and Changing a Profile
You can recall a profile by:
•
Using a keyfob that has been linked to a
driver profile to access the remote start
feature, press an unlock button or open
the door with the exterior door handle.
• Pressing a memory seat button that has
been linked to a driver profile.
• Using the Personal Profiles menu on the
SYNC touchscreen.
Note: The recalled profile replaces the
previously active profile. If the active profile
is not your desired profile, you can change
it using any of the three methods listed. When you switch on the personal profiles
feature:
•
Unlocking a door with a keyfob that is
not linked to a driver profile recalls
non-positional settings from the guest
profile. It will not change the positional
settings.
• Pressing a memory seat button that is
not linked to a driver profile or has not
been saved to a preset setting recalls
non-positional settings from the guest
profile. It will not change the positional
settings.
• Pressing a memory seat button that is
not linked to a driver profile but has been
saved to a preset setting recalls
non-positional settings from the guest
profile. It recalls the positional settings
that you saved to that memory seat
button.
See SYNC™ 3 Troubleshooting (page 473). When you switch off a personal profile
feature:
•
Unlocking a door with a keyfob recalls
non-positional settings from the guest
profile and still recalls positional settings
from the driver profile which the keyfob
had been linked to.
• Pressing a memory seat button that has
not been linked to a driver profile or has
not been saved to a preset setting recalls
non-positional settings from the guest
profile. It will not change the positional
settings.
• Pressing a memory seat button that has
been linked to a driver profile or has
saved to a preset setting recalls
non-positional settings from the guest
profile. It recalls the positional settings
that you saved to that memory seat
button.
157
Nautilus (CD9) Canada/United States of America, enUSA, Edition date: 201907, First-Printing Seats
Page 170 of 596
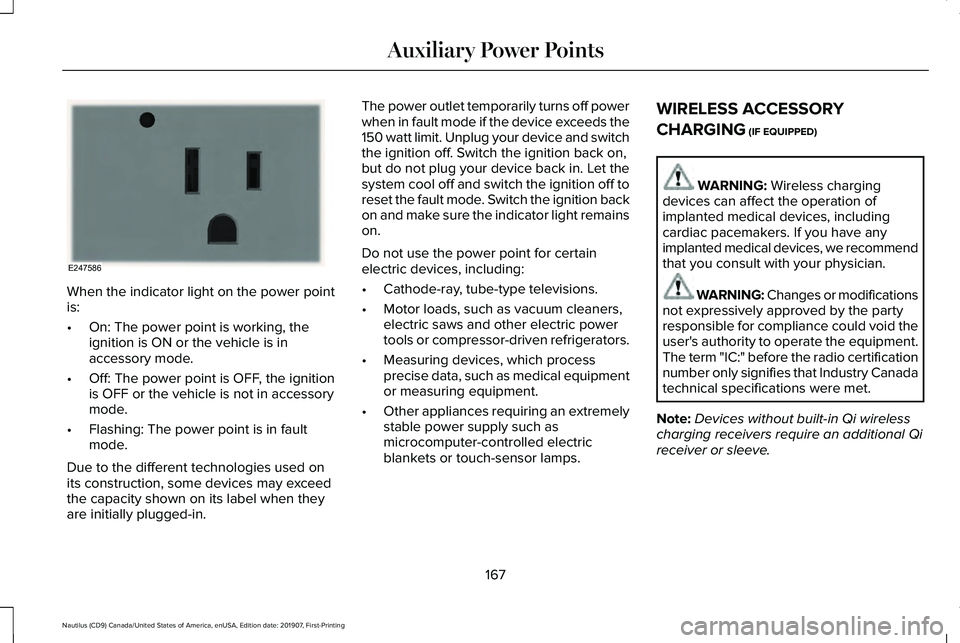
When the indicator light on the power point
is:
•
On: The power point is working, the
ignition is ON or the vehicle is in
accessory mode.
• Off: The power point is OFF, the ignition
is OFF or the vehicle is not in accessory
mode.
• Flashing: The power point is in fault
mode.
Due to the different technologies used on
its construction, some devices may exceed
the capacity shown on its label when they
are initially plugged-in. The power outlet temporarily turns off power
when in fault mode if the device exceeds the
150 watt limit. Unplug your device and switch
the ignition off. Switch the ignition back on,
but do not plug your device back in. Let the
system cool off and switch the ignition off to
reset the fault mode. Switch the ignition back
on and make sure the indicator light remains
on.
Do not use the power point for certain
electric devices, including:
•
Cathode-ray, tube-type televisions.
• Motor loads, such as vacuum cleaners,
electric saws and other electric power
tools or compressor-driven refrigerators.
• Measuring devices, which process
precise data, such as medical equipment
or measuring equipment.
• Other appliances requiring an extremely
stable power supply such as
microcomputer-controlled electric
blankets or touch-sensor lamps. WIRELESS ACCESSORY
CHARGING (IF EQUIPPED) WARNING:
Wireless charging
devices can affect the operation of
implanted medical devices, including
cardiac pacemakers. If you have any
implanted medical devices, we recommend
that you consult with your physician. WARNING: Changes or modifications
not expressively approved by the party
responsible for compliance could void the
user's authority to operate the equipment.
The term "IC:" before the radio certification
number only signifies that Industry Canada
technical specifications were met.
Note: Devices without built-in Qi wireless
charging receivers require an additional Qi
receiver or sleeve.
167
Nautilus (CD9) Canada/United States of America, enUSA, Edition date: 201907, First-Printing Auxiliary Power PointsE247586
Page 178 of 596
4. Keep the accelerator pedal fully
depressed and press the push button
ignition switch until the engine starts.
Automatic Engine Shutdown
This feature automatically shuts down the
engine if it has been idling for an extended
period. The ignition also turns off to save
battery power. Before your vehicle shuts
down, a message appears in the information
display showing a timer counting down. If
you do not intervene within 30 seconds, your
vehicle shuts down. Another message
appears in the information display to inform
you that your vehicle has shut down to save
fuel. Start your vehicle as normal.
Automatic Engine Shutdown Override
Note: You cannot permanently switch off
the automatic shutdown. When you switch
it off temporarily, it turns on at the next
ignition cycle. You can stop the shutdown, or reset the
timer, at any point before the 30-second
countdown has expired by doing any of the
following:
•
Reset the timer by pressing the brake or
accelerator pedal.
• Temporarily switch off the shutdown
feature during the current ignition cycle
using the information display. See
General Information (page 116).
• Press OK or RESET to temporarily switch
the feature off during the current ignition
cycle.
Stopping the Engine When Your
Vehicle is Stationary
1. Shift into park (P).
2. Press the push button ignition switch.
3. Apply the parking brake.
Note: The ignition, all electrical circuits and
all warning lamps and indicators will be
turned off.
Note: If the engine is idling for 30 minutes,
the ignition and engine automatically shuts
down. Stopping the Engine When Your
Vehicle is Moving WARNING:
Switching off the engine
when the vehicle is still moving will result
in a loss of brake and steering assistance.
The steering will not lock, but higher effort
will be required. When the ignition is
switched off, some electrical circuits,
including air bags, warning lamps and
indicators may also be off. If the ignition
was turned off accidentally, you can shift
into neutral (N) and re-start the engine.
1. Put the transmission into neutral (N) and
use the brakes to bring your vehicle to a
safe stop.
2. When your vehicle has stopped, shift into
park (P).
3. Press and hold the push button ignition switch until the engine stops, or press it
three times within two seconds.
4. Apply the parking brake.
175
Nautilus (CD9) Canada/United States of America, enUSA, Edition date: 201907, First-Printing Starting and Stopping the Engine
Page 190 of 596
9. Fully close the fuel filler door.
Note:
The message may not immediately
reset. If the message continues to appear
and a warning lamp illuminates, have your
vehicle checked as soon as possible.
FUEL CONSUMPTION
Advertised Capacity
The advertised capacity is the maximum
amount of fuel that you can add to the fuel
tank after running out of fuel. Included in the
advertised capacity is an empty reserve. The
empty reserve is an unspecified amount of
fuel that remains in the fuel tank when the
fuel gauge indicates empty.
Note: The amount of fuel in the empty
reserve varies and should not be relied upon
to increase driving range.
Fuel Economy
Your vehicle calculates fuel economy figures
through the trip computer average fuel
function. See General Information (page
116). The first 1,000 mi (1,500 km) of driving is the
break-in period of the engine. A more
accurate measurement is obtained after
2,000 mi (3,000 km)
.
Impacting Fuel Economy
• Incorrect tire inflation pressures.
• Fully loading your vehicle.
• Carrying unnecessary weight.
• Adding certain accessories to your
vehicle such as bug deflectors, rollbars
or light bars, running boards and ski
racks.
• Using fuel blended with alcohol.
See
Fuel Quality (page 182).
• Fuel economy may decrease with lower
temperatures.
• Fuel economy may decrease when
driving short distances.
• You may get better fuel economy when
driving on flat terrain than when driving
on hilly terrain.
187
Nautilus (CD9) Canada/United States of America, enUSA, Edition date: 201907, First-Printing Fuel and Refueling