ECO mode LINCOLN NAUTILUS 2020 Owner's Manual
[x] Cancel search | Manufacturer: LINCOLN, Model Year: 2020, Model line: NAUTILUS, Model: LINCOLN NAUTILUS 2020Pages: 596, PDF Size: 5.88 MB
Page 197 of 596
If you turn the ignition off when your vehicle
is moving, your vehicle first shifts into neutral
(N) until it slows down enough to shift into
park (P) automatically.
Note:
If you have waited an extended period
of time, 2-15 minutes before starting your
vehicle, unlatching your seatbelt causes this
feature to activate, even with the driver door
closed.
Note: This feature may not work properly if
the door ajar switch is malfunctioning. If your
door ajar indicator does not illuminate when
you open the driver door or the indicator
illuminates with the driver door closed, see
your authorized dealer.
Reverse (R)
With the transmission in reverse (R), your
vehicle moves backward. Always come to a
complete stop before shifting into and out
of reverse (R). Neutral (N) WARNING: In neutral (N) your vehicle
has the ability to roll freely. If you intend to
leave your vehicle, make sure you apply
the parking brake.
With the transmission in neutral (N), you can
start your vehicle and it is free to roll. Hold
the brake pedal down when in this position.
Stay in Neutral Mode
Note: Stay in neutral mode is a temporary
vehicle state with the ignition off. Once in
this mode, the battery must maintain
sufficient voltage or your vehicle returns to
park.
Note: When entering an automatic car wash,
always shift to Neutral (N). If you are exiting
the vehicle before the car wash, Stay in
Neutral Mode is available.
Extended usage of Stay in Neutral mode may
result in a battery voltage reduction to a level
where the vehicle may no longer start.
Do not tow your vehicle in this mode. Failure to follow this instruction could result
in vehicle damage not covered by the vehicle
Warranty.
To enter Stay in Neutral mode, do the
following:
1. Bring your vehicle to a complete stop.
2. Shift into neutral (N).
Note:
A message appears in the information
display.
3. Press the neutral (N) button.
Note: A confirmation message appears in
the information display when your vehicle
has entered Stay in Neutral mode and the
neutral (N) button on the transmission
selector blinks slowly.
To exit Stay in Neutral mode, press the brake
pedal and shift into another gear.
Drive (D)
The normal driving position for the best fuel
economy.
Sport (S)
Putting the vehicle in sport (S):
194
Nautilus (CD9) Canada/United States of America, enUSA, Edition date: 201907, First-Printing Transmission
Page 200 of 596
5.
Once in driver seat, fully apply the brake
pedal and hold. Do not release. Pull the
orange tether outward towards the driver,
move the tether to the lower right-hand
corner to seat the metal bead in the
pocket, locking it in the override position.
If done correctly, a message on the
instrument cluster displays Park Not
Available, Transmission Not In Park or
Shift System Fault.
Note: Your vehicle is now out of the park (P)
position and is free to roll.
6. With your foot still fully applied on the brake pedal, disengage the parking
brake. See Electric Parking Brake (page
205).
7. Your vehicle remains in neutral (N) for emergency towing purposes.
8. Switch off the ignition.
9. Once safe to do so, and there is no risk that your vehicle will roll, disconnect the
negative (black) battery cable from the
battery. Returning Your Vehicle to Normal Mode
1. Once it is safe to do so, reconnect the
negative (black) battery cable to the
battery.
2. Apply the parking brake.
See Electric
Parking Brake (page 205).
Note: If vehicle battery is dead, for example,
no electrical power available, an external
power may be required to apply the parking
brake.
Note: Do not pull the tether until you are in
the driver seat.
3. Once in the driver seat, fully apply the brake pedal and hold. Do not release.
Pull the orange tether outward towards
the driver seat.
4. Move the tether towards the left and release to return it to the rest position.
5. Stow the manual park release cable tether, install the access cover and
replace the screw. 6.
With your foot fully applied on the brake
pedal, start your vehicle. Confirm that
your vehicle is in the park (P) position and
that the instrument cluster indicates park
(P).
7. If the instrument cluster is not displaying
the park (P) position or there is a
message stating Park Not Available,
Transmission Not In Park or Shift System
Fault, apply the parking brake before
exiting your vehicle. Contact an
authorized dealer for service.
Automatic Transmission Adaptive
Learning
This feature increases durability and provides
consistent shift feel over the life of your
vehicle. A new vehicle or transmission may
have firm or soft shifts. This operation does
not affect function or durability of your
transmission and is normal. Over time, the
adaptive learning process can fully update
transmission operation. Additionally, the
strategy must be relearned whenever the
battery is disconnected or a new battery is
installed.
197
Nautilus (CD9) Canada/United States of America, enUSA, Edition date: 201907, First-Printing Transmission
Page 202 of 596
USING ALL-WHEEL DRIVE
All-wheel drive uses all four wheels to power
the vehicle. This increases traction, enabling
you to drive over terrain and road conditions
that a conventional two-wheel drive vehicle
cannot. The AWD system turns on when
needed and does not require input from you.
Note:
The AWD feature gives your vehicle
some limited off-road capabilities in which
driving surfaces are relatively level,
obstruction-free and otherwise similar to
normal on-road driving conditions. Operating
your vehicle under other than those
conditions could subject the vehicle to
excessive stress that might result in damage
that your vehicle warranty does not cover.
Note: A warning message appears in the
information display when an AWD system
fault is present. See Information Messages
(page 122). An AWD system fault causes the
AWD system to default to front-wheel drive
only mode. When this warning message
displays, have your vehicle serviced at an
authorized dealer Note:
A warning message appears in the
information display if the AWD system has
overheated. See Information Messages
(page 122). This condition may occur if you
operate the vehicle in extreme conditions
with excessive wheel slip, such as deep
sand. To resume normal AWD function as
soon as possible, stop the vehicle in a safe
location and stop the engine for at least 10
minutes. After you restart the engine and the
AWD system adequately cools, the warning
message turns off and normal AWD function
returns.
Do not use a spare tire of a different size
other than the tire provided. If the mini-spare
tire is installed, the AWD system may disable
automatically and enter front-wheel drive
only mode to protect driveline components.
A warning in the information display appears,
indicating that the system is in front-wheel
drive only mode. See Information Messages
(page
122). If there is a warning message in
the information display from using the spare
tire, this indicator should turn off after
reinstalling the repaired or replaced normal
road tire and cycling the ignition off and on.
We recommend that you reinstall the repaired or replaced road tire as soon as
possible. Major dissimilar tire sizes between
the front and rear axles could cause the AWD
system to stop functioning and default to
front-wheel drive or damage the AWD
system.
Driving in Special Conditions with All-
Wheel Drive (AWD)
AWD vehicles are ready to drive on sand,
snow, mud and rough roads and have
operating characteristics that are somewhat
different from conventional vehicles, both on
and off the highway.
Under severe operating conditions, the A/C
may cycle on and off to protect overheating
of the engine.
Basic operating principles in special
conditions
•
Drive slower in strong crosswinds which
can affect the normal steering
characteristics of your vehicle.
• Be extremely careful when driving on
pavement made slippery by loose sand,
water, gravel, snow or ice.
199
Nautilus (CD9) Canada/United States of America, enUSA, Edition date: 201907, First-Printing All-Wheel Drive
(If Equipped)
Page 215 of 596
Electronic Stability Control
The system enhances your vehicle
’s ability
to prevent skids or lateral slides by applying
brakes to one or more of the wheels
individually and, if necessary, reducing
engine power.
Roll Stability Control
The system enhances your vehicle ’s ability
to prevent rollovers by detecting your
vehicle ’s roll motion and the rate at which it
changes by applying the brakes to one or
more wheels individually.
Traction Control
The system enhances your vehicle ’s ability
to maintain traction of the wheels by
detecting and controlling wheel spin. See
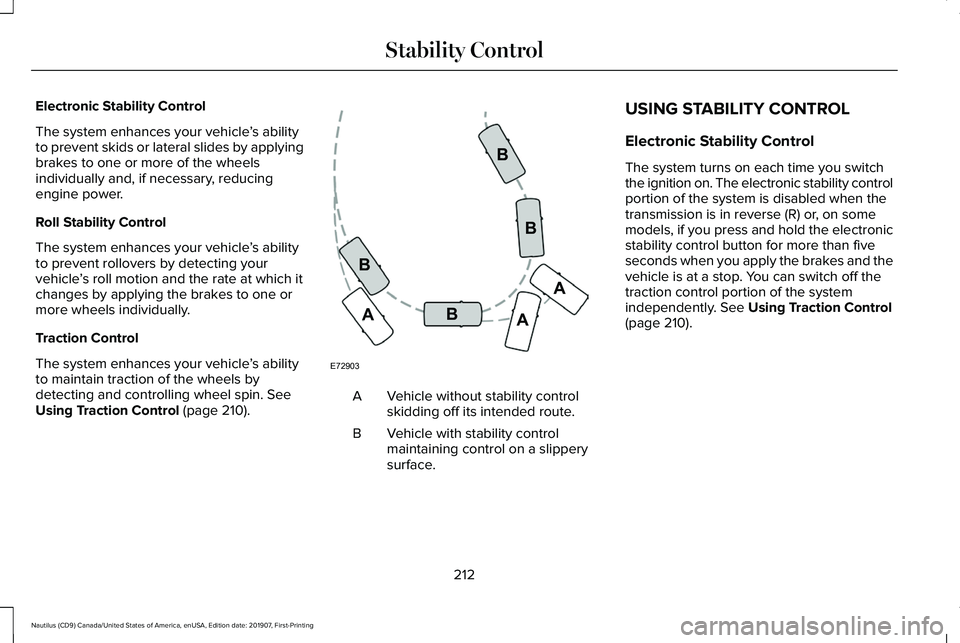
Using Traction Control (page 210). Vehicle without stability control
skidding off its intended route.
A
Vehicle with stability control
maintaining control on a slippery
surface.
B USING STABILITY CONTROL
Electronic Stability Control
The system turns on each time you switch
the ignition on. The electronic stability control
portion of the system is disabled when the
transmission is in reverse (R) or, on some
models, if you press and hold the electronic
stability control button for more than five
seconds when you apply the brakes and the
vehicle is at a stop. You can switch off the
traction control portion of the system
independently.
See Using Traction Control
(page 210).
212
Nautilus (CD9) Canada/United States of America, enUSA, Edition date: 201907, First-Printing Stability ControlE72903A
AA
B
BB
B
Page 224 of 596
Note:
If you change any tires, the system
must recalibrate and may not correctly
operate for a short time.
Active park assist is a multi-step process and
may require you to shift the transmission
multiple times. Follow the onscreen
instructions until the parking maneuver is
complete.
If you are uncomfortable with the proximity
to any vehicle or object, you may choose to
override the system by grabbing the steering
wheel, or by taking full control of your vehicle
after pressing the active park assist button.
Keep your hands, hair, clothing and any
loose items clear of the steering wheel when
using active park assist.
The sensors are on the front and rear
bumpers.
The system may not correctly operate in any
of the following conditions:
• You use a spare tire or a tire that is
significantly worn more than the other
tires.
• One or more tires are incorrectly inflated.
• You try to park on a tight curve. •
Something passes between the front
bumper and the parking space. For
example, a pedestrian or cyclist.
• The edge of the neighboring parked
vehicle is high off the ground. For
example, a bus, tow truck or flatbed
truck.
• The weather conditions are poor. For
example, during heavy rain, snow, fog,
high humidity and high temperatures.
Do not use the system if:
• You have attached an add-on accessory
close to the sensors on the front or rear
of your vehicle. For example, a bike rack
or trailer.
• You have attached an overhanging
object to the roof. For example, a
surfboard.
• The front bumper, rear bumper or the
side sensors are damaged.
• The correct tire size is not in use on your
vehicle. For example, a mini-spare tire. Using Active Park Assist
Selecting an Active Park Assist Mode Press the button once to activate
parallel parking. Press the button
a second time to activate
perpendicular parking. If you press the
button again the system switches off.
If your vehicle is parked and after you switch
the ignition on, you can use the information
display to toggle through the modes. Press
the button to switch the system on and open
the system menu in the information display.
Note: If your vehicle is parked, the default
mode is parallel park out assist. However, if
you did not use active park assist to parallel
park your vehicle, use the information
display to select park out assist.
Note: You can repeatedly press the active
park assist button to toggle through the
modes only after moving your vehicle
approximately 33 ft (10 m).
221
Nautilus (CD9) Canada/United States of America, enUSA, Edition date: 201907, First-Printing Parking AidsE146186
Page 271 of 596
These systems have a range of modes which
you can choose from to customize your ideal
driving experience:
•
Comfort – Provides a more relaxed
driving experience, maximizing comfort.
Your steering effort decreases and the
suspension movement is more fluid.
Comfort mode is ideal when you desire
enhanced traveling comfort.
• Normal
– Delivers a balanced
combination of comfortable, controlled
ride and confident handling. This mode
provides an engaging driving experience
and a direct connection to the road
without sacrificing any of the composure
demanded from a luxury vehicle.
• Sport
– Provides a sportier driving
experience. The suspension stiffens, with
an emphasis on handling and control.
The engine responds more directly to
your inputs and takes on a more powerful
tone. This mode is ideal for use during
more spirited driving.
You can change the drive control settings in
the information display.
See General
Information (page 116). Note:
Not all settings may be available.
Note: Lincoln Drive Control has diagnostic
checks that continuously monitor the system
to ensure proper operation. Certain types of
system errors gray out the mode selections
within the information display, preventing
you from changing states when the gear
position is changed. Other types of errors
produce a temporary message in the
information display. If either condition
persists for multiple key cycles, see an
authorized dealer.
EcoCoach
The system is designed to monitor certain
driving characteristics to help you drive more
efficiently.
See Economical Driving (page
285).
Note: The efficiency levels do not result in a
defined fuel consumption figure.
See Fuel
Consumption (page 187).
Note: The system only indicates the
efficiency level for the current trip. The
system resets each time you switch the
ignition on. EcoCoach System Display
You can view the instantaneous efficiency
level or the trip summary in the information
display.
Instantaneous Efficiency Level
The display ring increases as the
instantaneous efficiency level increases and
illuminates when it reaches maximum
efficiency. The level continuously updates
to indicate the efficiency level for the current
trip.
Use the information display controls to view
the instantaneous efficiency level.
See
General Information (page 116).
Trip Summary
The calculated trip summary is shown as four
colored bars. The bars travel from left to right
as the calculated efficiency levels increase.
The bars indicate the average efficiency level
for acceleration, deceleration, speed and
gear shifting during the total distance
traveled by your vehicle for the current trip.
268
Nautilus (CD9) Canada/United States of America, enUSA, Edition date: 201907, First-Printing Driving Aids
Page 287 of 596
If your vehicle becomes inoperable without
access to wheel dollies or a vehicle transport
trailer, it can be flat-towed with all wheels on
the ground, regardless of the powertrain and
transmission configuration, under the
following conditions:
•
Your vehicle is facing forward for towing
in a forward direction.
• Refer to the Manual Park Release
procedure. See Automatic Transmission
(page 192). Failing to do so may result in
damage to the transmission.
• Maximum speed is
35 mph (56 km/h).
• Maximum distance is
50 mi (80 km).
Recreational Towing
Note: Put your climate control system in
recirculated air mode to prevent exhaust
fumes from entering the vehicle.
See
Climate Control (page 142).
Follow these guidelines if you have a need
for recreational towing. An example of
recreational towing would be towing your
vehicle behind a motorhome. We designed
these guidelines to prevent damage to your
transmission. You can recreational tow your vehicle with
all four wheels on the ground using the
Manual Park Release procedure, or with all
four wheels off the ground using a vehicle
transport trailer. If you are using a vehicle
transport trailer, follow the instructions
specified by the equipment provider.
If you recreational tow your vehicle with all
four wheels on the ground:
•
Only tow your vehicle in the forward
direction.
• Refer to the Manual Park Release
procedure. See Automatic Transmission
(page
192). Failing to do so may result in
damage to the transmission.
• Do not exceed
65 mph (105 km/h).
284
Nautilus (CD9) Canada/United States of America, enUSA, Edition date: 201907, First-Printing Towing
Page 288 of 596
BREAKING-IN
You need to break in new tires for
approximately 300 mi (480 km). During this
time, your vehicle may exhibit some unusual
driving characteristics.
Avoid driving too fast during the first 1,000 mi
(1,600 km)
. Vary your speed frequently and
change up through the gears early. Do not
labor the engine.
Do not tow during the first
1,000 mi
(1,600 km).
REDUCED ENGINE PERFORMANCE WARNING:
If you continue to drive
your vehicle when the engine is
overheating, the engine could stop without
warning. Failure to follow this instruction
could result in the loss of control of your
vehicle. If the engine coolant temperature gauge
needle moves to the upper limit position, the
engine is overheating.
See Gauges (page
109).
You must only drive your vehicle for a short
distance if the engine overheats. The
distance you can travel depends on ambient
temperature, vehicle load and terrain. The
engine continues to operate with limited
power for a short period of time.
If the engine temperature continues to rise,
the fuel supply to the engine reduces. The
air conditioning switches off and the engine
cooling fan operates continually.
1. Gradually reduce your speed and stop your vehicle as soon as it is safe to do
so.
2. Immediately switch the engine off to prevent severe engine damage.
3. Wait for the engine to cool down.
4. Check the coolant level.
See Engine
Coolant Check (page 329).
5. Have your vehicle checked as soon as possible. ECONOMICAL DRIVING
Fuel economy is affected by several things
such as how you drive, the conditions you
drive under and how you maintain your
vehicle.
There are some things to keep in mind that
may improve your fuel economy:
•
Accelerate and slow down in a smooth,
moderate fashion.
• Drive at steady speeds.
• Anticipate stops; slowing down may
eliminate the need to stop.
• Combine errands and minimize
stop-and-go driving (When running
errands, go to the furthest destination
first and then work your way back home).
• Close the windows for high-speed
driving.
• Drive at reasonable speeds.
• Keep the tires properly inflated and use
only the recommended size.
• Use the recommended engine oil.
• Perform all regularly scheduled
maintenance.
285
Nautilus (CD9) Canada/United States of America, enUSA, Edition date: 201907, First-Printing Driving Hints
Page 294 of 596
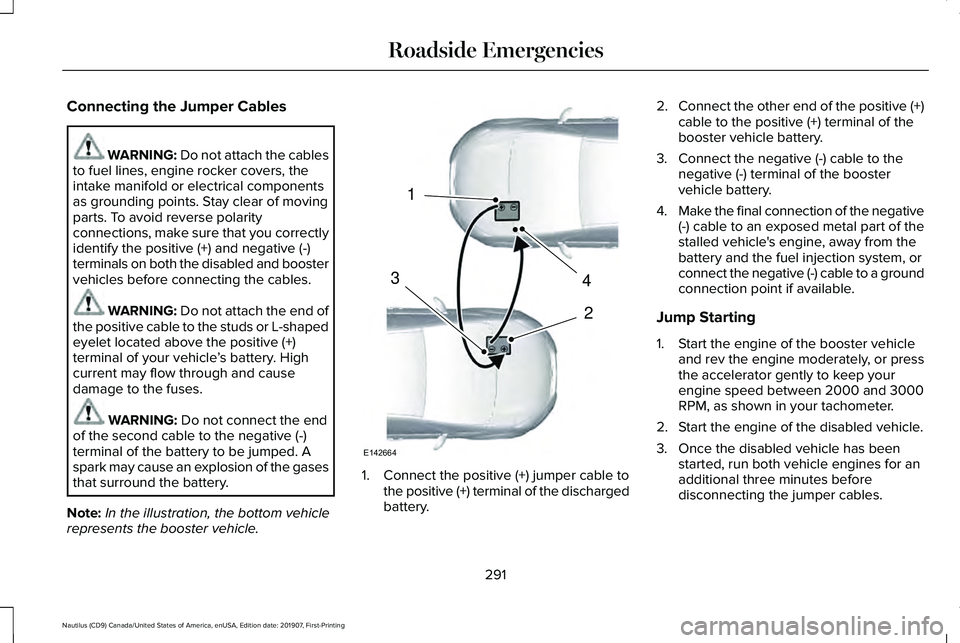
Connecting the Jumper Cables
WARNING: Do not attach the cables
to fuel lines, engine rocker covers, the
intake manifold or electrical components
as grounding points. Stay clear of moving
parts. To avoid reverse polarity
connections, make sure that you correctly
identify the positive (+) and negative (-)
terminals on both the disabled and booster
vehicles before connecting the cables. WARNING: Do not attach the end of
the positive cable to the studs or L-shaped
eyelet located above the positive (+)
terminal of your vehicle ’s battery. High
current may flow through and cause
damage to the fuses. WARNING:
Do not connect the end
of the second cable to the negative (-)
terminal of the battery to be jumped. A
spark may cause an explosion of the gases
that surround the battery.
Note: In the illustration, the bottom vehicle
represents the booster vehicle. 1. Connect the positive (+) jumper cable to
the positive (+) terminal of the discharged
battery. 2.
Connect the other end of the positive (+)
cable to the positive (+) terminal of the
booster vehicle battery.
3. Connect the negative (-) cable to the negative (-) terminal of the booster
vehicle battery.
4. Make the final connection of the negative
(-) cable to an exposed metal part of the
stalled vehicle's engine, away from the
battery and the fuel injection system, or
connect the negative (-) cable to a ground
connection point if available.
Jump Starting
1. Start the engine of the booster vehicle and rev the engine moderately, or press
the accelerator gently to keep your
engine speed between 2000 and 3000
RPM, as shown in your tachometer.
2. Start the engine of the disabled vehicle.
3. Once the disabled vehicle has been started, run both vehicle engines for an
additional three minutes before
disconnecting the jumper cables.
291
Nautilus (CD9) Canada/United States of America, enUSA, Edition date: 201907, First-Printing Roadside Emergencies4
2
1
3
E142664
Page 335 of 596
If the engine reaches a preset
over-temperature condition, the engine
automatically switches to alternating cylinder
operation. Each disabled cylinder acts as an
air pump and cools the engine.
When this occurs, your vehicle still operates,
however:
•
Engine power is limited.
• The air conditioning system turns off.
Continued operation increases the engine
temperature, causing the engine to
completely shut down. Your steering and
braking effort increases in this situation.
When the engine temperature cools, you can
re-start the engine. Have your vehicle
checked as soon as possible to minimize
engine damage. When Fail-Safe Mode Is Activated WARNING: Fail-safe mode is for use
during emergencies only. Operate your
vehicle in fail-safe mode only as long as
necessary to bring your vehicle to rest in
a safe location and seek immediate repairs.
When in fail-safe mode, your vehicle will
have limited power, will not be able to
maintain high-speed operation, and may
completely shut down without warning,
potentially losing engine power, power
steering assist, and power brake assist,
which may increase the possibility of a
crash resulting in serious injury. WARNING: Do not remove the
coolant reservoir cap when the engine is
on or the cooling system is hot. Wait 10
minutes for the cooling system to cool
down. Cover the coolant reservoir cap with
a thick cloth to prevent the possibility of
scalding and slowly remove the cap.
Failure to follow this instruction could result
in personal injury. Your vehicle has limited engine power when
in the fail-safe mode, drive your vehicle with
caution. Your vehicle does not maintain
high-speed operation and the engine may
operate poorly.
Remember that the engine is capable of
automatically shutting down to prevent
engine damage. In this situation:
1. Pull off the road as soon as safely
possible and switch the engine off.
2. If you are a member of a roadside assistance program, we recommend that
you contact your roadside assistance
service provider.
3. If this is not possible, wait a short period
for the engine to cool.
4. Check the coolant level. If the coolant level is at or below the minimum mark,
add prediluted coolant immediately.
5. When the engine temperature cools, you
can re-start the engine. Have your vehicle
checked as soon as possible to minimize
engine damage.
Note: Driving your vehicle without repair
increases the chance of engine damage.
332
Nautilus (CD9) Canada/United States of America, enUSA, Edition date: 201907, First-Printing Maintenance