remote control LINCOLN NAUTILUS 2020 Owner's Manual
[x] Cancel search | Manufacturer: LINCOLN, Model Year: 2020, Model line: NAUTILUS, Model: LINCOLN NAUTILUS 2020Pages: 596, PDF Size: 5.88 MB
Page 83 of 596
Note:
Allow the power system to open the
liftgate. Manually pushing or pulling the
liftgate may activate the system’ s obstacle
detection feature and stop the power
operation or reverse its direction, replicate
a strut failure, or damage mechanical
components.
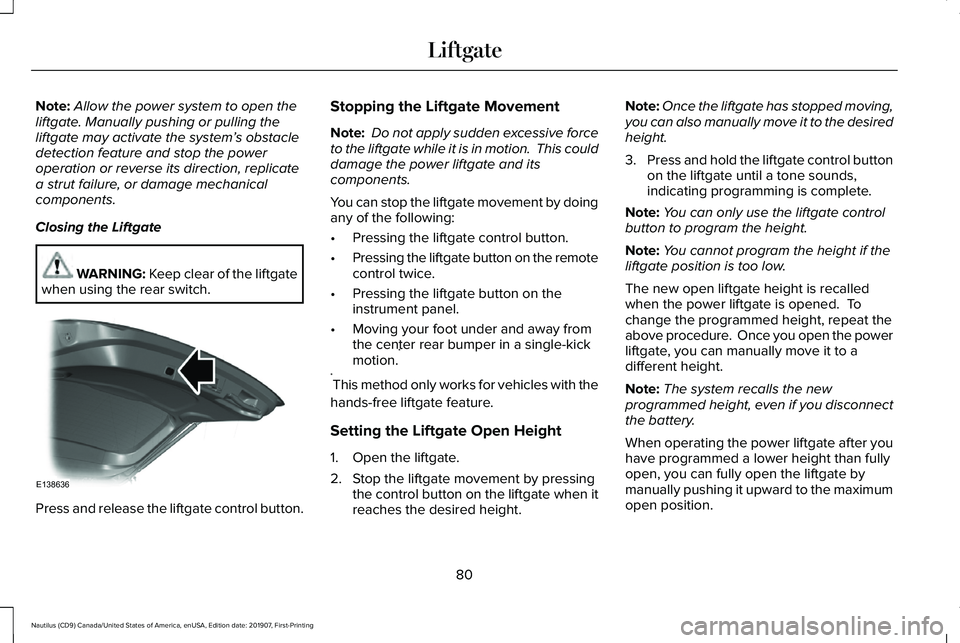
Closing the Liftgate WARNING: Keep clear of the liftgate
when using the rear switch. Press and release the liftgate control button. Stopping the Liftgate Movement
Note:
Do not apply sudden excessive force
to the liftgate while it is in motion. This could
damage the power liftgate and its
components.
You can stop the liftgate movement by doing
any of the following:
• Pressing the liftgate control button.
• Pressing the liftgate button on the remote
control twice.
• Pressing the liftgate button on the
instrument panel.
• Moving your foot under and away from
the center rear bumper in a single-kick
motion. *
* This method only works for vehicles with the
hands-free liftgate feature.
Setting the Liftgate Open Height
1. Open the liftgate.
2. Stop the liftgate movement by pressing the control button on the liftgate when it
reaches the desired height. Note:
Once the liftgate has stopped moving,
you can also manually move it to the desired
height.
3. Press and hold the liftgate control button
on the liftgate until a tone sounds,
indicating programming is complete.
Note: You can only use the liftgate control
button to program the height.
Note: You cannot program the height if the
liftgate position is too low.
The new open liftgate height is recalled
when the power liftgate is opened. To
change the programmed height, repeat the
above procedure. Once you open the power
liftgate, you can manually move it to a
different height.
Note: The system recalls the new
programmed height, even if you disconnect
the battery.
When operating the power liftgate after you
have programmed a lower height than fully
open, you can fully open the liftgate by
manually pushing it upward to the maximum
open position.
80
Nautilus (CD9) Canada/United States of America, enUSA, Edition date: 201907, First-Printing LiftgateE138636
Page 85 of 596
PASSIVE ANTI-THEFT SYSTEM
Note:
The system is not compatible with
non-Ford aftermarket remote start systems.
Use of these systems may result in engine
starting problems and a loss of security
protection.
Note: Metallic objects, electronic devices
or a second coded key on the same key
chain may result in vehicle starting problems,
especially if they are too close to the key
when starting your vehicle. Prevent these
objects from touching the coded key when
starting your vehicle. Switch the ignition off,
move all objects on the key chain away from
the coded key and restart your vehicle if a
problem occurs.
Note: Do not leave a duplicate coded key
in your vehicle. Always take your keys and
lock all doors when leaving your vehicle. SecuriLock™
The system helps prevent the engine from
starting unless you use a coded key
programmed to your vehicle. Using the
wrong key may prevent your vehicle from
starting. A message may appear in the
information display.
If you are unable to start your vehicle with a
coded key, it is not operating correctly. A
message may appear in the information
display.
Automatic Arming
The system arms when you switch the
ignition off.
Automatic Disarming
The system disarms when you switch the
ignition on with a coded key.
Replacement Keys
Note:
Your vehicle comes with two keys. The intelligent access key functions as a
programmed key that operates the driver
door lock and turns on the intelligent access
with push button start system, as well as a
remote control.
If your coded keys are lost or stolen and you
do not have an extra coded key, you need
to erase the key codes from your vehicle and
program new coded keys. Contact an
authorized dealer.
Store a spare intelligent access key away
from your vehicle in a safe place. You can
purchase replacement keys or remote
controls from an authorized dealer.
Programming a Spare Intelligent Access
Key
Note:
You can program a maximum of four
intelligent access keys to your vehicle.
You must have two previously programmed
intelligent access keys inside your vehicle
and the new unprogrammed intelligent
access keys readily accessible. Contact an
authorized dealer to have the spare key
programmed if two previously programmed
keys are not available.
82
Nautilus (CD9) Canada/United States of America, enUSA, Edition date: 201907, First-Printing Security
Page 87 of 596
ANTI-THEFT ALARM
The system will warn you of an unauthorized
entry to your vehicle. It will be triggered if
any door, the luggage compartment or the
hood is opened without using the key,
remote control or keyless entry keypad.
The direction indicators will flash and the
horn will sound if unauthorized entry is
attempted while the alarm is armed.
Take all remote controls to an authorized
dealer if there is any potential alarm problem
with your vehicle.
Arming the Alarm
The alarm is ready to arm when there is not
a key in your vehicle. Electronically lock your
vehicle to arm the alarm.
Disarming the Alarm
Disarm the alarm by any of the following
actions:
•
Unlock the doors or luggage
compartment with the remote control or
keyless entry keypad.
• Switch your vehicle on or start your
vehicle.
• Use a key in the driver door to unlock
your vehicle, then switch your vehicle on
within 12 seconds.
Note: Pressing the panic button on the
remote control will stop the horn and signal
indicators, but will not disarm the system.
84
Nautilus (CD9) Canada/United States of America, enUSA, Edition date: 201907, First-Printing Security
Page 101 of 596
DIRECTION INDICATORS
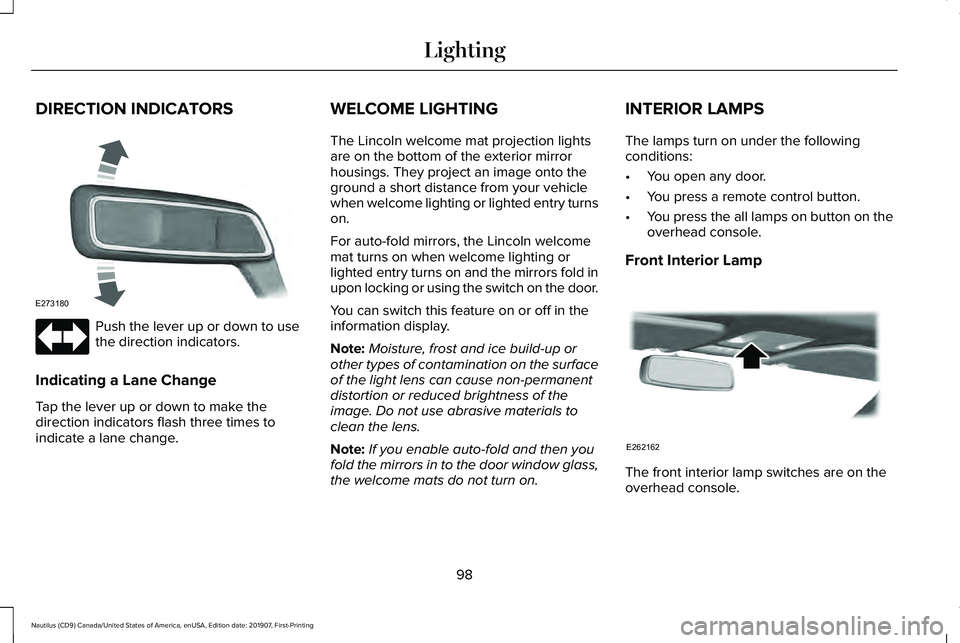
Push the lever up or down to use
the direction indicators.
Indicating a Lane Change
Tap the lever up or down to make the
direction indicators flash three times to
indicate a lane change. WELCOME LIGHTING
The Lincoln welcome mat projection lights
are on the bottom of the exterior mirror
housings. They project an image onto the
ground a short distance from your vehicle
when welcome lighting or lighted entry turns
on.
For auto-fold mirrors, the Lincoln welcome
mat turns on when welcome lighting or
lighted entry turns on and the mirrors fold in
upon locking or using the switch on the door.
You can switch this feature on or off in the
information display.
Note:
Moisture, frost and ice build-up or
other types of contamination on the surface
of the light lens can cause non-permanent
distortion or reduced brightness of the
image. Do not use abrasive materials to
clean the lens.
Note: If you enable auto-fold and then you
fold the mirrors in to the door window glass,
the welcome mats do not turn on. INTERIOR LAMPS
The lamps turn on under the following
conditions:
•
You open any door.
• You press a remote control button.
• You press the all lamps on button on the
overhead console.
Front Interior Lamp The front interior lamp switches are on the
overhead console.
98
Nautilus (CD9) Canada/United States of America, enUSA, Edition date: 201907, First-Printing LightingE273180 E262162
Page 107 of 596
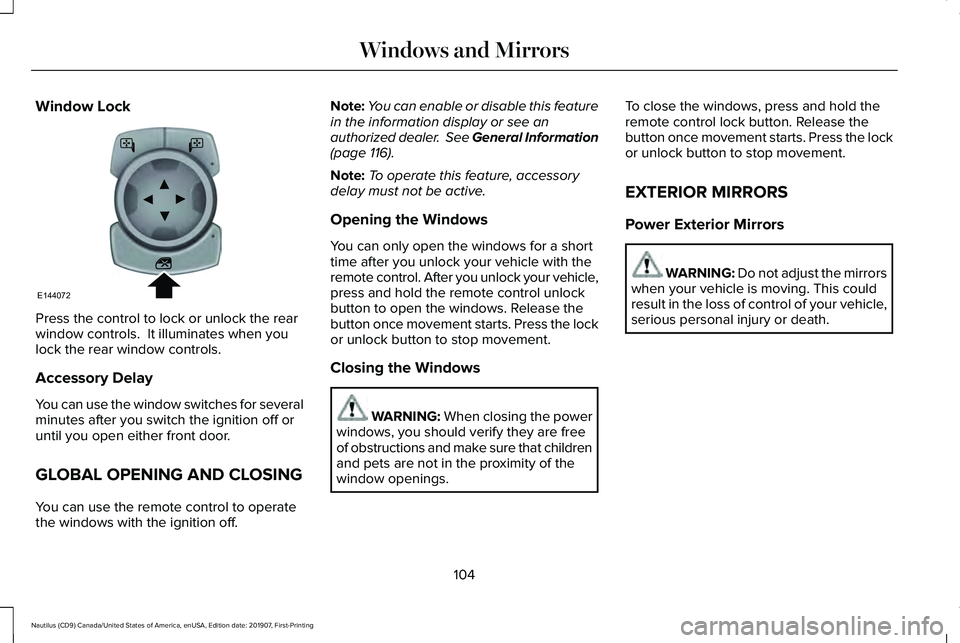
Window Lock
Press the control to lock or unlock the rear
window controls. It illuminates when you
lock the rear window controls.
Accessory Delay
You can use the window switches for several
minutes after you switch the ignition off or
until you open either front door.
GLOBAL OPENING AND CLOSING
You can use the remote control to operate
the windows with the ignition off. Note:
You can enable or disable this feature
in the information display or see an
authorized dealer. See General Information
(page 116).
Note: To operate this feature, accessory
delay must not be active.
Opening the Windows
You can only open the windows for a short
time after you unlock your vehicle with the
remote control. After you unlock your vehicle,
press and hold the remote control unlock
button to open the windows. Release the
button once movement starts. Press the lock
or unlock button to stop movement.
Closing the Windows WARNING: When closing the power
windows, you should verify they are free
of obstructions and make sure that children
and pets are not in the proximity of the
window openings. To close the windows, press and hold the
remote control lock button. Release the
button once movement starts. Press the lock
or unlock button to stop movement.
EXTERIOR MIRRORS
Power Exterior Mirrors
WARNING: Do not adjust the mirrors
when your vehicle is moving. This could
result in the loss of control of your vehicle,
serious personal injury or death.
104
Nautilus (CD9) Canada/United States of America, enUSA, Edition date: 201907, First-Printing Windows and MirrorsE144072
Page 123 of 596
Settings
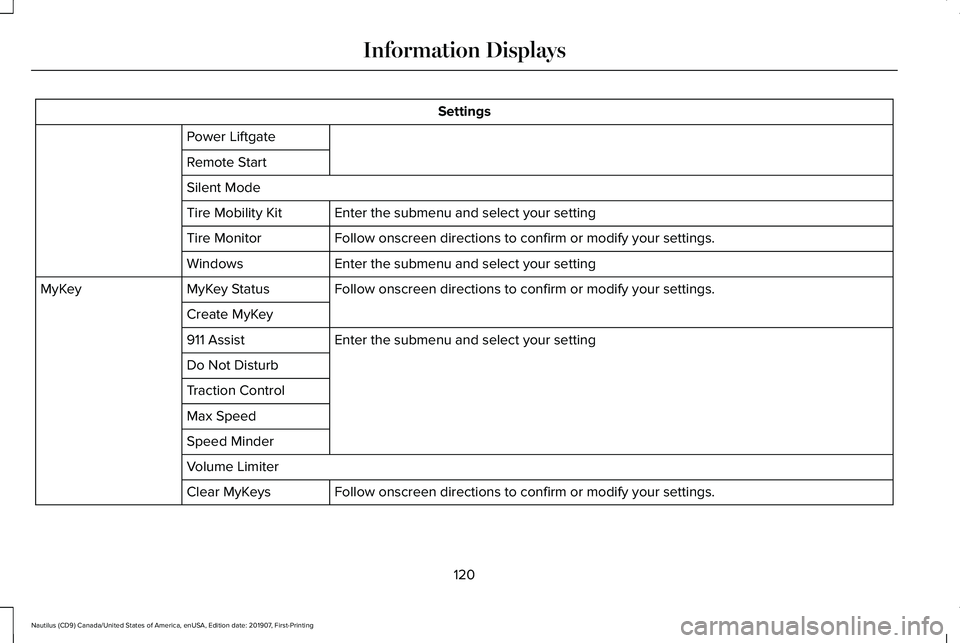
Power Liftgate
Remote Start
Silent Mode Enter the submenu and select your setting
Tire Mobility Kit
Follow onscreen directions to confirm or modify your settings.
Tire Monitor
Enter the submenu and select your setting
Windows
Follow onscreen directions to confirm or modify your settings.
MyKey Status
MyKey
Create MyKey Enter the submenu and select your setting
911 Assist
Do Not Disturb
Traction Control
Max Speed
Speed Minder
Volume Limiter
Follow onscreen directions to confirm or modify your settings.
Clear MyKeys
120
Nautilus (CD9) Canada/United States of America, enUSA, Edition date: 201907, First-Printing Information Displays
Page 148 of 596
Note:
Do not remove ice from the mirrors
with a scraper or adjust the mirror glass
when it is frozen in place.
Note: Do not clean the mirror housing or
glass with harsh abrasives, fuel or other
petroleum-based cleaning products. The
vehicle warranty may not cover damage
caused to the mirror housing or glass.
CABIN AIR FILTER
Your vehicle is equipped with a cabin air
filter, which gives you and your passengers
the following benefits:
• It improves your driving comfort by
reducing particle concentration.
• It improves the interior compartment
cleanliness.
• It protects the climate control
components from particle deposits.
You can locate the cabin air filter behind the
glove box. Note:
Make sure you have a cabin air filter
installed at all times. This prevents foreign
objects from entering the system. Running
the system without a filter in place could
result in degradation or damage to the
system.
Replace the filter at regular intervals. See
Scheduled Maintenance (page 495).
For additional cabin air filter information, or
to replace the filter, see an authorized dealer.
REMOTE START
The system adjusts the interior temperature
depending on your chosen settings during
remote start.
You cannot adjust the climate control setting
during remote start operation. When you
switch the ignition on, the climate control
system returns to the previous settings. You
can now make adjustments.
Some features may remain on if they turn on
during remote start:
• Driver heated seat.
• Driver ventilated seat. •
Heated steering wheel.
• Heated mirrors.
• Heated rear window.
• Windshield wiper de-icer.
Note: If the passenger heated or ventilated
seats are on when you switch the vehicle
off, they default to the driver setting when
you switch the vehicle on.
You can adjust the default remote start
settings using the information display
controls.
See Information Displays (page
116).
Automatic Settings
In hot weather, the system sets to
72°F
(22°C). The ventilated seats set to high (if
available, and if you select AUTO in the
information display).
In moderate weather, the system heats or
cools (based on pre-selected settings). The
rear defroster, heated mirrors and heated or
ventilated seats do not turn on.
145
Nautilus (CD9) Canada/United States of America, enUSA, Edition date: 201907, First-Printing Climate Control
Page 158 of 596
WARNING: Do not use the memory
function when your vehicle is moving.
This feature automatically recalls the position
of the following:
• Driver seat.
• Power mirrors.
• Optional power steering column.
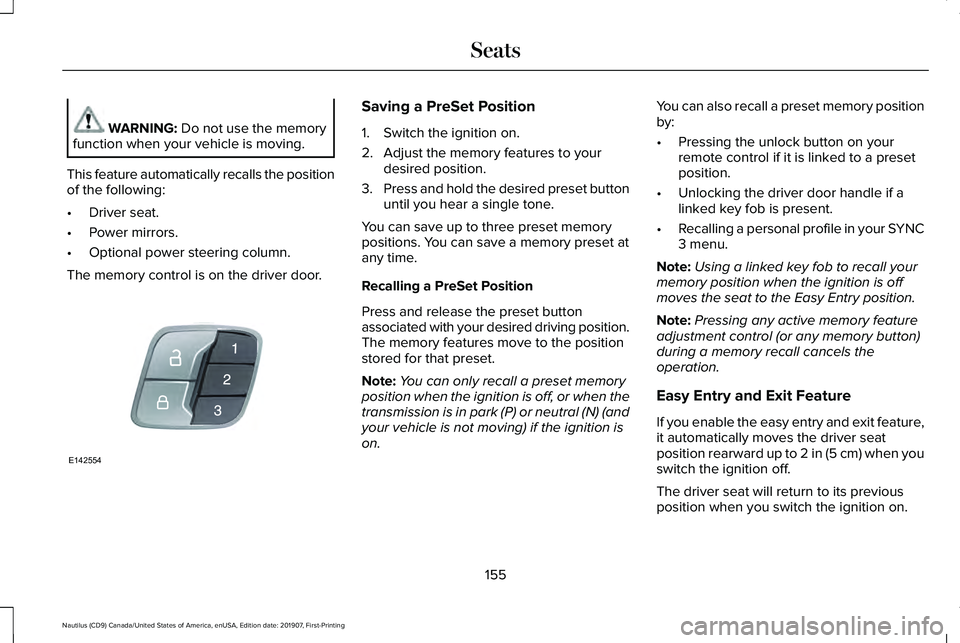
The memory control is on the driver door. Saving a PreSet Position
1. Switch the ignition on.
2. Adjust the memory features to your
desired position.
3. Press and hold the desired preset button
until you hear a single tone.
You can save up to three preset memory
positions. You can save a memory preset at
any time.
Recalling a PreSet Position
Press and release the preset button
associated with your desired driving position.
The memory features move to the position
stored for that preset.
Note: You can only recall a preset memory
position when the ignition is off, or when the
transmission is in park (P) or neutral (N) (and
your vehicle is not moving) if the ignition is
on. You can also recall a preset memory position
by:
•
Pressing the unlock button on your
remote control if it is linked to a preset
position.
• Unlocking the driver door handle if a
linked key fob is present.
• Recalling a personal profile in your SYNC
3 menu.
Note: Using a linked key fob to recall your
memory position when the ignition is off
moves the seat to the Easy Entry position.
Note: Pressing any active memory feature
adjustment control (or any memory button)
during a memory recall cancels the
operation.
Easy Entry and Exit Feature
If you enable the easy entry and exit feature,
it automatically moves the driver seat
position rearward up to
2 in (5 cm) when you
switch the ignition off.
The driver seat will return to its previous
position when you switch the ignition on.
155
Nautilus (CD9) Canada/United States of America, enUSA, Edition date: 201907, First-Printing SeatsE142554
Page 159 of 596
You can enable or disable this feature
through the information display. See
Information Displays (page 116).
Personal Profiles
This feature allows you to create multiple
personal profiles enabling users to
personalize vehicle ’s settings. You can
create one profile for each preset memory
seat button along with a guest profile. You
can recall a profile using SYNC 3 or the
preset button you selected when you created
your profile. You can also link a keyfob to
your profile, which is used to recall it.
Creating a Personal Profile
Use the SYNC display to create a personal
profile.
1. Switch the ignition on and leave the vehicle in park (P).
2. Select the Personal Profiles button under
Settings.
3. Follow the instructions on the display. Linking a Personal Profile to your Remote
Control or Intelligent Access Keyfob
You can save preset memory positions for
up to three remote controls or intelligent
access (IA) keys, by assigning a keyfob to a
personal profile in your SYNC 3.
Use the SYNC display to link a keyfob to a
personal profile.
1. Switch the ignition on and leave the
vehicle in park (P).
2. Select the Personal Profiles button under
Settings.
3. Touch the arrow for the profile you wish to link a keyfob to.
4. Select the Link Keyfob button.
5. Follow the instructions on the display.
Note: If more than one linked remote control
or intelligent access key is in range, the
memory function moves to the settings of
the first key to initiate a memory recall. Note:
The guest profile consists of existing
settings when there is no driver profile
created. After you create a driver profile, the
guest profile serves as an additional driver
profile.
Note: You cannot link a personalized name,
a memory seat button or a keyfob to a guest
profile.
Personal Settings
Personal profiles allow you to personalize
positional settings such as seats and mirrors,
as well as non-positional settings such as
radio, navigation, driver assist and system
settings.
See SYNC™ 3 (page 429). You
cannot change the menu locations and
settings of those personalized features with
personal profiles.
Note: Non-positional settings are saved to
the active driver profile whenever you
change a setting.
Note: You can save positional settings if you
press and hold a memory seat button.
See
Settings (page 471).
156
Nautilus (CD9) Canada/United States of America, enUSA, Edition date: 201907, First-Printing Seats
Page 163 of 596
Note:
The heated seats only function when
the engine is running.
The rear seat heat controls are on the rear
of the center console. Press the heated seat symbol to cycle
through the various heat settings and off.
More indicator lights indicate warmer
settings.
Note:
After an extended period of time, the
heated seats switch off. Press the heated
seat symbol to switch the heated seats on. CLIMATE CONTROLLED SEATS (IF
EQUIPPED)
Heated Seats WARNING: Use caution when using
the heated seat if you are unable to feel
pain to your skin because of advanced
age, chronic illness, diabetes, spinal cord
injury, medication, alcohol use, exhaustion
or other physical conditions. The heated
seat could cause burns even at low
temperatures, especially if used for long
periods of time. Failure to follow this
instruction could result in personal injury. WARNING:
Do not poke sharp
objects into the seat cushion or seat
backrest. This could damage the heated
seat element and cause it to overheat.
Failure to follow this instruction could result
in personal injury. WARNING:
Do not place anything
on the seat that blocks the heat, for
example a seat cover or a cushion. This
could cause the seat to overheat. Failure
to follow this instruction could result in
personal injury.
Note: The heated seats switch on during a
remote start if they are enabled.
See
Remote Start (page 145).
Note: The heated seats may also switch on
when you start your vehicle if they were on
when you previously switched your vehicle
off.
Note: Do not do the following:
• Place heavy objects on the seat.
• Operate the seat heater if water or any
other liquid spills on the seat. Allow the
seat to dry thoroughly.
160
Nautilus (CD9) Canada/United States of America, enUSA, Edition date: 201907, First-Printing SeatsE146322