climate control LINCOLN NAUTILUS 2022 User Guide
[x] Cancel search | Manufacturer: LINCOLN, Model Year: 2022, Model line: NAUTILUS, Model: LINCOLN NAUTILUS 2022Pages: 586, PDF Size: 13.97 MB
Page 185 of 586
LOCATING THE USB PORTS
Data Transfer USB Ports
The USB ports could be in the followinglocations:
•On the lower instrument panel below theclimate control.
•Inside the center console.
Note: These USB ports can also chargedevices.
Note: Not all USB ports in your vehicle havedata transfer capabilities.
Note: We recommend using only USB-IFcertified cables and adapters. Non-certifiedcables and adapters may not work.
Charge Only USB Ports
The USB ports could be in the followinglocations:
•On the lower instrument panel.
•On the upper instrument panel.
•Inside the media bin.
•Inside the center console.
•On the rear of the center console.
•In the cargo area.
PLAYING MEDIA USING THE USB
PORT
WARNING: Driving while distractedcan result in loss of vehicle control, crashand injury. We strongly recommend thatyou use extreme caution when using anydevice that may take your focus off theroad. Your primary responsibility is the safeoperation of your vehicle. We recommendagainst the use of any hand-held devicewhile driving and encourage the use ofvoice-operated systems when possible.Make sure you are aware of all applicablelocal laws that may affect the use ofelectronic devices while driving.
Connect your device to the USB port.
Press the audio button on thefeature bar.
Select Sources.
Select the USB option.
Press the button to play a track.Press the button again to pausethe track.
Press the button to skip to the nexttrack.
Press and hold the button to fastforward through the track.
Press the button once to return tothe beginning of a track.Repeatedly press the button toreturn to previous tracks.
Press and hold the button to fast rewind.
CHARGING A DEVICE
Connect your device to the USB port.
181
2022 Nautilus (CD9) Canada/United States of America, enUSA, Edition date: 202108, First-PrintingUSB Ports E100027
Page 194 of 586
STARTING AND STOPPING THE
ENGINE – PRECAUTIONS
WARNING: Extended idling at highengine speeds can produce very hightemperatures in the engine and exhaustsystem, creating the risk of fire or otherdamage.
WARNING: Do not park, idle or driveyour vehicle on dry grass or other dryground cover. The emission system heatsup the engine compartment and exhaustsystem, creating the risk of fire.
WARNING: Do not start the enginein a closed garage or in other enclosedareas. Exhaust fumes are toxic. Alwaysopen the garage door before you start theengine. Failure to follow this instructioncould result in personal injury or death.
WARNING: Do not use starting fluid,for example ether, in the air intake system.Such fluid could cause immediateexplosive damage to the engine andpossible personal injury.
WARNING: Exhaust leaks may resultin entry of harmful and potentially lethalfumes into the passenger compartment. Ifyou smell exhaust fumes inside yourvehicle, have your vehicle inspectedimmediately. Do not drive if you smellexhaust fumes.
The powertrain control system meets allCanadian interference-causing equipmentstandard requirements regulating theimpulse electrical field or radio noise.
If you stop your vehicle and leave the engineidling for long periods, we recommend thatyou do one of the following:
•Open the windows at least 1 in (2.5 cm).
•Set your climate control to outside air.
PUSH BUTTON IGNITION SWITCH
Switching the Ignition Off
When the ignition is on or in accessory mode,press the push button ignition switch oncewithout your foot on the brake pedal.
Switching the Ignition to AccessoryMode
When the ignition is off, press the pushbutton ignition switch once without your footon the brake pedal.
All electrical circuits and accessories areoperational and the warning lamps andindicators illuminate.
190
2022 Nautilus (CD9) Canada/United States of America, enUSA, Edition date: 202108, First-PrintingStarting and Stopping the EngineE321258
Page 196 of 586
ENGINE BLOCK HEATER (IF EQUIPPED)
ENGINE BLOCK HEATERPRECAUTIONS
WARNING: Failure to follow engineblock heater instructions could result inproperty damage or serious personalinjury.
WARNING: Do not use your heaterwith ungrounded electrical systems ortwo-pronged adapters. There is a risk ofelectrical shock.
WARNING: Do not fully close thehood, or allow it to drop under its ownweight when using the engine blockheater. This could damage the power cableand may cause an electrical short resultingin fire, injury and property damage.
We recommend that you do the following fora safe and correct operation:
•Use a 16-gauge outdoor extension cordthat is product certified by Underwriter’sLaboratory (UL) or Canadian StandardsAssociation (CSA). This extension cordmust be suitable for use outdoors, in coldtemperatures, and be clearly markedSuitable for Use with OutdoorAppliances. Do not use an indoorextension cord outdoors. This couldresult in an electric shock or become afire hazard.
•Use as short an extension cord aspossible.
•Do not use multiple extension cords.
•Make sure that when in operation, theextension cord plug and engine blockheater cord plug connections are freeand clear of water. This could cause anelectric shock or fire.
•If the engine block heater cord is underthe hood, do not remove the wiring fromits original location. Do not close thehood on the extension wiring.
•Park your vehicle in a clean area, clearof combustible materials.
•Firmly connect the engine block heatercord and the extension cord.
•Check the extension cord for heatanywhere when the system has beenoperating for approximately 30 minutes.
•Unplug and properly stow the systembefore starting and driving your vehicle.The protective cover seals the terminalsof the engine block heater cord plugwhen not in use.
•Check the engine block heater systemfor proper operation before winter.
HOW DOES THE ENGINE BLOCKHEATER WORK
The engine block heater warms the enginecoolant. This allows the climate controlsystem to quickly respond. The equipmentincludes a heater element installed in theengine block and a wire harness. You canconnect the system to a grounded 220-240volt AC electrical source.
192
2022 Nautilus (CD9) Canada/United States of America, enUSA, Edition date: 202108, First-PrintingStarting and Stopping the Engine
Page 325 of 586
TOWING YOUR VEHICLE
PRECAUTIONS
Use the following guidelines when towingyour vehicle. Failure to follow this instructioncould result in vehicle damage not coveredby the vehicle warranty.
Note:Make sure you properly secure yourvehicle to the tow vehicle.
Note:If you are unsure of the vehicle’sconfiguration, contact an authorized dealer.
RECREATIONALLY TOWING YOUR
VEHICLE - 2.0L, AWD
You cannot recreational tow your vehiclewith all wheels on the ground becausevehicle or transmission damage could occur.You must recreational tow your vehicle withall four wheels off the ground, such as whenusing a car-hauling trailer. Otherwise, youcannot recreational tow your vehicle.
RECREATIONALLY TOWING YOUR
VEHICLE - 2.0L, FWD
You cannot recreational tow your vehiclewith all wheels on the ground becausevehicle or transmission damage could occur.Place the front wheels on a two-wheel towdolly. If you are using a tow dolly, follow theinstructions specified by the equipmentprovider.
Note:Release the parking brake beforetowing your vehicle. See ManuallyReleasing the Electric Parking Brake (page223).
RECREATIONALLY TOWING YOUR
VEHICLE - 2.7L
Note:Put your climate control system inrecirculated air mode to prevent exhaustfumes from entering the vehicle. SeeClimate Control (page 156).
Follow these guidelines if you have a needfor recreational towing. An example ofrecreational towing would be towing yourvehicle behind a motorhome. We designedthese guidelines to prevent damage to yourtransmission.
You can recreational tow your vehicle withall four wheels on the ground using theManual Park Release procedure, or with allfour wheels off the ground using a vehicletransport trailer. If you are using a vehicletransport trailer, follow the instructionsspecified by the equipment provider.
If you recreational tow your vehicle with allfour wheels on the ground:
•Only tow your vehicle in the forwarddirection.
•Use the manual park release procedure.See Using Manual Park Release (page214). Failure to do so may result indamage to the transmission.
•Do not exceed 65 mph (105 km/h).
321
2022 Nautilus (CD9) Canada/United States of America, enUSA, Edition date: 202108, First-PrintingTowing Your Vehicle
Page 336 of 586
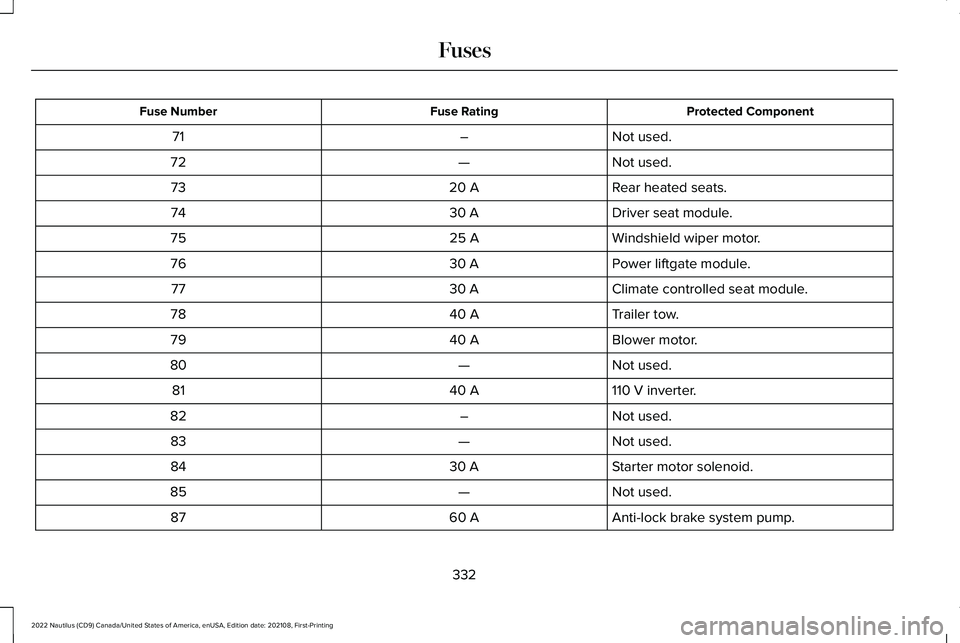
Protected ComponentFuse RatingFuse Number
Not used.–71
Not used.—72
Rear heated seats.20 A73
Driver seat module.30 A74
Windshield wiper motor.25 A75
Power liftgate module.30 A76
Climate controlled seat module.30 A77
Trailer tow.40 A78
Blower motor.40 A79
Not used.—80
110 V inverter.40 A81
Not used.–82
Not used.—83
Starter motor solenoid.30 A84
Not used.—85
Anti-lock brake system pump.60 A87
332
2022 Nautilus (CD9) Canada/United States of America, enUSA, Edition date: 202108, First-PrintingFuses
Page 339 of 586
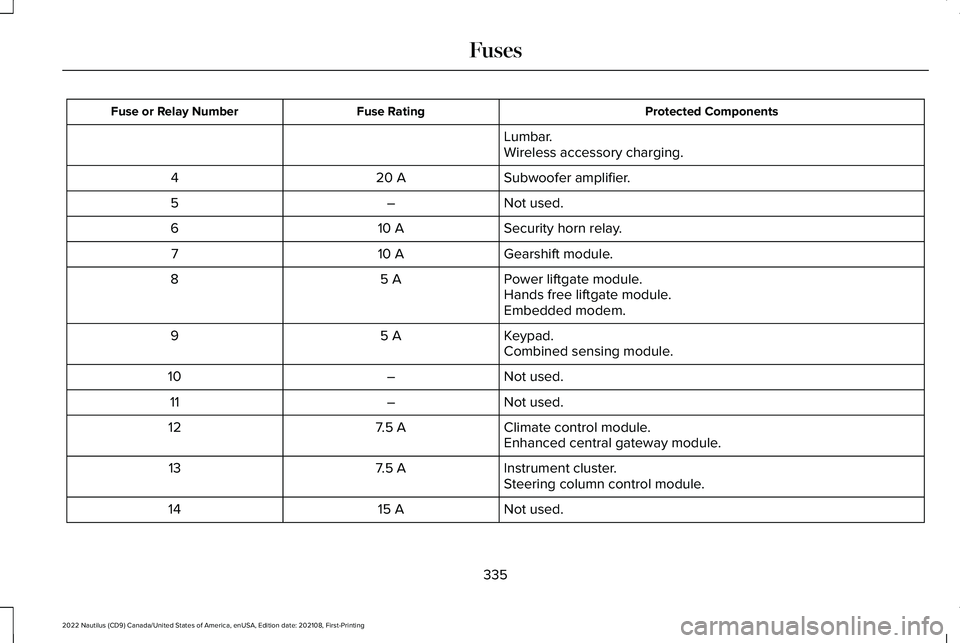
Protected ComponentsFuse RatingFuse or Relay Number
Lumbar.Wireless accessory charging.
Subwoofer amplifier.20 A4
Not used.–5
Security horn relay.10 A6
Gearshift module.10 A7
Power liftgate module.5 A8Hands free liftgate module.Embedded modem.
Keypad.5 A9Combined sensing module.
Not used.–10
Not used.–11
Climate control module.7.5 A12Enhanced central gateway module.
Instrument cluster.7.5 A13Steering column control module.
Not used.15 A14
335
2022 Nautilus (CD9) Canada/United States of America, enUSA, Edition date: 202108, First-PrintingFuses
Page 359 of 586
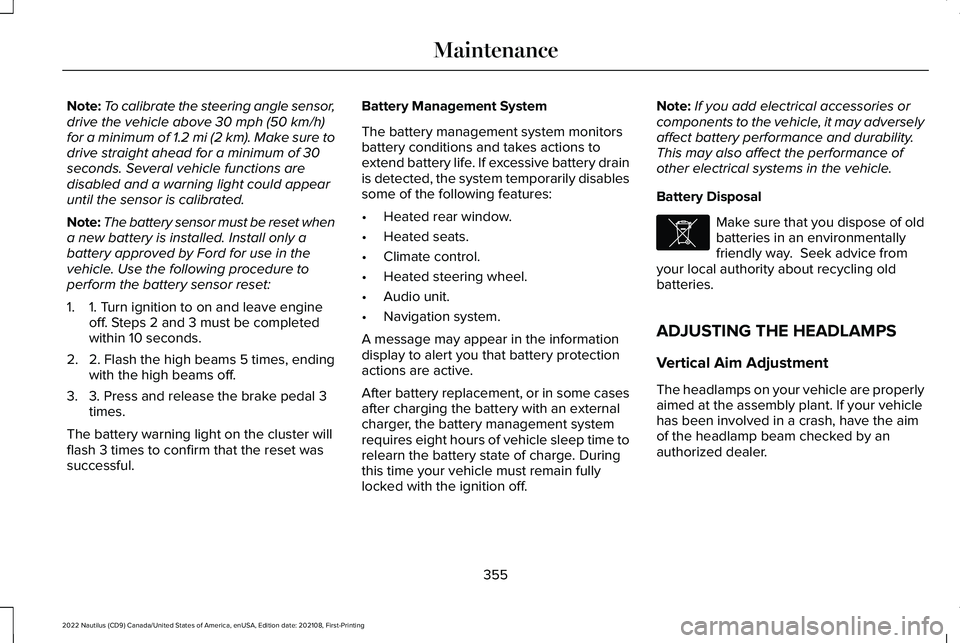
Note:To calibrate the steering angle sensor,drive the vehicle above 30 mph (50 km/h)for a minimum of 1.2 mi (2 km). Make sure todrive straight ahead for a minimum of 30seconds. Several vehicle functions aredisabled and a warning light could appearuntil the sensor is calibrated.
Note:The battery sensor must be reset whena new battery is installed. Install only abattery approved by Ford for use in thevehicle. Use the following procedure toperform the battery sensor reset:
1.1. Turn ignition to on and leave engineoff. Steps 2 and 3 must be completedwithin 10 seconds.
2.2. Flash the high beams 5 times, endingwith the high beams off.
3.3. Press and release the brake pedal 3times.
The battery warning light on the cluster willflash 3 times to confirm that the reset wassuccessful.
Battery Management System
The battery management system monitorsbattery conditions and takes actions toextend battery life. If excessive battery drainis detected, the system temporarily disablessome of the following features:
•Heated rear window.
•Heated seats.
•Climate control.
•Heated steering wheel.
•Audio unit.
•Navigation system.
A message may appear in the informationdisplay to alert you that battery protectionactions are active.
After battery replacement, or in some casesafter charging the battery with an externalcharger, the battery management systemrequires eight hours of vehicle sleep time torelearn the battery state of charge. Duringthis time your vehicle must remain fullylocked with the ignition off.
Note:If you add electrical accessories orcomponents to the vehicle, it may adverselyaffect battery performance and durability.This may also affect the performance ofother electrical systems in the vehicle.
Battery Disposal
Make sure that you dispose of oldbatteries in an environmentallyfriendly way. Seek advice fromyour local authority about recycling oldbatteries.
ADJUSTING THE HEADLAMPS
Vertical Aim Adjustment
The headlamps on your vehicle are properlyaimed at the assembly plant. If your vehiclehas been involved in a crash, have the aimof the headlamp beam checked by anauthorized dealer.
355
2022 Nautilus (CD9) Canada/United States of America, enUSA, Edition date: 202108, First-PrintingMaintenanceE107998
Page 373 of 586
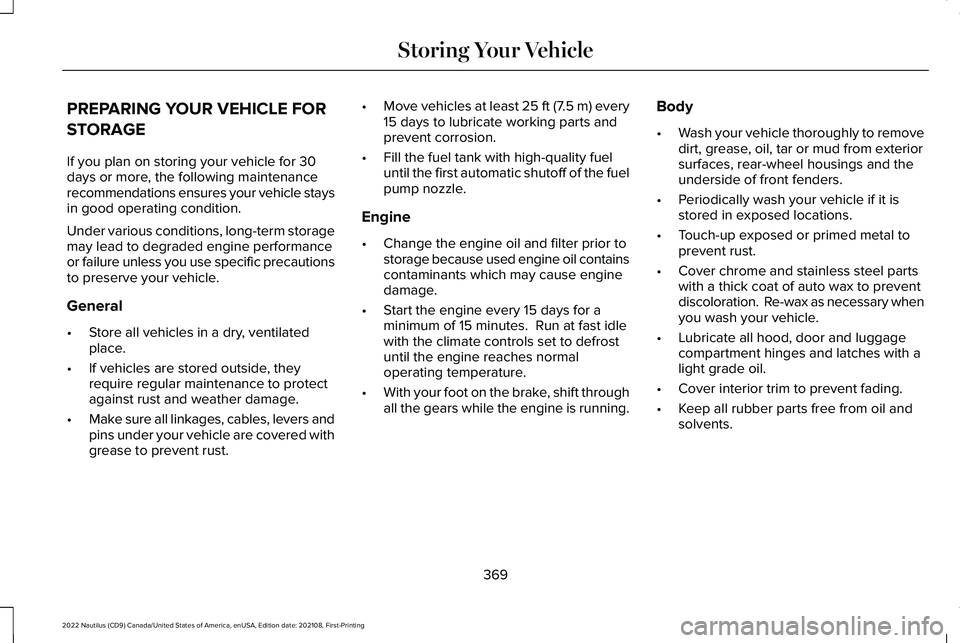
PREPARING YOUR VEHICLE FOR
STORAGE
If you plan on storing your vehicle for 30days or more, the following maintenancerecommendations ensures your vehicle staysin good operating condition.
Under various conditions, long-term storagemay lead to degraded engine performanceor failure unless you use specific precautionsto preserve your vehicle.
General
•Store all vehicles in a dry, ventilatedplace.
•If vehicles are stored outside, theyrequire regular maintenance to protectagainst rust and weather damage.
•Make sure all linkages, cables, levers andpins under your vehicle are covered withgrease to prevent rust.
•Move vehicles at least 25 ft (7.5 m) every15 days to lubricate working parts andprevent corrosion.
•Fill the fuel tank with high-quality fueluntil the first automatic shutoff of the fuelpump nozzle.
Engine
•Change the engine oil and filter prior tostorage because used engine oil containscontaminants which may cause enginedamage.
•Start the engine every 15 days for aminimum of 15 minutes. Run at fast idlewith the climate controls set to defrostuntil the engine reaches normaloperating temperature.
•With your foot on the brake, shift throughall the gears while the engine is running.
Body
•Wash your vehicle thoroughly to removedirt, grease, oil, tar or mud from exteriorsurfaces, rear-wheel housings and theunderside of front fenders.
•Periodically wash your vehicle if it isstored in exposed locations.
•Touch-up exposed or primed metal toprevent rust.
•Cover chrome and stainless steel partswith a thick coat of auto wax to preventdiscoloration. Re-wax as necessary whenyou wash your vehicle.
•Lubricate all hood, door and luggagecompartment hinges and latches with alight grade oil.
•Cover interior trim to prevent fading.
•Keep all rubber parts free from oil andsolvents.
369
2022 Nautilus (CD9) Canada/United States of America, enUSA, Edition date: 202108, First-PrintingStoring Your Vehicle
Page 375 of 586
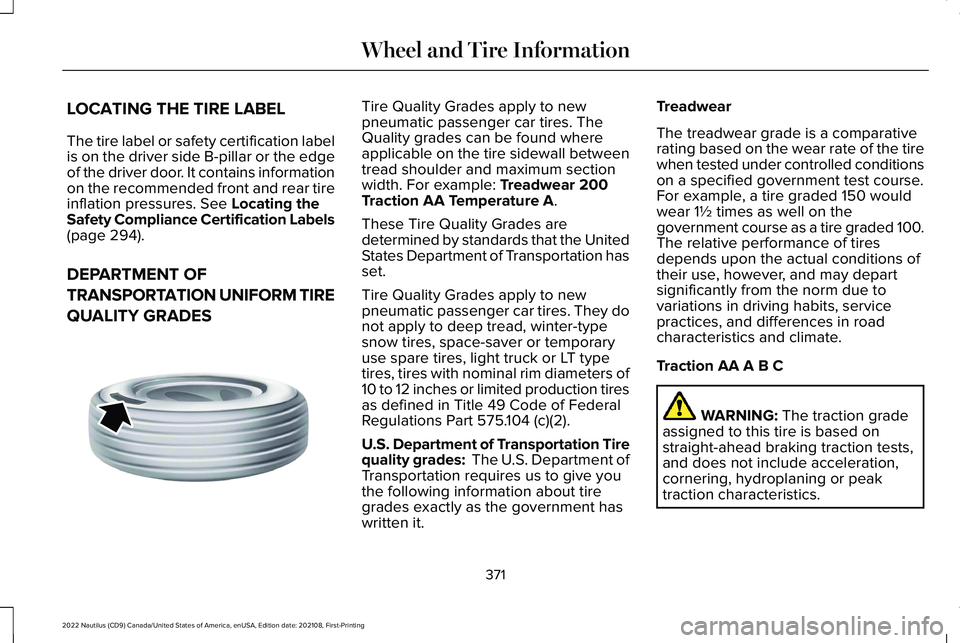
LOCATING THE TIRE LABEL
The tire label or safety certification labelis on the driver side B-pillar or the edgeof the driver door. It contains informationon the recommended front and rear tireinflation pressures. See Locating theSafety Compliance Certification Labels(page 294).
DEPARTMENT OF
TRANSPORTATION UNIFORM TIRE
QUALITY GRADES
Tire Quality Grades apply to newpneumatic passenger car tires. TheQuality grades can be found whereapplicable on the tire sidewall betweentread shoulder and maximum sectionwidth. For example: Treadwear 200Traction AA Temperature A.
These Tire Quality Grades aredetermined by standards that the UnitedStates Department of Transportation hasset.
Tire Quality Grades apply to newpneumatic passenger car tires. They donot apply to deep tread, winter-typesnow tires, space-saver or temporaryuse spare tires, light truck or LT typetires, tires with nominal rim diameters of10 to 12 inches or limited production tires
as defined in Title 49 Code of FederalRegulations Part 575.104 (c)(2).
U.S. Department of Transportation Tirequality grades: The U.S. Department ofTransportation requires us to give youthe following information about tiregrades exactly as the government haswritten it.
Treadwear
The treadwear grade is a comparativerating based on the wear rate of the tirewhen tested under controlled conditionson a specified government test course.For example, a tire graded 150 wouldwear 1½ times as well on thegovernment course as a tire graded 100.The relative performance of tiresdepends upon the actual conditions oftheir use, however, and may departsignificantly from the norm due tovariations in driving habits, servicepractices, and differences in roadcharacteristics and climate.
Traction AA A B C
WARNING: The traction gradeassigned to this tire is based onstraight-ahead braking traction tests,and does not include acceleration,cornering, hydroplaning or peaktraction characteristics.
371
2022 Nautilus (CD9) Canada/United States of America, enUSA, Edition date: 202108, First-PrintingWheel and Tire InformationE142542
Page 565 of 586
1
12V Battery Gauge.........................................141
3
360 Degree Camera...................................245360 Degree Camera Settings.........................247
360 Degree Camera Guide Lines............246360 Degree Camera Limitations..............246360 Degree Camera Precautions............245360 Degree Camera Settings...................247Switching the 360 Degree Camera On andOff......................................................................247Switching the 360 Degree CameraView..................................................................248
9
911 Assist...........................................................74
A
A/CSee: Climate Control..........................................156
About This Publication....................................17ABSSee: Brakes..........................................................220
Accessing Apps............................................449Accessing Navigation.................................454Accessing the Passive Key BackupPosition..........................................................194Accessories...................................................458Active Park Assist.........................................249Active Park Assist – Troubleshooting............251
Active Park Assist Precautions.................249Active Park Assist –Troubleshooting..........................................251Active Park Assist – Frequently AskedQuestions..........................................................251Active Park Assist – InformationMessages..........................................................251
Adaptive Cruise Control.............................256Adaptive Cruise Control –Troubleshooting.............................................266Lane Centering...................................................263
Adaptive Cruise Control AutomaticCancellation................................................260Adaptive Cruise Control Indicators.........263Adaptive Cruise Control Limitations........257Adaptive Cruise ControlPrecautions.................................................256Adaptive Cruise Control –Troubleshooting.........................................266Adaptive Cruise Control – InformationMessages.........................................................266
Adaptive Front Lighting...............................127How Does Adaptive Front LightingWork...................................................................127Switching Adaptive Front Lighting On andOff.......................................................................128
Adjusting the Exterior Mirrors....................135Adjusting the Headlamps..........................355Adjusting the Instrument Panel LightingBrightness....................................................130Adjusting the Map........................................454Changing the Format of the Map...................454Zooming the Map In and Out..........................454
Adjusting the Seatbelt Height.....................57Adjusting the Seatbelts DuringPregnancy......................................................56Adjusting the Sound Settings...................430Adjusting the Steering Wheel - VehiclesWith: Manual Adjustable SteeringColumn...........................................................114Adjusting the Steering Wheel - VehiclesWith: Power Adjustable SteeringColumn...........................................................114Adjusting the Volume..................................430Aid Mode.........................................................271How Does Aid Mode Work...............................271What Is Aid Mode................................................271
Airbag Precautions.........................................67
561
2022 Nautilus (CD9) Canada/United States of America, enUSA, Edition date: 202108, First-PrintingIndex