steering LINCOLN NAUTILUS 2022 Manual PDF
[x] Cancel search | Manufacturer: LINCOLN, Model Year: 2022, Model line: NAUTILUS, Model: LINCOLN NAUTILUS 2022Pages: 586, PDF Size: 13.97 MB
Page 317 of 586

Note:Do not rock your vehicle if the engineis not at normal operating temperature, asdamage to the transmission could occur.
Note:Do not rock your vehicle for more thana minute, as damage to the transmissionand tires could occur or the engine couldoverheat
DRIVING THROUGH SHALLOW
WATER
WARNING: Do not attempt to crossa deep or flowing body of water. Failure tofollow this instruction could result in theloss of control of your vehicle, personalinjury or death.
Note:Driving through standing water cancause vehicle damage.
Note:Engine damage can occur if waterenters the air filter.
Before driving through standing water, checkthe depth. Never drive through water that ishigher than the bottom of the front rockerarea of your vehicle.
When driving through standing water, drivevery slowly and do not stop your vehicle. Your brake performance and traction couldbe limited. After driving through water andas soon as it is safe to do so:
•Lightly press the brake pedal to dry thebrakes and to check that they work.
•Turn the steering wheel to check that thesteering power assist works.
Check the function of the following:
•Horn
•Exterior lights
FLOOR MATS
WARNING: Use a floor mat designedto fit the footwell of your vehicle that doesnot obstruct the pedal area. Failure tofollow this instruction could result in theloss of control of your vehicle, personalinjury or death.
WARNING: Pedals that cannot movefreely can cause loss of vehicle control andincrease the risk of serious personal injury.
WARNING: Secure the floor mat toboth retention devices so that it cannot slipout of position and interfere with thepedals. Failure to follow this instructioncould result in the loss of control of yourvehicle, personal injury or death.
313
2022 Nautilus (CD9) Canada/United States of America, enUSA, Edition date: 202108, First-PrintingDriving Hints E266447
Page 331 of 586
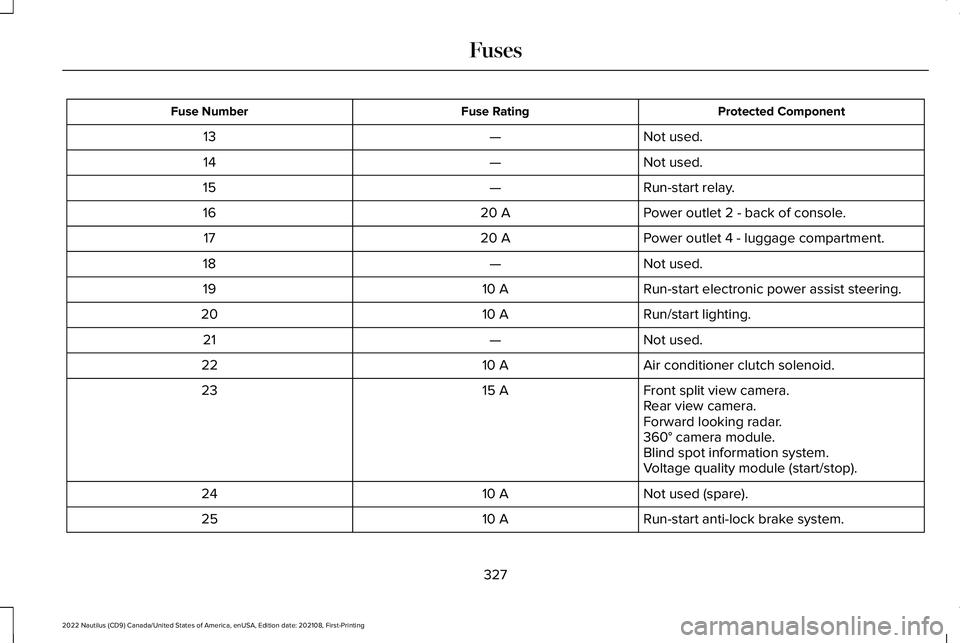
Protected ComponentFuse RatingFuse Number
Not used.—13
Not used.—14
Run-start relay.—15
Power outlet 2 - back of console.20 A16
Power outlet 4 - luggage compartment.20 A17
Not used.—18
Run-start electronic power assist steering.10 A19
Run/start lighting.10 A20
Not used.—21
Air conditioner clutch solenoid.10 A22
Front split view camera.15 A23Rear view camera.Forward looking radar.360° camera module.Blind spot information system.Voltage quality module (start/stop).
Not used (spare).10 A24
Run-start anti-lock brake system.10 A25
327
2022 Nautilus (CD9) Canada/United States of America, enUSA, Edition date: 202108, First-PrintingFuses
Page 339 of 586
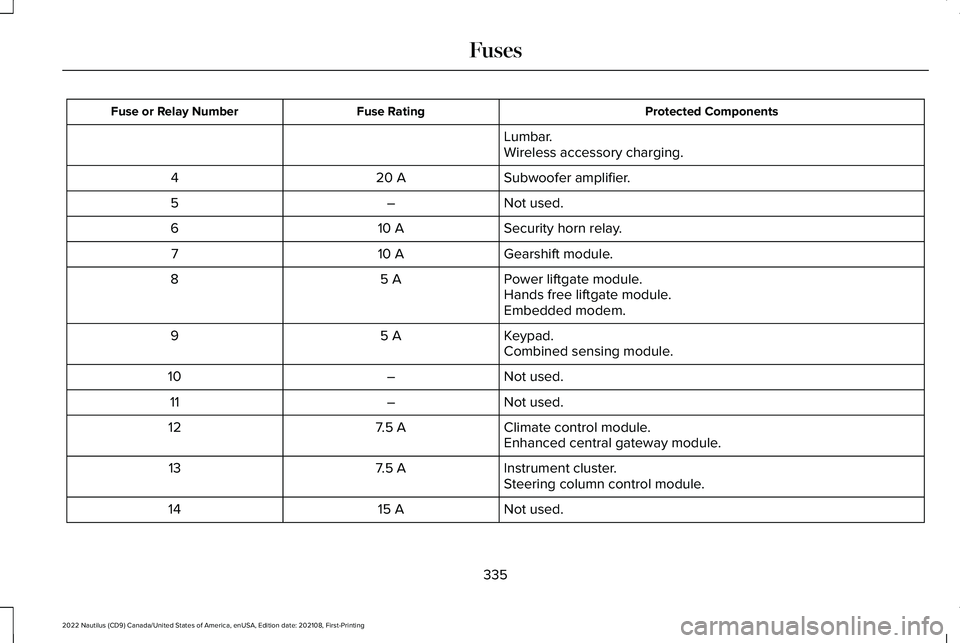
Protected ComponentsFuse RatingFuse or Relay Number
Lumbar.Wireless accessory charging.
Subwoofer amplifier.20 A4
Not used.–5
Security horn relay.10 A6
Gearshift module.10 A7
Power liftgate module.5 A8Hands free liftgate module.Embedded modem.
Keypad.5 A9Combined sensing module.
Not used.–10
Not used.–11
Climate control module.7.5 A12Enhanced central gateway module.
Instrument cluster.7.5 A13Steering column control module.
Not used.15 A14
335
2022 Nautilus (CD9) Canada/United States of America, enUSA, Edition date: 202108, First-PrintingFuses
Page 341 of 586
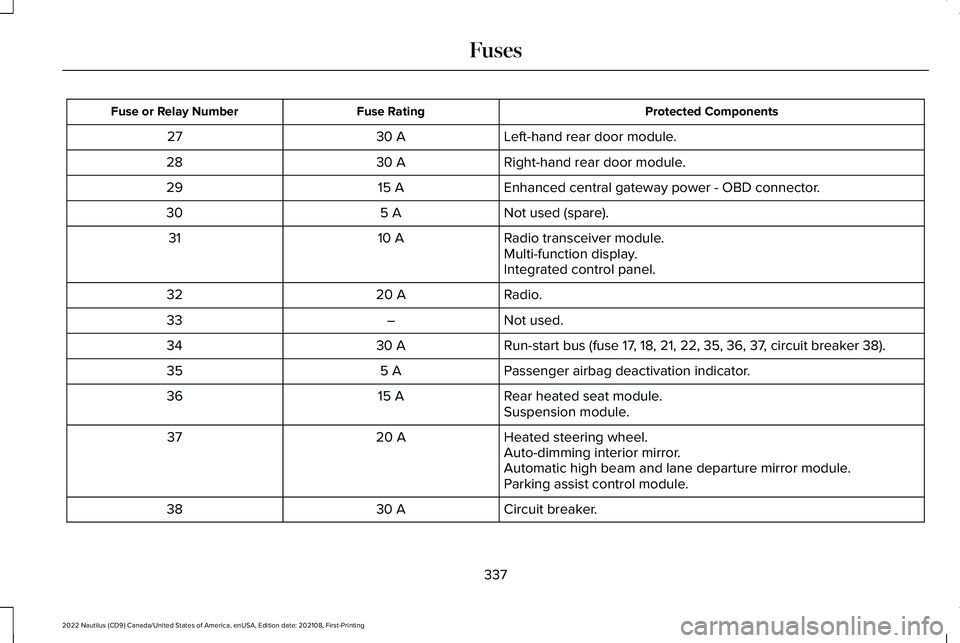
Protected ComponentsFuse RatingFuse or Relay Number
Left-hand rear door module.30 A27
Right-hand rear door module.30 A28
Enhanced central gateway power - OBD connector.15 A29
Not used (spare).5 A30
Radio transceiver module.10 A31Multi-function display.Integrated control panel.
Radio.20 A32
Not used.–33
Run-start bus (fuse 17, 18, 21, 22, 35, 36, 37, circuit breaker 38).30 A34
Passenger airbag deactivation indicator.5 A35
Rear heated seat module.15 A36Suspension module.
Heated steering wheel.20 A37Auto-dimming interior mirror.Automatic high beam and lane departure mirror module.Parking assist control module.
Circuit breaker.30 A38
337
2022 Nautilus (CD9) Canada/United States of America, enUSA, Edition date: 202108, First-PrintingFuses
Page 350 of 586
ADDING ENGINE OIL
WARNING: Do not remove the fillercap when the engine is running.
WARNING: Do not add engine oilwhen the engine is hot. Failure to followthis instruction could result in personalinjury.
Do not use supplemental engine oil additivesbecause they are unnecessary and couldlead to engine damage that the vehiclewarranty may not cover.
1.Clean the area surrounding the engineoil filler cap before you remove it.
2.Remove the engine oil filler cap.
3.Add engine oil that meets ourspecifications. See Capacities andSpecifications (page 404).
4.Reinstall the engine oil filler cap. Turn itclockwise until you feel a strongresistance.
Note: Do not add oil further than themaximum mark. Oil levels above themaximum mark may cause engine damage.
Note:Immediately soak up any oil spillagewith an absorbent cloth.
RESETTING THE ENGINE OIL CHANGEREMINDER
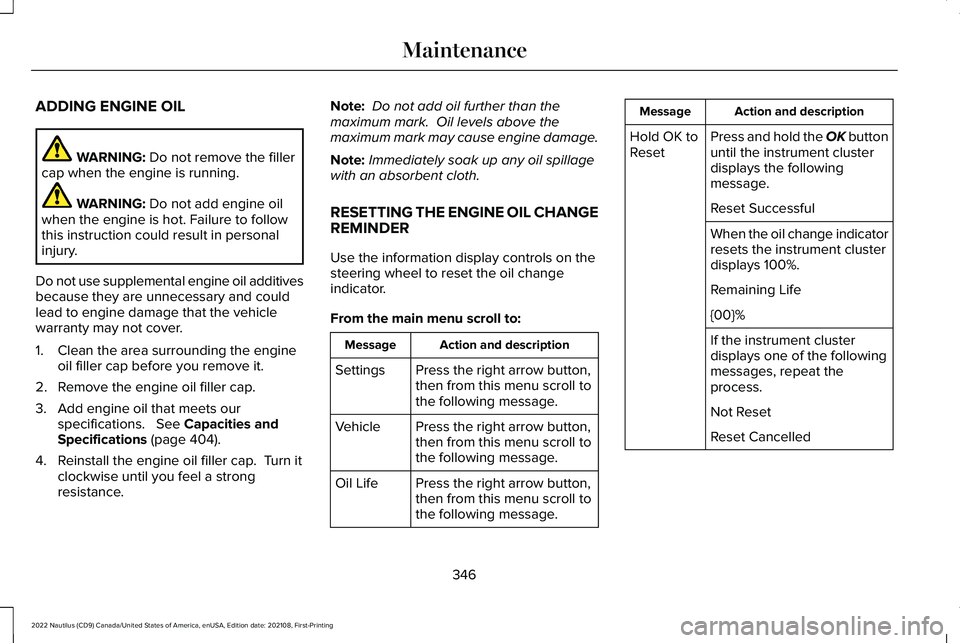
Use the information display controls on thesteering wheel to reset the oil changeindicator.
From the main menu scroll to:
Action and descriptionMessage
Press the right arrow button,then from this menu scroll tothe following message.
Settings
Press the right arrow button,then from this menu scroll tothe following message.
Vehicle
Press the right arrow button,then from this menu scroll tothe following message.
Oil Life
Action and descriptionMessage
Press and hold the OK buttonuntil the instrument clusterdisplays the followingmessage.
Hold OK toReset
Reset Successful
When the oil change indicatorresets the instrument clusterdisplays 100%.
Remaining Life
{00}%
If the instrument clusterdisplays one of the followingmessages, repeat theprocess.
Not Reset
Reset Cancelled
346
2022 Nautilus (CD9) Canada/United States of America, enUSA, Edition date: 202108, First-PrintingMaintenance
Page 353 of 586
Note:A coolant concentration of 40%provides improved overheat protection.Coolant concentrations below 40% decreasethe overheat and corrosion protectioncharacteristics of the coolant and couldcause engine damage.
Coolant Change
WARNING: Do not dispose of coolantin the household refuse or the publicsewage system. Use an authorized wastedisposal facility.
Change the coolant at specific mileageintervals. Refer to the scheduledmaintenance information. See NormalScheduled Maintenance (page 467).
Note:Dispose of used coolant in theappropriate manner.
Follow your community's regulations andstandards for recycling and disposing ofautomotive fluids.
Fail-Safe Cooling
Fail-safe cooling allows you to temporarilydrive your vehicle before any incrementalcomponent damage occurs. The fail-safedistance depends on ambient temperature,vehicle load and terrain.
How Fail-Safe Cooling Works
If the engine begins to overheat,the coolant temperature gaugemoves toward the red zone:
A warning lamp illuminates and amessage may appear in theinformation display.
If the engine reaches a presetover-temperature condition, the engineautomatically switches to alternating cylinderoperation. Each disabled cylinder acts as anair pump and cools the engine.
When this occurs, your vehicle still operates,however:
•Engine power is limited.
•The air conditioning system turns off.
Continued operation increases the enginetemperature, causing the engine tocompletely shut down. Your steering andbraking effort increases in this situation.
When the engine temperature cools, you canre-start the engine. Have your vehiclechecked as soon as possible to minimizeengine damage.
When Fail-Safe Mode Is Activated
WARNING: Fail-safe mode is for useduring emergencies only. Operate yourvehicle in fail-safe mode only as long asnecessary to bring your vehicle to rest ina safe location and seek immediate repairs.When in fail-safe mode, your vehicle willhave limited power, will not be able tomaintain high-speed operation, and maycompletely shut down without warning,potentially losing engine power, powersteering assist, and power brake assist,which may increase the possibility of acrash resulting in serious injury.
349
2022 Nautilus (CD9) Canada/United States of America, enUSA, Edition date: 202108, First-PrintingMaintenance
Page 358 of 586
We recommend that you disconnect thenegative battery cable terminal from thebattery if you plan to store your vehicle foran extended period.
Note:If you only disconnect the negativebattery cable terminal, make sure it isisolated or placed away from the batteryterminal to avoid unintended connection orarcing.
To maintain correct operation of the batterymanagement system, if you add anyelectrical devices to your vehicle, do notconnect the ground connection directly tothe negative battery terminal. A connectionat the negative battery terminal can causeinaccurate measurements of the batterycondition and potential incorrect systemoperation.
Note:If you add electrical accessories orcomponents to your vehicle this mayadversely affect battery performance,durability and the performance of otherelectrical systems on your vehicle.
If you replace the battery make sure itmatches the electrical requirements of yourvehicle.
If you disconnect or replace the battery andyour vehicle has an automatic transmission,it must relearn its adaptive strategy. Becauseof this, the transmission may shift firmly whenfirst driven. This is normal operation whilethe transmission fully updates its operationto optimum shift feel.
Remove and Reinstall the Battery
To disconnect or remove the battery, do thefollowing:
1.Apply the parking brake and switch theignition off.
2.Switch all electrical equipment off, forexample lights and radio.
3.Wait a minimum of two minutes beforedisconnecting the battery.
Note:The engine management system hasa power hold function and remains poweredfor a period of time after you switch theignition off. This is to allow diagnostic andadaptive tables to be stored. Disconnectingthe battery without waiting can causedamage not covered by the vehicleWarranty.
4.Disconnect the negative battery cableterminal.
5.Disconnect the positive battery cableterminal.
6.Remove the battery securing clamp.
7.Remove the battery.
8.To install, reverse the removal procedure.
Note:Before reconnecting the battery, makesure the ignition remains switched off.
Note:Make sure the battery cable terminalsare fully tightened.
Note:After cleaning or replacing the battery,make sure you reinstall the battery cover orshield.
If you disconnect or replace the vehiclebattery, you must reset the followingfeatures:
•Window bounce-back. See Windows(page 131).
•Clock Settings.
•Pre-set radio stations.
•Steering Angle Sensor.
354
2022 Nautilus (CD9) Canada/United States of America, enUSA, Edition date: 202108, First-PrintingMaintenance
Page 359 of 586
Note:To calibrate the steering angle sensor,drive the vehicle above 30 mph (50 km/h)for a minimum of 1.2 mi (2 km). Make sure todrive straight ahead for a minimum of 30seconds. Several vehicle functions aredisabled and a warning light could appearuntil the sensor is calibrated.
Note:The battery sensor must be reset whena new battery is installed. Install only abattery approved by Ford for use in thevehicle. Use the following procedure toperform the battery sensor reset:
1.1. Turn ignition to on and leave engineoff. Steps 2 and 3 must be completedwithin 10 seconds.
2.2. Flash the high beams 5 times, endingwith the high beams off.
3.3. Press and release the brake pedal 3times.
The battery warning light on the cluster willflash 3 times to confirm that the reset wassuccessful.
Battery Management System
The battery management system monitorsbattery conditions and takes actions toextend battery life. If excessive battery drainis detected, the system temporarily disablessome of the following features:
•Heated rear window.
•Heated seats.
•Climate control.
•Heated steering wheel.
•Audio unit.
•Navigation system.
A message may appear in the informationdisplay to alert you that battery protectionactions are active.
After battery replacement, or in some casesafter charging the battery with an externalcharger, the battery management systemrequires eight hours of vehicle sleep time torelearn the battery state of charge. Duringthis time your vehicle must remain fullylocked with the ignition off.
Note:If you add electrical accessories orcomponents to the vehicle, it may adverselyaffect battery performance and durability.This may also affect the performance ofother electrical systems in the vehicle.
Battery Disposal
Make sure that you dispose of oldbatteries in an environmentallyfriendly way. Seek advice fromyour local authority about recycling oldbatteries.
ADJUSTING THE HEADLAMPS
Vertical Aim Adjustment
The headlamps on your vehicle are properlyaimed at the assembly plant. If your vehiclehas been involved in a crash, have the aimof the headlamp beam checked by anauthorized dealer.
355
2022 Nautilus (CD9) Canada/United States of America, enUSA, Edition date: 202108, First-PrintingMaintenanceE107998
Page 369 of 586
Note:Do not pressure wash camera lensand sensors.
WAXING
Wax the high-gloss painted surface of yourprewashed vehicle once or twice a year.
We recommend that you only use anapproved quality wax that does not containabrasives. For additional information andassistance, we recommend that you contactan authorized dealer.
When washing and waxing, park your vehiclein a shaded area out of direct sunlight.
Note:Avoid waxing unpainted or low-glossblack colored parts, they discolor over time.
CLEANING THE INTERIOR
CLEANING THE INSTRUMENT PANEL
WARNING: Do not use chemicalsolvents or strong detergents whencleaning the steering wheel or instrumentpanel to avoid contamination of the airbagsystem.
We recommend that you only clean theinstrument panel and cluster lens with adamp soft cloth. Dry the area with a clean,soft cloth.
For additional information and assistance,we recommend that you contact anauthorized dealer.
Note:Avoid cleaners or polishes thatincrease the gloss of the upper portion ofthe instrument panel. The dull finish in thisarea helps protect you from undesirablewindshield reflection.
CLEANING PLASTIC
We recommend that you only use a mildsoap and water solution on a soft cloth. Drythe area with a clean, soft cloth.
CLEANING DISPLAYS AND SCREENS
We recommend that you only use amicrofiber cloth in a circular motion to cleanoff the fingerprint or dust.
If dirt or fingerprints are still on the screen,apply a small amount of alcohol to the clothand try to clean it again.
Note:Do not pour or spray alcohol onto thetouchscreen.
Note: Do not use detergent or any type ofsolvent to clean the touchscreen.
CLEANING LEATHER AND VINYL
We recommend that you only clean theleather and vinyl surfaces in the followingway:
1.Remove dust and loose dirt with avacuum cleaner.
365
2022 Nautilus (CD9) Canada/United States of America, enUSA, Edition date: 202108, First-PrintingVehicle Care
Page 382 of 586
WARNING: Only usereplacement tires and wheels that arethe same size, load index, speed ratingand type (such as P-metric versusLT-metric or all-season versusall-terrain) as those originally providedby Ford. The recommended tire andwheel size may be found on either theSafety Compliance Certification Label(affixed to either the door hinge pillar,door-latch post, or the door edge thatmeets the door-latch post, next to thedriver's seating position), or the TireLabel which is located on the B-Pillaror edge of the driver's door. If thisinformation is not found on theselabels, then you should contact yourauthorized dealer as soon as possible.
Use of any tire or wheel notrecommended by Ford can affect thesafety and performance of yourvehicle, which could result in anincreased risk of loss of vehiclecontrol, vehicle rollover, personalinjury and death.
WARNING: To reduce the risk ofserious injury, when mountingreplacement tires and wheels, youshould not exceed the maximumpressure indicated on the sidewall ofthe tire to set the beads withoutadditional precautions listed below. Ifthe beads do not seat at the maximumpressure indicated, re-lubricate andtry again.
WARNING: For a mountingpressure more than 20 psi (1.38 bar)greater than the maximum pressure,a Ford dealer or other tire serviceprofessional should do the mounting.
WARNING: Always inflate steelcarcass tires with a remote air fill withthe person inflating standing at aminimum of 12 ft (3.66 m) away fromthe wheel and tire assembly.
WARNING: When inflating thetire for mounting pressures up to20 psi (1.38 bar) greater than themaximum pressure on the tire sidewall,the following precautions must betaken to protect the person mountingthe tire:
WARNING: Use only thespecified jacking points. If you useother locations, you could damage thebody, steering, suspension, engine,braking system or the fuel lines.
•Make sure that you have the correcttire and wheel size.
•Lubricate the tire bead and wheelbead seat area again.
•Stand at a minimum of 12 ft (3.66 m)away from the wheel and tireassembly.
•Use both eye and ear protection.
Important: Remember to replace thewheel valve stems when the road tiresare replaced on your vehicle.
378
2022 Nautilus (CD9) Canada/United States of America, enUSA, Edition date: 202108, First-PrintingWheel and Tire Information