lights LINCOLN NAUTILUS 2023 User Guide
[x] Cancel search | Manufacturer: LINCOLN, Model Year: 2023, Model line: NAUTILUS, Model: LINCOLN NAUTILUS 2023Pages: 606, PDF Size: 13.57 MB
Page 291 of 606
PRE-COLLISION ASSIST
PRECAUTIONS
WARNING: You are responsible forcontrolling your vehicle at all times. Thesystem is designed to be an aid and doesnot relieve you of your responsibility todrive with due care and attention. Failureto follow this instruction could result in theloss of control of your vehicle, personalinjury or death.
WARNING: The system does notdetect vehicles moving in a differentdirection or animals. Apply the brakeswhen necessary. Failure to follow thisinstruction could result in the loss ofcontrol of your vehicle, personal injury ordeath.
WARNING: The system does notoperate during hard acceleration orsteering. Failure to take care may lead toa crash or personal injury.
WARNING: The system may operatewith reduced function during cold andinclement weather conditions. Snow, ice,rain, spray and fog can adversely affect thesystem. Keep the front camera and radarfree of snow and ice. Failure to follow thisinstruction may result in the loss of controlof your vehicle, serious personal injury ordeath.
WARNING: Take additional care ifyour vehicle is heavily loaded or you aretowing a trailer. These conditions couldresult in reduced performance of thissystem. Failure to follow this instructioncould result in the loss of control of yourvehicle, personal injury or death.
WARNING: The system cannot helpprevent all crashes. Do not rely on thissystem to replace driver judgment and theneed to maintain a safe distance andspeed.
WARNING: System performancecould be reduced in situations where thevehicle camera has limited detectioncapability. These situations include but arenot limited to direct or low sunlight,vehicles at night without tail lights,unconventional vehicle types, andpedestrians and cyclists with complex,partially obscured backgrounds. Failure totake care may result in the loss of controlof your vehicle, personal injury or death.
PRE-COLLISION ASSIST
LIMITATIONS
Pre-collision assist depends on the detectionability of its camera and sensors. Anyobstructions or damage to these areas canlimit detection or prevent the system fromfunctioning. See Locating the Pre-CollisionAssist Sensors (page 288).
The system is active at 3 mph (5 km/h) andabove.
287
2023 Nautilus (CD9) Canada/United States of America, enUSA, Edition date: 202207, DOMPre-Collision Assist
Page 309 of 606
CONNECTING A TRAILER
PRECAUTIONS
Do not tow a trailer until you drive yourvehicle at least 1,000 mi (1,600 km).
Consult your local motor vehicle laws fortowing a trailer.
See the instructions included with towingaccessories for the proper installation andadjustment specifications.
Service your vehicle more frequently if youtow a trailer. See Normal ScheduledMaintenance (page 474).
If you use a rental trailer, follow theinstructions the rental agency gives you.
When attaching the trailer wiring connectorto your vehicle, only use a proper fittingconnector that works with the vehicle andtrailer functions.
Account for the trailer coupler weight as partof your vehicle load when calculating thetotal vehicle weight.
Do not exceed the load limits. SeeCalculating the Load Limit (page 298).
CONNECTING A TRAILER
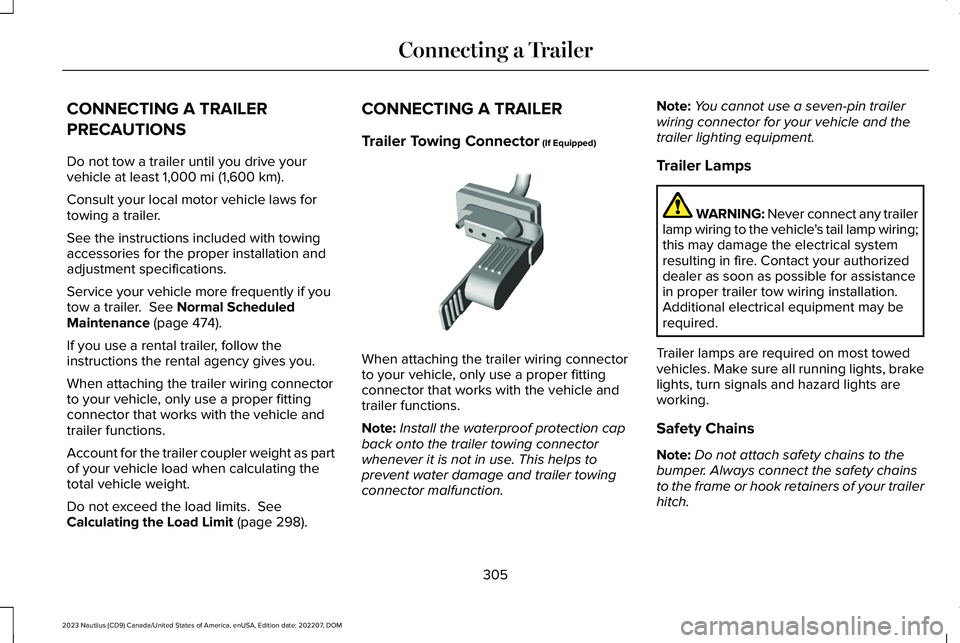
Trailer Towing Connector (If Equipped)
When attaching the trailer wiring connectorto your vehicle, only use a proper fittingconnector that works with the vehicle andtrailer functions.
Note:Install the waterproof protection capback onto the trailer towing connectorwhenever it is not in use. This helps toprevent water damage and trailer towingconnector malfunction.
Note:You cannot use a seven-pin trailerwiring connector for your vehicle and thetrailer lighting equipment.
Trailer Lamps
WARNING: Never connect any trailerlamp wiring to the vehicle's tail lamp wiring;this may damage the electrical systemresulting in fire. Contact your authorizeddealer as soon as possible for assistancein proper trailer tow wiring installation.Additional electrical equipment may berequired.
Trailer lamps are required on most towedvehicles. Make sure all running lights, brakelights, turn signals and hazard lights areworking.
Safety Chains
Note:Do not attach safety chains to thebumper. Always connect the safety chainsto the frame or hook retainers of your trailerhitch.
305
2023 Nautilus (CD9) Canada/United States of America, enUSA, Edition date: 202207, DOMConnecting a Trailer E168683
Page 320 of 606
•Horn
•Exterior lights
FLOOR MATS
WARNING: Use a floor mat designedto fit the footwell of your vehicle that doesnot obstruct the pedal area. Failure tofollow this instruction could result in theloss of control of your vehicle, personalinjury or death.
WARNING: Pedals that cannot movefreely can cause loss of vehicle control andincrease the risk of serious personal injury.
WARNING: Secure the floor mat toboth retention devices so that it cannot slipout of position and interfere with thepedals. Failure to follow this instructioncould result in the loss of control of yourvehicle, personal injury or death.
WARNING: Do not place additionalfloor mats or any other covering on top ofthe original floor mats. This could result inthe floor mat interfering with the operationof the pedals. Failure to follow thisinstruction could result in the loss ofcontrol of your vehicle, personal injury ordeath.
WARNING: Always make sure thatobjects cannot fall into the driver foot wellwhile your vehicle is moving. Objects thatare loose can become trapped under thepedals causing a loss of vehicle control.
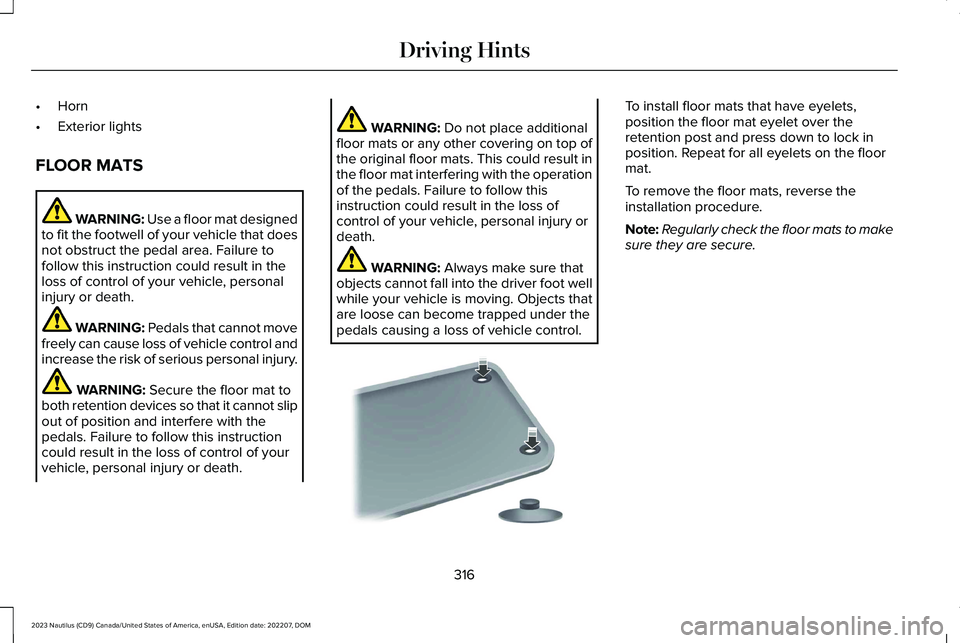
To install floor mats that have eyelets,position the floor mat eyelet over theretention post and press down to lock inposition. Repeat for all eyelets on the floormat.
To remove the floor mats, reverse theinstallation procedure.
Note:Regularly check the floor mats to makesure they are secure.
316
2023 Nautilus (CD9) Canada/United States of America, enUSA, Edition date: 202207, DOMDriving HintsE142666
Page 361 of 606
If you disconnect or replace the battery andyour vehicle has an automatic transmission,it must relearn its adaptive strategy. Becauseof this, the transmission may shift firmly whenfirst driven. This is normal operation whilethe transmission fully updates its operationto optimum shift feel.
Remove and Reinstall the Battery
To disconnect or remove the battery, do thefollowing:
1.Apply the parking brake and switch theignition off.
2.Switch all electrical equipment off, forexample lights and radio.
3.Wait a minimum of two minutes beforedisconnecting the battery.
Note:The engine management system hasa power hold function and remains poweredfor a period of time after you switch theignition off. This is to allow diagnostic andadaptive tables to be stored. Disconnectingthe battery without waiting can causedamage not covered by the vehicleWarranty.
4.Disconnect the negative battery cableterminal.
5.Disconnect the positive battery cableterminal.
6.Remove the battery securing clamp.
7.Remove the battery.
8.To install, reverse the removal procedure.
Note:Before reconnecting the battery, makesure the ignition remains switched off.
Note:Make sure the battery cable terminalsare fully tightened.
Note:After cleaning or replacing the battery,make sure you reinstall the battery cover orshield.
If you disconnect or replace the vehiclebattery, you must reset the followingfeatures:
•Window bounce-back. See Windows(page 131).
•Clock Settings.
•Pre-set radio stations.
•Steering Angle Sensor.
Note:To calibrate the steering angle sensor,drive the vehicle above 30 mph (50 km/h)for a minimum of 1.2 mi (2 km). Make sure todrive straight ahead for a minimum of 30seconds. Several vehicle functions aredisabled and a warning light could appearuntil the sensor is calibrated.
Note:The battery sensor must be reset whena new battery is installed. Install only abattery approved by Ford for use in thevehicle. Use the following procedure toperform the battery sensor reset:
1.1. Turn ignition to on and leave engineoff. Steps 2 and 3 must be completedwithin 10 seconds.
2.2. Flash the high beams 5 times, endingwith the high beams off.
3.3. Press and release the brake pedal 3times.
The battery warning light on the cluster willflash 3 times to confirm that the reset wassuccessful.
357
2023 Nautilus (CD9) Canada/United States of America, enUSA, Edition date: 202207, DOMMaintenance
Page 395 of 606
What to do when a tire is punctured
A tire puncture within the tire's tread areacan be repaired in two stages with the kit.
•In the first stage, the tire is reinflated witha sealing compound and air. After the tirehas been inflated, drive the vehicle ashort distance approximately 4 mi (6 km)to distribute the sealant in the tire.
•In the second stage, check the tirepressure and adjust, if necessary, to thevehicle's specified tire inflation pressure.
First Stage: Reinflating the Tire withsealing compound and air
WARNING: Do not stand directly overthe kit while inflating the tire. If you noticeany unusual bulges or deformations in thetire's sidewall during inflation, stop and callroadside assistance.
WARNING: If the tire does not inflateto the recommended tire pressure within15 minutes, stop and call roadsideassistance.
Park the vehicle in a safe, level and securearea, away from moving traffic.
Turn the hazard lights on. Apply the parkingbrake and power off the vehicle. Inspect theflat tire for visible damage.
If a puncture is located in the tire sidewall,stop and call roadside assistance.
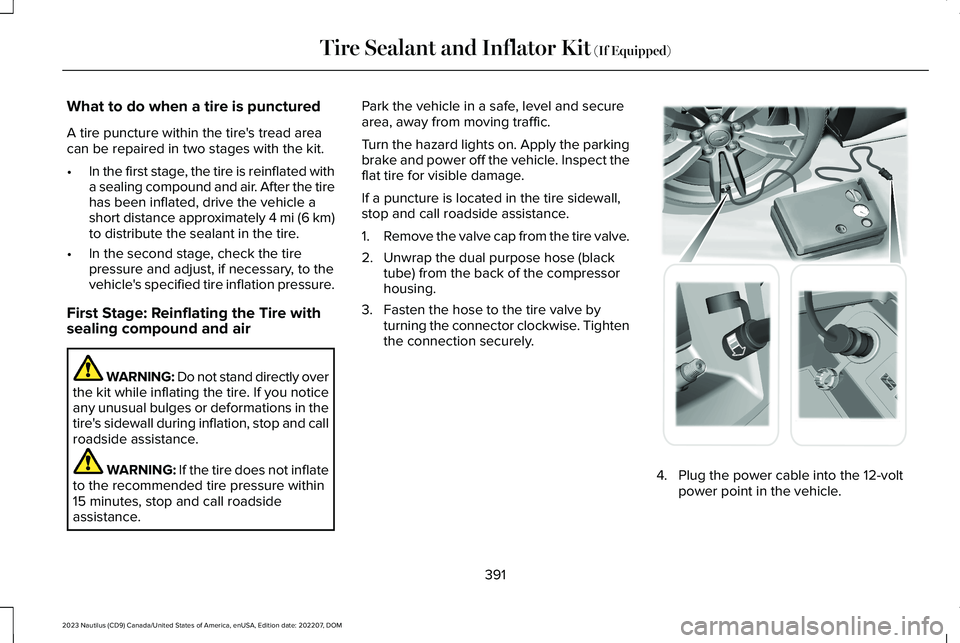
1.Remove the valve cap from the tire valve.
2.Unwrap the dual purpose hose (blacktube) from the back of the compressorhousing.
3.Fasten the hose to the tire valve byturning the connector clockwise. Tightenthe connection securely.
4.Plug the power cable into the 12-voltpower point in the vehicle.
391
2023 Nautilus (CD9) Canada/United States of America, enUSA, Edition date: 202207, DOMTire Sealant and Inflator Kit (If Equipped) E175979
Page 476 of 606
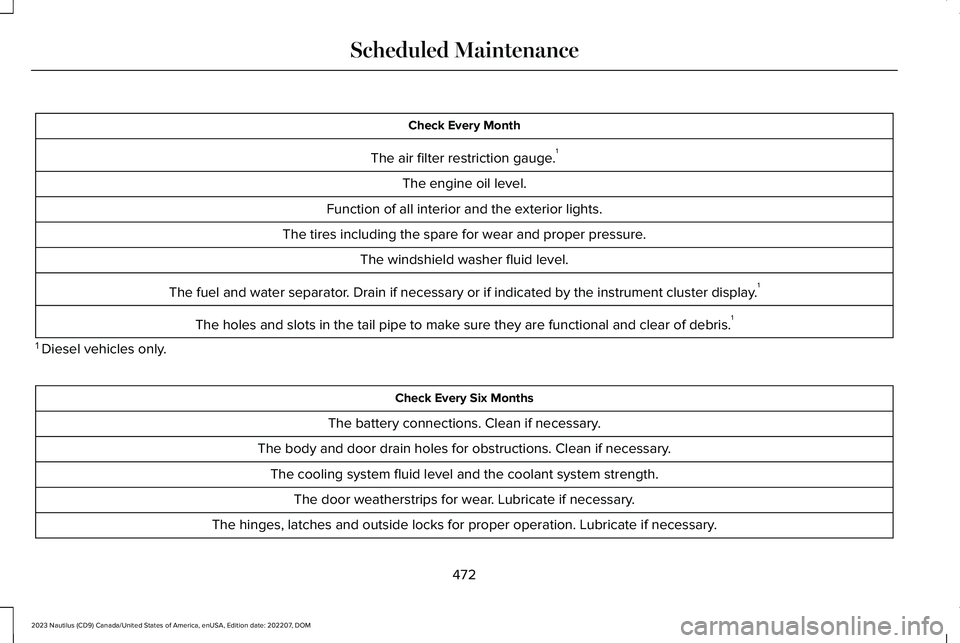
Check Every Month
The air filter restriction gauge.1
The engine oil level.
Function of all interior and the exterior lights.
The tires including the spare for wear and proper pressure.
The windshield washer fluid level.
The fuel and water separator. Drain if necessary or if indicated by the instrument cluster display.1
The holes and slots in the tail pipe to make sure they are functional and clear of debris.1
1 Diesel vehicles only.
Check Every Six Months
The battery connections. Clean if necessary.
The body and door drain holes for obstructions. Clean if necessary.
The cooling system fluid level and the coolant system strength.
The door weatherstrips for wear. Lubricate if necessary.
The hinges, latches and outside locks for proper operation. Lubricate if necessary.
472
2023 Nautilus (CD9) Canada/United States of America, enUSA, Edition date: 202207, DOMScheduled Maintenance