ECO mode LINCOLN NAVIGATOR 2004 Owners Manual
[x] Cancel search | Manufacturer: LINCOLN, Model Year: 2004, Model line: NAVIGATOR, Model: LINCOLN NAVIGATOR 2004Pages: 368, PDF Size: 8.21 MB
Page 10 of 368
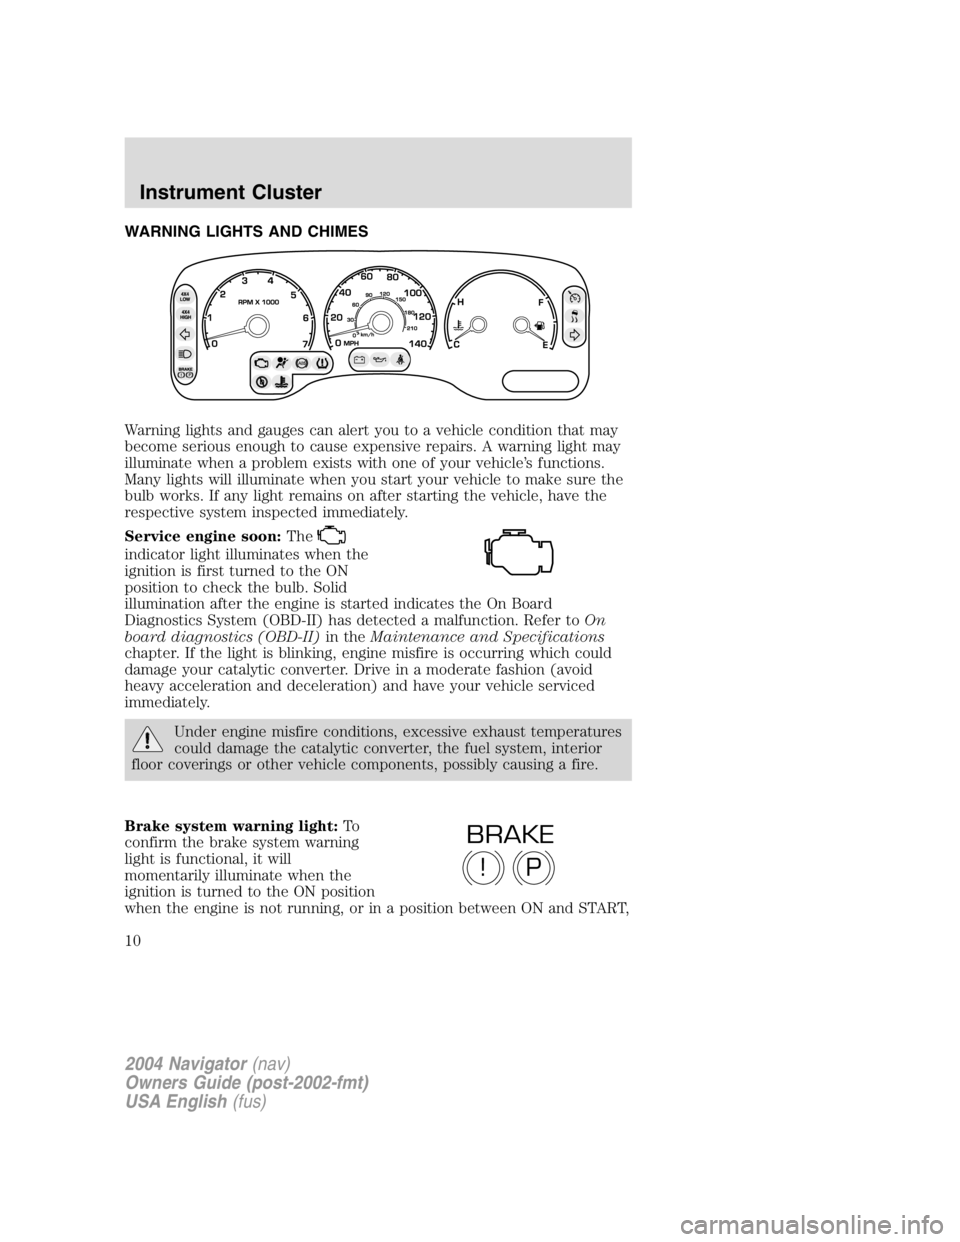
WARNING LIGHTS AND CHIMES
Warning lights and gauges can alert you to a vehicle condition that may
become serious enough to cause expensive repairs. A warning light may
illuminate when a problem exists with one of your vehicle ’ s functions.
Many lights will illuminate when you start your vehicle to make sure the
bulb works. If any light remains on after starting the vehicle, have the
respective system inspected immediately.
Service engine soon: The
indicator light illuminates when the
ignition is first turned to the ON
position to check the bulb. Solid
illumination after the engine is started indicates the On Board
Diagnostics System (OBD-II) has detected a malfunction. Refer to On
board diagnostics (OBD-II) in the Maintenance and Specifications
chapter. If the light is blinking, engine misfire is occurring which could
damage your catalytic converter. Drive in a moderate fashion (avoid
heavy acceleration and deceleration) and have your vehicle serviced
immediately.
Under engine misfire conditions, excessive exhaust temperatures
could damage the catalytic converter, the fuel system, interior
floor coverings or other vehicle components, possibly causing a fire.
Brake system warning light: To
confirm the brake system warning
light is functional, it will
momentarily illuminate when the
ignition is turned to the ON position
when the engine is not running, or in a position between ON and START,
P!BRAKE
2004 Navigator (nav)
Owners Guide (post-2002-fmt)
USA English (fus)Instrument Cluster
Instrument Cluster
10
Page 15 of 368
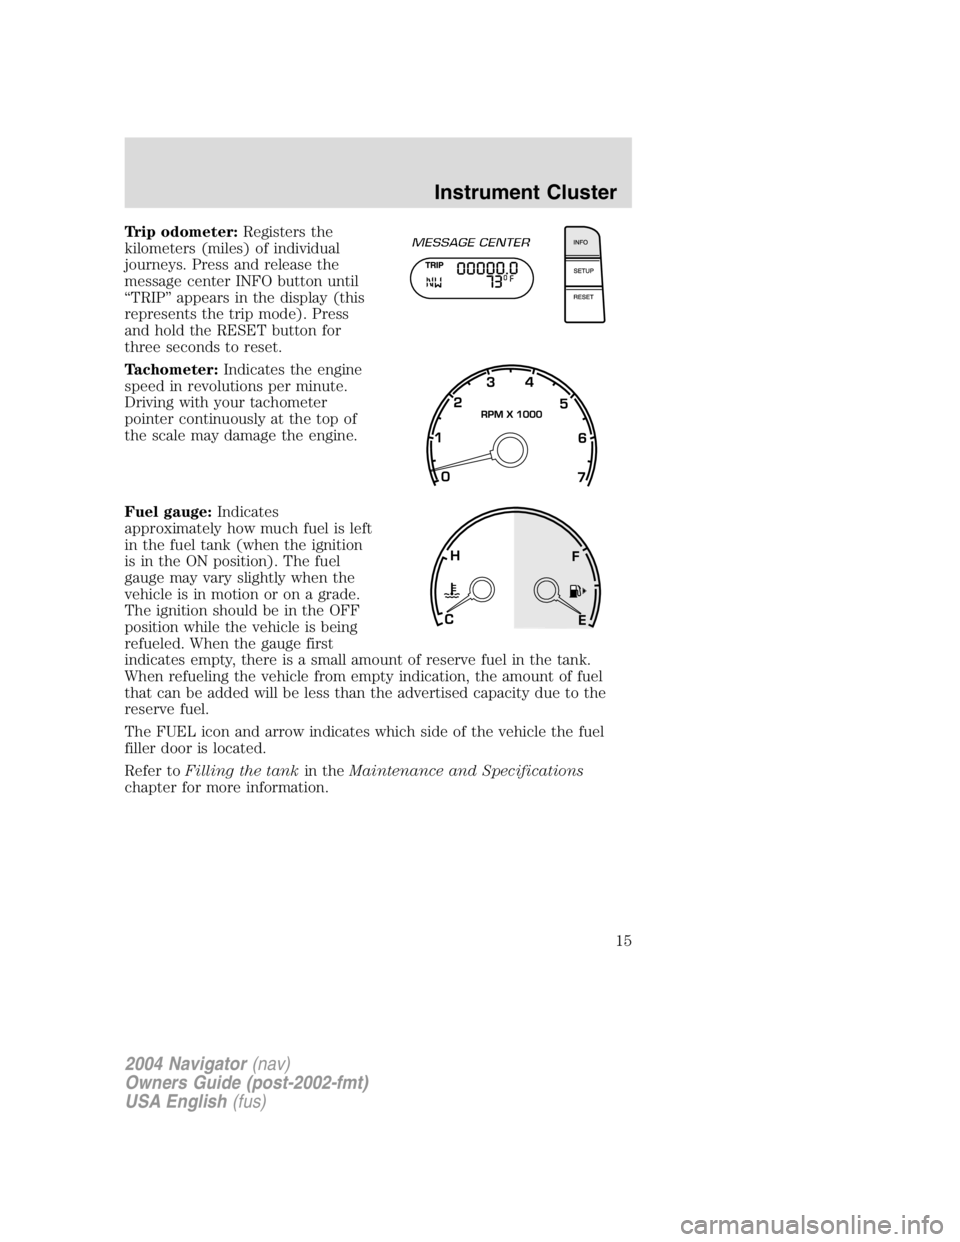
Trip odometer: Registers the
kilometers (miles) of individual
journeys. Press and release the
message center INFO button until
“ TRIP ” appears in the display (this
represents the trip mode). Press
and hold the RESET button for
three seconds to reset.
Tachometer: Indicates the engine
speed in revolutions per minute.
Driving with your tachometer
pointer continuously at the top of
the scale may damage the engine.
Fuel gauge: Indicates
approximately how much fuel is left
in the fuel tank (when the ignition
is in the ON position). The fuel
gauge may vary slightly when the
vehicle is in motion or on a grade.
The ignition should be in the OFF
position while the vehicle is being
refueled. When the gauge first
indicates empty, there is a small amount of reserve fuel in the tank.
When refueling the vehicle from empty indication, the amount of fuel
that can be added will be less than the advertised capacity due to the
reserve fuel.
The FUEL icon and arrow indicates which side of the vehicle the fuel
filler door is located.
Refer to Filling the tank in the Maintenance and Specifications
chapter for more information.
2004 Navigator (nav)
Owners Guide (post-2002-fmt)
USA English (fus) Instrument Cluster
15
Page 18 of 368
FF (Fast Forward): Works in tape
and CD modes.
In the tape mode, tape direction
automatically reverses when the end of the tape is reached.
In CD mode, FF advances the CD within the current track.
10. MUTE: Press to mute the
playing media. Press again to return
to playing media.
Note: If your vehicle is equipped with the Reverse Sensing System, the
audio volume (if set above a certain level) will be lowered to a preset
value when the Backup aid tone is sounded.
RDS: (Radio Data System): Press RDS to access the clock mode and the
RDS features.
RDS must be turned ON to activate the Traffic, Find Program Type and
Show functions. To turn RDS ON, put the radio in FM mode then press
the RDS button until RDS OFF appears then press SEL control to toggle
function ON.
• Traffic: Allows you to hear traffic broadcasts. With the feature ON,
press SEEK or SCAN to find a station broadcasting a traffic report (if
it is broadcasting RDS data). Traffic information is not available in
most U.S. markets. To activate, press RDS until TRAFFIC OFF
appears in the display then use SEL to toggle function ON.
• FIND Program type: Allows you to search RDS-equipped stations for
a certain category of music format: Classic, Country, Info, Jazz, Oldies,
R&B, Religious, Rock, Soft, Top 40. Press RDS until FIND appears in
the display then use the SEL control to scroll through the desired
music types. Press SEEK or SCAN to find program type.
• Show TYPE: Allows you to display radio station call sign or format.
To activate, press RDS until SHOW appears in the display, then use
the SEL to select NAME or TYPE.
The Federal Communications Commission (FCC) and the Canadian Radio
and Telecommunications Commission (CRTC) recommend that FM radio
broadcasters use RDS technology to transmit information. FM radio
stations are independently operated and individually elect to use RDS
technology to transmit station ID and program type as desired.
Setting the clock: Your vehicle is equipped with a separate analog
clock. Refer to Setting the clock in the Driver Controls Chapter.
2004 Navigator (nav)
Owners Guide (post-2002-fmt)
USA English (fus)Entertainment Systems
18
Page 19 of 368
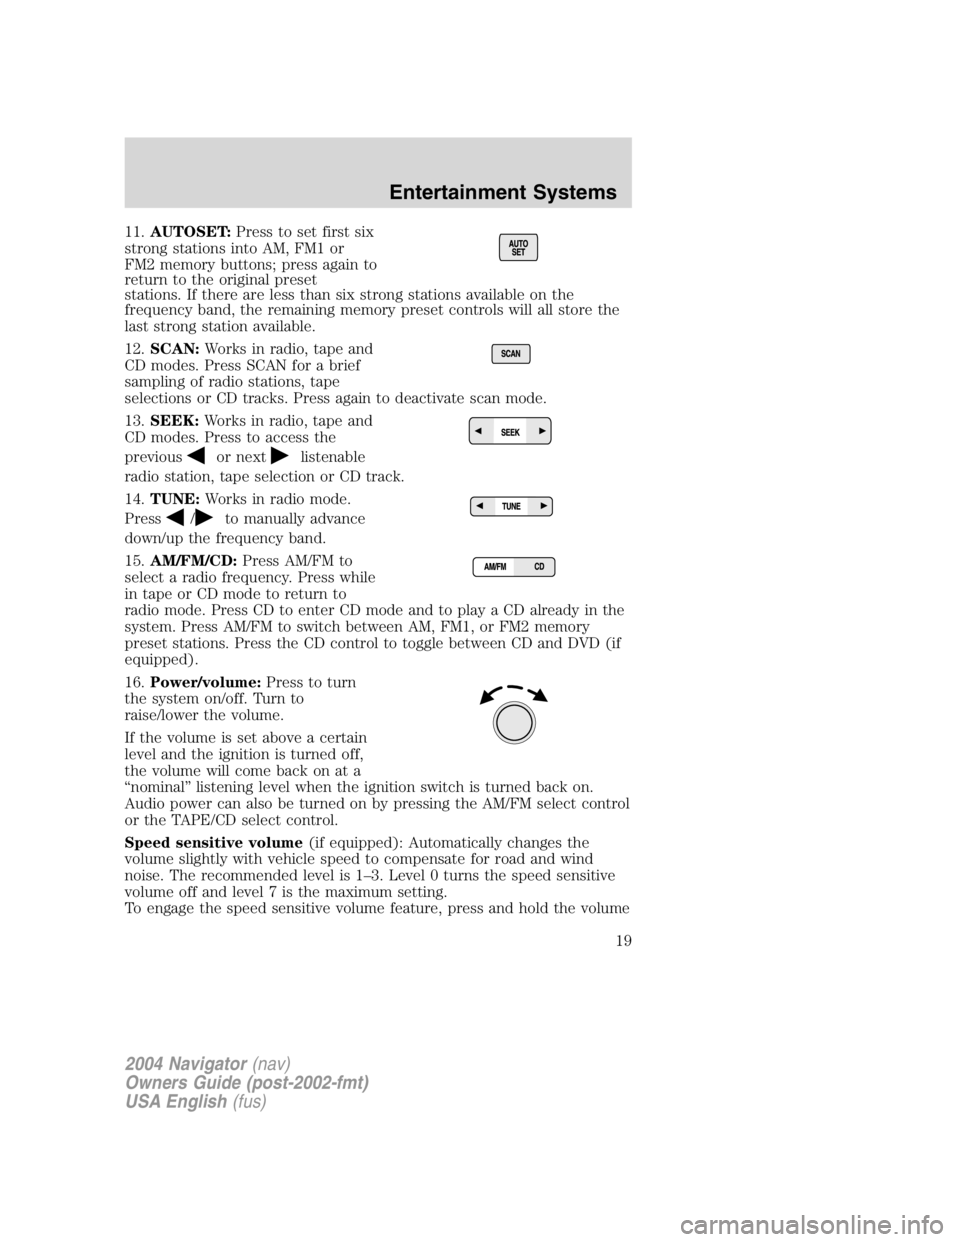
11. AUTOSET: Press to set first six
strong stations into AM, FM1 or
FM2 memory buttons; press again to
return to the original preset
stations. If there are less than six strong stations available on the
frequency band, the remaining memory preset controls will all store the
last strong station available.
12. SCAN: Works in radio, tape and
CD modes. Press SCAN for a brief
sampling of radio stations, tape
selections or CD tracks. Press again to deactivate scan mode.
13. SEEK: Works in radio, tape and
CD modes. Press to access the
previous or next listenable
radio station, tape selection or CD track.
14. TUNE: Works in radio mode.
Press / to manually advance
down/up the frequency band.
15. AM/FM/CD: Press AM/FM to
select a radio frequency. Press while
in tape or CD mode to return to
radio mode. Press CD to enter CD mode and to play a CD already in the
system. Press AM/FM to switch between AM, FM1, or FM2 memory
preset stations. Press the CD control to toggle between CD and DVD (if
equipped).
16. Power/volume: Press to turn
the system on/off. Turn to
raise/lower the volume.
If the volume is set above a certain
level and the ignition is turned off,
the volume will come back on at a
“ nominal ” listening level when the ignition switch is turned back on.
Audio power can also be turned on by pressing the AM/FM select control
or the TAPE/CD select control.
Speed sensitive volume (if equipped): Automatically changes the
volume slightly with vehicle speed to compensate for road and wind
noise. The recommended level is 1 – 3. Level 0 turns the speed sensitive
volume off and level 7 is the maximum setting.
To engage the speed sensitive volume feature, press and hold the volume
2004 Navigator (nav)
Owners Guide (post-2002-fmt)
USA English (fus) Entertainment Systems
19
Page 22 of 368
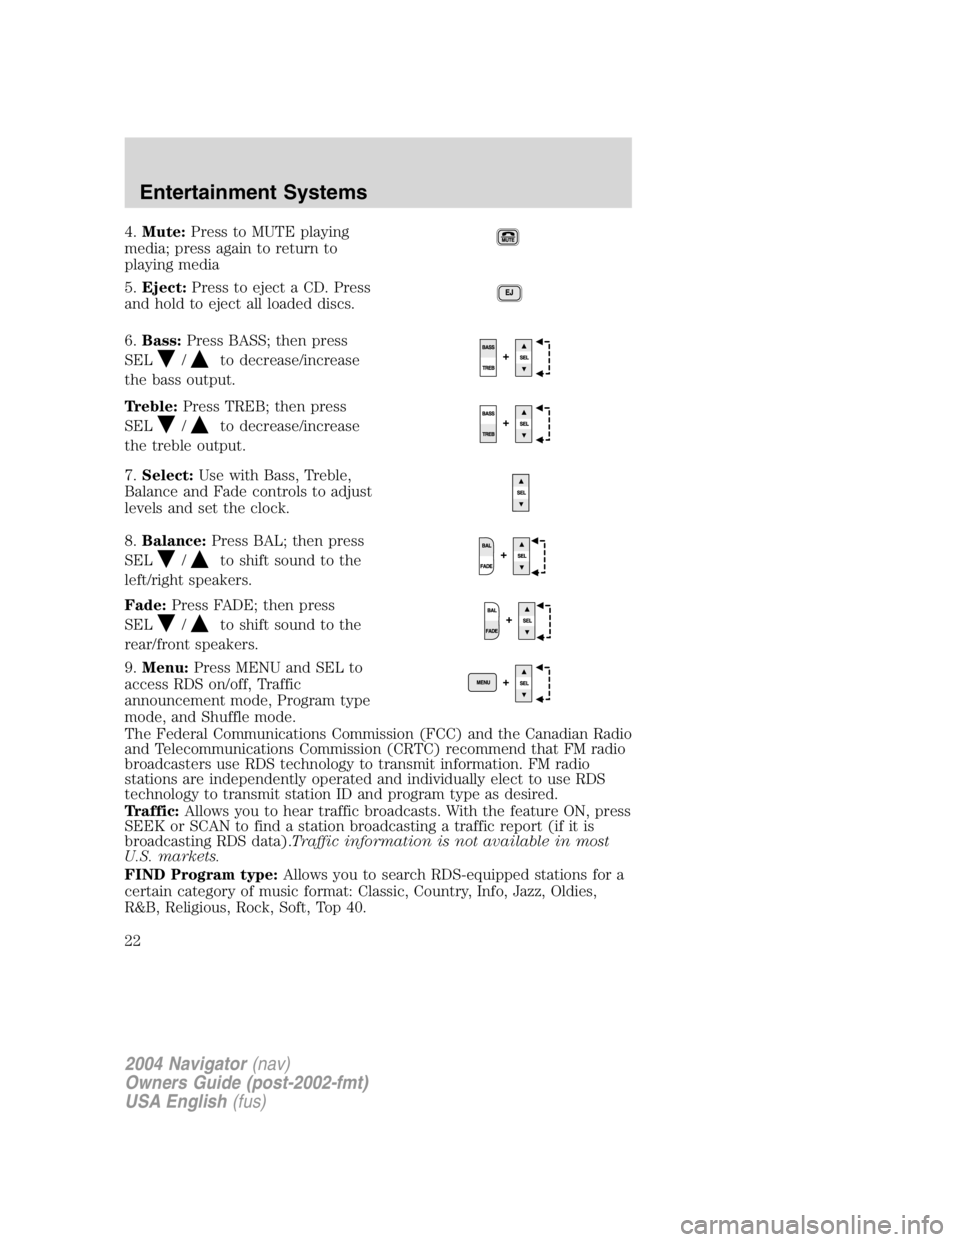
4. Mute: Press to MUTE playing
media; press again to return to
playing media
5. Eject: Press to eject a CD. Press
and hold to eject all loaded discs.
6. Bass: Press BASS; then press
SEL / to decrease/increase
the bass output.
Treble: Press TREB; then press
SEL / to decrease/increase
the treble output.
7. Select: Use with Bass, Treble,
Balance and Fade controls to adjust
levels and set the clock.
8. Balance: Press BAL; then press
SEL / to shift sound to the
left/right speakers.
Fade: Press FADE; then press
SEL / to shift sound to the
rear/front speakers.
9. Menu: Press MENU and SEL to
access RDS on/off, Traffic
announcement mode, Program type
mode, and Shuffle mode.
The Federal Communications Commission (FCC) and the Canadian Radio
and Telecommunications Commission (CRTC) recommend that FM radio
broadcasters use RDS technology to transmit information. FM radio
stations are independently operated and individually elect to use RDS
technology to transmit station ID and program type as desired.
Traffic: Allows you to hear traffic broadcasts. With the feature ON, press
SEEK or SCAN to find a station broadcasting a traffic report (if it is
broadcasting RDS data). Traffic information is not available in most
U.S. markets.
FIND Program type: Allows you to search RDS-equipped stations for a
certain category of music format: Classic, Country, Info, Jazz, Oldies,
R&B, Religious, Rock, Soft, Top 40.
2004 Navigator (nav)
Owners Guide (post-2002-fmt)
USA English (fus)Entertainment Systems
22
Page 25 of 368
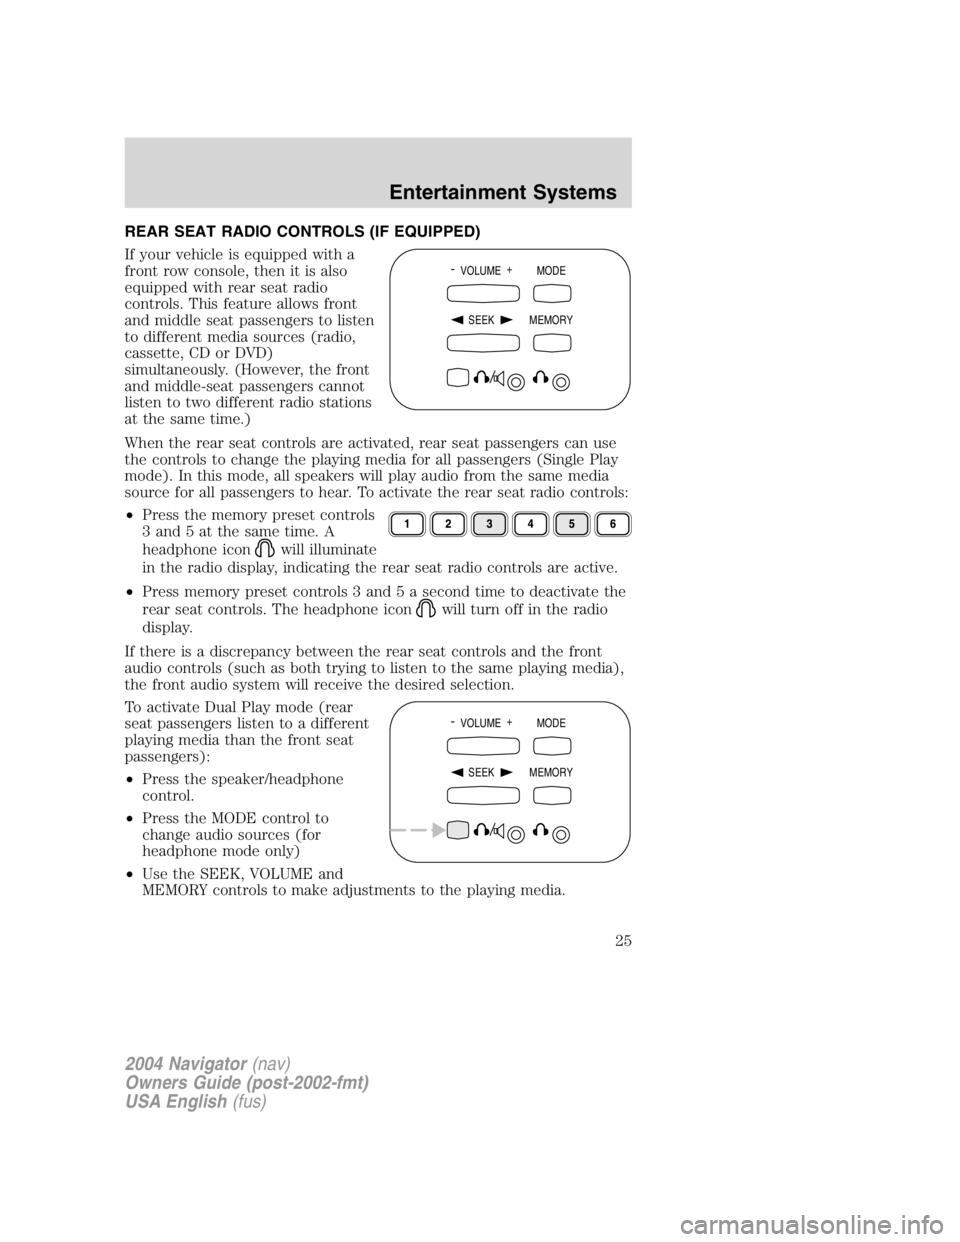
REAR SEAT RADIO CONTROLS (IF EQUIPPED)
If your vehicle is equipped with a
front row console, then it is also
equipped with rear seat radio
controls. This feature allows front
and middle seat passengers to listen
to different media sources (radio,
cassette, CD or DVD)
simultaneously. (However, the front
and middle-seat passengers cannot
listen to two different radio stations
at the same time.)
When the rear seat controls are activated, rear seat passengers can use
the controls to change the playing media for all passengers (Single Play
mode). In this mode, all speakers will play audio from the same media
source for all passengers to hear. To activate the rear seat radio controls:
• Press the memory preset controls
3 and 5 at the same time. A
headphone icon will illuminate
in the radio display, indicating the rear seat radio controls are active.
• Press memory preset controls 3 and 5 a second time to deactivate the
rear seat controls. The headphone icon will turn off in the radio
display.
If there is a discrepancy between the rear seat controls and the front
audio controls (such as both trying to listen to the same playing media),
the front audio system will receive the desired selection.
To activate Dual Play mode (rear
seat passengers listen to a different
playing media than the front seat
passengers):
• Press the speaker/headphone
control.
• Press the MODE control to
change audio sources (for
headphone mode only)
• Use the SEEK, VOLUME and
MEMORY controls to make adjustments to the playing media. -
VOLUME +
MODE
SEEK MEMORY
-
VOLUME +
MODE
SEEK MEMORY
2004 Navigator (nav)
Owners Guide (post-2002-fmt)
USA English (fus) Entertainment Systems
25
Page 28 of 368
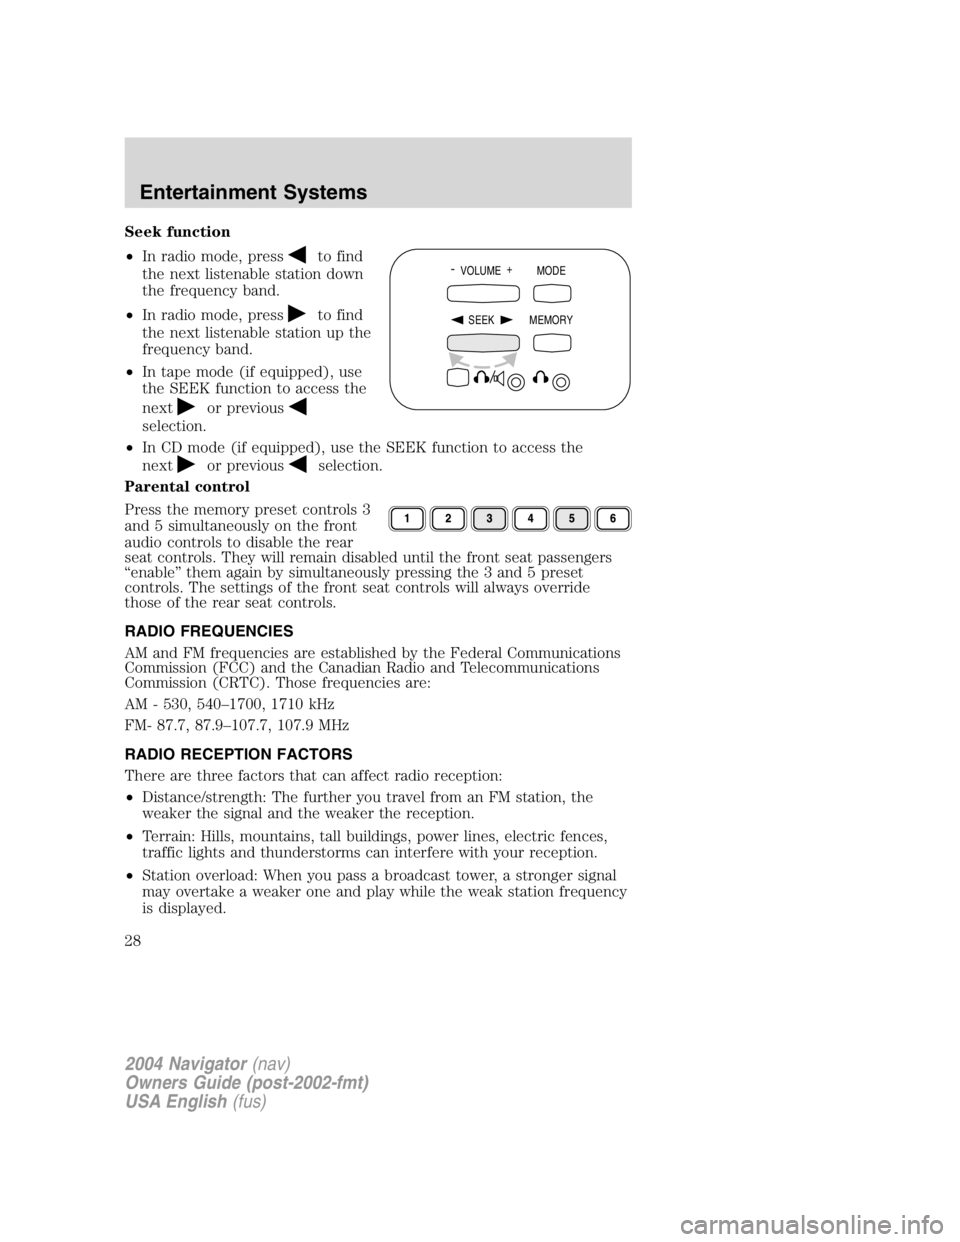
Seek function
• In radio mode, press to find
the next listenable station down
the frequency band.
• In radio mode, press to find
the next listenable station up the
frequency band.
• In tape mode (if equipped), use
the SEEK function to access the
next or previous
selection.
• In CD mode (if equipped), use the SEEK function to access the
next or previous selection.
Parental control
Press the memory preset controls 3
and 5 simultaneously on the front
audio controls to disable the rear
seat controls. They will remain disabled until the front seat passengers
“ enable ” them again by simultaneously pressing the 3 and 5 preset
controls. The settings of the front seat controls will always override
those of the rear seat controls.
RADIO FREQUENCIES
AM and FM frequencies are established by the Federal Communications
Commission (FCC) and the Canadian Radio and Telecommunications
Commission (CRTC). Those frequencies are:
AM - 530, 540 – 1700, 1710 kHz
FM- 87.7, 87.9 – 107.7, 107.9 MHz
RADIO RECEPTION FACTORS
There are three factors that can affect radio reception:
• Distance/strength: The further you travel from an FM station, the
weaker the signal and the weaker the reception.
• Terrain: Hills, mountains, tall buildings, power lines, electric fences,
traffic lights and thunderstorms can interfere with your reception.
• Station overload: When you pass a broadcast tower, a stronger signal
may overtake a weaker one and play while the weak station frequency
is displayed. -
VOLUME +
MODE
SEEK MEMORY
2004 Navigator (nav)
Owners Guide (post-2002-fmt)
USA English (fus)Entertainment Systems
28
Page 29 of 368
CASSETTE/PLAYER CARE
Do:
• Use only cassettes that are 90 minutes long or less.
• Tighten very loose tapes by inserting a finger or pencil into the hole
and turning the hub.
• Remove loose labels before inserting tapes.
• Allow tapes which have been subjected to extreme heat, humidity or
cold to reach a moderate temperature before playing.
• Clean the cassette player head with a cassette cleaning cartridge after
10 – 12 hours of play to maintain good sound/operation.
Don ’ t:
• Expose tapes to direct sunlight, extreme humidity, heat or cold.
• Leave tapes in the cassette player for a long time when not being
played.
CD/CD PLAYER CARE
Do:
• Handle discs by their edges only. Never touch the playing surface.
• Inspect discs before playing. Clean only with an approved CD cleaner
and wipe from the center out.
Don ’ t:
• Expose discs to direct sunlight or heat sources for extended periods
of time.
• Insert more than one disc into each slot of the CD changer magazine.
• Clean using a circular motion.
CD units are designed to play commercially pressed 12 cm (4.75
in) audio compact discs only. Due to technical incompatibility,
certain recordable and re-recordable compact discs may not
function correctly when used in Ford CD players. Irregular
shaped CDs, CDs with a scratch protection film attached, and CDs
with homemade paper (adhesive) labels should not be inserted
into the CD player. The label may peel and cause the CD to
become jammed. It is recommended that homemade CDs be
identified with permanent felt tip marker rather than adhesive
labels. Ball point pens may damage CDs. Please contact your
dealer for further information.
2004 Navigator (nav)
Owners Guide (post-2002-fmt)
USA English (fus) Entertainment Systems
29
Page 30 of 368
AUDIO SYSTEM WARRANTY AND SERVICE
Refer to the Warranty Guide for audio system warranty information. If
service is necessary, see your dealer or qualified technician.
Whenever a warning is received, the radio volume will be lowered
to a volume that will allow the tones to be heard. The radio
volume will return to the previous level after the warning goes
away.
REAR SEAT ENTERTAINMENT DVD SYSTEM (IF EQUIPPED)
Your vehicle may be equipped with a Rear Seat Entertainment DVD
System which allows you to watch DVDs, play music CDs and to plug in
and play video game systems. Please review this material to become
familiar with the system features and safety information.
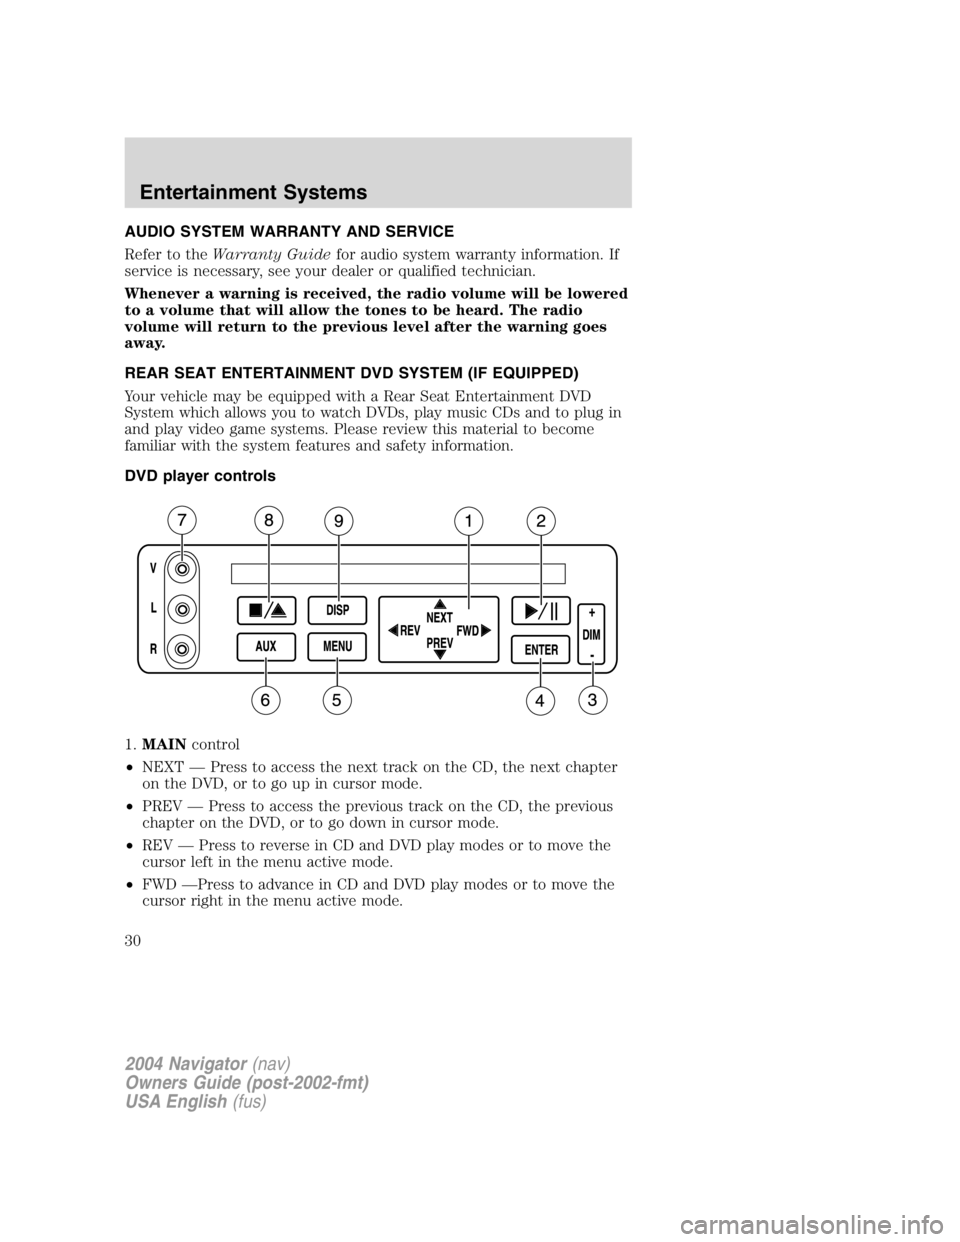
DVD player controls
1. MAIN control
• NEXT — Press to access the next track on the CD, the next chapter
on the DVD, or to go up in cursor mode.
• PREV — Press to access the previous track on the CD, the previous
chapter on the DVD, or to go down in cursor mode.
• REV — Press to reverse in CD and DVD play modes or to move the
cursor left in the menu active mode.
• FWD — Press to advance in CD and DVD play modes or to move the
cursor right in the menu active mode.
2004 Navigator (nav)
Owners Guide (post-2002-fmt)
USA English (fus)Entertainment Systems
30
Page 37 of 368
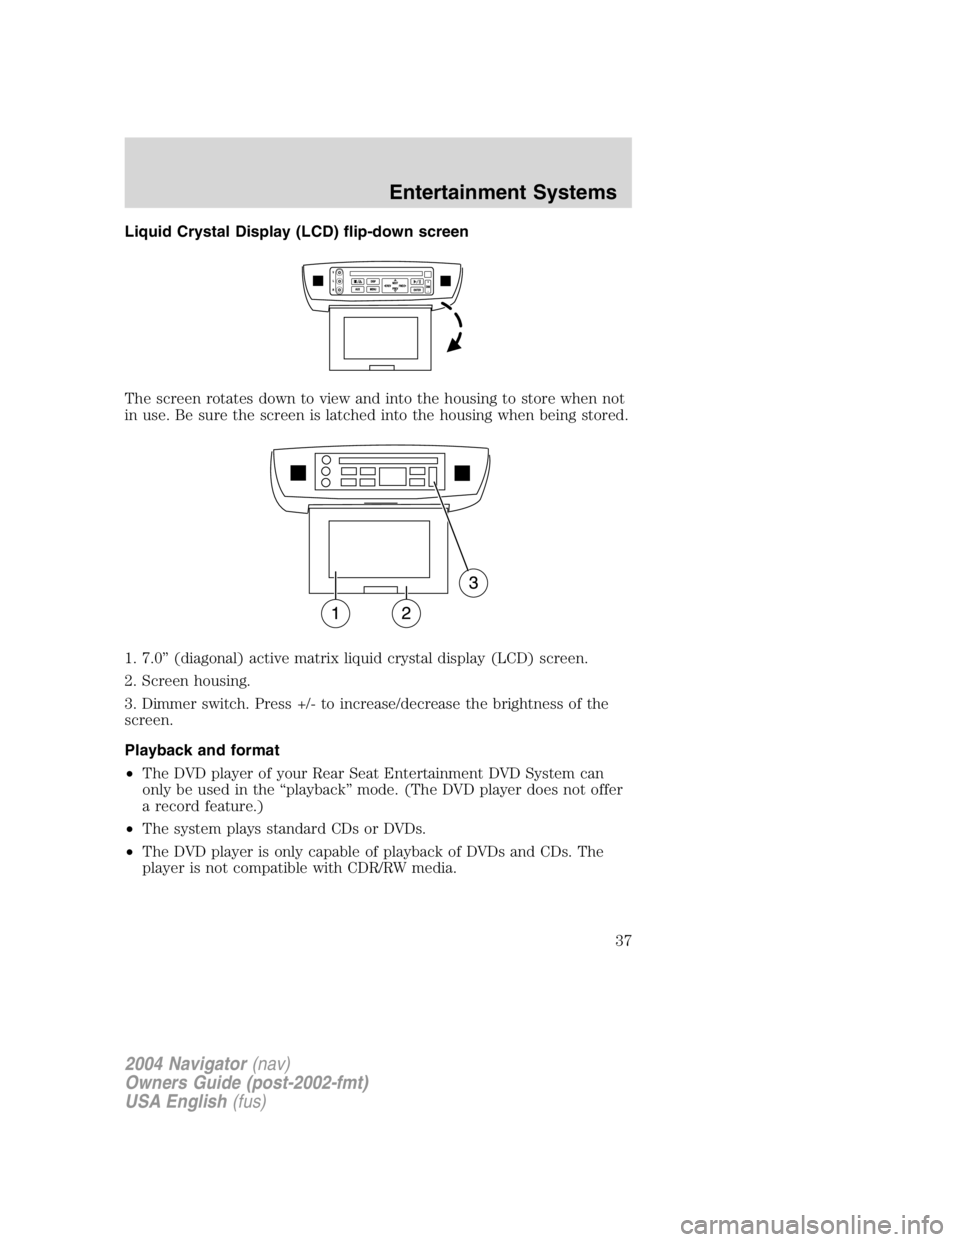
Liquid Crystal Display (LCD) flip-down screen
The screen rotates down to view and into the housing to store when not
in use. Be sure the screen is latched into the housing when being stored.
1. 7.0 ” (diagonal) active matrix liquid crystal display (LCD) screen.
2. Screen housing.
3. Dimmer switch. Press +/- to increase/decrease the brightness of the
screen.
Playback and format
• The DVD player of your Rear Seat Entertainment DVD System can
only be used in the “ playback ” mode. (The DVD player does not offer
a record feature.)
• The system plays standard CDs or DVDs.
• The DVD player is only capable of playback of DVDs and CDs. The
player is not compatible with CDR/RW media.
2004 Navigator (nav)
Owners Guide (post-2002-fmt)
USA English (fus) Entertainment Systems
37