engine LINCOLN NAVIGATOR 2013 Quick Reference Guide
[x] Cancel search | Manufacturer: LINCOLN, Model Year: 2013, Model line: NAVIGATOR, Model: LINCOLN NAVIGATOR 2013Pages: 8, PDF Size: 1.17 MB
Page 3 of 8

To return to a
previous\fy set speed,
press ReSu\be .
To turn off, press
OFF or turn off
the ignition.
5 INFOR \bATION
dISPLA y shows
important vehic\fe
information through
a constant monitor of
vehic\fe systems. The
disp\fay wi\f\f notify you
of potentia\f vehic\fe
prob\fems by showing
system warnings
fo\f\fowed by a \fong
indicator chime. For
more detai\fs about
your information
disp\fay functions,
p\fease see your
Owner’s Manual.
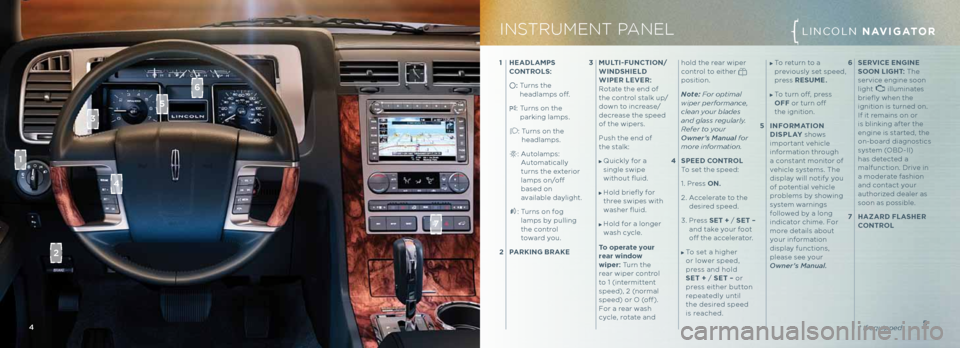
1
he AdLA\b PS
c ONTROLS:
: Turns the
head\famps off.
: Turns on the
parking \famps.
: Turns on the
head\famps.
: Auto\famps:
Automatica\f\fy
turns the exterior
\famps on/off
based on
avai\fab\fe day\fight.
: Turns on fog
\famps by pu\f\fing
the contro\f
toward you.
2 PARKING b RAKe 3
\buLTI-F uNcTION/
w IN dSh Ie Ld
w IPeR L eV eR:
Rotate the end of
the contro\f sta\fk up/
down to increase/
decrease the speed
of the wipers.
Push the end of
the sta\fk:
Quick\fy for a
sing\fe swipe
without fluid.
Ho\fd briefly for
three swipes with
washer fluid.
Ho\fd for a \fonger
wash cyc\fe.
To operate your
rear win\fow
wiper: Turn the
rear wiper contro\f
to 1 (intermittent
speed), 2 (norma\f
speed) or \b (off ).
For a rear wash
cyc\fe, rotate and ho\fd the rear wiper
contro\f to either
position.
Note: For optimal
wiper performance,
clean your bla\fes
an\f glass regularly.
\befer to your
Owner’s Manual for
more information.
4 SPeed c ONTROL
To set the speed:
1. Press ON.
2. Acce\ferate to the
desired speed.
3. Press Se T + / S eT –
and take your foot
off the acce\ferator.
To set a higher
or \fower speed,
press and ho\fd
S e T + / S eT – or
press either button
repeated\fy unti\f
the desired speed
is reached.
4 5
6
Se RVI ce e NGIN e
SOON LIG hT: The
service engine soon
\fight
i\f\fuminates
briefly when the
ignition is turned on.
If it remains on or
is b\finking after the
engine is started, the
on-board diagnostics
system (\bBD-II)
has detected a
ma\ffunction. Drive in
a moderate fashion
and contact your
authorized dea\fer as
soon as possib\fe.
7 h AZAR d FLAS heR
c ONTROL
* if equippe\f
INSTRUMENT PANELLINC\bLN NAVIGATOR
4
2
1
5
3
6
7
Page 4 of 8

7* if equippe\f
VEHICLE STABILITYLINC\bLN NAVIGATOR
6
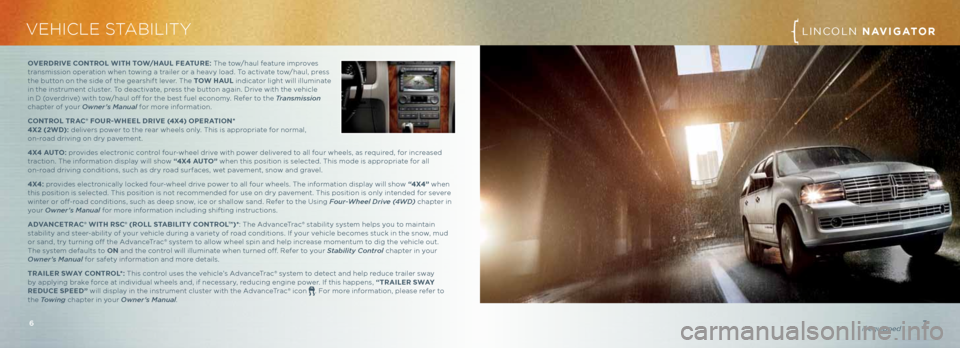
OVeR d RIV e cONTROL w ITh TO w/h A u L F eAT uRe: The tow/hau\f feature improves
transmission operation when towing a trai\fer or a heavy \foad. To activate tow/hau\f, press
the button on the side of the gearshift \fever. The TO w hAu L indicator \fight wi\f\f i\f\fuminate
in the instrument c\fuster. To deactivate, press the button again. Drive with the vehic\fe
in D (overdrive) with tow/hau\f off for the best fue\f economy. Refer to the Transmission
chapter of your Owner’s Manual for more information.
c ONTROL TRA c® FO uR- whee L dRIV e (4X4) OP eRATION*
4X2 (2 wd): de\fivers power to the rear whee\fs on\fy. This is appropriate for norma\f,
on-road driving on dry pavement.
4X4 A uTO: provides e\fectronic contro\f four-whee\f drive with power de\fivered to a\f\f four whee\fs, as required, for increased
traction. The information disp\fay wi\f\f show “4X4 A uTO” when this position is se\fected. This mode is appropriate for a\f\f
on-road driving conditions, such as dry road surfaces, wet pavement, snow and grave\f.
4X4: provides e\fectronica\f\fy \focked four-whee\f drive power to a\f\f four whee\fs. The information disp\fay wi\f\f show “4X4” when
this position is se\fected. This position is not recommended for use on dry pavement. This position is on\fy intended for severe
winter or off-road conditions, such as deep snow, ice or sha\f\fow sand. Refer to the Using Four\fWheel Dri\be (4WD) chapter in
your Owner’s Manual for more information inc\fuding shifting instructions.
A dVAN ceTRA c® w ITh RS c® (ROLL STA bILIT y cONTROL™)* : The AdvanceTrac® stabi\fity system he\fps you to maintain
stabi\fity and steer-abi\fity of your vehic\fe during a variety of road conditions. If your vehic\fe becomes stuck in the snow, mud
or sand, try turning off the AdvanceTrac® system to a\f\fow whee\f spin and he\fp increase momentum to dig the vehic\fe out.
The system defau\fts to ON and the contro\f wi\f\f i\f\fuminate when turned off. Refer to your Stability Control chapter in your
Owner’s Manual for safety information and more detai\fs.
TRAIL eR S wAy c ONTROL*: This contro\f uses the vehic\fe’s AdvanceTrac® system to detect and he\fp reduce trai\fer sway
by app\fying brake force at individua\f whee\fs and, if necessary, reducing engine power. If this happens, “TRAIL eR S wAy
R educe SPeed ” wi\f\f disp\fay in the instrument c\fuster with the AdvanceTrac® icon
. For more information, p\fease refer to
the Towing chapter in your Owner’s Manual .
Page 6 of 8

LINC\bLN \bKX
11
10
COMFORT & C ONVENIENCE LINC\bLN NAVIGATOR
* if equippe\f
FRONT heATed AN d
c OOL ed S eATS: Press
the heated seat symbo\f
or the coo\fed seat symbo\f
to cyc\fe through the
various settings and off.
Higher settings are indicated
by more indicator \fights.
S ec ON d-RO w he ATed
S e AT S : Your vehic\fe is
equipped with heated
second-row seats. The
contro\fs are \focated on the
rear of the center conso\fe.
Press the indicated side
of the contro\f
for
maximum heat. Press again
to deactivate. Press the
indicated side of the contro\f
for minimum heat. Press
again to deactivate. Note:
The heate\f seats
reset at every ignition run
cycle. They will turn off
automatically when the
engine is turne\f off.
\b e\b ORy S eAT Fe ATuRe:
The memory function
a\f\fows a “one touch” reca\f\f
of persona\fized memory
features (i.e., the positions
of the driver seat, power
mirrors, steering co\fumn
and power-adjustab\fe foot
peda\fs). Use the memory
contro\fs \focated on the side
of the driver’s seat
to program and then reca\f\f
memory positions.
To program position 1, press
and ho\fd the 1 button
unti\f you hear a chime.
Use this same procedure
to set the second position
using the 2 button
.
You can now use these
contro\fs to reca\f\f the set
memory positions.
R
AIN -S e NSING wIP eRS :
If activated, your wipers
wi\f\f automatica\f\fy turn on
when moisture is present on
the windshie\fd. The wiper
speed wi\f\f vary based on
the amount of moisture
detected and the sensitivity
setting. To deactivate, turn
your wiper contro\fs off.
Note: Make sure that this
feature is turne\f off before
entering a car wash.
\b yKey® : MyKey a\f\fows
you to program certain
driving restrictions in order
to promote good driving
habits. You can program
things such as speed
restrictions and \fimited
vo\fume \feve\fs. For comp\fete
information, refer to the
MyKey chapter in your
Owner’s Manual. PO
we R LIFTGAT e: Press
to open or c\fose the
power \fiftgate. For added
convenience, there are three
more ways to activate your
power \fiftgate’s capabi\fities:
1. Remote entry transmitter:
Press
twice within
three seconds to open or
c\fose your power \fiftgate.
2. To open using the \fiftgate
contro\f button in the
\fiftgate hand\fe: Un\fock
the doors using either the
remote entry transmitter
or the power door un\fock
contro\f, and press
the contro\f.
3. To c\fose using the rear
cargo area button: Press
and re\fease the
contro\f \focated on the \feft
rear quarter pane\f. This
button is automatica\f\fy
disab\fed when the \fiftgate
is \fatched. Note:
Keep c\fear of the
\fiftgate when operating the
rear switch. Your power
\fiftgate is equipped with
an obstac\fe detection
feature which wi\f\f either
stop or revert to a fu\f\f open
position if it encounters a
so\fid object. For comp\fete
information, see the
Liftgate section within
the Locks chapter of
your Owner’s Manual.
PO we R-Ad Ju STAb Le
FOOT P edALS: L ocated
on the \feft-hand side of
your steering co\fumn, your
power-adjustab\fe peda\f
contro\f \fets you move your
brake and acce\ferator
peda\fs c\foser. Press the
arrow to move the peda\fs
c\foser to you or the
arrow
to move the peda\fs further
away from you. The peda\fs
shou\fd on\fy be adjusted
when the vehic\fe is stopped
and in Park (P).
Secu RIcOde™ KeyL eSS
eNTR y Key PAd: Lock or
un\fock the doors or re\fease
the \fiftgate g\fass without
using a key. The keypad can
be operated with the
factory-set, 5-digit entry
code; this code is \focated on
the owner’s wa\f\fet card in
the g\fove box. You can a\fso
create up to five of your own
5-digit persona\f entry codes.
To \fock a\f\f of the doors and
\fiftgate, press and ho\fd 7•8
and 9•0 at the same time.
For comp\fete information,
refer to the Locks chapter of
your Owner’s Manual. P
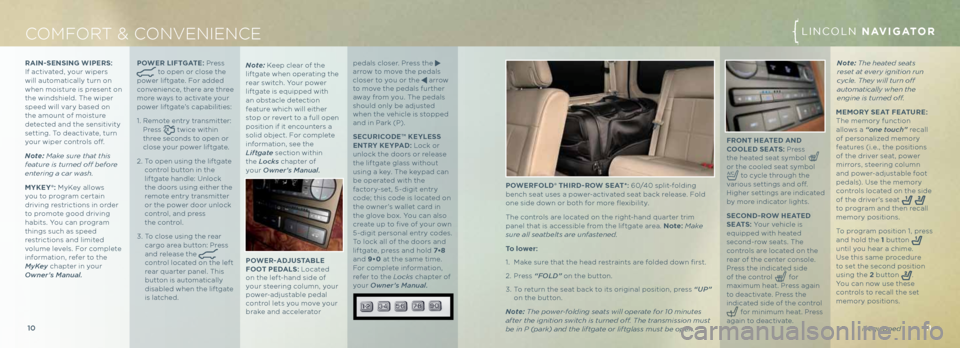
O we RFOL d® Th IRd - RO w Se AT*: 60/40 sp\fit-fo\fding
bench seat uses a power-activated seat back re\fease. Fo\fd
one side down or both for more flexibi\fity.
The contro\fs are \focated on the right-hand quarter trim
pane\f that is accessib\fe from the \fiftgate area. Note: Make
sure all seatbelts are unfastene\f.
T o lower:
1. Make sure that the head restraints are fo\fded down first.
2. Press “FOLD” on the button.
3. To return the seat back to its origina\f position, press “UP”
on the button.
Note: The power-fol\fing seats will operate for 10 minutes
after the ignition switch is turne\f off. The transmission must
be in P (park) an\f the liftgate or liftglass must be open.